

The sun is shining, and the Salesforce Summer ’26 release is now live. But if you and your Salesforce team have been busy, you might have barely noticed that summer has even arrived. And maybe you’ve assumed the latest release is all about Agentforce features.
The good news is there is plenty here for Salesforce professionals beyond that. In this post, I’m sharing my top 10 features from Summer ’26 that you and your team will actually want to use.
1. Review Field Access Across Profiles, Permission Sets, and Permission Set Groups
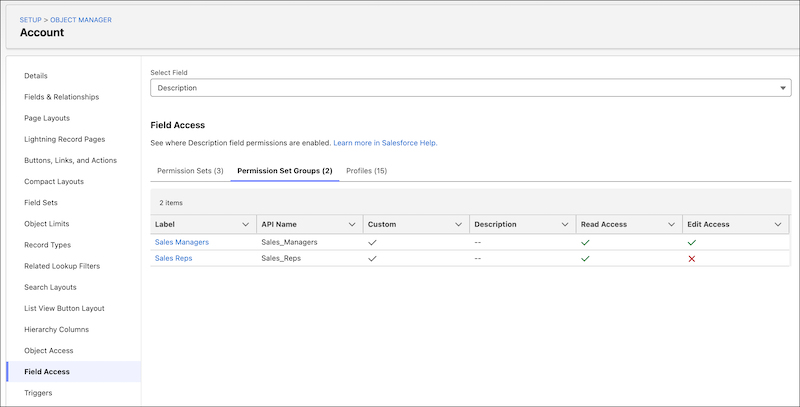
If you’ve ever found yourself clicking through multiple Setup pages just to figure out who has access to a field, Salesforce has quietly made your life a bit easier. There’s a new feature in Object Manager called Field Access, and it gives you a single place to review field-level security for a specific field across your org.
Instead of hopping between profiles, permission sets, and permission set groups, you can now see everything in one view through the Field Access Summary. It’s a much faster way to answer the classic question: “Who actually has access to this field?”
You’ll find it in Setup by going to Object Manager, selecting your object, and then choosing Field Access from the sidebar. From there, pick the field you want to investigate.
It’s important to note one key detail. This view is read-only. You can’t change field access from here; it’s purely for visibility and troubleshooting. Think of it as your “source of truth” for understanding how access is being granted.
2. Track Permission Dependencies More Easily
If you’ve ever changed a permission in Salesforce and later discovered it quietly caused a ripple effect elsewhere, this update is going to feel very welcome.
Salesforce now makes it much easier to track permission dependencies directly in the enhanced profile user interface.
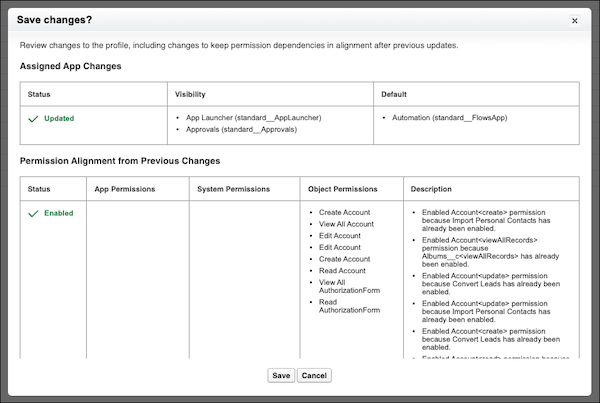
When you update user permissions, object permissions, or assigned apps, Salesforce will now show you any additional changes needed to keep related permissions in sync. So instead of surprises happening behind the scenes, you get visibility at the point of change. Previously, these dependency updates still happened, but they were hidden in the background and only really surfaced later in the Setup Audit Trail. Useful, but not exactly proactive.
Now, after you save your changes, you’ll be prompted to review any related permission updates before moving on. It’s a simple step, but it adds a lot more clarity and control to what’s actually changing in your org.
3. Expand Reporting Capabilities With More Row-Level Formulas
If you spend a lot of time in reports, this is one of those updates that quietly makes your life easier. You can now add up to two row-level formulas in a single Salesforce report. Yes, two. Not one carefully chosen formula that you debate for five minutes, but two.
This means you can calculate values directly in the report without needing to create extra formula fields on the object. This means less admin overhead and a much quicker path to insight.
For example, you could calculate both commission rate and time to close in the same report, side by side, without jumping through hoops or creating additional fields just to support reporting. Previously, we only had one row-level formula to work with, which often meant compromises. Now, you’ve got a bit more flexibility to answer real business questions in one place.
It’s a small change on paper, but in practice it saves time, reduces clutter in your data model, and makes reports that little bit more powerful.
4. Manage List View Sharing and Editing With Granular Permissions
In Setup, under the User Interface page, there’s a new toggle that lets you make shared list views editable. Yes, finally! What this means in practice is that users who have a list view shared with them can now edit it, as long as they also have the Create and Customize List Views permission.
There’s also a new permission called Manage Shared List Views, which changes the sharing experience quite nicely. It allows users to share their personal list views with roles, groups, and territories they belong to, without needing broader admin-level access.
Previously, if you wanted to share list views, you needed the Manage Public List Views permission. That one came with quite a lot of power, including the ability to edit or delete any public list view in Salesforce. Useful in the right hands, but definitely more than most users need just to collaborate.
Now, things are more balanced. Users can share their own list views without being able to touch every public one in the org.
5. Save Screen Space With Radio Button Groups in Screen Flows
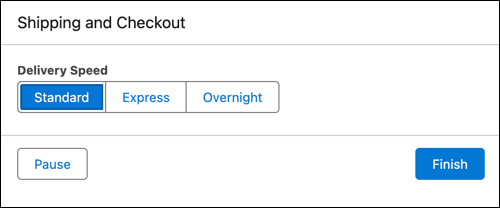
Use the Radio Button Group screen component to display choices in a horizontal layout on desktop devices or a vertical layout on mobile devices. This compact format makes options easier to scan and helps reduce scrolling.
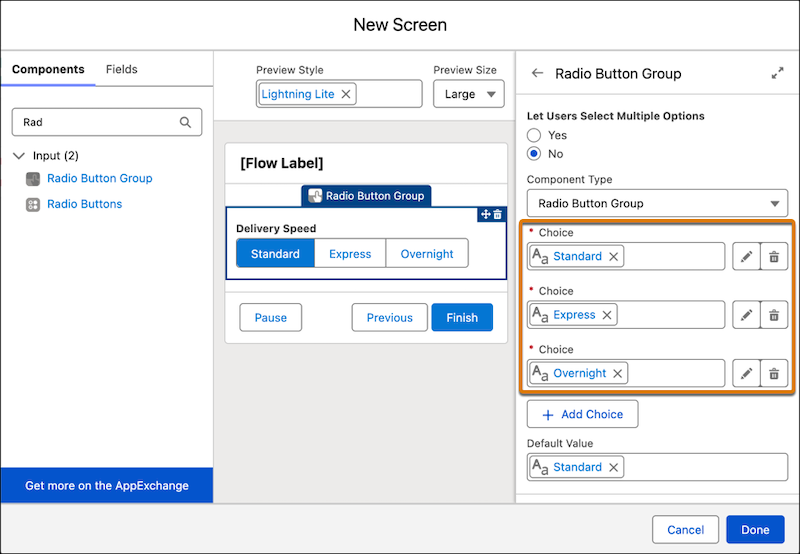
Like the standard Radio Buttons component, the Radio Button Group allows users to select a single option at run time. The difference is in the presentation. Options are displayed in a stacked horizontal or vertical arrangement, providing a more modern alternative to traditional radio buttons, checkboxes, and picklists.
Considerations
- Use the Radio Button Group component when presenting up to seven choices.
- For more than seven choices, use the Picklist or Radio Buttons component instead.
- The Radio Button Group component does not support choices that use the Display text input option. Because the input text is not visible at run time, users cannot see the choice values.
6. Expose Style Settings for Your Custom Flow Screen Components
Expose style settings for your custom Flow Screen components by adding styling hooks to your Lightning web components. This gives flow authors a simple way to adjust things like colours, spacing, and dimensions directly in Flow Builder, so components can better match the look and feel of the app or brand they are working with.
To set this up, add a <stylingHook /> tag in your component’s .js-meta.xml file under the <targetConfig targets="lightning__FlowScreen"> section. From there, you define the hook name, label, and type for each style option you want to expose. If you have a lot of styling options, you can use <stylingHookGroup /> to group them into more manageable sections or tabs, which makes the experience much easier to work with inside Flow Builder.
This means you can expose things like colour, radius, or weight using standard SLDS styling hooks, without overcomplicating the interface.
As Flow shows up in more places across Salesforce, this becomes really useful. It helps ensure your custom components don’t feel out of place and can be styled to fit the experience they are being used in, while still keeping things simple for flow authors.
7. Use Date Operators in Decision Logic
Create date-based branching in Flow Builder using the enhanced date operators in Decision elements. When a condition uses a Date data type, you can now select operators such as Is Today, Is Tomorrow, Is On, Is Anniversary of Today, and Last Number of Days.
These options make it easier to build logic based on recency and key milestones without relying on formula workarounds. In a Decision element, simply add or edit a condition, choose the appropriate date operator, and configure the resource, operator, and comparison values to define each outcome path.
Previously, Decision element conditions offered limited options for date comparisons. The expanded operators improve consistency with other Flow Builder comparisons and make time-based logic clearer and easier to maintain.
These operators are designed specifically for Date fields and support use cases such as birthday reminders and renewal communications. Note that these enhancements do not apply to DateTime data types.
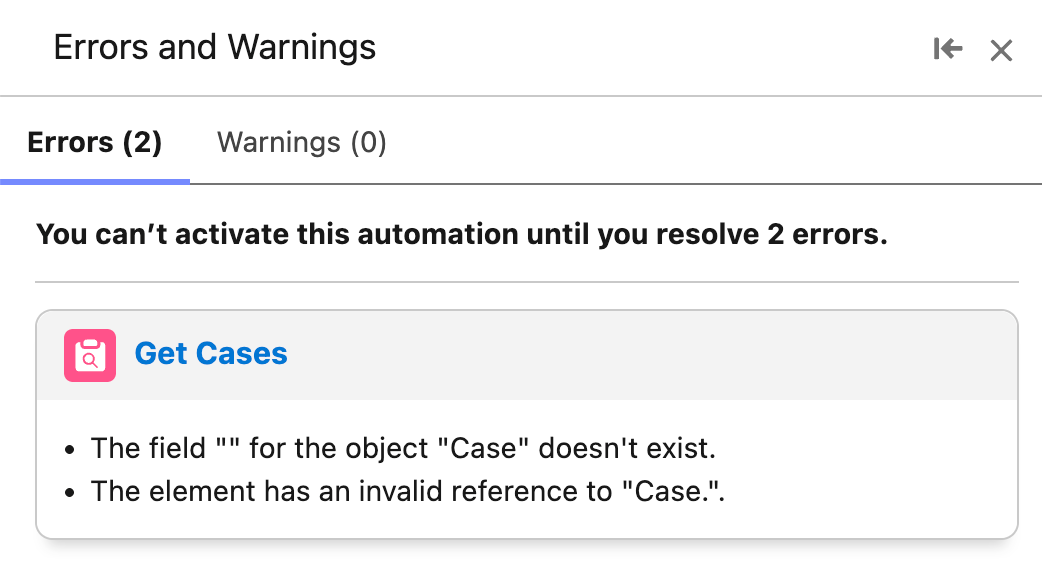
8. Review Flow Errors and Warnings With the Redesigned Validation Panel
Focus on building flows with fewer interruptions from validation messages. When you open a draft flow, the validation panel now remains closed by default, allowing you to work through your build before reviewing errors and warnings. This helps you stay focused on configuration and review issues when you are ready to address them.
When you do open the validation panel, issues are presented in clearly organized cards grouped by element. You can select a card title to jump directly to that element’s property panel and resolve the issue. Consistent validation patterns across Flow Builder make errors easier to understand and fix, creating a more predictable troubleshooting experience.
9. Collapse Fault Paths to Focus on Your Main Flow
Simplify your flow canvas by focusing on the working path and hiding fault paths until you need them. Fault paths can now be collapsed and expanded on demand, so you only see them when you are ready to review or edit error handling. Your browser remembers your layout state, so the canvas view is personal to you and reflects how you prefer to work.
This enhancement continues Salesforce’s effort to streamline Flow Builder. In Summer ’26, fault paths can be collapsed, following the Spring ’26 update that introduced collapsible Decisions and Loops. This is particularly useful in flows where multiple fault paths point to a shared error-handling subflow element. Reducing visual clutter makes the canvas easier to navigate and helps keep focus on the main flow logic.
10. Use Dark Mode in More Editions and Features (Beta)
Dark mode in Salesforce has been quietly evolving, and this latest update for SLDS 2 takes it another step forward.
If you’re working in Performance or Unlimited editions, you can now enable dark mode for Salesforce Lightning Design System 2 (SLDS 2) themes. And across all editions where dark mode is available, there’s also support for uploading a dark-mode version of your company logo, so your branding stays consistent no matter the theme.
To enable it, head to Setup, search for Themes and Branding, and either create a new SLDS 2 theme or edit an existing one. In the Dark Mode section, you’ll see the option to allow users to enable dark mode. Once saved and activated, users can choose their preferred appearance from their profile menu.
A quick but important note: dark mode is currently a pilot or beta feature, so it comes with the usual beta terms and conditions.
Final Thoughts
I’ve intentionally kept AI and Agentforce out of this article to highlight some of the other useful features that I’m pretty sure most of you already have access to and can benefit from right away. I hope you enjoy exploring them!
If you still need to catch up on the latest release, then fear not! We’ve got everything you need right here:
- Salesforce Summer ‘26 Release: Everything You Need to Know Before Go‑Live
- Top 11 Salesforce Summer ‘26 Features for Admins
- Top 8 Salesforce Summer ’26 Features for Developers
- Sales Cloud: Top Salesforce Summer ‘26 Features
- Service Cloud: Top Salesforce Summer ’26 Features
- 10 New Salesforce Flow Features in Summer ‘26
- Top 9 Summer ‘26 Updates for Salesforce Marketers


Comments: