

Summer ’26 is one of those releases that doesn’t shout the loudest, but quietly packs in a lot of quality-of-life improvements for admins. The kind that saves you clicks, reduces setup friction, and generally makes Salesforce feel a bit more considered.
From reporting and permissions to Slack integration and approval processes, there’s a clear theme running through this release: more control, more consistency, and less time spent jumping between Setup pages trying to piece things together. Nothing wildly dramatic on its own, but taken together, it’s a meaningful step forward in how we design, manage, and collaborate in Salesforce.
1. Ensure Consistent Branding Across Your Reports and Dashboards With Brand Color Palettes
I’ll admit it, I have a bit of a soft spot for themes and branding in Salesforce. So seeing this concept extend into reports and dashboards is a genuinely welcome update.
Even more interesting, it lines up nicely with what we’re starting to see in Salesforce Flow too, with more options to customize colours and themes across the platform. It’s all starting to feel a lot more cohesive.
So what’s the headline here? You can now apply your organization’s brand colour palette directly to reports and dashboards. Yes, finally.
Once you’ve set up a default theme in Setup under Themes and Branding, you can use that same branding across your data visualizations without having to tweak each one individually. Less fiddling, more consistency.
Here’s how it works in practice:
- For reports, head into the chart properties and select “Brand”
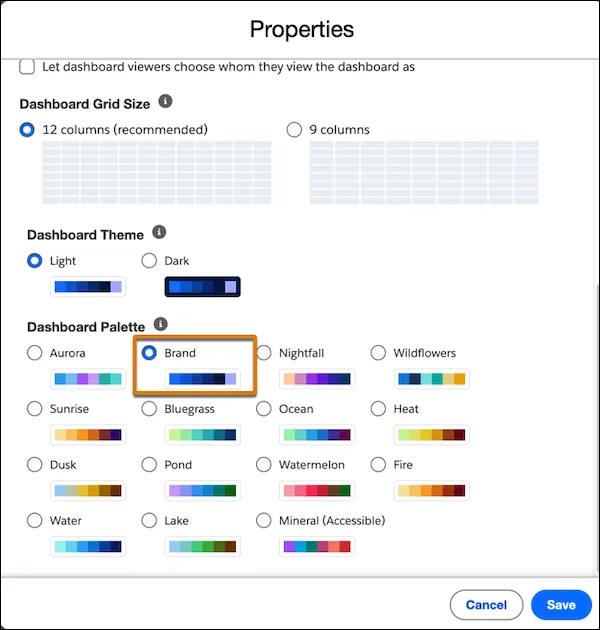
- For dashboards, go to the dashboard properties and choose “Branding” in the palette options
Instead of manually updating colours across multiple reports and dashboards, you define your palette once and reuse it everywhere.
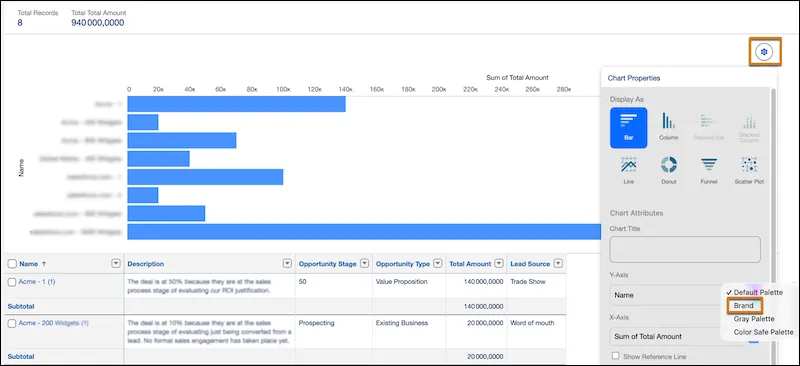
And just like that, your charts start reflecting your corporate look and feel.
The real win here is efficiency. It keeps things standardized, improves accessibility, and, let’s be honest, makes everything look a lot more polished.
If you need to set this up, it’s straightforward:
Head to Setup, type Themes and Branding into Quick Find, and either create a new theme or update an existing one. Set your brand colours, activate the theme, and you’re good to go.
From there, it’s just a case of selecting “Brand” in your report charts or dashboard properties.
This is available in Lightning Experience for Professional, Enterprise, and Unlimited editions, and it’s one of those small changes that makes a surprisingly big difference day to day.
Because good data is important. But well-presented, on-brand data? Even better.
2. Expand Reporting Capabilities With More Row-Level Formulas
If you spend a lot of time in reports, this is one of those updates that quietly makes your life easier.
You can now add up to two row-level formulas in a single Salesforce report. Yes, two. Not one carefully chosen formula that you debate for five minutes, but two.
This means you can calculate values directly in the report without needing to create extra formula fields on the object. Less admin overhead, and a much quicker path to insight.
For example, you could calculate both commission rate and time to close in the same report, side by side, without jumping through hoops or creating additional fields just to support reporting.
Previously, we only had one row-level formula to work with, which often meant compromises. Now, you’ve got a bit more flexibility to answer real business questions in one place.
It’s a small change on paper, but in practice it saves time, reduces clutter in your data model, and makes reports that little bit more powerful.
3. Chatter Is Turned Off by Default in New Orgs
If you’re spinning up a shiny new org from Summer ’26 onwards, here’s something to know early: Chatter is now switched off by default.
Before you panic, nothing’s “gone,” it’s just opt-in. If you’re using features that rely on Chatter (or its APIs), you’ll simply need to pop into Setup and turn it back on. This includes things like Case Feed, Experience Cloud sites with Chatter, or those situations where Slack isn’t available.
And don’t worry, this change doesn’t touch existing orgs. Your current setups keep humming along as they are.
Now, why the shift? Salesforce is gently (and not-so-gently) steering collaboration toward Slack. With Salesforce Channels enabled by default in Lightning Experience (for Enterprise and Unlimited editions), you can collaborate on records directly using Slack instead of Chatter. Other editions can still join the party; you’ll just need to enable Salesforce Channels manually.
Of course, if you do leave Chatter switched off, a few familiar faces won’t be around:
- The Chatter tab and feeds
- The Follow button
- Chatter in the App Launcher
- Groups and the Groups tab
- Chatter APIs
So yes, this is a change, but not exactly a surprise. The signs have been there for a while. Or, as Parker Harris (co-founder of Salesforce and Slack CTO) rather memorably put it: “I built Chatter, I’m going to kill Chatter.”
Subtle? Not particularly. Clear? Absolutely.
4. Review Field Access Across Profiles, Permission Sets, and Permission Set Groups
If you’ve ever found yourself clicking through multiple Setup pages just to figure out who has access to a field, Salesforce has quietly made your life a bit easier.
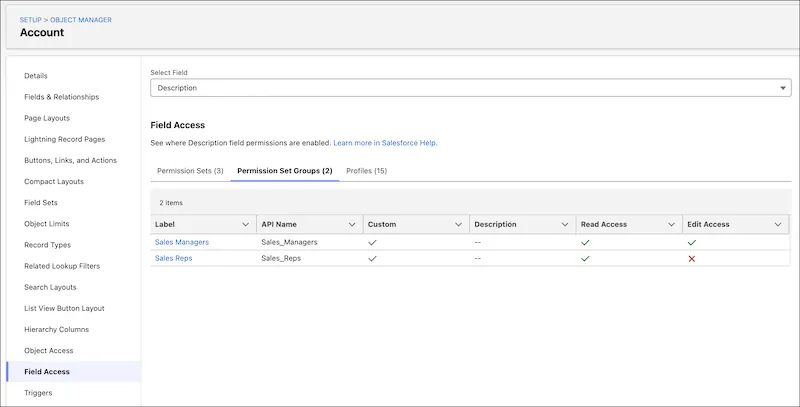
There’s a new feature in Object Manager called Field Access, and it gives you a single place to review field-level security for a specific field across your org.
Instead of hopping between profiles, permission sets, and permission set groups, you can now see everything in one view through the Field Access Summary. It’s a much faster way to answer the classic question: “Who actually has access to this field?”
You’ll find it in Setup by going to Object Manager, selecting your object, and then choosing Field Access from the sidebar. From there, pick the field you want to investigate.
What you get is a clear breakdown of where access is coming from. That includes profiles, permission sets, and permission set groups that grant visibility or edit rights to that field.
It’s important to note one key detail. This view is read-only. You can’t change field access from here; it’s purely for visibility and troubleshooting. Think of it as your “source of truth” for understanding how access is being granted.
5. Track Permission Dependencies More Easily
If you’ve ever changed a permission in Salesforce and later discovered it quietly caused a ripple effect elsewhere, this update is going to feel very welcome.
Salesforce now makes it much easier to track permission dependencies directly in the enhanced profile user interface.
When you update user permissions, object permissions, or assigned apps, Salesforce will now show you any additional changes needed to keep related permissions in sync. So instead of surprises happening behind the scenes, you get visibility at the point of change.
Previously, these dependency updates still happened, but they were hidden in the background and only really surfaced later in the Setup Audit Trail. Useful, but not exactly proactive.

Now, after you save your changes, you’ll be prompted to review any related permission updates before moving on. It’s a simple step, but it adds a lot more clarity and control to what’s actually changing in your org.
6. Choose Whether to Grant Access Using Role Hierarchies for Queues
If you’ve ever worked with queues in Salesforce and wondered why more people than expected were getting access to records, this update will make things a lot more predictable.
Salesforce has introduced a new setting called Grant Access Using Hierarchies, giving you more control over how record sharing behaves for queues.
In short, you can now restrict record access to only the specified queue members, without automatically extending access up the role hierarchy.
Previously, anything shared with a queue was also visible to users higher up in the role hierarchy. That might be fine in some scenarios, but in others it meant unnecessary access and, let’s be honest, a few too many email notifications for people who didn’t really need them.
Now you can decide whether that upward sharing should happen or not, giving you much tighter control over who sees what.
From a setup perspective, it’s straightforward. Go to Setup, open Queues, and either create a new queue or edit an existing one. You’ll see the option to enable or disable Grant Access Using Hierarchies, then simply save your changes.
There is one important detail to be aware of. For existing queues, this setting is enabled by default. For new queues, it’s disabled by default.
If you want to control the default behaviour at org level, you can adjust the “Grant access using hierarchies by default in new queues” setting on the Sharing Settings page. Just keep in mind this won’t change existing queues, and you can still override the setting individually per queue.
7. Manage List View Sharing and Editing With Granular Permissions
This is one of those small Summer ’26 updates that’s easy to miss, but actually makes list views a lot more flexible.
In Setup, under the User Interface page, there’s a new toggle that lets you make shared list views editable. Yes, finally.
What this means in practice is that users who have a list view shared with them can now edit it, as long as they also have the Create and Customize List Views permission.
There’s also a new permission called Manage Shared List Views, which changes the sharing experience quite nicely. It allows users to share their personal list views with roles, groups, and territories they belong to, without needing broader admin-level access.
Previously, if you wanted to share list views, you needed the Manage Public List Views permission. That one came with quite a lot of power, including the ability to edit or delete any public list view in Salesforce. Useful in the right hands, but definitely more than most users need just to collaborate.
Now, things are more balanced. Users can share their own list views without being able to touch every public one in the org.
8. Keep Approvals Moving in Slack
If your approval processes are still living entirely inside Salesforce, this is a nice step toward meeting users where they already are.
You can now bring approval workflows into Slack, allowing reviewers to approve or reject requests and add comments directly within Slack itself. No need to jump back into Salesforce just to respond.
Submitters also get real-time notifications when requests are submitted and when decisions are made, which makes the whole process feel a lot more immediate and transparent.
On the Salesforce side, the Approval Trace component on the related record keeps everything visible. It tracks Slack activity so teams can still see the full status and history of each approval work item in one place.
From a setup and access perspective, there are a couple of key requirements. To connect Salesforce with Slack, users need the Connect Salesforce with Slack permission. On top of that, both approvers and submitters need Read access to the Approval Submission object.
This is available in Lightning Experience for Enterprise, Performance, Unlimited, and Developer editions, and it works with Advanced Approvals or Flow Approval Processes.
Overall, it’s a simple but powerful shift. Approvals become less about chasing people through Salesforce and more about quick, contextual decisions in Slack, while still keeping everything properly tracked in CRM.
9. Require Unanimous Approval for Approval Steps Assigned to Groups
If you’ve ever tried to manage approvals with multiple stakeholders, you’ll know it can get… creative.
Good news, Salesforce has made this much simpler in Flow Approvals. You can now require unanimous approval for approval steps assigned to groups.
In plain terms, every member of the group must approve before the step can move forward. No more “first response wins” scenarios.
When you enable this option, each group member receives their own approval work item. If even one person rejects, the whole step is rejected. If everyone approves, you’re good to go. Simple, predictable, and much closer to how real-world approval processes actually work.
Previously, if you wanted input from multiple people, you had to create separate approval steps for each approver. Functional, yes. Elegant, not so much. Now, you can manage multi-stakeholder reviews in a single step, which is a big win for both admins and process clarity.
From a setup perspective, it’s straightforward. When configuring your approval step, just select “Require unanimous approval.”
Behind the scenes, Salesforce creates individual approval work items for each group member and sends out personalized notifications. The Work Guide then shows each person’s approval item, while admins can still track overall progress through a parent work item.
There is one small thing to keep in mind. You can’t reassign approval work items in steps that require unanimous approval, so it’s worth making sure your groups are set up correctly from the start.
10. Use Dark Mode in More Editions and Features (Beta)
Dark mode in Salesforce has been quietly evolving, and this latest update for SLDS 2 takes it another step forward.
If you’re working in Performance or Unlimited editions, you can now enable dark mode for Salesforce Lightning Design System 2 (SLDS 2) themes. And across all editions where dark mode is available, there’s also support for uploading a dark-mode version of your company logo, so your branding stays consistent no matter the theme.
At its core, dark mode presents light text and UI elements on a darker background. It’s not just a visual preference; it also helps reduce eye strain in low-light environments and improves readability for many users. Plus, it opens the door for more flexible theming and deeper customization of Lightning components.
To enable it, head to Setup, search for Themes and Branding, and either create a new SLDS 2 theme or edit an existing one. In the Dark Mode section, you’ll see the option to allow users to enable dark mode. Once saved and activated, users can choose their preferred appearance from their profile menu.
A quick but important note: dark mode is currently a pilot or beta feature, so it comes with the usual beta terms and conditions.
There are also a few limitations to be aware of. Not everything in Salesforce is fully optimized for dark mode yet. Areas like Analytics, Reports and Dashboards, Builders, and Setup may not fully support it at this stage.
Overall, it’s a nice step toward a more modern and customizable user experience. And for anyone who has ever stared at a bright screen at 8 pm, wondering about their life choices, this one will probably be appreciated.
11. Stay Up to Date With the Salesforce My Trust Center (Generally Available)
If you’re keeping an eye on platform health (and let’s be honest, you probably are), Salesforce has made some thoughtful updates to My Trust Center over at my.trust.salesforce.com.
First things first, if the name feels new, you’re not imagining it. This was previously called Personalized Trust and got its new identity back in Spring ’26. Same idea, just a clearer label.
So, what’s new and worth your attention?
You can now monitor incidents, major releases, patch releases, and maintenance updates with much better clarity. Everything is neatly color-coded, finally, so at a glance you’ll know whether you’re looking at something urgent or just routine upkeep. Red for incidents, green for major releases, yellow for patches, and purple for maintenance. Simple, visual, effective.
For those working across regions, there’s a welcome push toward better global collaboration. Labels and standard messaging are now localized in supported languages, making it easier for distributed teams to stay aligned. There’s even a language picker at the bottom of the page, so you can switch things up without digging through settings. Thai isn’t supported just yet, but hopefully on the roadmap.
Dates and times have also had a bit of a glow-up. You’ll now see dates in your browser’s preferred format, alongside system times in 24-hour notation. Much easier when you’re comparing timelines across time zones and trying to avoid the classic “wait, whose 2 PM is this?” moment.
And if patch releases are your thing, or your responsibility, you can now subscribe to notifications for products like Agentforce Sales, Agentforce Service, and Marketing Cloud Engagement. Less refreshing pages, more staying informed.
All in all, these updates make My Trust Center a lot more intuitive and a lot more useful day to day. Which, when you’re dealing with incidents and releases, is exactly what you want.
Summary
If there’s a thread tying these updates together, it’s simplification with intent.
Branding in reports and dashboards finally feels cohesive, row-level formulas are becoming more practical, and permission visibility is steadily improving in ways that actually help you troubleshoot faster. Meanwhile, collaboration continues its gradual shift toward Slack, approvals are becoming more structured and transparent, and even smaller tweaks, like list view sharing or queue behaviour, make day-to-day admin work feel less brittle.
It’s not a release defined by one headline feature, but rather a collection of thoughtful refinements that reduce admin overhead and bring a bit more predictability to how Salesforce behaves.
Read More
- 10 New Salesforce Flow Features in Summer ‘26
- Top 8 Salesforce Summer ’26 Features for Developers
- Service Cloud: Top Salesforce Summer ’26 Features
- Sales Cloud: Top Salesforce Summer ‘26 Features
- Top 9 Summer ‘26 Updates for Salesforce Marketers
