

Approval processes have been around for a long time, helping Salesforce professionals build multi-step processes to control how records are approved.
With Salesforce Flow becoming the main declarative automation tool in Salesforce, it should come as no surprise that the time has come for it to offer approval-process-specific functionality, rather than just invoking an already existing approval process through an action. In this post, we will explore the brand new Flow Approval Orchestration released in Spring ’25 and how you can create an approval process only using Salesforce Flow at no additional cost, plus the updates made in Summer ’25 and Winter ’26.
Meet the Approval Orchestration Flow Types
As if Spring ‘25 wasn’t already packed with Flow updates, ranging from the real-time field validations in screen flows to the ability to join collections with the Transform element, the addition of Approval Orchestration flow types should excite all Salesforce professionals.
These new flow types cater for all approval-related needs within the org, and can account for both simple and complex requirements, including Salesforce only or external users and external systems too. Although they’re orchestrations, there will be no automation credit consumption involved, and they can be used just like an approval process at no extra cost.
When creating a new flow, you will notice the option to choose one of the new flow types:
- Autolaunched Approval Orchestration (No Trigger): This type can be triggered from other processes or even custom buttons.
- Record-triggered Approval Orchestration: This will be triggered based on the record to be sent for approval being created or updated.


Stages and steps are the main building blocks of Flow orchestration. Each stage can be customized into a multi-step process, allowing you to orchestrate screen flows or autolaunched flows that execute sequentially or in parallel, based on the entry criteria you set for each step.
Within each stage, you can choose between two types of Steps:
- Approval Step: An interactive step leveraged for the user action. This requires a screen flow to be selected, which will be used when the step starts. This is where approver(s) will be assigned, and where you can also choose to customize the notification email, lock the record, and allow the approver to make edits in the record.

- Background Step: An automatically triggered step, more or less equivalent to workflow actions. This uses an autolaunched flow that will be triggered and completed in the background with no user interaction.

The default setting for stage completion is when all steps within that stage are finished, allowing the orchestration to proceed. However, this can be customized to allow specific conditions to be met, or you can utilize an Evaluation Flow for more intricate requirements.

For the Approval Step, you can also customize the condition that determines when the individual step will be marked as complete.

Optionally, you can use an Evaluation Flow if your process has complex entry or exit criteria to consider. In this case, simply use the IsOrchestrationConditionMet output variable to further trigger and control the behavior of the approval orchestration.
However, make sure to review the Evaluation Flow considerations before getting started.

The last player within the orchestration is the Decision element. This element allows you to navigate through different Stages based on criteria being met, making it easy to handle even the most intertwined approval scenarios, while keeping the stages separated and easy to read when reviewing the overall flow.

Build Your Approval Process in Flow Builder
There are as many possible Approval Process scenarios as there are businesses, but all of them within Flow will progress similarly and ultimately lead to an outcome. To try this new functionality out, let’s take a basic example of an Opportunity that should enter the approval workflow as soon as it’s created (if the Account Type it is related to is already a Customer Account).
For this example, we’ll use the Record-Triggered Approval Orchestration Flow Type and set the Opportunity Owner’s manager as the approver.
Firstly, to create a Flow Orchestration, you need to determine the Flows you will be using within the steps. Map out the process before you begin to ensure that the flows you need are active and ready to go by the time you start working on the actual orchestration.
For this example, we will need a screen flow for the approver to input their decision and an autolaunched flow to update an Approval_Status__c field on the Opportunity. These will be used within the Approval Steps and Background Steps, respectively.
While you could build your own from scratch, as long as you have the output variables ready to be used afterward, Salesforce offers a readily available Approvals Workflow for the screen flow: Evaluate Approval Requests template.


For the record-triggered flow, however, it’s a matter of creating the variables that will be needed. The first is to store the Opportunity Id, and the other is to store the approval process outcome that is to be added to the field.
These will then be used in an Update Records element:

Once the flows are ready, it is time to move on to the actual approval orchestration within Flow Builder.
The Stage in this example will capture the manager’s decision in an interactive Approval Step first. This step will start as soon as the stage begins and uses the screen flow as an action.
If you choose to use a User Resource to determine the approver, as we need to in this scenario, ensure that it contains the username of the desired approver and not the User Id. You can also set a User, Queue, or even Group as the approver.
Within the Approval Step, you can customize the approver notification email, while also having the option to lock the record or allow editing access to the approver. For the step to be completed, the assigned user needs to complete the action, but for other use cases, you may want to select one of the other available options.

The next step within the same Stage is to update the custom Opportunity field with the outcome of the Approval Process, similar to how you would have done with a Field Update in an Approval Process.
The manager’s decision will be found in the approvalDecision output variable coming from the screen flow in the step above – if you’d like to use other values than ‘Approve’ or ‘Reject’ for the field, you’ll need to adapt them accordingly before the field update.
In this step, you can also select when it will be started while determining the user on whom the action will be run on, be it the automated process or a different one.

While you can and should leverage the out of the box notifications sent to the submitter, if you would like to provide them with more information than what is already included, you can stop these ones and create your own.
In this example, you can add the notification to be sent as part of the same autolauched Flow updated by the Opportunity.
Since the input variables can be set directly from the orchestration Background Step, you could add more of them to send over additional details from the Opportunity that triggered the approval orchestration, for example, or the manager’s comments.
However, turning the out-of-the-box submitter notifications off means that you would have to make sure all scenarios are covered, so unless really needed, it’s a better idea to keep these on and make use of them.


As most of us work in a fast-paced environment, changes in requirements are bound to happen. While the first iteration of the orchestration may start just as simple as the one above, it may evolve over time. In this regard, having the entire process in Flow Builder instead of Approval Processes makes it much easier to manage and adapt accordingly.
For Opportunity amounts less than 500K, the direct manager is the sole approver. For amounts exceeding 500K, the direct manager can either approve or reject outright, but a secondary approver must also provide input. The final approval decision, whether approval or rejection, is stored in the Opportunity field.

Account for Recalls and Errors
The launch of flow approval capabilities in Spring ‘25 has been well received by the community, as it ultimately enhances approvals with long-awaited flexibility in comparison with the legacy approval processes. One functionality highlighted as missing in the initial release was included in Summer ‘25, and that is the possibility to add recall behavior.
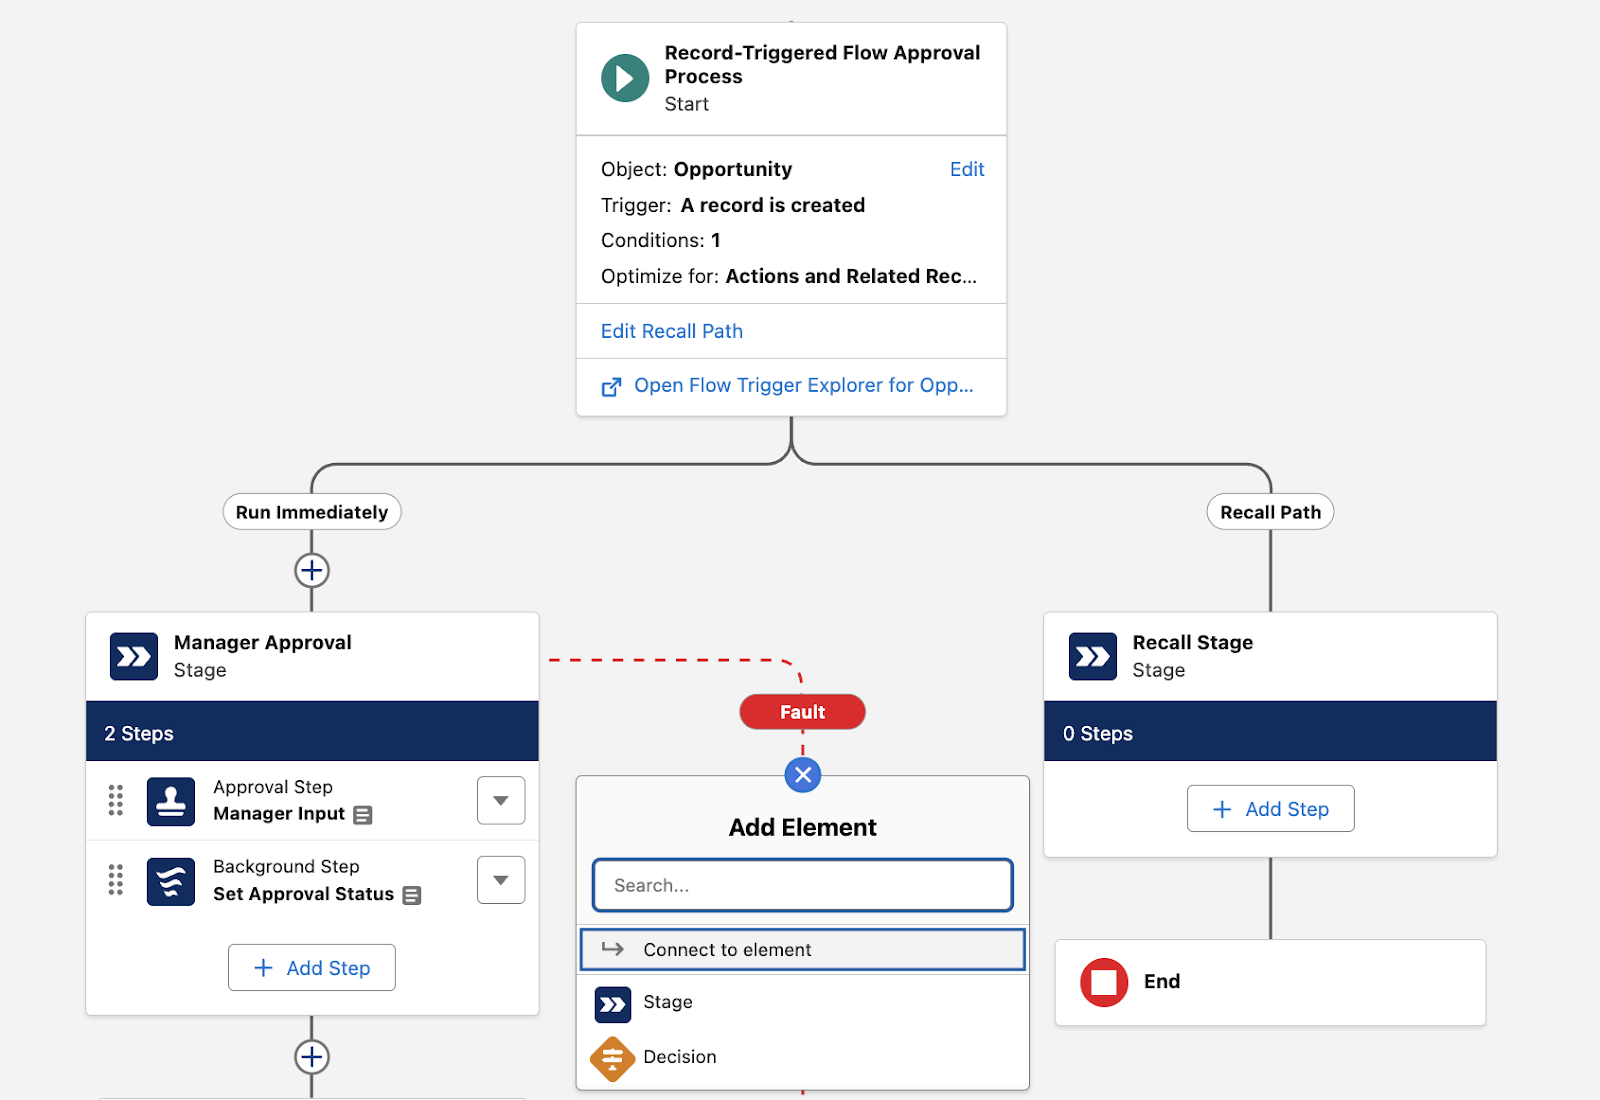
There is no need to leave the Flow Orchestration in order to add the recall path, as this will simply become a new option as part of the start node. The recall path can also be split by Stages as needed, with the only possible steps being background ones – this means that prior to adding this optional path, you should have an autolaunched flow already activated and ready to use.

In addition to the recall path possibility, Summer ‘25 also brought Fault Paths along to the Flow Orchestration Stages. This applies to Flow Orchestrations broadly, and therefore to Flow Approvals by implication. You now have greater control over potential error handling for each Stage, and can decide what the next step should be if a Stage results in an error.
Debug, Debug, Debug
Speaking of errors, there’s nothing worse than finding an error in production when you could have accounted for it during the build. Coming in Winter ‘26 to Flow Orchestrations is the well-known Debug mode with a new look and feel – this includes flow approval processes, and it also means that you no longer need to test every single scenario manually to ensure it works as intended. The Debug button provides the ability to troubleshoot these approval processes directly within Flow Builder, similar to other types of flows you might have used it for.
You can debug in rollback mode, but keep in mind that steps that are to be executed asynchronously will error out unless you make use of the new option to Manually Set Output Variables. These can be turned on and set for each individual step within a stage. The debug configuration tab will appear even outside of debug mode, whenever you are editing a step, so you can set these as you’re building.

Take Action, Review, and Re-Assign Approvals
Now that the approval orchestration is ready, it’s time to make it accessible to users. Approvers will receive an email and can respond using keywords, but if they need to approve directly within the user interface on the Opportunity record, the Flow Orchestration Work Guide (renamed to Orchestration Work Guide) component must be added to the Record Page.
Additionally, this component includes a useful setting that automatically hides the work guide when it’s empty.

To ensure the new Approval Process works as intended, let’s create an Opportunity on an Account that has the Type set as Customer – Direct. As soon as the Opportunity is saved, the Work Guide appears and exposes the screen flow alongside the names of the process, stage, and step as selected.

After the decision is logged, the work item is completed, and the component disappears. You will notice that the Approval History-related list remains empty – this is expected, though, as it is not an actual Approval Process we’re using. In this case, where can all the approval-related information be seen?

The Approval Work Items can be made visible on individual records by adding the Approval Trace component on the Record Page. Key information such as the status, any comments, and who the item was assigned to and reviewed by will be visible in the table as soon as the record enters the approval orchestration.


Alongside the Flow Approval Orchestration capabilities, Salesforce is also introducing a central hub where both you and your users can see everything you need related to Approvals. The new Lightning App offers readily available list views, which make navigation through Approval Submissions, Approval Submission Details, and Approval Work Items a breeze.
The list views can be customized as needed if you would like to reorder the fields, for example.
The Approval Submission records contain a lot of information for both analytics and troubleshooting purposes. The status will note its current state, including whether an error occurred.
You will also have the name of the related Object at hand, the related record, and even more details in the Related section. These contain the related Approval Work Items and Approval Submission Details records, such as the details record containing the action channel name.

Approval Work items can be reassigned when necessary, directly from the list view. A user, queue, or group can be selected.
Similarly, they can be reviewed directly from the list view too. This action would pop up the screen flow on the page rather than users needlessly navigating to individual records and using the Work Guide component.


Additionally, If you need to create reports instead of leveraging the readily available list views from the Approvals Lightning App, it’s not a problem! You can find the Approval Submissions, Approval Work Items, and Approval Submission Details available for selection when creating a Custom Report Type. So, in case list views were not what you were looking for, the option to use reports is there.

Flow Approval Process Wizard
While in this example we created the Flow approval process from scratch, Summer ‘25 allowed us to leverage a wizard to assist with the creation if you choose to start creating the new process from the dedicated Approvals App.
You will be prompted to choose the number of levels that the approval process will have, as well as whether final actions and a recall path are to be added.
The output of the wizard is the skeleton of the orchestration directly within Flow Builder, where you can add any additional steps.
Note that the Approval Steps are already linked to the out of the box screen flow, which you can choose to keep or change with your very own instead. By using this option, you could save quite a bit of time, and just continue tailoring this base process created according to your selections as needed.
Extend Access for Your Power Users
When it comes to Quote, Account, or Opportunity approval processes, who knows the criteria best, if not the Sales Operations or Revenue Operations teams? With Winter ‘26, Salesforce Admins can now give limited permissions to other users, without requiring the Manage Flows permission, for them to manage autolaunched approval flows exclusively.
With great power comes great responsibility, though – while assigning these additional permissions can make certain things easier, it could also wreak havoc in no time. In my opinion, while it’s great that the option exists, the new Approval Designer administrative permission should be granted sparingly, and ideally fall into the list of permissions that shouldn’t really be assigned to users. Especially if your organisation is following an organized DevOps process, users should only get these powers in a sandbox rather than the production environment.
The good news is that Salesforce did account for the mistakes users with this permission might make. Autolaunched flow approval processes modified by a user with the new permission require them to use the new ‘Submit for Activation’ button on the canvas. This will act as an approval process for the approval process changes, so that the admin can review their notes and decide how to proceed. The activation request will be routed to the selected approver and can also be recalled if needed.


Considerations
Similar to most Salesforce out-of-the-box features, there are many things you should consider before using the new Approval Orchestration Flows in your business process:
- An approval orchestration can have a maximum of 50 versions, just like Salesforce Flows.
- Flow Approval Orchestrations never consumed orchestration credits, and since Flow Orchestrations no longer incur an additional cost (as of February 2026), it may be time to re-evaluate if and where they can fit within your Flow strategy.
- If a flow related to one of the steps fails, you will receive two separate emails – one for the approval orchestration failing, and one for the flow failing. The way I caused the error Status above was to use a random picklist value in the autolaunched flow for a restricted picklist. As you may already be accustomed to troubleshooting flows, you will see the error both in the email and by accessing the interview in the paused and failed flow interviews section in Setup.
- Consider migrating to approval orchestration from the Approval Process, but review the considerations first. For example, as of now, manually selecting the next approver is not supported, as all approvers must be determined within the Approval Step.
- When assigning interactive steps, check how users, groups, or queues can be specified. As you saw in the example above, when it comes to User Resource, the variable should contain the username.
- All considerations and limits for Flow Approval Processes can be found here, and you should go through all of them before getting started.
Final Thoughts
Managing all declarative automations natively in Flow Builder is a significant step forward for both Salesforce Admins and users alike.
From deliberately setting entry and exit criteria, juggling variables to fit your use cases like a glove, and easily reviewing and actioning the Approval Work Items, this new functionality checks all the boxes for you to try it out yourself in a sandbox first before determining how it fits your specific scenario.
Are you looking forward to migrating away from Approval Processes? Let us know in the comments below!

Comments: