


Since the dawn of Flow, many Apex enthusiasts and code-based developers have ripped into how inflexible the tool is. One of the biggest critiques was that Flow sat neatly inside Salesforce with no interaction with the outside world. This is why HTTP Callouts are such an impactful enhancement to Salesforce Flow.
While HTTP Callouts in Flow have been around for a while, they’re still one of the features that I get the most questions about. I wanted to share some clarity about exactly what they do, how they’re to be configured, and where they’ll be useful to your business. Saddle up! Let’s go on a journey and learn all about HTTP Callouts in Salesforce Flow!
What Are HTTP Callouts?
If you’re looking to push or pull data between Flow and an external system without needing to write Apex, you may find HTTP Callouts to be beneficial. This is because they do what a code-based solution does without having to write any code yourself.
It’s not that they magically do the same thing without requiring the same infrastructure, but more that you can configure them in a Flow, and Salesforce will automatically create everything else that is required. The Apex classes, external service, and invocable action are all built behind the scenes – you simply need to click through and input the right information. That’s all Flow really is at the end of the day – a clickable interface that creates code behind the scenes.
Did you know that Flows are saved as XML files in Salesforce? While you don’t write the code, your inputs in Flow Builder tell Salesforce what needs to be created.
HTTP Callouts History in Flow Builder
Spring ‘23 introduced HTTP Callouts for the first time, in beta, and it only supported a GET operation. Summer ‘23 made GET callouts generally available and introduced POST. Winter ‘24 followed this pattern by making POST calls generally available. Finally, Winter ‘24 rounded things out by making POST GA as well as PUT, PATCH, and DELETE.
These were three big releases for Salesforce Flow, especially as we saw the first instances of being able to communicate with third-party systems directly from a flow.
How to Use HTTP Callouts in Salesforce Flow
Let’s go through an example together. I want to keep this one relatively simple and engaging to make it easier to follow and grasp the basics.
Let’s talk through the scenario: a very important business requirement has emerged within your organisation, Certified Giggles. The staff morale is low due to an industry wide shortage in laughs, and you’re the super Salesforce Admin who is going to save the day. Your solution is simple – you want to embed a Screen Flow into the Utility Bar so that whenever your less-than-happy business users need a pick-me-up, they’ll be able to quickly receive a Chuck Norris joke related to something they are thinking about.
This is mission critical stuff, people. Let’s get to work, and fast!
Understanding the Technical Requirements
When working with HTTP Callouts we first need to know where we’re sending our request. This is what we’ll use a Named Credential for.
Next, we need to figure out what kind of Flow we’re using and where we’re going to use the callout. We also need to know what parameters we’re going to pass in. In this example, we’re going to create a very simple Screen Flow to do this, and we want to pass through the string parameter ‘query’. More on that later.
Finally, we need to build the HTTP Callout itself. This is a relatively straightforward and guided process, and we’ll discuss the details when we get to it.
For reference, we’re going to use the Chuck Norris Jokes API for this tutorial, which does not require authentication.
Important Note: I do not recommend doing this in Production. Make sure when you’re learning and testing new concepts that you use a Sandbox, or preferably a Developer Org for something like this.
Create Named Credential
The Named Credential is used to identify which endpoint we want to call. Head over to Setup and search for ‘Named Credential’ in the Setup menu. Make sure you’re in the ‘Named Credentials’ tab on this page, then we need to create a new Named Credential, but don’t click the New button just yet! Doing so will force you to match to an External Credential, which we don’t need to do for this example. There is a way to bypass this, however, and that’s by clicking on the dropdown on the New button and clicking New Legacy – this allows us to only create the Named Credential, and not populate an External Credential.
From here, populate the following fields:
- Label: ChuckNorrisSearch
- Name: ChuckNorrisSearch
- URL: https://api.chucknorris.io/jokes/search
Leave the rest, and click Save.

It’s as simple as that for this example. This will be the Named Credential that we use later on in the example.
Create Screen Flow and Input Screen
Now that the Named Credential has been created, you’ll need to start building the Screen Flow that it’ll be used in.
Let’s remember the solution that we’re building:
- It must be accessible from the Utility Bar.
- The user should be able to provide a topic for the API to make a joke about.
- It then needs to output a Chuck Norris joke to cheer the user up.
Based on the user interaction, we know that the Flow Type must be a Screen Flow, so head over to Flow Builder and create a new Screen Flow. From here, we’ll build a simple Screen to gather the input from the user.
Drag a Text component onto the page and label it “Give me a Chuck Norris joke about:,” as shown in the example below.
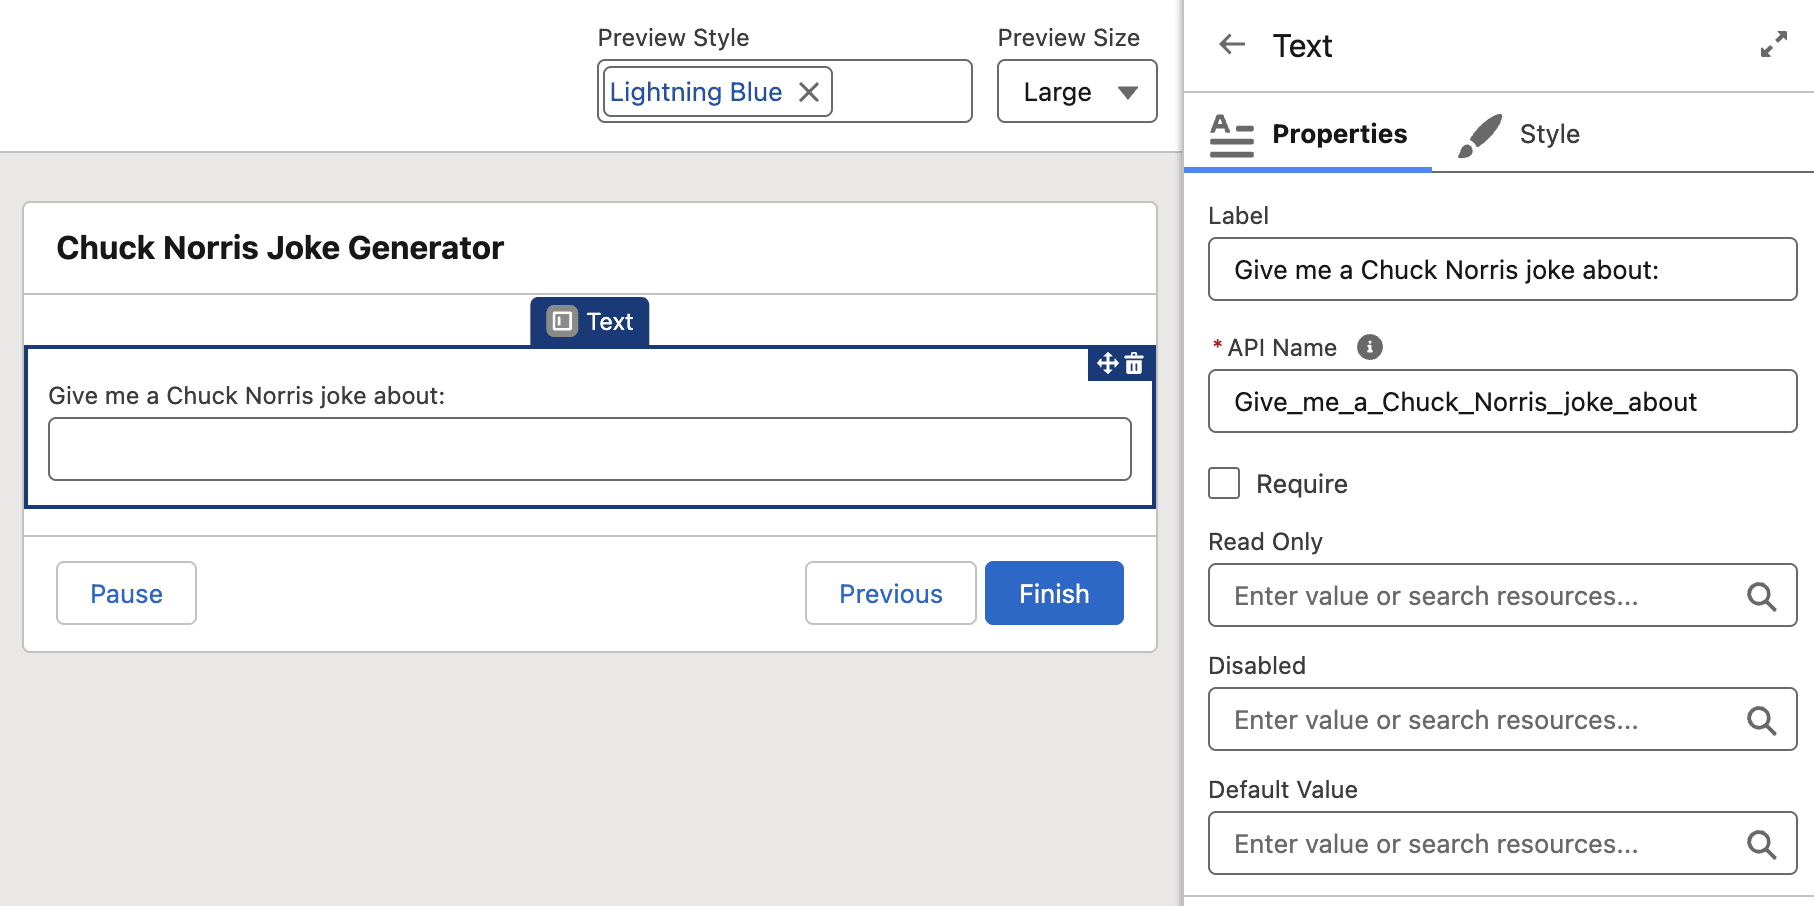
Before we continue, you should save the Flow. I’ve called it Chuck Norris Joke Generator and given it a relevant description as below.

Create the HTTP Callout Action
Now we get to the crux of our build – the HTTP Callout itself. To set one up, we need to add an Action.

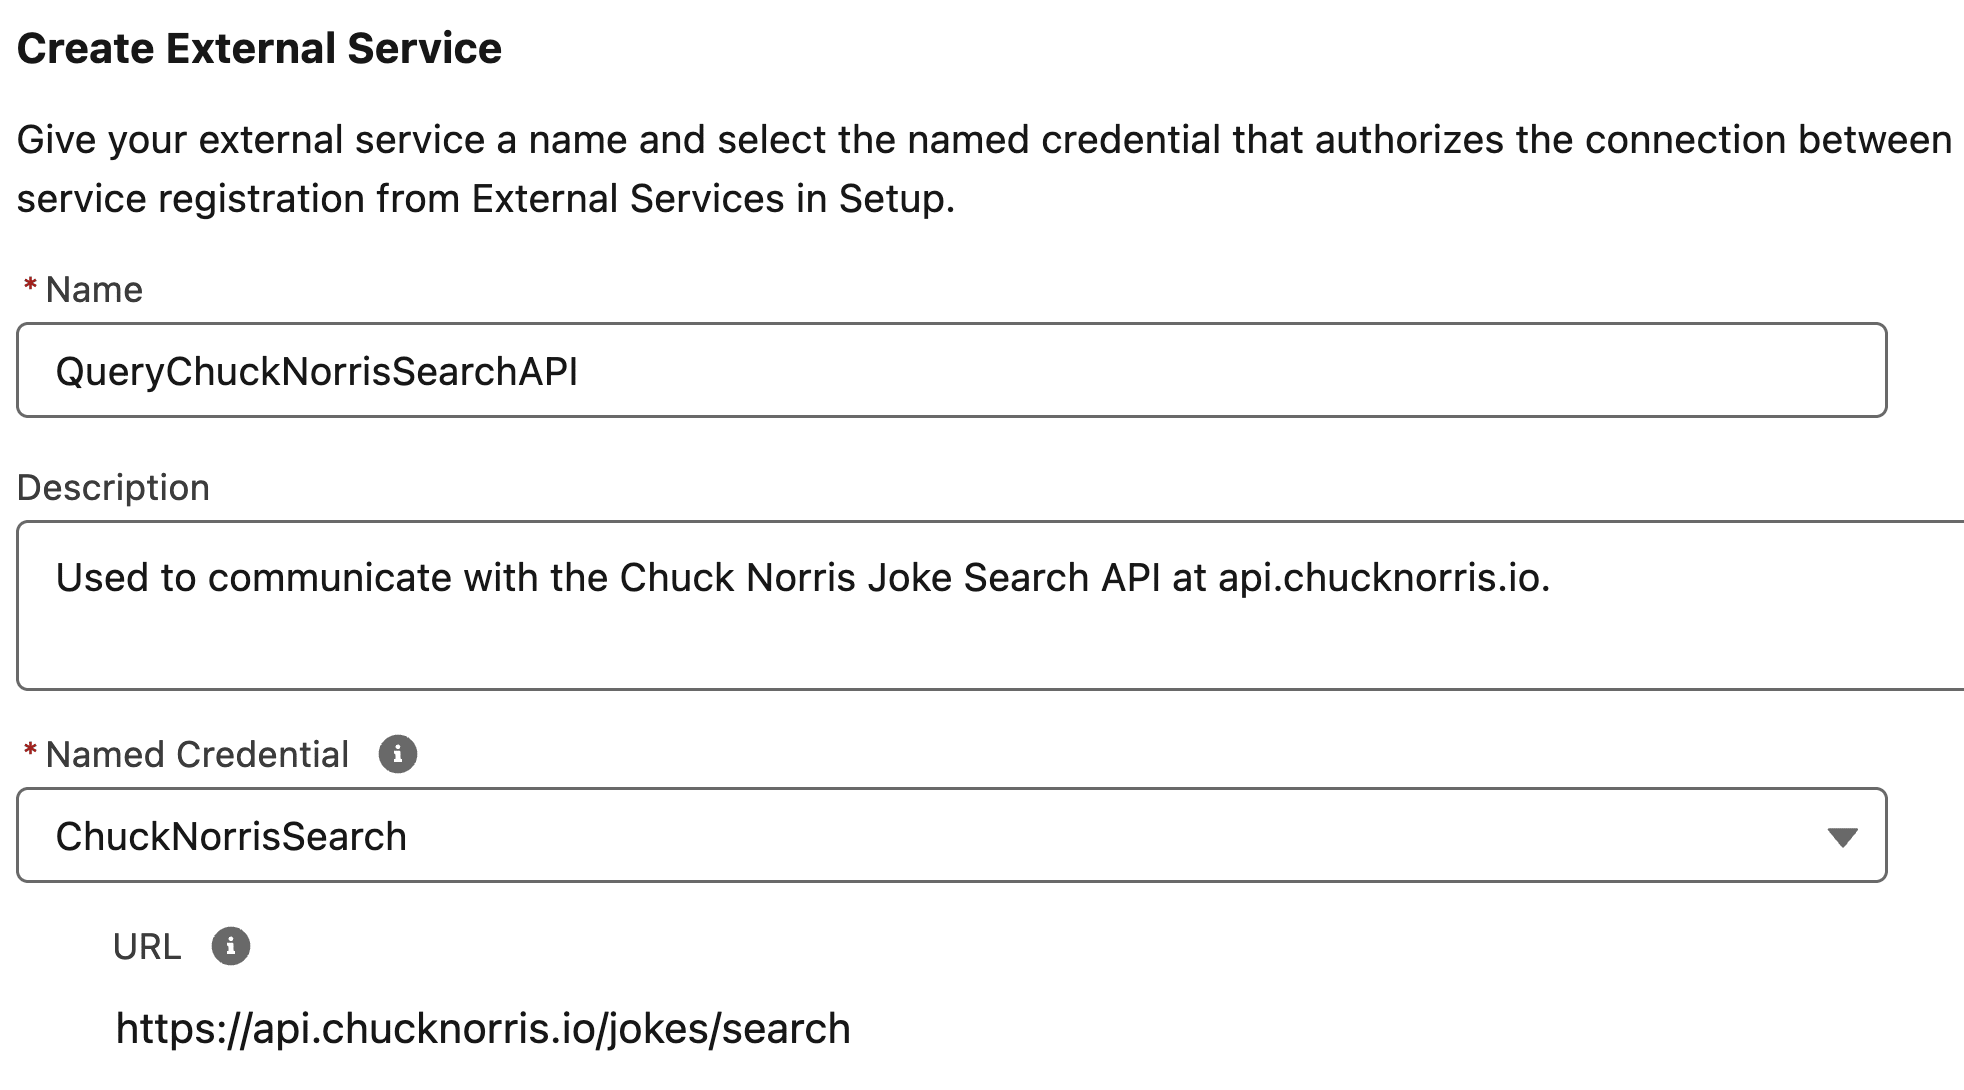
The first thing you’ll see is the screen asking us to create an External Service (this is why we went with New Legacy when creating the Named Credential). An External Service is required for communicating with an external platform outside of Salesforce, and doing it as part of the Flow’s HTTP Callout just helps to streamline the creation process. Give it a name, set a relevant description, and select your Named Credential that you’ve created above, similar to the example below.
Click Next, and populate the following information on the next page in the wizard:
- Label: Get Chuck Norris Joke from Search
- Method: GET
- Description: Get Chuck Norris Jokes based on a search term.

Leave the URL Path field blank, because we’ve already got this in our Named Credential URL. This would be where you specify the individual endpoint at the base URL, if you needed to.
You will need to provide a single URL Parameter, query. Click + Add Key and populate the fields as below:
- Key: query
- Data Type: String
- Description: The search term that you wish to use in the query.
- Require: TRUE

Click Next. It’s now time to validate the work you’ve done. Leave the selection as Connect for Schema and click Next once more.

Now you get to check that your callout works! On the left side of the screen you’ll see a Value field – this is what we want to pass into the query to give it some context. This will be what the user wants their joke to be about. I’m going to test it in my example below by providing a value of beach and clicking Connect to get my results.

Two things are returned to us when we click Connect (assuming all has been configured as expected): the Data Structure, and the actual Response.
The Data Structure shows the shape of what is returned from the call, and the types of data that it can be broken into. We don’t want to change anything here. The Data Structure shows us some interesting information that we want to understand though, notably:
- total: This shows us the total number of results that have been returned.
- result and item: This just tells us how the data is structured – there is an array (or a collection) called result that contains the data. Each instance of this data is called an item.
- id: The Id of the individual result item.
- value: This is the value we care the most about, and will contain the actual Chuck Norris joke.
Because we’re receiving an array, or a collection, of results we know that we need to be able to handle scenarios where zero, one, or many jokes are returned.

At this stage we care more about the Response tab – click on the Response tab to open this up.

Reviewing the Response
Now I know what you’re thinking, I thought Flow was supposed to be clicks, NOT code! Why am I seeing so much text?! Fear not – this is relatively simple to digest when we know what we’re looking for.
Below is a portion of the response that I received:
{
   "total": 14,
   "result": [
      {
         "categories": [],
         "created_at": "2020-01-05 13:42:19.897976",
         "icon_url": "https://api.chucknorris.io/img/avatar/chuck-norris.png",
         "id": "oJFv_vZ5SZ2JBbY-1u6ZgA",
         "updated_at": "2020-01-05 13:42:19.897976",
         "url": "https://api.chucknorris.io/jokes/oJFv_vZ5SZ2JBbY-1u6ZgA",
         "value": "When Chuck Norris goes to the beach, he doesn't need sunblock, the sun needs Chuckblock."
      },
      {
         "categories": [],
         "created_at": "2020-01-05 13:42:20.568859",
         "icon_url": "https://api.chucknorris.io/img/avatar/chuck-norris.png",
         "id": "bYp7PdO5QLS7LbB_wZRYLg",
         "updated_at": "2020-01-05 13:42:20.568859",
         "url": "https://api.chucknorris.io/jokes/bYp7PdO5QLS7LbB_wZRYLg",
         "value": "Chuck Norris shot an Eagle on the 14th hole at Pebble Beach. It was a Bald Eagle and died with a smile on it's beak."
      },
… (there was more here, but I removed it for simplicity’s sake)...
      }
   ]
}
While this may be a bit daunting if you’re not overly familiar with JSON, there’s not much to it for this result. Firstly, we already know that the total variable shows the number of results, or jokes, returned. In my case, I received 14 jokes.
Then, in the results table, we can see a plain text representation of the individual items, each sitting within a set of curly brackets {}.
Here’s an example of a single item:
"categories": [],
         "created_at": "2020-01-05 13:42:19.897976",
         "icon_url": "https://api.chucknorris.io/img/avatar/chuck-norris.png",
         "id": "oJFv_vZ5SZ2JBbY-1u6ZgA",
         "updated_at": "2020-01-05 13:42:19.897976",
         "url": "https://api.chucknorris.io/jokes/oJFv_vZ5SZ2JBbY-1u6ZgA",
         "value": "When Chuck Norris goes to the beach, he doesn't need sunblock, the sun needs Chuckblock."
The primary thing that we care about here is the value itself – this contains the joke that we want to display to the user.
With all that understood, click Save to finalise the build of your HTTP Callout.
Populate the following pieces of information on the Action that you’ve just built:
- Label: Get Chuck Norris Jokes
- API Name: Get_Chuck_Norris_Jokes
- Description: Get the Chuck Norris jokes from the search term.
- Value: {!Give_me_a_Chuck_Norris_joke_about}
- This is the Text Screen Component that we created earlier on – passing the value into the query so that the query can have context.
This is a great opportunity to Save your Flow. Nearly done!
Connecting the Dots
To tie it all together, you’ll need to create one more Screen that displays the output from the query. Because we know the query will return multiple records, we want to make sure that we build to allow for this. There’s a couple of ways we could do this, but given that this tutorial is focusing on HTTP Callouts we’ll keep it simple and pop them all in a data table.
Create a new Screen element after the HTTP Callout Action in the canvas. Call this screen “Display Chuck Norris Jokes” and add a Data Table component with the following attributes:
- API Name: jokeResultsTable
- Label: Chuck Norris Results
- Source Collection: {!Get_Chuck_Norris_Jokes.2XX.result}
- This is the results collection from your callout action
- Row Selection Mode: View only
- Unique Identifier: id

Next, you’ll want to configure the columns that you want to display. Add a new column and provide the following information:
- Source Field: value
- Custom column label: TRUE
- Label: Chuck Norris Joke

Leave the rest how it is and click Done to set the column, then click Done to close the Screen element.
Your Flow should look like the below with an input screen, the HTTP Callout, and the output screen.

Save your flow.
Testing the Flow
Now we come to the most important part: testing the flow. Open the Debug tool, and type in a topic that you want to receive a Chuck Norris joke about!
Fair warning – there are some wild ones in there. Tester discretion is advised!
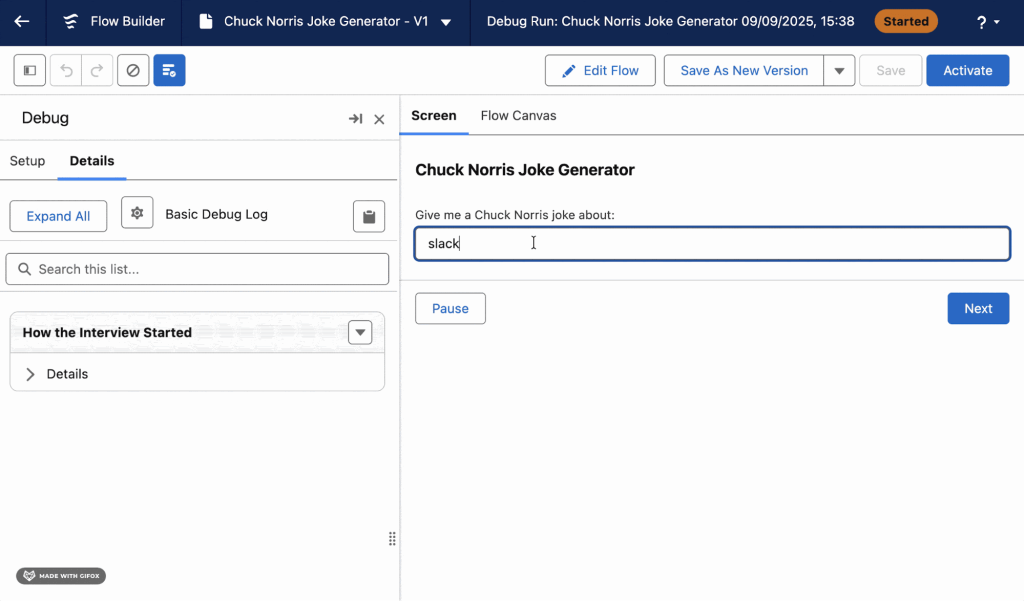
Unfortunately, there are no Chuck Norris jokes about Salesforce just yet. Perhaps they should add this one to the database: Chuck Norris doesn’t build HTTP Callouts in Flows. They build themselves out of fear.
How HTTP Callouts Can Benefit Your Business
I’m honestly gobsmacked that you’re not impressed enough by the ability to instantly uplift team morale by using HTTP Callouts to get Chuck Norris jokes from an external system, but fear not! There are a multitude of ways that they can be used to benefit your business.
The example above only demonstrated the GET functionality that HTTP Callouts offers – getting data from an external system for use in Salesforce. It also has the ability to modify data in external systems using POST, PUT, PATCH, or DELETE calls.
The possibilities here are endless:
- Pass data from Salesforce to an external system to validate details prior to a record being saved.
- Get updates from an external shipping service based on a tracking code in Salesforce.
- Check stock availability for Product records.
- Trigger a document to be sent for signature using an external eSignature tool.
- Send an SMS through a third-party system.
- Check the balance of a customer’s loyalty points.
- Pull the latitude and longitude for a customer’s address from an external service.
- Send data to a pricing engine to calculate accurate complex pricing.
…and all without writing a single line of code in Salesforce!
Flow’s HTTP Callouts empower declarative builders to communicate with systems outside of Salesforce. Normally this would require a developer to build the infrastructure, which introduces additional complexity and can take some time. The same infrastructure is built behind the scenes when using HTTP Callouts in Flow.
Summary
So there you have it, HTTP Callouts empower Flow builders to connect to and communicate with external systems without the need to write a single line of code in Salesforce. Simply create a Named Credential, build the HTTP Callout Action in a Flow, and use the outputs to create wonderful experiences for your users that will save them time and give them a full insight into their customers.
If this is a totally new concept to you, what do you plan on using HTTP Callouts for? If you’ve used them before, what have you built using HTTP Callouts? Let us know in the comments below!


Comments: