

Salesforce Flow has been the go-to for declarative automations for a long time, but with numerous options to choose from, how do you know which kind of flow you need to create?
Ultimately, it all comes down to your very first decision: selecting the flow type. This determines the behavior of your flow, as well as what elements and functionality will be available to use within your automation.
In this article, we’ll do a deep dive into the available types for Salesforce Flows, what each type can be used for, and what other functionality or dependency certain flow types rely on – plus a handy, downloadable visual (jump to infographic).
Salesforce Flow
If you’re new to Salesforce Flow, do not worry! If you have used workflow rules or Process Builder in the past, the transition might be smoother than you think.
Unlike Salesforce declarative automation offerings, flows offer more control and freedom than ever before. All the magic happens within Flow Builder – a visual interface that allows you to tailor the perfect automation for a variety of use cases. While Salesforce provides a long list of out of the box components, additional custom actions can also be built in-house or purchased from various ISVs.
Salesforce Flow opens up possibilities that were either difficult to achieve declaratively or solely relied on custom code in the past. Learning how to make use of this tool is no longer optional and can unlock a wide array of functionality when mastered.
Ready to Discover the Salesforce Flow Types?
Selecting the Flow Type is the first step when starting to build, so knowing what you’re looking to achieve through your automation will go hand in hand with this selection.
1. Screen Flow
What it does: An interactive wizard with screens to guide a user through various steps.
How can it be triggered: Manually by a user, either from an action, Lightning Page, or even Utility Bar.
From its inception, Salesforce Flow distinguished itself from other declarative automation tools by offering the ability to build step-by-step guided wizards. Screen Flows have come a long way since then, but allowing admins to drag and drop components, rely on reactivity to and visibility criteria, and offer the user a bespoke process is perhaps one of the platform’s greatest innovations.
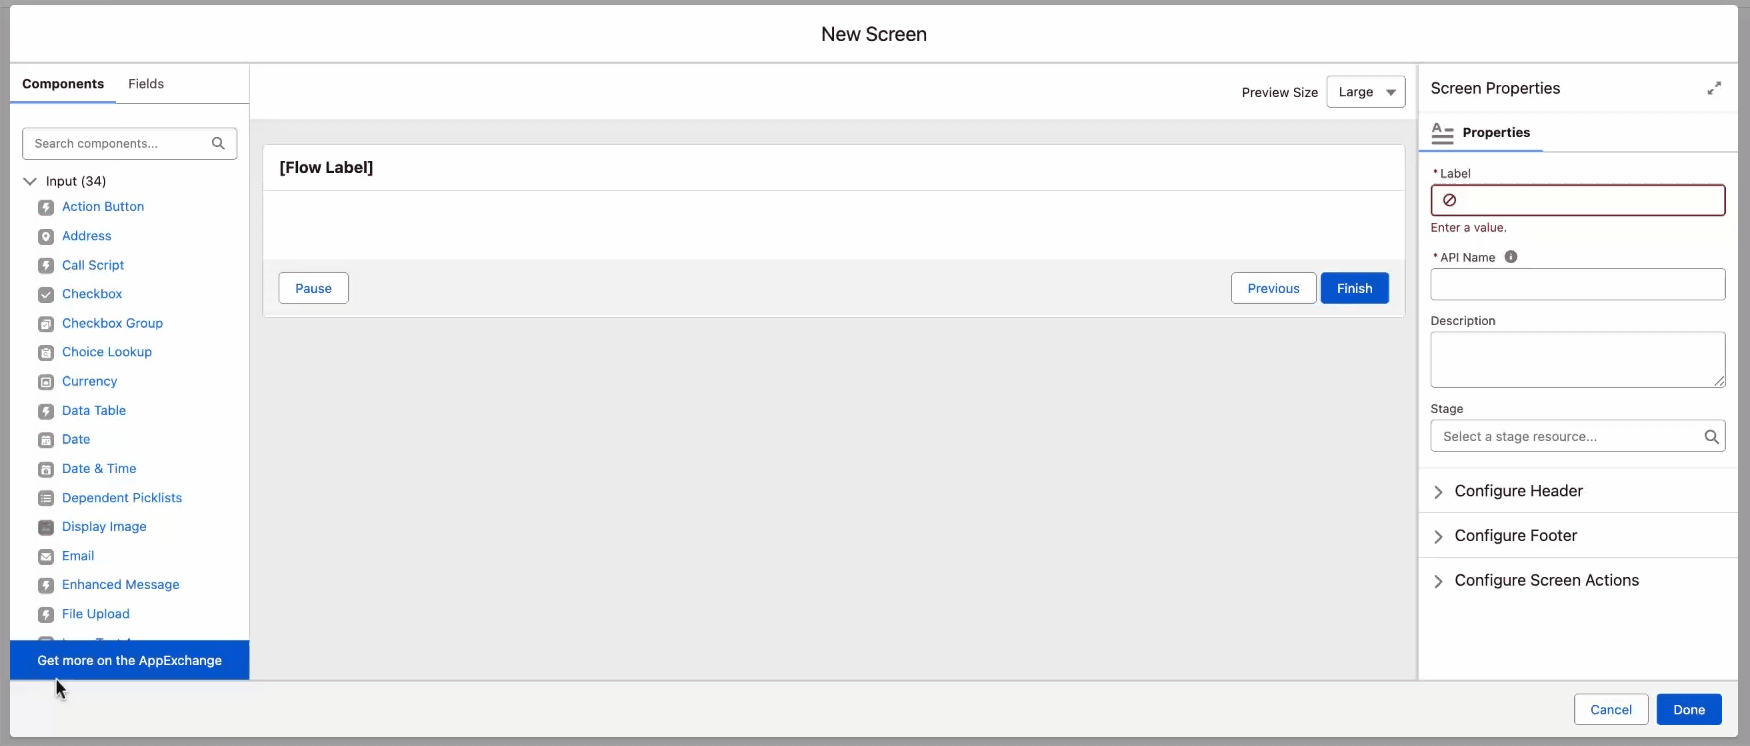
This means that either data entry scenarios can be handled on one screen, or the process can be easily split between multiple screens in a step-by-step fashion. The fairly recent addition of out of the box progress bars also lets users know where they are in the process, and separate success and failure screens should be used to display tailored messages for added context.
So if your team is in need of an easier way to gather user input – or even just display information before action is taken – look no further than Screen Flows!
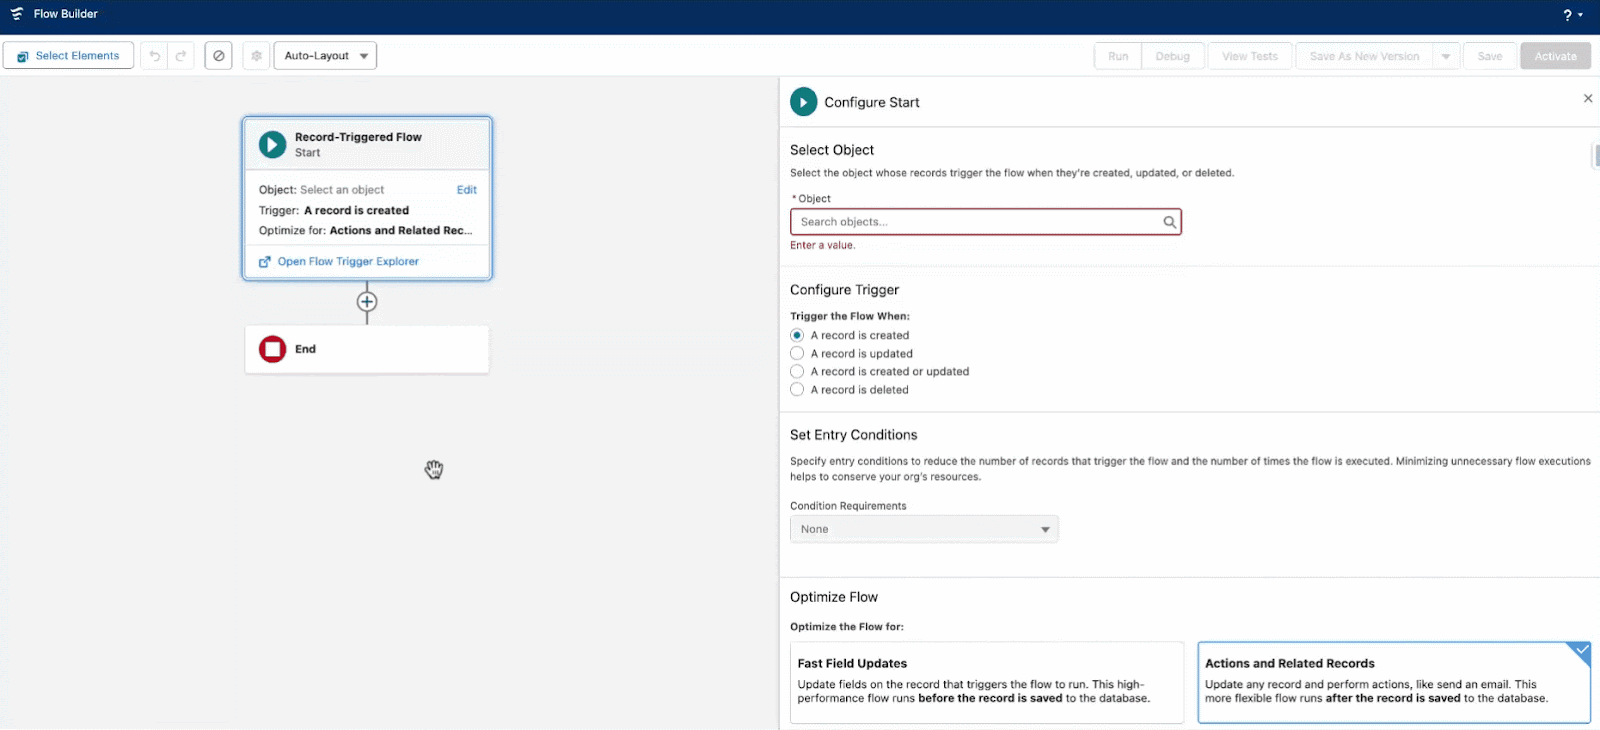
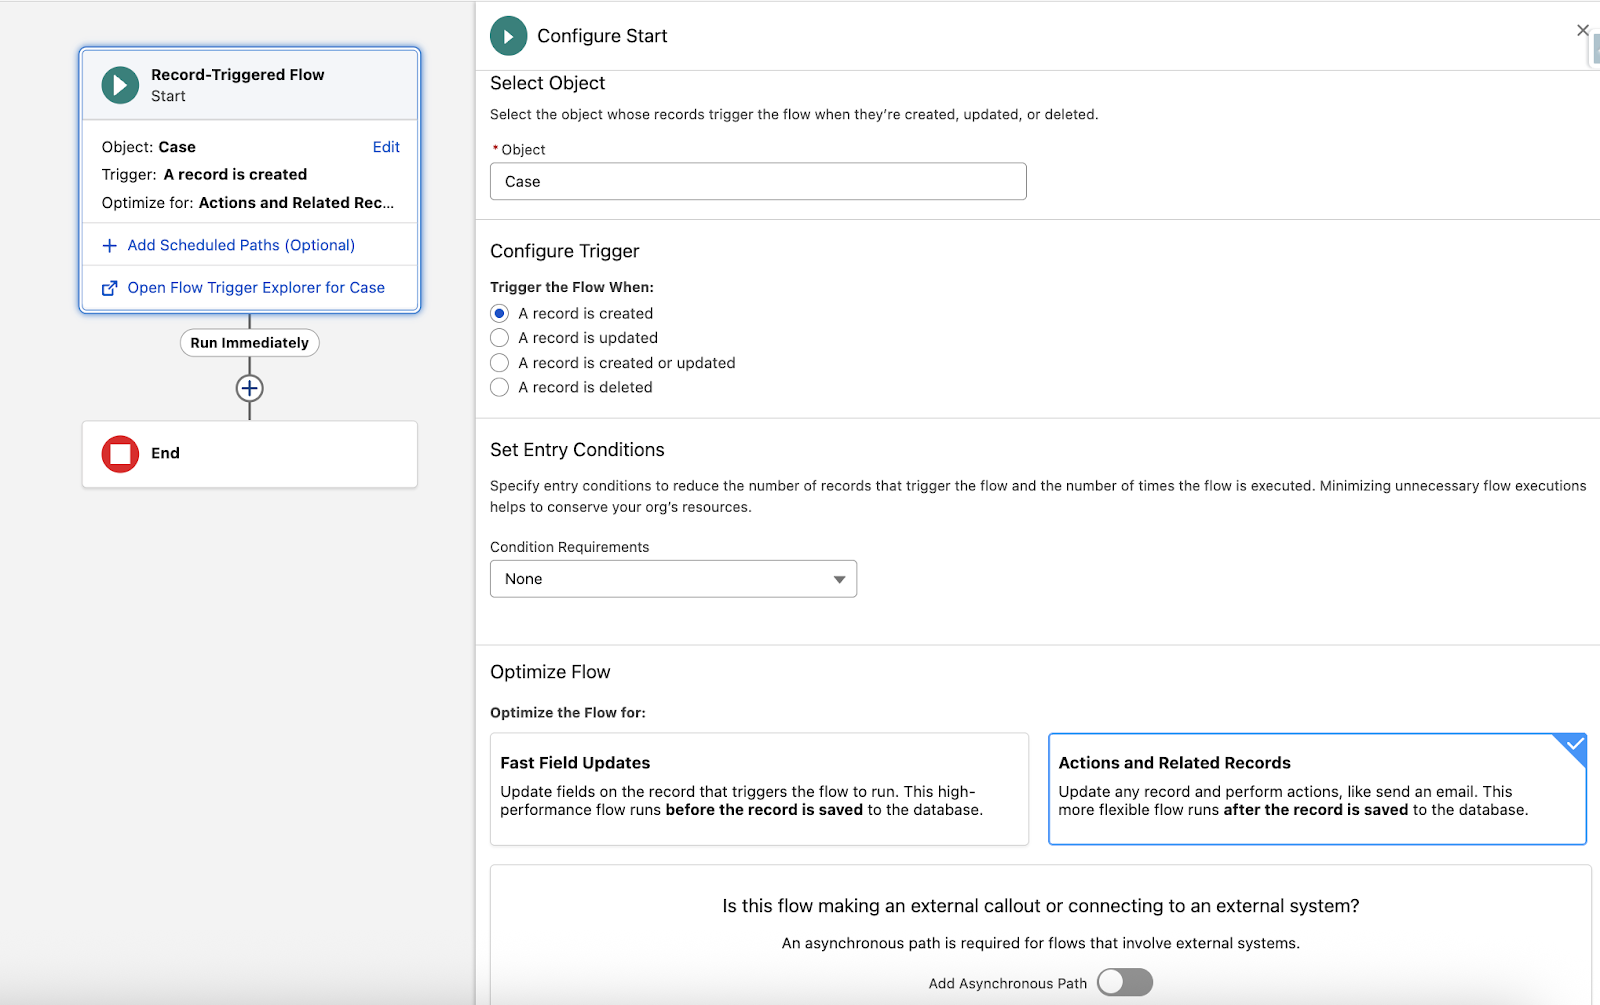
2. Record-Triggered Flow
What it does: It fires automatically when a record is created, updated, or deleted, to automate processes related to the record or related records.
How can it be triggered: Record creation or change in the database.
Perhaps the most widely used type of flow, record-triggered, is something that most Salesforce admins already use every day. As the name suggests, this automation will start automatically based on ‘something’ happening to a Salesforce record. Be it a standard (with some exceptions!) or a custom object, this type of flow can be set to trigger upon record creation, update, both, or deletion.
It is recommended to set entry conditions for each of these flows in order to prevent the flow run from being triggered by all records. Additionally, record-triggered flows can be optimized for:
- Fast Field Updates: The automation will run BEFORE the record is saved, and can be used for same record updates.
- Actions and Related Records: The automation will run AFTER the record is saved, and can be used for updating related records, sending emails, and more.
When selecting a record-triggered flow, make sure to carefully consider its purpose and choose the best option from both a use case and a performance perspective.
Record-triggered flows also allow for scheduled and asynchronous paths – ideal for a wide array of scenarios, which may even include callouts to external systems.
3. Schedule-Triggered Flow
What it does: It offers admins a way to evaluate records on a cadence and conduct database operations such as updates or deletions.
How can it be triggered: Time-based recurrence, which can be once, daily, or weekly.
Have you considered automating user deactivation in your org to free up licenses? This is a perfect example of a use case that was made for Schedule-Triggered Flows. Since the automation can be set to run at predefined intervals – and will run once for each record – it can get going in a matter of minutes and can be built as you would for one record, without needing to loop through a collection in this case.
Within this type of flow, you can use any of the CRUD elements, Actions, or even Wait elements if needed. Keep in mind that the fact that one interview is created for each record can be a good or a bad thing as well: the limit per 24 hours is currently set at 250K, or 200 times your license count if it’s greater.

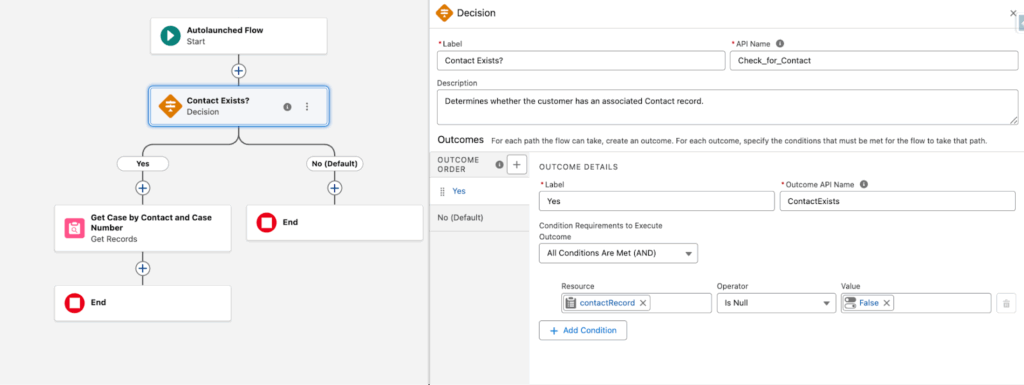
4. Autolaunched Flow
What it does: A background automation that runs without user interaction.
How can it be triggered: Apex, another Flow, REST API, Agent Action, or a button.
This type of flow can query records and conduct all the available database operations, such as record creation or even deletion. Autolaunched flows run fully in the background and have to be invoked by another process or integration in order to fire.
Nowadays, Salesforce professionals should become more familiar with Autolaunched Flows as they can easily empower Agentforce Agents to perform actions in Salesforce.
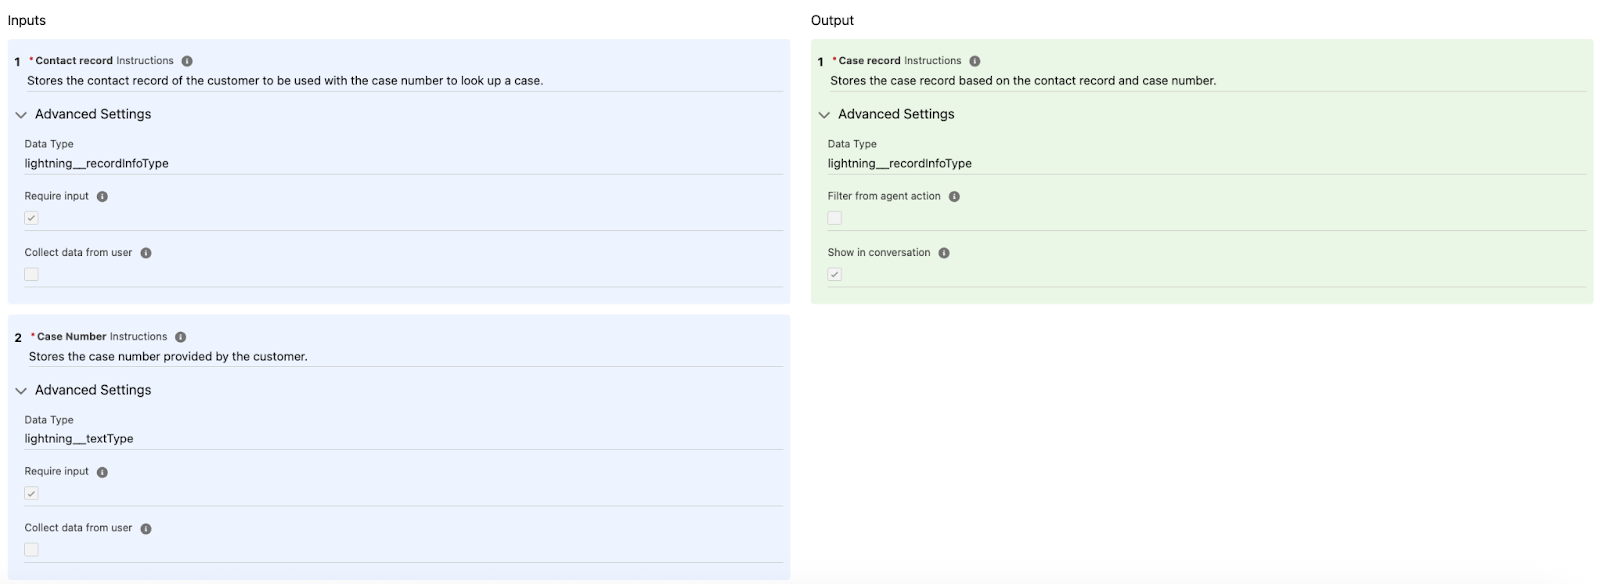
If you’re beginning your Agentforce journey, it may be worth exploring the standard actions that use Flows, since you can see the Flow, each of the steps, how the input and output variables are set up, as well as the details and descriptions for each.
For example, the Get Case by Case Number autolaunched flow below requires the contactRecord and caseNumber from the Agent (defined within the Agent action), then retrieves the caseRecord to pass on. Of course, there are a myriad of use cases you could consider, and Agent actions are just one of them!
5. Subflow
What it does: It allows admins to create reusable automation blocks that can be called from multiple other flows.
How can it be triggered: Invoked by a parent flow.
Example: Common address validation used in multiple processes.
Reusable building blocks can certainly make maintenance a breeze, and that is exactly the sort of option Subflows brings to the table. Have you ever found yourself repeating the same logic across multiple automations? If so, Subflows are what you have been looking for.
Subflow is not exactly a type of flow, but it allows you to think differently about Autolaunched Flows and Screen Flows, since both of these can be used within a Subflow element. Yes, this means even existing Flows can become Subflows, as long as you account for the input parameters needed. Cool, right?
One gap you might notice as you’re starting to use Subflows is that the element is not available for selection within flows that are set to run before the record is saved.
Note: If you’d like to see this improvement happen, make sure to upvote this idea.
6. Platform Event–Triggered Flow
What it does: Supports event-driven architectures by allowing admins to control subsequent automations based on platform events.
How can it be triggered: Starts when a platform event message is received.
Using Platform Events within your Salesforce implementations and integrations can easily become a performance game-changer, unlocking new automation possibilities – especially related to third-party integration.
While you can use Salesforce Flows to create Platform Events similar to how you would another record, did you know that you can have Flows listening for them as well?
The Platform Event-Triggered Flow does exactly that. It reacts to a platform event message being published, irrespective of where it’s coming from. It could be another Salesforce automation creating it, but it might as well be an external system sending an event when a shipment is received or an order fulfilled.
Once the event is selected, it’s a matter of adding other flow components to achieve the desired behavior, such as sending a notification.

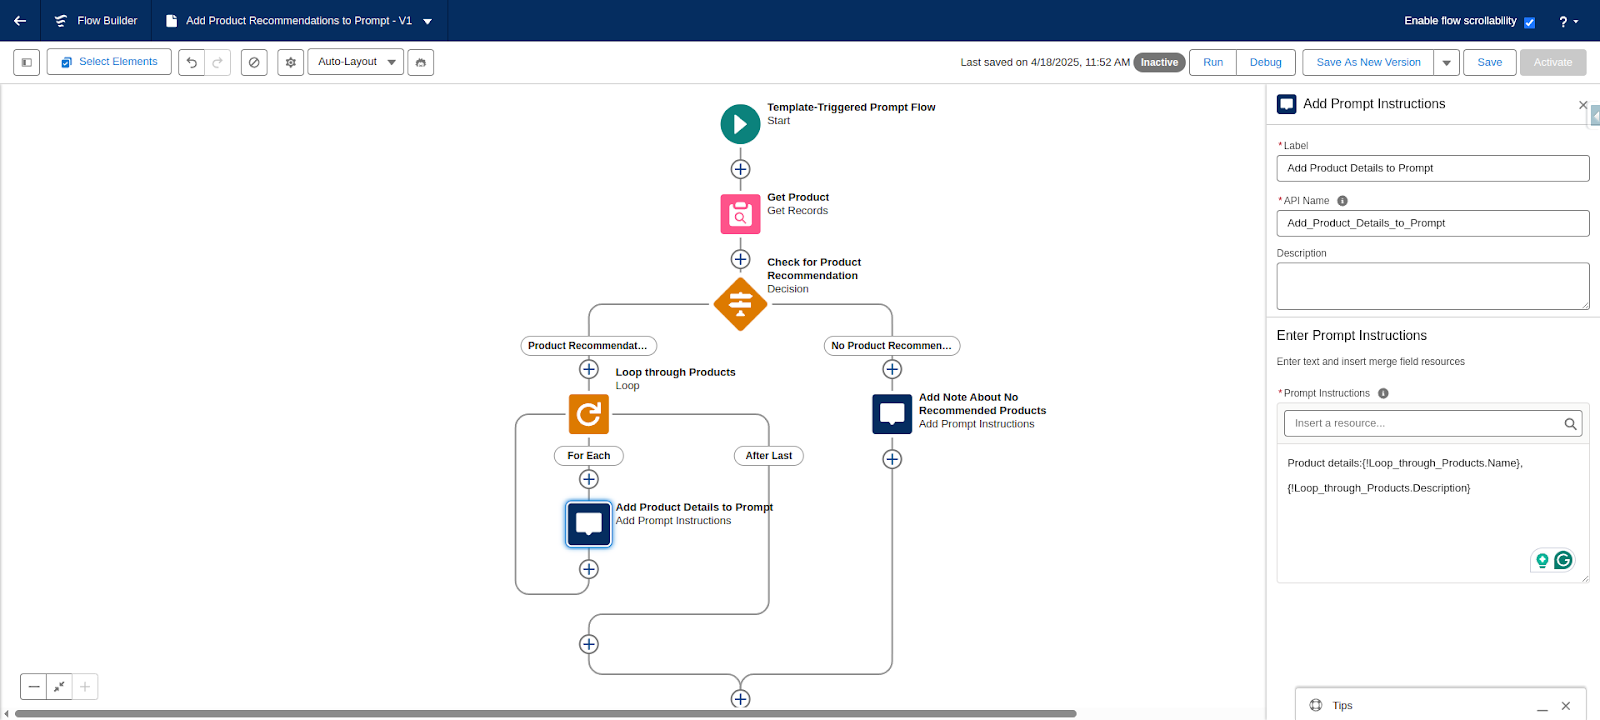
7. Template-Triggered Prompt Flow
What it does: It empowers admins to create a more robust grounding logic for their Prompt Templates.
How can it be triggered: From a Prompt Template.
AI and automation within Salesforce go hand in hand, so it shouldn’t be a surprise that there is a specific type of flow that offers professionals a deterministic layer for their prompt templates.
The Template-Triggered Prompt Flow will be responsible for sending the LLM accurate information about your Salesforce records, based on the criteria or logic you define within the flow. Through the use of the Add Prompt Instructions Element, the additional information can be included for the LLM to then process.
These instructions will be appended within the prompt template, based on where you referenced the flow.
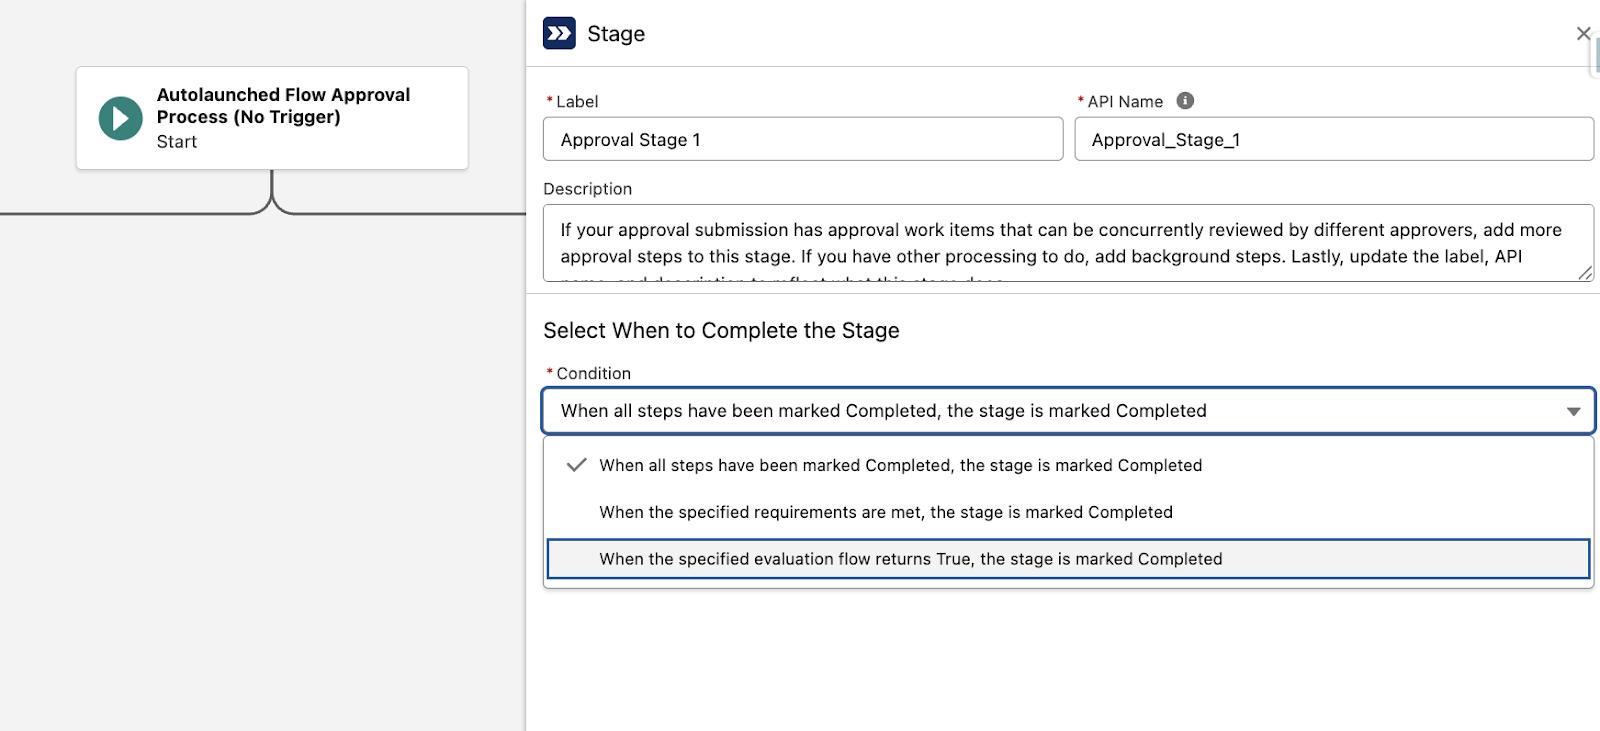
8. Approval Flows
What it does: It allows admins to tailor complex Approval Processes directly within Flow Builder.
How can they be triggered: Record meets the criteria for an approval process upon creation or update (record-triggered), or are invoked from custom buttons/links, REST API, and Apex (autolaunched).
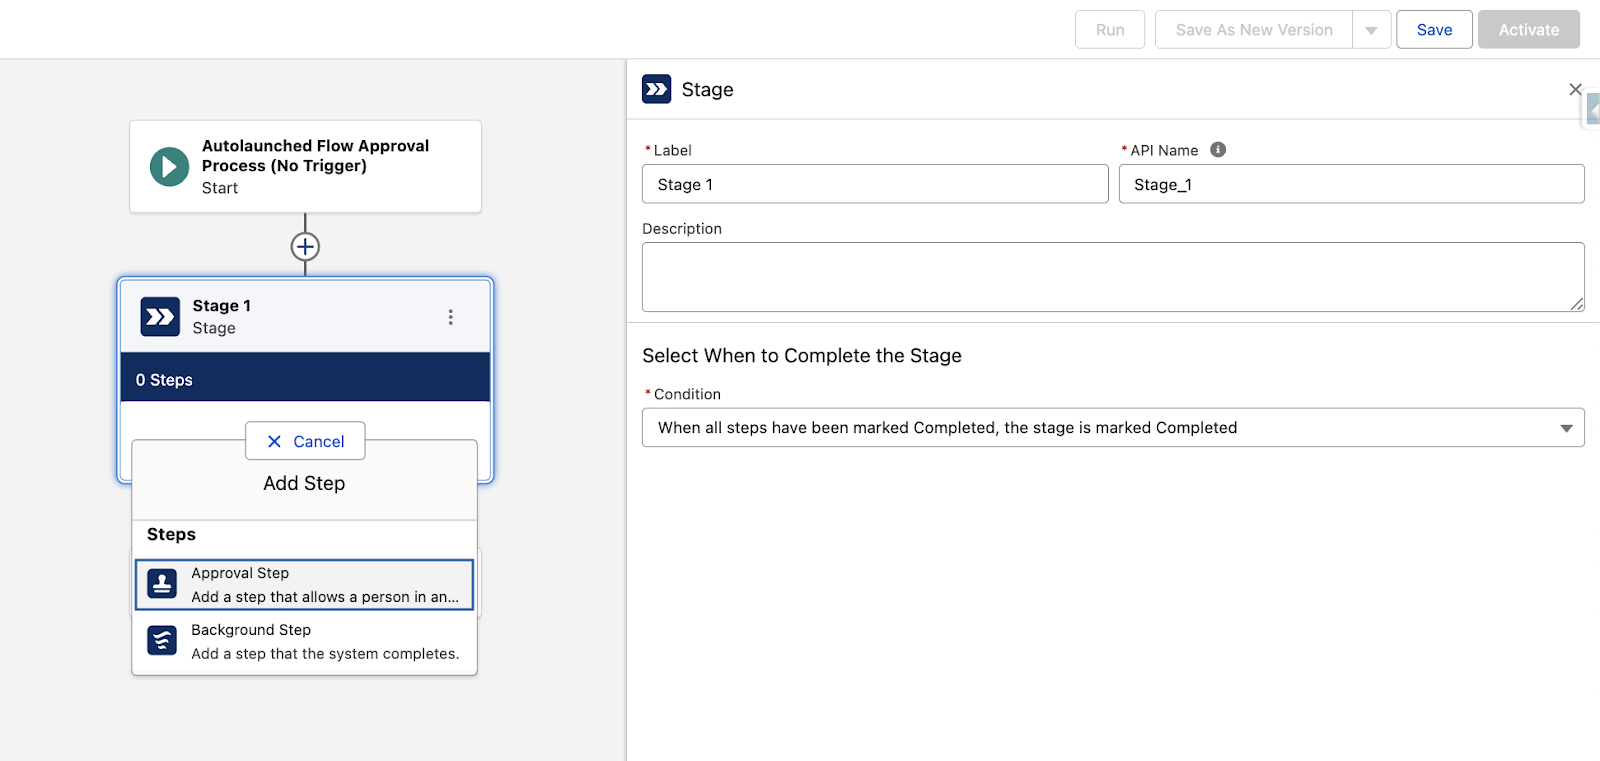
Flow Approval Processes are still a fairly new functionality, which leverages the flow orchestration capabilities to empower admins to create any type of approval process they need. Be it a simple one-step approval for new Opportunities, or a multi-step, multi-user, and multi-level Quote approval, flow approval processes could become the new go-to for this task.
There are two available Approval Flow types, based on the direction your requirement asks for:
- Autolaunched Flow Approval Process (No trigger).
- Record-Triggered Flow Approval Process.
Irrespective of the way the approval process is to be triggered, one thing is for certain: you will have to start creating one or more Stages, use Decision Elements if needed, and for each Stage, account for the interactive and background steps.
One thing to keep in mind is that interactive steps need an active Screen Flow, while background steps will leverage an active autolaunched flow. This way, you have full flexibility over how the approval journey should happen.
9. Flow Orchestration
What it does: It coordinates multiple flows in a sequence.
How can it be triggered: Record creation, update, or delete (record-triggered) or invoked from Apex, REST API or another flow (autolaunched).
Before the above-mentioned Flow Approvals, there was the Flow Orchestration. Unlike Flow Approvals, Flow Orchestration used to have an associated consumption to consider and the individual Stages can contain interactive steps (Screen Flows), background steps (Autolaunched Flows) as well as MuleSoft steps, which run asynchronously. Since Flow Orchestrations no longer incur an additional cost (as of February 2026), it may be time to re-evaluate if and where they can fit within your Flow strategy.
Flow Orchestration is ideal to use when a multi-step process should be implemented and orchestrated in such a way that multiple users have to share input or complete a different action, alongside automated updates based on their actions.

10. Evaluation Flow
What it does: Can be used for Flow Approval Orchestrations or Flow Orchestrations Stages to determine that conditions are met before the orchestration continues.
How can it be triggered: From a Flow Approval process or Flow Orchestration.
Evaluation Flows are a specific type of autolaunched flows which can be used to determine when an orchestration Stage is marked as Complete. Using this type of flow can offer you another level of flexibility, which may not be achievable through the other two available options.
Luckily, when selecting this option, you don’t even have to worry about setting variables in the orchestration – the predefined isOrchestrationConditionMet will be evaluated, and if it returns True, the Stage will be completed and the orchestration will proceed as intended.
11. Field Service Mobile Flow
What it does: Screen Flow optimized for the Field Service Mobile app.
How can it be triggered: Manually launched in the Field Service Mobile app.
While this can be considered just another Screen Flow, the Field Service Mobile app requires this type of flow to be used to customize the experience. For example, such a flow may come in handy if you’d like your technicians to have a guided checklist while on the go.
The Field Service Mobile Flows are specifically optimized for the mobile app, but also have plenty of considerations in comparison to Screen Flows you may have created for other requirements.
12. Contact Request Flow
What it does: Screen Flow to capture contact requests in public-facing Experience Cloud sites.
How can it be triggered: Manual, based on an authenticated or unauthenticated user clicking the Contact Request button.
Even if this flow may seem like a normal Screen Flow (and that’s because it sort of is!), you need to select the Contact Request Flow Type in order to make the most out of the functionality within Experience Cloud. When editing a site within the builder, active Contact Request Flows will become available for selection for the Contact Request Button and Flow component.
When external users click this button, they will be presented with a Screen Flow, which will require the information you set up on the screen. Once completed, a contact request record will be created to be handled by the internal team. Ultimately, the button can represent whatever you need – a contact form, a support request, or another variation of the request your team may need.

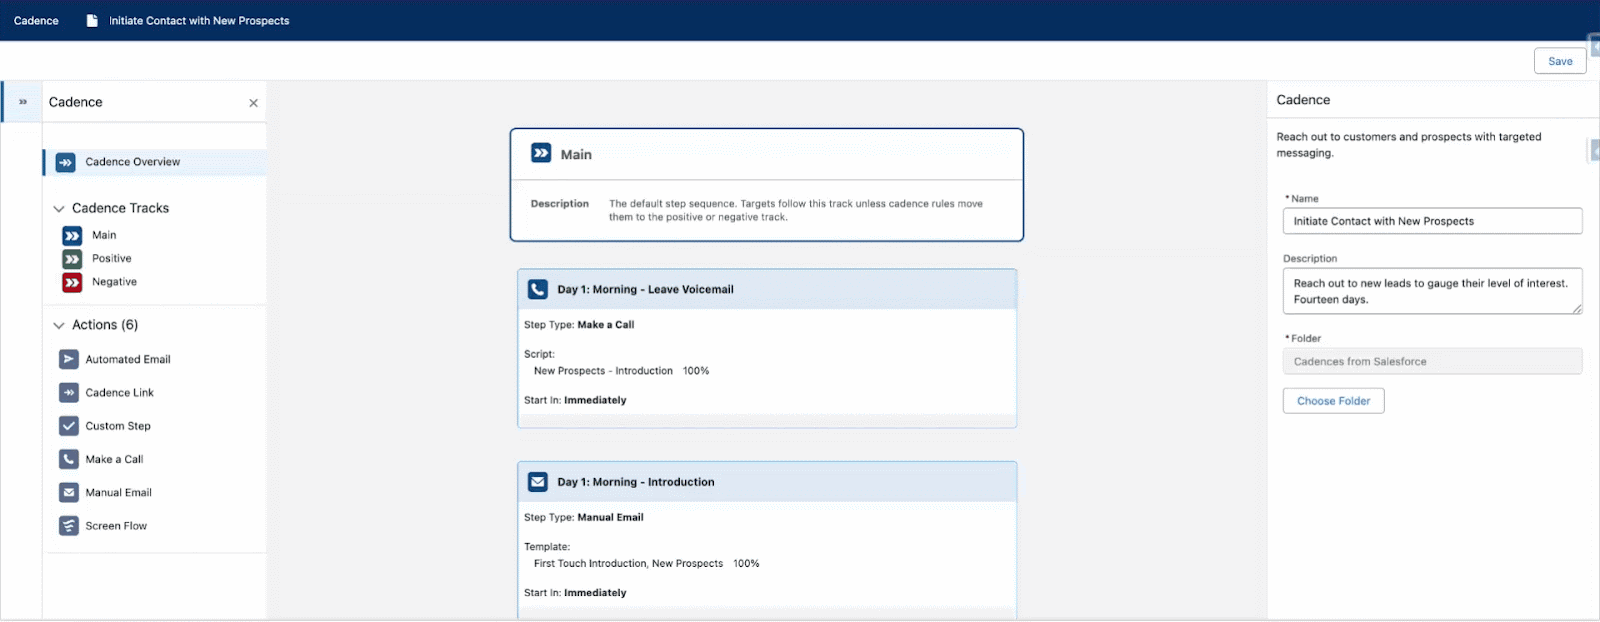
13. Cadence Step Flow
What it does: Sales Engagement-specific Screen Flows, which can be used within Cadence Builder to enhance Cadences.
How can it be triggered: Manually launched by users from the Work Queue or from the dedicated record component.
Sales Engagement cadences allow your sales team to predefine different steps they need to take when engaging with prospects. Records can easily be added to these sequences of activities, ensuring that all steps are followed when they should and that the team is consistent in their approach.
On top of the readily available actions within Cadence Builder, admins can create Cadence Step Flows, which are yet another kind of Screen Flow, which will allow the team to access it at an established point within the cadence.
Out of the box, Sales Engagement includes three templates using this flow type:
- Create a Task
- Create a Case
- Create an Event
Final Thoughts
While having this many options can initially seem overwhelming (and there are a few more!), each type of flow has its purpose and ideal use case. Knowing when to use each of them, as well as how to combine them in a way that makes your automations easy to maintain, should be the priority for any Salesforce professional building on the platform.
Salesforce Flows are a powerful automation tool with many advanced capabilities, and selecting the right flow type is one of the most important decisions towards a successful implementation. Have you used all of the flow types listed above? Let us know in the comments below!