

Mailability Flags clearly show who can, or can’t, be contacted by marketing emails. Visibility into communication preferences on Salesforce records helps to link up what’s going on in your marketing automation platform (Pardot, Marketing Cloud, etc.) giving a clear indication to more teams across the organization (e.g. sales, service, or finance).
Display a colored flag icon on the Lead or Contact record in Salesforce – it’s simple, but effective. This guide will show you how to create it, examples to try out, and some tips to make the most of this hack.
Step 1: Create a Salesforce Formula Field to Show a Flag
This type of Salesforce formula field displays an image when conditions are met – in this case, either a red, orange or green flag will display according to the subscriber’s preferences.
If you feel lost with the process to create a formula field, you may find the guide below useful for additional context:
- In Salesforce setup, go to the Object Manager, and search for Leads. Go to Fields and Relationships, and click the New button.

- Select Formula from the list of field types. Choose the output type: Text.
Step 2: Plan Out Your Flags
In order to build your formula, you will need a clear idea of which checkbox fields you will be using, and what combination of fields checked/uncheck will show the red, orange, green flags.
The below is an example to get you started with to show:
- Green flag: When the subscriber is not opted out, and not marked as Do Not Email (Pardot mailability status = Mailable).
- Orange flag: When the Lead is opted-out, but is not marked as Do Not Email (Pardot mailability status = Transactional Emails Only).
- Red flag: When the Lead is marked as Do Not Email or an email has bounced when sent to the subscriber (Pardot mailability status = Transactional Emails Only or Undeliverable).
Note: Do Not Email (Pardot field) is not mapped to Salesforce by default. In the examples, you will see I’ve referenced a custom field (appended with __c).
Here’s a breakdown of the formula:
- Line 1:
IF
(HasOptedOutOfEmail = TRUE && Pardot_Hard_Bounced = TRUE,
IMAGE(“/img/samples/flag_red.gif”, “Red Flag”),
If Email Opt Out is true (checked), and Pardot Hard Bounced is true (checked) → then show the RED flag.
- Line 2:
IF
(HasOptedOutOfEmail = TRUE && Do_Not_Mail__c = FALSE,
IMAGE(“/img/samples/flag_yellow.gif”,”Yellow Flag”),
If Email Opt Out is true (checked), but Do Not Email is false (unchecked) → then show the YELLOW flag.
- Line 3:
IMAGE(“/img/samples/flag_green.gif”,”Green Flag”)))
Otherwise, show the green flag.
Step 3: Formula Editor
On the next screen in the formula field set up, go ahead and paste the complete formula into the box:
IF

(HasOptedOutOfEmail = TRUE && Do_Not_Mail__c = TRUE,

IIF
(HasOptedOutOfEmail = TRUE && Pardot_Hard_Bounced = TRUE,
IMAGE(“/img/samples/flag_red.gif”, “Red Flag”),

IF
(HasOptedOutOfEmail = TRUE && Do_Not_Mail__c = FALSE,
IMAGE(“/img/samples/flag_yellow.gif”,”Yellow Flag”),

IMAGE("/img/samples/flag_green.gif","Green Flag")))
Step 4: Check Syntax
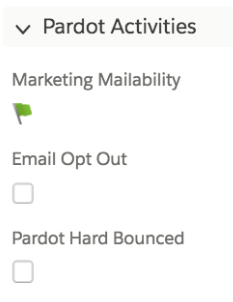
Click Check Syntax to check your formula is using the correct field names and is formatted correctly. Once you save, your overview screen will look something like this:

Don’t forget to repeat the steps above for the Contact, and/or Person Account object.
Further Example Mailability Flag Formulas
- Transactional emails only: Account Engagement will not allow marketing emails to be sent when either the Do Not Email or Opted Out checkboxes are checked – they can only receive operational emails. This is useful for business functions such as Service Teams or Finance that are under obligation to contact customers in certain instances, think invoicing, critical updates, service outage, etc.
- Managing multiple channels: With more channels than email to consider, you can extend mailability fields to phone call, SMS, physical mail, etc.
- Tracking confirmed opt-in: Also known as double opt-in, this request asks that subscribers confirm their consent twice. The double opt-in setup requires two checkboxes which means that there’s a chance that subscribers stay in a ‘pending’ status – an orange flag is ideal to highlight this.
- Verified email address: You may decide to use a third party email verification service to identify invalid email addresses and, ultimately, keep a clean marketing database.
Implementation Tips
1. Visibility On the Record Page
When you went through the formula field setup steps, you would have come across field-level security (which determines who can see the field) – so check that the relevant audiences can see the field.
Adding the field to the page layout is a given – but have you considered moving it to a more prominent position? Take advantage of the Highlights Panel which holds the fields your organization considers the most important:

2. Make Fields Uneditable
Formula fields are not editable, which makes sense because their values are determined by the formula. Other fields can be editable for users. Audit who has editing rights on preference fields such as Do Not Email, Email Opt-Out, etc.
3. Test Each Scenario
Test each combination of field values and cross-reference the color flag which appears alongside what you would expect. It’s easy to get tripped up, so I find mapping each field and True/False combinations in a spreadsheet ensures that I systematically cover all scenarios.
4. Add Help Text
Add help text and a description when you create the formula fields. A description is for admins’ information in the back-end. Help text is for users and will appear by hovering over the icon next to the field. Keep in mind when you are writing help text to keep it relevant and clear for each audience.
Some example help text for users: When the flag is red, this contact cannot be emailed by marketing. The contact has either opted out (unsubscribed), or caused a hard bounce (email does not exist/deactivated).
5. Spread the Word
In addition to adding help text, set up user training sessions that include other teams in the organization; don’t fall into the mindset that mailability should only be for marketing!
Summary
Mailability Flags clearly show who can, or can’t, be contacted by marketing emails. Visibility into communication preferences on Salesforce records helps to link up what’s going on in your marketing automation platform (Pardot, Marketing Cloud, etc.) giving a clear indication to more teams across the organization (e.g. sales, service, or finance).
Display a colored flag icon on the Lead or Contact record in Salesforce – it’s simple, but effective. This guide has shown you how to create it, examples to try out, and some tips to make the most of this hack.

Comments: