

Campaign Approval Processes are a popular request, especially those marketers using Pardot. There is no approval functionality available for Pardot campaigns, but luckily we have options now that Salesforce Connected campaigns have aligned Pardot marketing activities with Salesforce campaigns. So, this is the perfect time to raise our hands with this solution!
Running Campaigns can be a huge cost to your company. You want to make sure you’re getting as high an ROI as possible for every campaign you run, which means monitoring costs to control budget spend. Especially with in-person events, those expenses can rack up fast! Another great example is content approval, to ensure you have a consistent brand voice across all collateral. Both of these examples need a second, third opinion in the business in order to progress the campaign planning to the next stage.
Salesforce Campaigns (being a Salesforce object), can leverage Salesforce Approval processes. In this tutorial, I am going to show you how to implement your own campaign approval process.
Ps: I recently wrote How to Build Salesforce Approval Process End to End, which I recommend you check out first, because I’ll be referencing some of the processes and best practices from that post.
Step 1: The Discovery
The most important part of an Approval Process building doesn’t actually happen in Salesforce. You’ll need to do some discovery work outside of Salesforce. I’m going to use the following example:
Donna Miller is the CMO at ReStoreD, a data storage and backup company. Every year, ReStoreD attends over two dozen events, of two types: trade shows, and hosted dinners. The Donna’s marketing team is always on the lookout for more events, since their customer base can span across all industries. When the marketing team comes across a new event, Donna would like for the team to submit a request for that new event. Donna would like to approve these through a chain of command, and in an orderly, repeatable fashion. She also needs a consistent information set so as not to have emails flying back and forth with questions. She needs to know:
- Date of the event
- Total cost of the event (booth + marketing materials)
- Expected Number of attendees
- Target Industry of event
- City/State/Country of event
- Expected Number of employees needed
- Expected: booth visitors, number of deals, number of conversions, amount revenue
- Description of Event
Donna wants to receive all of this information via email, and then the event can be approved by these people, in this order: the Finance Manager, Events Manager, and herself, CMO (but only when the cost of the event is over $5,000.) The team only needs to approve live events, not any other type of Campaign.
This is all the information we need to get started!
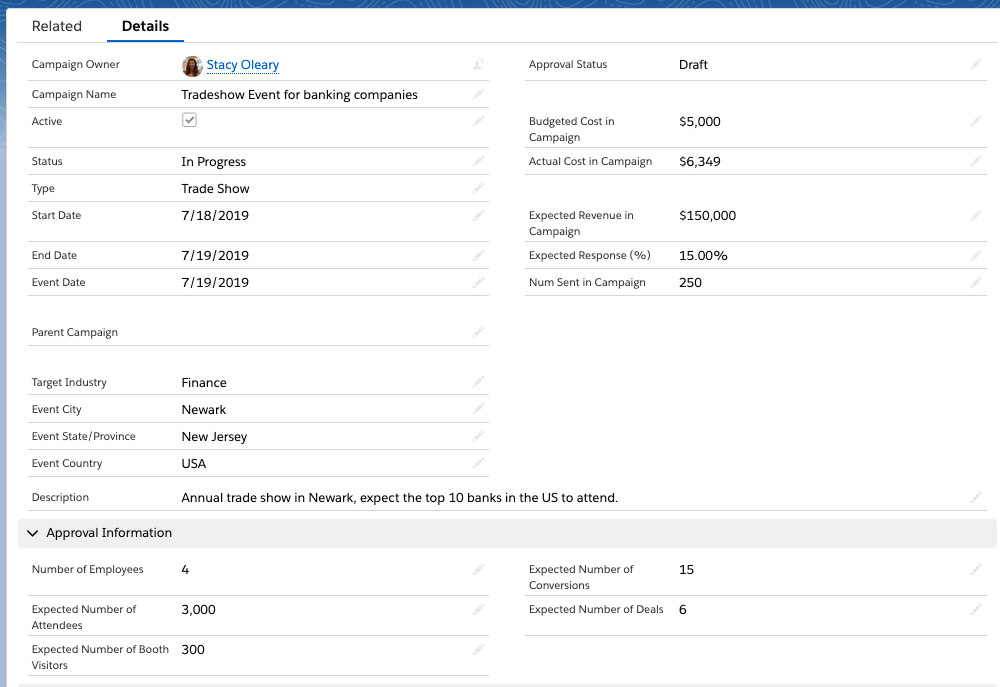
Step 2: Changes to the Campaign Object
Remember to always start building using a sandbox (copy of your live environment) first, before the production (‘live’) environment.
Before we can start building our Approval Process, we need to make some changes to the Campaign object, based on what Donna has asked for. Here’s the fields we need to create:
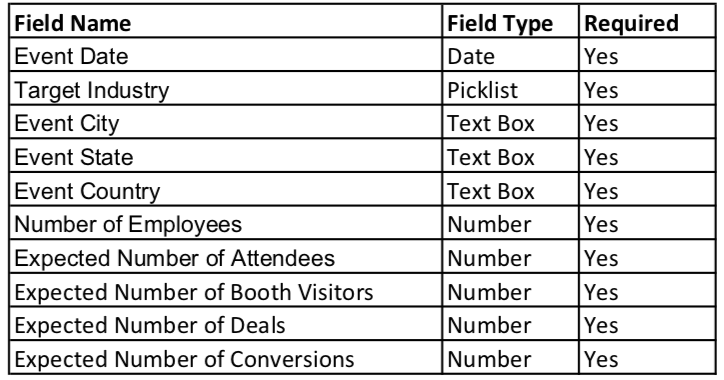
We’ll need to:
- Create these fields as custom fields
- Set some of the standard fields as required
- Adjust the page layout so that it makes sense to the user entering the data.
! Don’t forget to add “Approval Status” as a picklist, with values for Draft, Submitted, Approved, Denied, Recalled, with Draft being the default value.
Consider what should happen at every stage in the Approval Process. We’ll need to notify all the parties involved, as well as the initial submitter. So:
- create email templates for the following actions:

Step 3: Create the Approval Process
Now we are really ready to start building out our approval process!
This is an overview of the terms you’ll encounter, and how they work together:

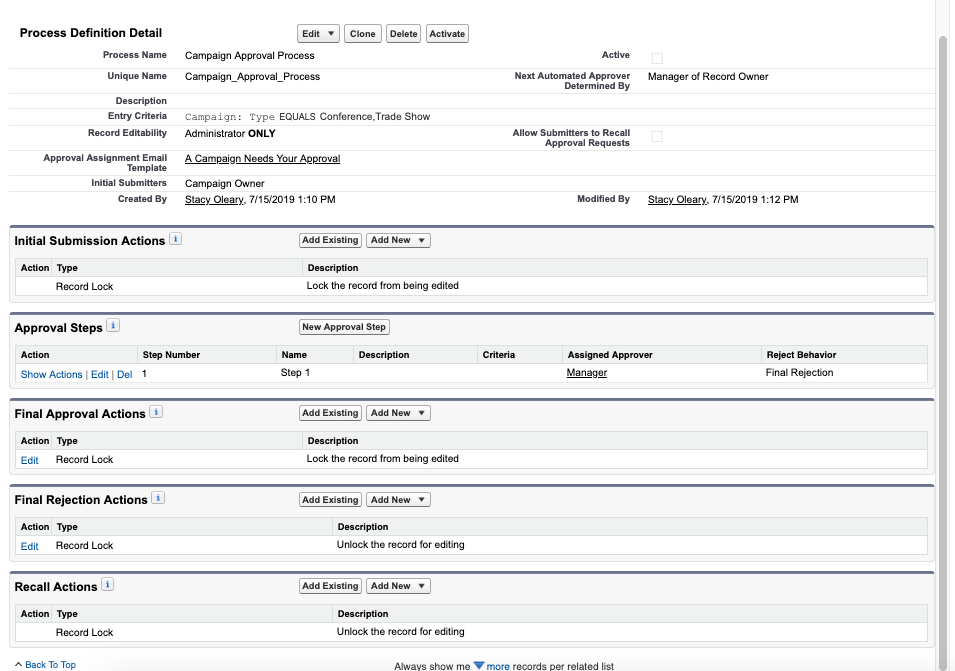
Go to Setup -> Approval Process. Select “Campaigns”, and create a new Approval Process, using the standard setup wizard.
- Name your Approval Process
- Specify entry criteria – What is the minimum criteria a record must have to enter the Approval Process? We don’t need a lot here, we’re already requiring pretty much everything on the page layout. We just want to add a single condition to mention that only “Trade Shows” or “Conference” campaign Types can be submitted for approval.
- Approver & Editability – who should be the default approver (if any) and who should be able to Edit this record, while it’s in the process.
- Approval Assignment Notification Template – use the “A Campaign Needs Your Approval” template we created earlier
- Approval Page Layout – when the manager goes to approve this record, which fields should they see on the page?
- Initial Submitters – who should be allowed to submit the record for approval?
When you get to the final page, just click “I’ll do this later”.
Step 4: Add the Notification Actions
Time for the fun part! We can start adding actions in each step of the process. Salesforce groups each step for you, and you can click “Add Existing” or “Add New” in each step.
If you aren’t sure what to do, a good thing to do now would be to step away from Salesforce for a moment and ask yourself, at each step, what should happen?
- When a Campaign is initially submitted, what should happen? Who should approve it?
- After that, what happens? Does someone else need to approve it?
- When a Campaign is approved, what should happen?
- When a Campaign is rejected, what should happen?
- When a Campaign is recalled, what should happen?
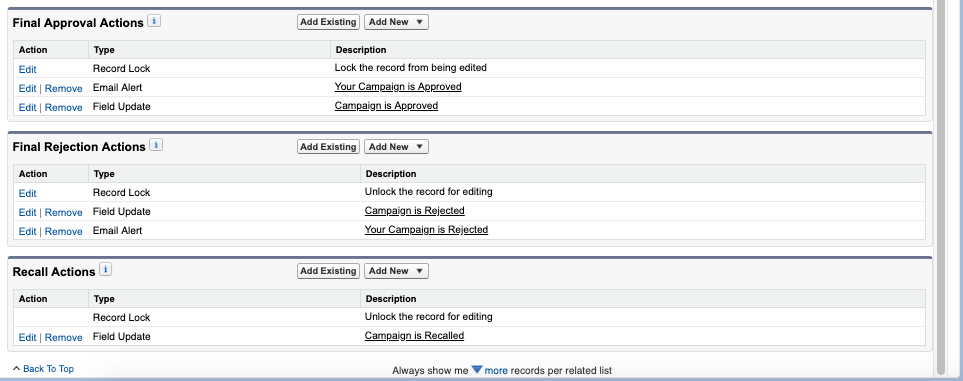
Figure out the answers to these questions, and you will know what to do in each step. For this example, all we really want to do is to keep the status updated accordingly, and notify the proper person via email.
For Initial Submission, Final Approval, Final Rejection, and Recall, this is easy – we only need to add a Field Update and Email alert.

Step 5: Add the Approval Steps
The Approval Steps, however, are the most important part. If you go back to our initial example, you’ll see what Donna, the CMO, said about approvals:
“the event can be approved by these people, in this order: the Finance Manager, Events Manager, and herself, CMO (but only when the cost of the event is over $5,000.”
So we need to add each person, in this order, and on the last person, Donna, an entry criteria of $5,000 cost.

That’s it! Campaign Approvals are no different than any other type of approval in Salesforce. They require a lot of planning, and can be intimidating. But, they’re actually pretty easy to build, as long as you do your prework. When you create an Approval Process in Salesforce, you are giving your users a scalable tool to they can use every day to increase accountability in your org.
Bonus Tips
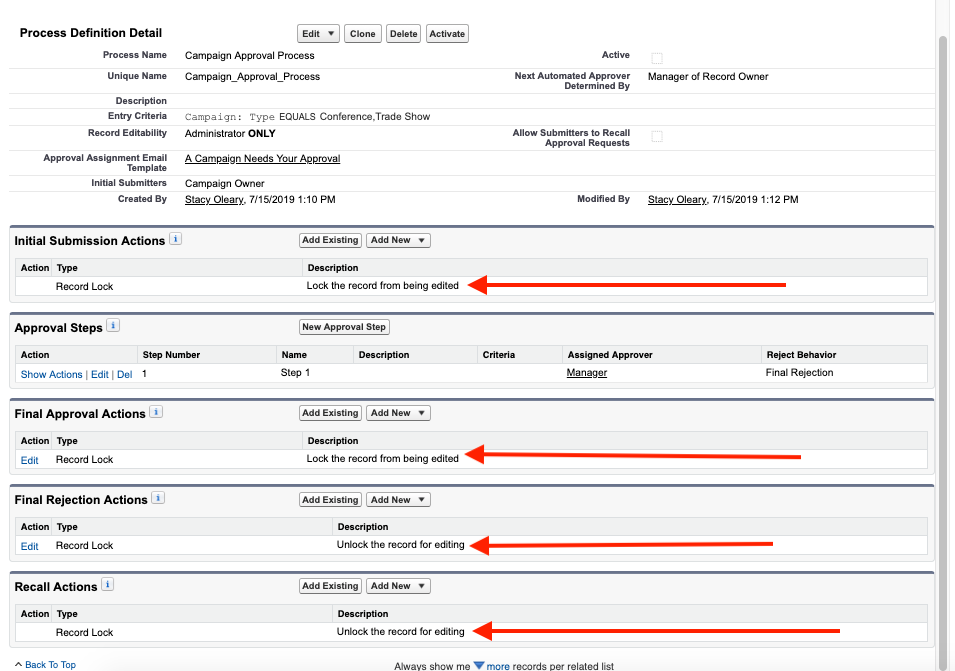
Tip #1: Record Locking
Eagle-eyed Admins may have noticed our record getting locked and unlocked at various steps. It’s not as scary as it sounds. A locked record is protected from editing. An unlocked record is open to editing.
You will have to decide what is best for your process. Once a record is approved, should the end user be allowed to edit it again? Every situation is different. The admin will be able to edit the record at any time, though. You could also use things like Validation Rules and Record Types to protect an unlocked record.
Tip #2: Entry Criteria vs Validation Rules
One of the biggest complaints I hear about Approval Processes is that the Entry Criteria, if they are not met, don’t explain which criteria is not met, or what is required.
This is easily fixed with validation rules, where you can directly control the error message. Something as simple as “Error: You may not submit a Campaign for any event over $20,000” will go a very long way toward helping your users, and saving you from having to answer constant emails about “Why won’t my Campaign submit??”
Tip #3: Record Types
Record Types and Approval Processes are BFFs!
Record Types are a great tool to be used in conjunction with the Approval Process. In this example, I might want to have three Record Types and use the Field Updates to adjust them as needed
- In-Person Campaign – Draft: I might use this for all Campaigns which will require approval, but are not approved. These would be unlocked, and all fields on the page layout are editable (except for Approval Status, of course)
- In-Person Campaign – Approved: I would use this Record Type for all campaigns that have been approved by the manager. This would be great if I need the marketing team to go back and add the results to the Campaign detail, but I don’t want them modifying the initial set of fields. I can leave certain fields open on the page layout, but leave the rest read-only. Then, I can have both an unlocked Campaign with protected initial data set.
- Digital Campaign: These do not need to be approved, so they would have a different page layout and no locking.
Always create, and aggressively test your Approval Processes in the Sandbox first. You may want to even list a set of scenarios, log in as a user, and test them out. Once you are confident that it works, you can upload it to Production.
Summary
Approval Processes in general are a useful tool, but I find that any time you have a situation where there is a specific, financial cost to your company (like a Free Trial, PoC, Campaign) they can be invaluable. Not only do they help you get a better ROI for these costs, but you’re getting a great ROI out of Salesforce as well.
