

Have you ever been forwarded a link to a form and it displays another person’s information? This can happen when an email with a link to a form is forwarded, or you share devices.
That’s where the ‘Not You’ link comes in. When the “Include “Not you?” link” Pardot form setting is enabled, a small link will appear under the email field. When a prospect clicks this, Pardot clears the data on the form so that the prospect can enter their own information.
Enabling this setting is best practice, otherwise, we will see the wrong data stored on the wrong records in Pardot.
This guide will cover how to add the ‘Not You?’ link to Pardot forms and show you how to translate it, too.
Add the ‘Not You?’ Link to Pardot Forms
- Go to the “Look and feel” step, and go to the Advanced tab.
- Check the “Include “Not you?” link to allow visitors to reset the form” setting.

Now, prospects will have the opportunity to change who is being tracked on their IP address. When a prospect submits a form their visitor records (i.e. browsing activity) are associated with their prospect record. This means you can relate their past and future browsing data on one record as they transfer from being unknown, to known. It’s important that the tracked activity for that IP is related to the correct prospect record.
Edit the ‘Not You?’ Link on Pardot Forms
Editing this small piece of text isn’t as straightforward as the rest of the form.
I first came across this requirement when an organization wanted forms in different languages. It’s a jarring user experience if the form is translated into one language, while this text remains in English.
All text can be modified on Pardot forms, at the form level, via the Form Wizard. You’ll be familiar with the ability to edit:
- Form field labels.
- Field description.
- Error message.
- Submit button text
- Above and below form content.


Except “[prospect email] “Not you?” Click Here”
You need to take a different route and make the change at the form template level.
- Open the form layout template your form is using. This is linked on the form summary page. Make a copy of the layout text so you don’t mess with any live forms.
- Take the Javascript code (found at the bottom of this guide) and paste it into a word doc.
- Replace two parts of the code with your translations, as shown below in yellow highlight.
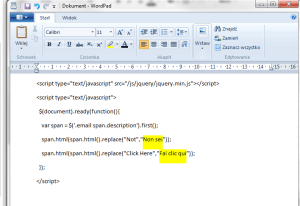
4. On the form layout template edit screen, paste the Javascript in between‘’ and ‘’ and save.

While this is a tedious exercise, create a layout template for each language. If you have some knowledge of CSS/HTML, you can seize the opportunity to resize your submit buttons (because they vary from language to language).
Finally, here’s the code:
<script type="text/javascript" src="/js/jquery/jquery.min.js"></script>

<script type="text/javascript">

  $(document).ready(function(){

    var span = $('.email span.description').first();

    span.html(span.html().replace("Not","Vous n’êtes pas"));

    span.html(span.html().replace("Click Here","Cliquez-ici"));

  });

</script>

Comments: