Custom report types enable you to create reports that go beyond the standard Salesforce report types. You can think of a Salesforce report type as a template/framework that tells Salesforce which objects and relationships to consider, and therefore which fields to make available in the report builder – like a magnifying glass on your whole Salesforce data model.
Salesforce provides us with a huge collection of standard report types out-of-the-box that can fulfil most business requirements. To report on more than two objects at a time, or to find ‘without’ relationships (eg. Contacts without Accounts) – these are common reasons why you will need to create a custom report type in Salesforce.
What is a Custom Report Type?
Custom report types in Salesforce enable you to create complex reports that go beyond the standard Salesforce report types.
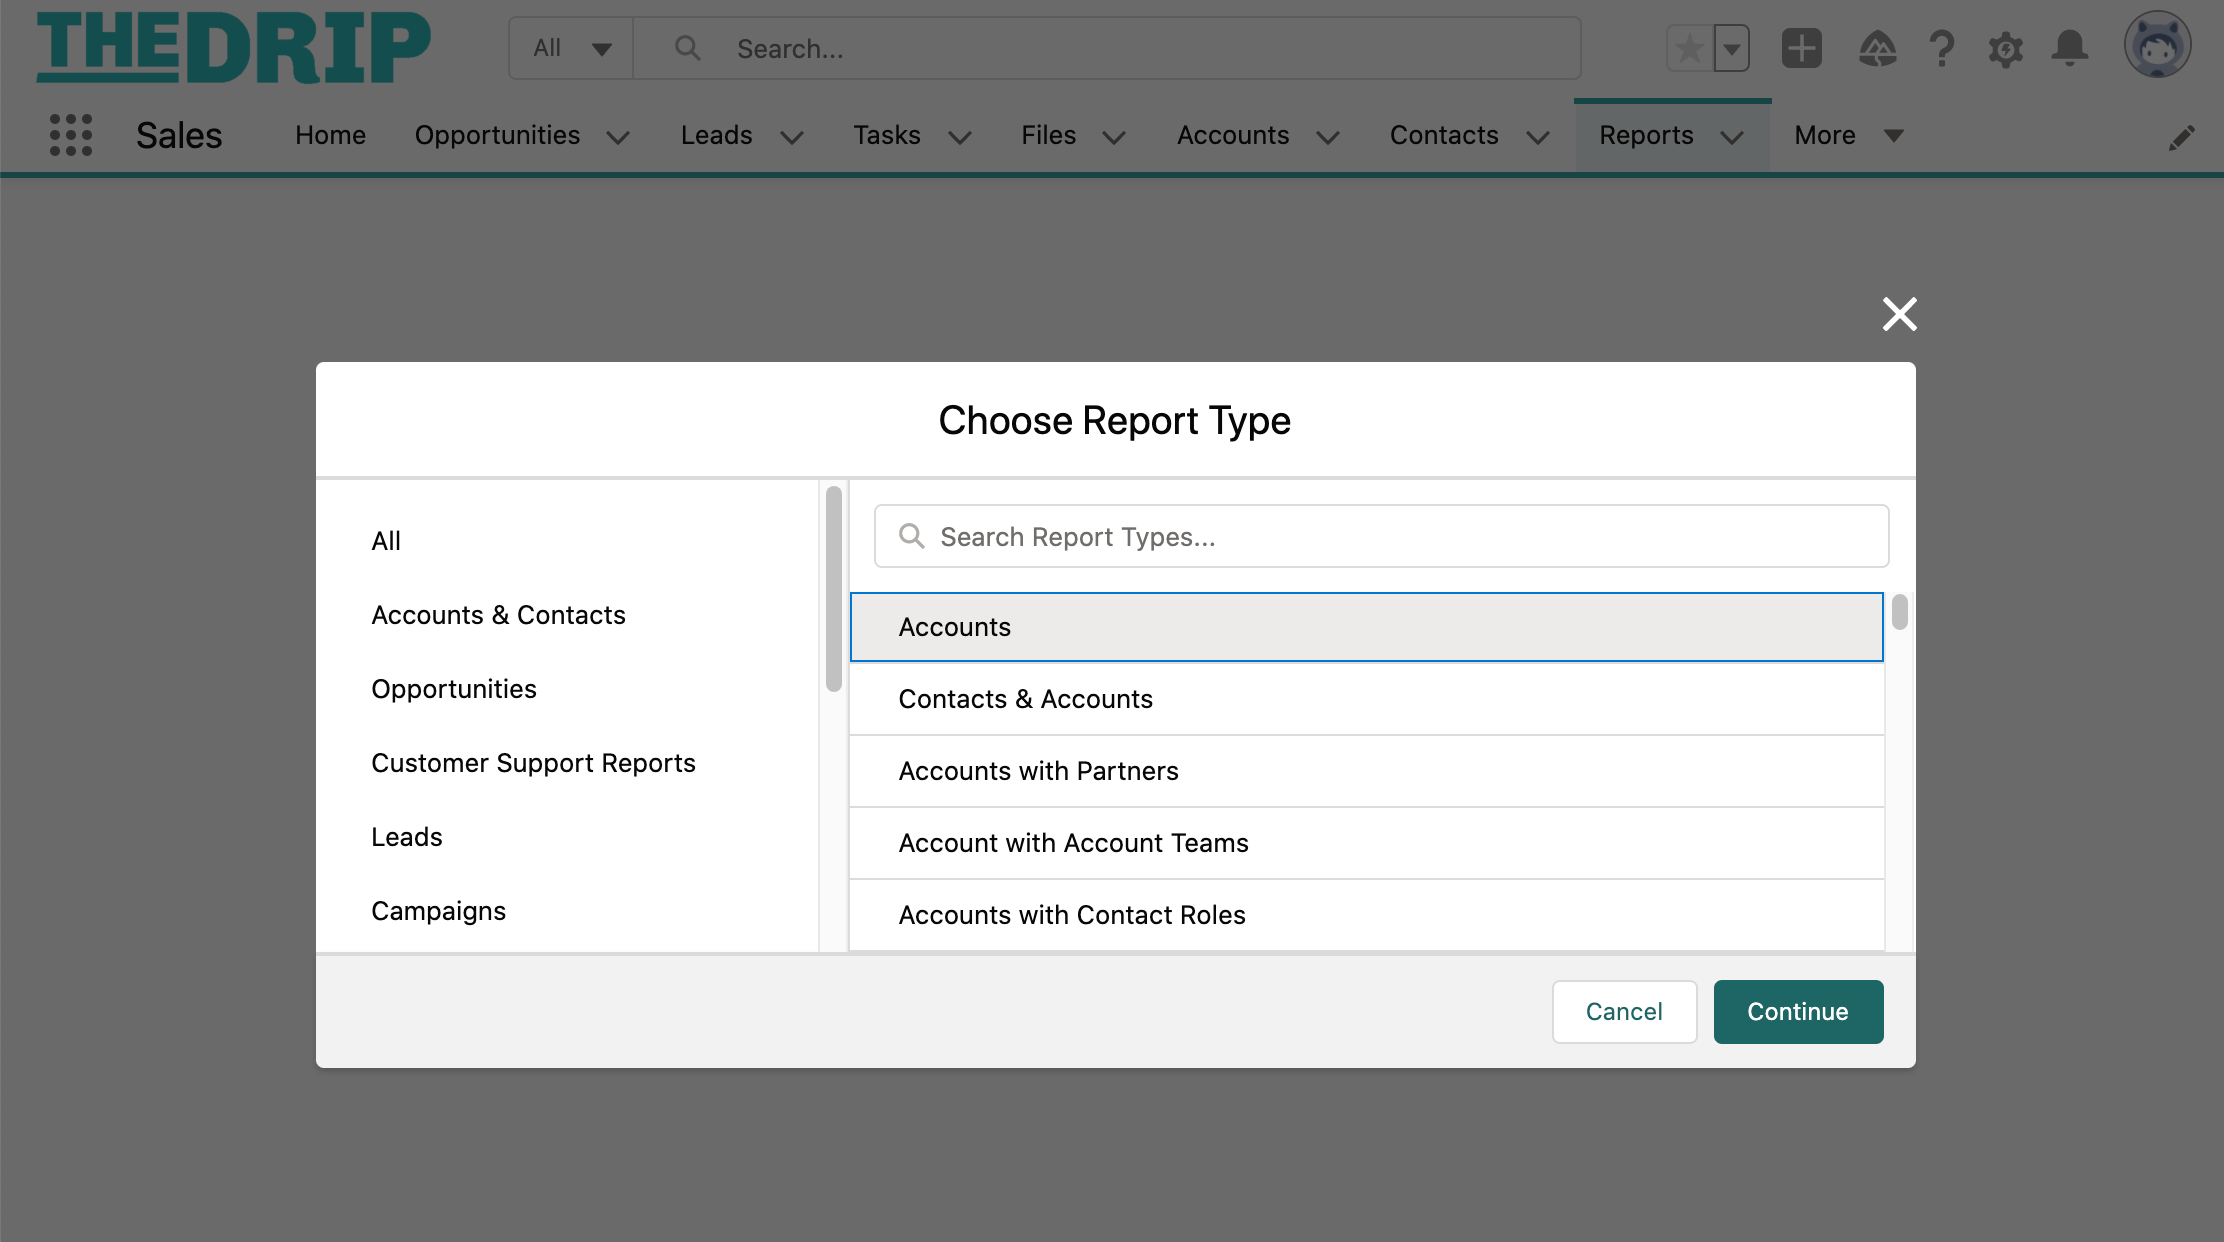
Salesforce comes with report types out-of-the-box for all standard objects and standard object relationships eg. “Contacts & Accounts” or “Opportunities with Products”. You can view a list of report types when creating a new report:


For the custom objects we build, Salesforce also creates report types automatically.
These report types have a “with” or “and” relationship, depending on whether the two objects have a Lookup or Master-detail relationship.
You may want to go beyond standard and auto-created report types – this is where custom report types come in.
When Should You Use a Custom Report Type?
Custom report types come in when you want to go beyond standard and auto-created report types. Great examples of when you would look to create a custom report type are if you need to:
- Report on more than two objects at a time?
- Report using ‘without’ a relationship (eg. Contacts without Accounts), instead of just a ‘with’ relationship?


The example custom report types that we will cover later will make the reasons why you need them even clearer!
How to Create a Custom Report Type
Creating a custom report type involves selecting the standard and custom objects you would like to include, and whether the parent object must have child records to be eligible for the report (which we will see later in the tutorial).
The high-level steps to create a custom report type are:
- Select the objects you would like to include in the report.
- Depending on the Primary object (Account in the example above), the wizard will show you its child objects. You can also report on grandchild objects, up to a total of 4 objects.
- You will notice that we can specify whether the object selected has to have related records to show up in the report. This is useful if you would like to pull a “without” report, eg. Accounts with & without Opportunities.
- Edit the report layout (which fields are included in the Report Builder, and where they are positioned). You can also set which fields should appear as report columns each time a user creates a new report.
Note: only Salesforce Administrators or users with the ‘Manage Custom Report Types’ permission can create custom report types, so check you have this before continuing.
Follow along using our interactive tutorial:
Examples of Salesforce Custom Report Types
1. Accounts With or Without Opportunities
By completing the interactive tutorial, you have successfully created this example. This report type will access account records that may or may not have related opportunities. The practical use would be for sales reps to identify accounts they haven’t targeted for a sale.
- Primary object: Accounts
- Store in Category: Accounts & Contacts
- Click to ‘relate to another object’: choose Opportunities.
- Select Each “A” record may or may not have related “B” records. (translation: accounts may or may not have related opportunities).


2. Contacts With Case Activities
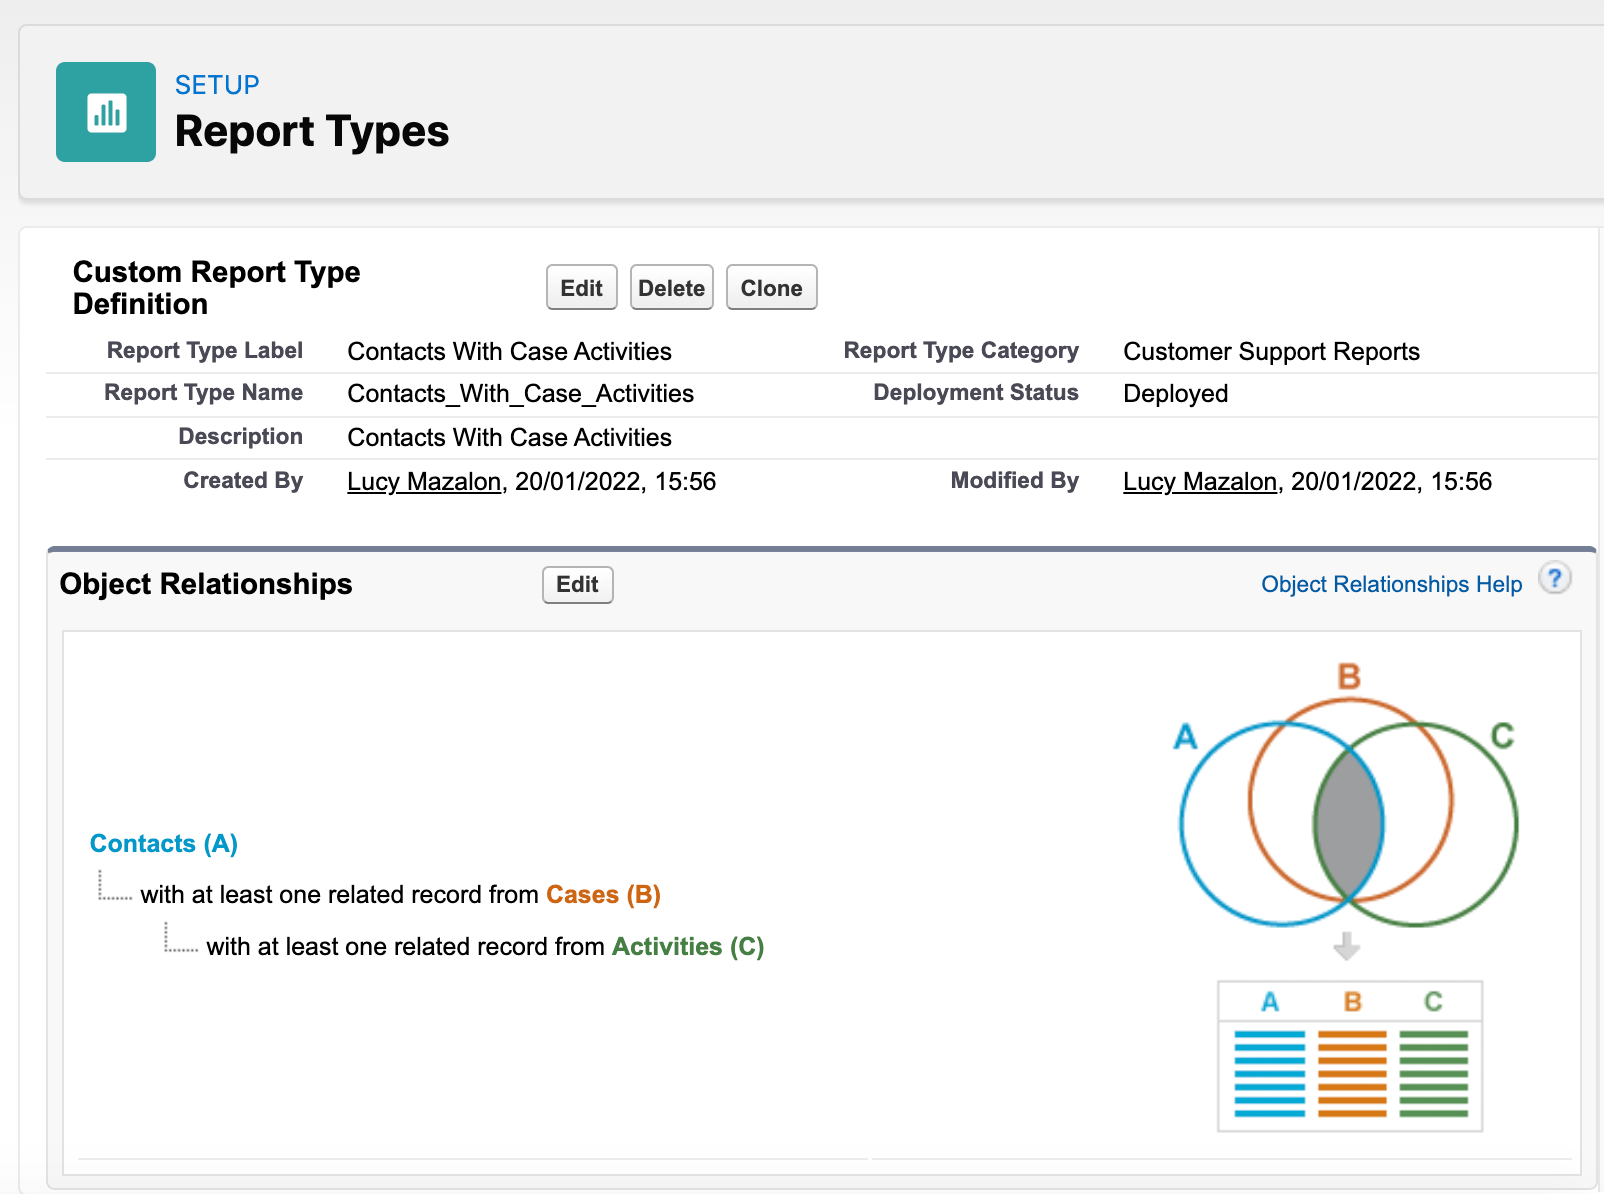
This report type will access contact records that have related cases, and those related cases have related activities. The practical use would be for either the sales or support team to identify contacts who have been engaged in a case (which could mean they are unsatisfied with your product/service, and it’s best to wait before discussing further purchases).
- Primary object: Contacts.
- Store in Category: Customer Support Reports
- Click to ‘relate to another object’: choose cases.
- Select Each “A” record must have at least one related “B” record. (translation: contacts must have related cases).
- Click to ‘relate to another object’: choose activities.
- Select Each “B” record must have at least one related “C” record. (translation: cases must have related activities).


3. Accounts With Orders and Products
This report type will access account records that have related orders, and those related orders have related products. The practical use would be to view outstanding/completed orders, and whether these products for either the sales or support team to identify contacts who have been engaged in a case (which could mean they are unsatisfied with your product/service, and it’s best to wait before discussing further purchases).
- Primary object: Accounts
- Store in Category: Accounts & Contacts (or whichever category suits your organization best)
- Click to relate to another object’: choose orders.
- Select Each “A” record must have at least one related “B” record. (translation: accounts must have related orders).
- Click to relate to another object’: choose products.
- Select Each “B” record must have at least one related “C” record. (translation: orders must have related products).


Salesforce Custom Report Type Features
Now that you understand how to build a custom report type, and have seen some popular examples, now it’s time to dive deeper into the highlights of custom report types. We have selected these four features that have the ‘wow factor’:
- Multiple Objects: add up to 4 layers of objects as long as they have a parent-child relationship,
- Fields via Lookup: you can add fields into the report from any related object,
- Sections and fields: create, remove, rename, and reorder,
- Default Columns: you can control which columns are already displayed on the report when users create a new one.
1. Include Multiple Objects on Reports
When you need to report on more objects than the standard report types allow – then, you’re in luck! With custom report types, you can add up to 4 layers of object relationships, so as long as they have a parent-child relationship.
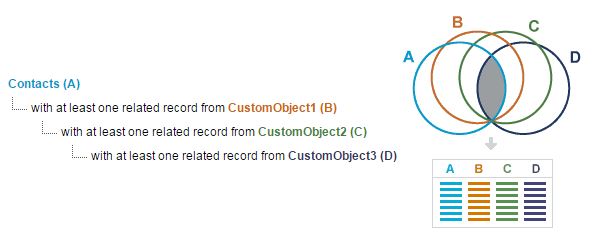
Below, you will see a Venn diagram of a custom report type as it’s being created. It’s a nice visual aid to see the scope of your report type – in other words, the results your final report can bring back.
These objects are all related with lookup relationships (can also be master-detail), so each successive object that’s added needs to be a child/grandchild of the master (first) object in the hierarchy.
- Each contact record must have at least one related record from the first child object, which must have at least one related record from the grandchild object (and so on…).
- This is the option called: “Each “A” record must have at least one related “B” record”.
- This means that the report will only return contact records that have relationships with the child/grandchild etc.
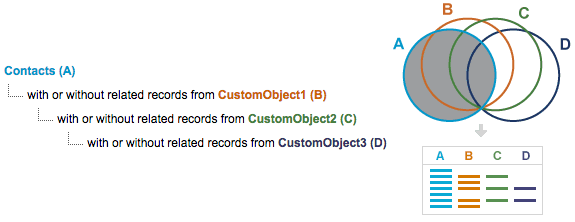
What happens if each record doesn’t need to have a related record?
At each level in the report type hierarchy, you can choose to select if related records are essential, or not.
- Each contact record could have related records from the first child object, which could have related records from the grandchild object (and so on…).
- This is the option called: Each “A” record may or may not have related “B” records.
- This means that the report will return all contact records, some with related child/grandchild etc. record, others not.
2. Add Fields Related via Lookup
With standard reports, fields are automatically added:
- From related objects (depending on which report is used).
- When new fields are created on the object.
Outside of those ways, you can’t add additional fields from objects (related via lookup) to standard report types. Let’s explain what this means further…
With custom report types, you can add fields onto the report from any related object. This is useful when you need to view fields that aren’t necessary to view on the record itself but are key to reporting.
By using the “Add fields related via lookup” feature, we can add opportunity fields, onto the report, too. For example, on an account/opportunity report, I could add fields from the user object, even though the user object is not included in the custom report type hierarchy. Follow the interactive tutorial below:
Scroll down, and you will see the field has been added. Fields added via lookup will have a magnifying glass icon beside them:
3. Report Sections & Fields
Just like you can add sections and position fields on a Salesforce page layout, custom report types open up the opportunity for you to make the Lightning Report Builder suit your users better.
From the Edit Layout page, you can control exactly how the fields and sections display when a user is creating a report. You saw this in action during the interactive tutorial.
4. Default Columns
In the Edit Layout view, you can also set which fields should appear as report columns each time a user creates a new report. This will save your users so much time and is useful for drawing their attention to the most important fields. You saw this in action during the interactive tutorial.
Tips For Finding the Right Salesforce Report Type
With both standard and custom report types existing, it’s obvious that Salesforce users can have many options to choose from when they are looking to building a report for their particular use case. Have you ever felt overwhelmed? We don’t blame you!
Salesforce have invested time and energy to make the process of selecting the correct Salesforce report type far more user-friendly.
- Find the Best Report Type for New Reports: View available objects and fields in a report type (Generally Available).
- Create Reports based on Selected Salesforce Objects: Filter report types by available objects (Beta).
- Create Reports based on Selected Salesforce Fields: Filter report types by available fields (Winter ’23).
- View Available Objects and Fields in a Report Type (Winter ’23)
But what does this all mean practically, as someone who relies on Salesforce day-to-day? Let’s find out.
View Available Objects and Fields in a Report Type
View the report’s structure (objects, fields) before even building it. When you create new reports, you will see a pop-up menu detailing which fields are available to use in the report type (either standard or custom) and the objects included.
This saves you time. Previously you would have to either a) launch a report for “trial and error” or b) going to the report type Setup. Safe to say, this is a huge time-saver.
Bonus: You can search the name of the field you would like to include. It won’t be necessary to scroll through an impossibly long list of fields (I’m not the only one, right?)
Thanks Andreea for the spot-on walk-through!
Filter Report Types by Available Objects
Building on the previous feature, with this enhancement, you will be able to filter by any object/s you need contained in your report type. The difference is being able to filter vs view in a pop-up menu.
Currently in Beta (i.e. not yet Generally Available), this Salesforce reporting feature will enable you to easily see if a matching report type (standard or custom) already exists with your target objects.


Note: To enable this functionality (while in beta), you need to contact Salesforce support.
Filter Report Types by Available Fields
Similar to the previous feature, this is going to be a huge time saver when building a report, especially if you’re looking to capturing certain fields. This even supports fields from different objects – see the example below.


Now available (Winter ’23 release).
View Available Objects and Fields in a Report Type
Perhaps our favorite feature, very useful especially for admins! Being able to view the joins between objects when building a report will be a huge hit. The alternative has always been to navigate through Salesforce Setup, find the custom report type, and deciphering the data model.


Now available (Winter ’23 release).
Summary
This guide has shown you how custom report types enable you to go beyond the standard Salesforce report types. You’re creating additional ‘magnifying glass’ views into your Salesforce data model so that your users can locate the records they need, and therefore, deepen their insight into your organization’s data.
Give the popular examples we included a go, and test drive using our interactive tutorial to build your confidence first. It’s a simple exercise now that will continue to provide a lot of value into the future!
Which custom report types have you created? Let us know in the comments!


Comments: