

This article will help nonprofit organizations begin to plan and implement successful fundraising campaigns with Salesforce. The first question to ask is, where should our journey begin? From my perspective, it starts with Salesforce itself. Of course, similar CRMs will also suffice, but Salesforce enables nonprofits to create a unique environment – one that helps manage fundraising while providing the tools to build capacity with programming and services, as well as other important information for successful operations.
This article will act as your comprehensive guide to fundraising – it can be used by the entire team, from the Executive Director to those working in Development. I will show you how to optimize the utilization of Salesforce to achieve your fundraising goals. After all, the data you collect is essential to your overall fundraising efforts.
1. Everything in One Place
Information ‘collection and cleansing’ should be your first step; ahead of any fundraising campaign, you should ensure all information is in one place. This includes all previous marketing materials, lists of donor materials, grants, campaign materials, relevant financial documents, a case for support, business plans, campaign plans, planning and feasibility studies, donor pipelines, and information about your programs and services. You’ll also want to upload information about previous volunteers, donors, board members, and supporters.
First, let’s move all of your activities into Salesforce. During the pandemic, these activities will have arrived mainly in the form of emails or phone calls, so I have picked out a few key tools (offered by Salesforce) to help you.
Salesforce Gmail Extension
Salesforce has developed an extension that will help you and your team move your emails onto the platform. From the Chrome application, you can add Tasks, Contacts, Cases, and Leads. The cool thing here is, Salesforce continues to improve this extension. So, if you add in a new Contact from the Chrome extension, both the first and last name will automatically populate (in addition to the email).


Here’s a step-by-step guide to get you started:
- Click here to install the Salesforce Gmail extension – note that you will need to use the Chrome browser and the Gmail needs to be connected to a G Suite account! This extension is made by Salesforce and it’s free.
- Press the Add to Chrome button.
- Next, you will be asked to Login to Salesforce by entering your credentials.
- You can also configure how the app will look within Chrome. In order to do this, you need to go to your Salesforce instance and complete the following steps:
- Setup → Gmail Integration and Sync.

- Enable the Gmail Integration → Click on the arrow (so it is pointing down) and then Enable → Click on Keep Gmail and Salesforce Connected.
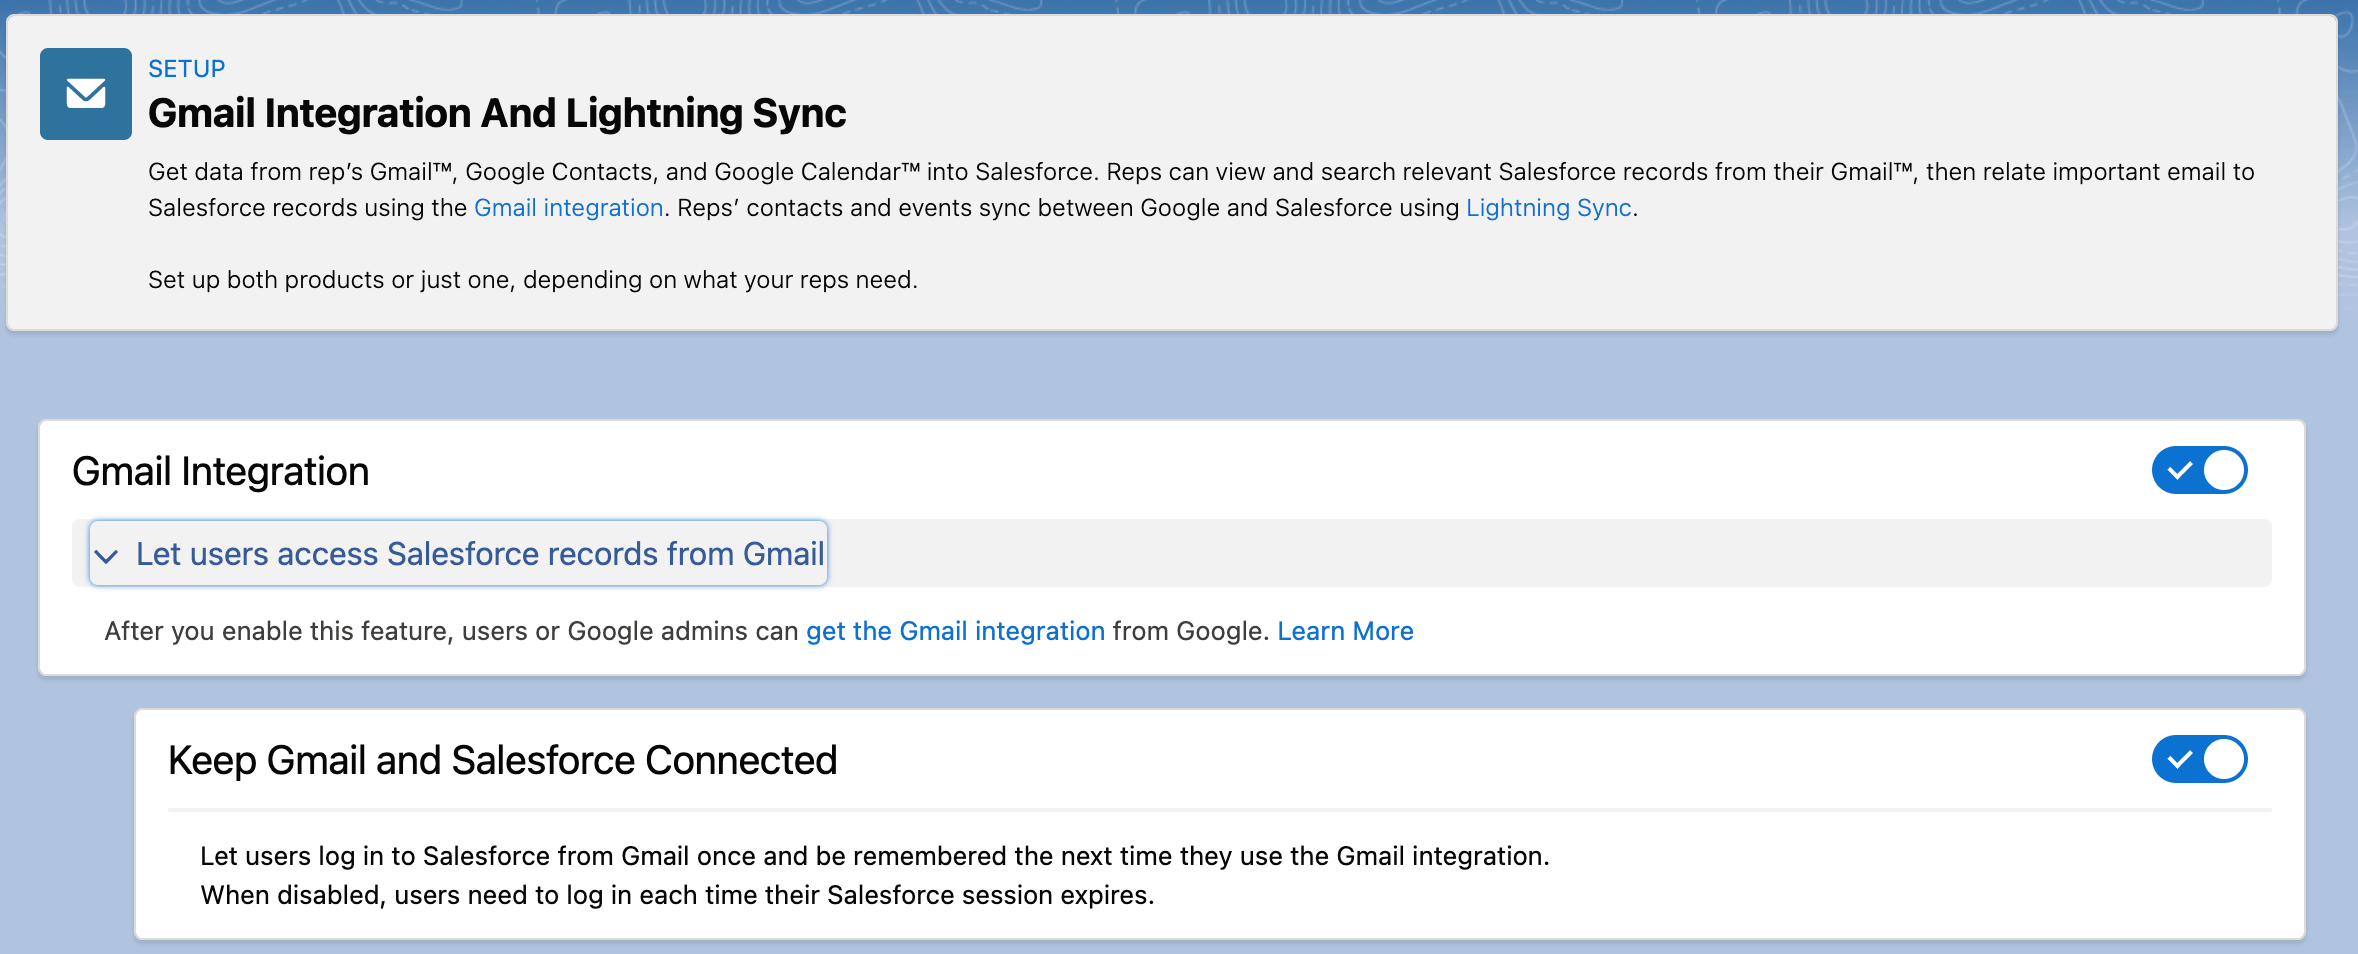
- Enable Customize Content with App Builder → Create New Pane → This will take you to the Lightning App Builder, where you can drag and drop to create the configuration you would like to use in your Gmail account.
- Once you have made your changes → Save → Activate → Set This Page as the Default Email Application Pane → Press Next and Activate.
- You will now see your changes in your Gmail account.
Later in this article, I will show you more ways to use this powerful extension to help get everyone on your team on the same page.
Custom Essential Document Object Setup for Document Cloud Services
You could use Salesforce Connect to link Google Drive or other cloud services to Salesforce – this would allow you to view all of your organization’s documents in Salesforce. However, at this point, I would suggest using a Custom Object setup. This will allow you to use multiple cloud services at one time, while keeping your team focused on the essential documents.
What you really need is a single place to put all of your important documents for the Campaign. In this Essential Document object, you can keep your case for support, donor letters, marketing materials, previous grants, campaign materials, relevant financial documents, business plans, campaign plans, planning, and feasibility studies, as well as any other documents you need to be readily available. The custom Essential Document object will also help your team view and work on the same documents at the same time.
I will now walk you through how to set a custom Essential Document object in Salesforce.
Note: You can use any cloud-based system with this setup, including Microsoft OneDrive, Dropbox, etc.
Create a Custom Object
- Go to Setup → Object Manager → Create → Click on Custom Object.
- Give the Object a Label such as Essential Document and a Plural Label such as Essential Documents. The Object Name will fill in automatically.
- The Data Type should be Text. Later you will be able to use the text for this field to input the name of the record. For instance, if you link a letter for everyone to edit, the text will say Initial Email Letter.
- Enable the optional features such as Allow Reports, Allow Activities, Track Field History, and Allow in Chatter Groups. Leave the Object Classification as it is.
- Tick Deployed and Allow Search Status.
- Finally, tick Add Notes and Attachments related list to default page layout and Launch New Custom Tab Wizard after saving this custom object.
- Pick the Tab Style → Press Next → Choose Profiles → Press Next → Add to Custom Apps → Press Next → and press Save.
- Add Fields and Relationships as necessary. Remember, you already have a Text Field for the document name. I have added the following fields:
- Click on Field and Relationships → New → Pick your fields.
- Create a URL Field for the link of the cloud service of your choice.
- Create a Complete Checkbox field. This will show you when the document is complete and ready for use.
- Create a formula field to record a completed timestamp. You can label the Field Completed Date. Click on Field and Relationships → Formula → Next → Field Label (Completed Date) → Formula Return Type → Data/Time → The Formula would look like this IF(Complete__c =True, NOW(), NULL) → Next → Next → Save.
- Create a Description Field → Long Text Area.

Uploading Important Contacts with the NPSP Import Wizard
Here, you should start by uploading your Directors, Current Donors, Event Attendees, and individuals on your newsletter mailing list – you are uploading these individuals as Contacts. However, with the NPSP Import Wizard, unlike the regular Import Wizard, you can also upload donation history and other information at the same time.
Before starting the import process you should turn on the Standard Matching and Duplicate Rules. This will help you avoid creating duplicates when importing your Contacts.
Enable Standard Matching and Duplicate Rules
- First you need to turn on the Standard Duplicate and Matching Rules option.
- Go to settings → Type Matching in the quick find box → Click on Matching Rules and enable the Standard Account Matching Rule, Standard Contact Matching Rule, and the Standard Lead Matching Rule. You should also enable the NPSP Contact Personal Email Matching Rule.
- Then go to Duplicate Rules and Activate the Standard Account Duplicate Rule, Standard Contact Duplicate Rule, and the Standard Rule for Contact with Duplicate Leads and the Standard Rule for Lead with Duplicate Contacts. Finally, you can Activate the NPSP Contact Personal Email Duplicate Rule.
Prepare Your Data for Import
The difficult part of the Data Import is figuring out what fields are required. Click here to view the NPSP Data Import templates. There is a template for the NPSP Import Wizard and there is a separate Template for the Data Loader.
NPSP Import Wizard
The NPSP Import Wizard takes you through an entirely new process from the generic Salesforce Import Wizard. You actually need to import twice. This is a check and balance that I think is useful because it makes sure all of your data is aligned before you import.
Note: During the import process for NPSP, you always need to start with Add New Records.
1. Go to 9 dots (App Manager) → Search → Click on NPSP Data Imports.
2. Press Import → NPSP Data Imports → Add New Records → Upload the CSV file → Next → Edit Field Mapping: NPSP Data Imports: Map the fields from the CSV to those fields in Salesforce → press Next.
3. Press Start Import. You will see whether your records were successfully imported on a separate screen which includes a summary of the import. If the imports were not successful, you will get an error – instead of Records Processed you will see Records Failed. You will then need to review the error to see what went wrong.

4. Once you have successfully imported the data → Go back to the NPSP Data Imports → Go to the To Be Imported list view and click Start Data Import.
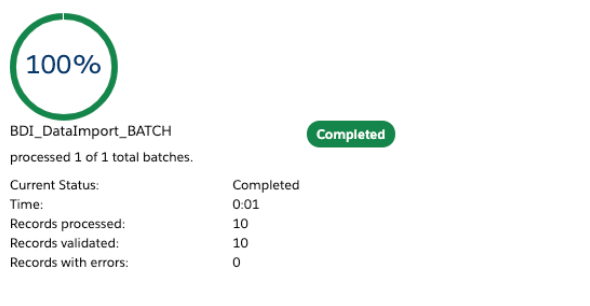
5. First press the Begin Dry Run button. This will not import the record. Instead, it will show if the import will be successful. It will show you the Records Processed, Records Validated, and the Records with Errors.
6. After pressing the Dry Run button → Go to the Dry Run – Validated list view → Again, press Start Data Import.
7. When you are ready, press Begin Data Import Process. After the import, you should see a screen similar to the one above. If you do not see the screen, it means that you have an error and you will need to work through the errors to figure out what the issue is.
Merge Your Contacts
If you do end up with duplicates after importing your data, there’s a nifty tool from Salesforce that can help. You can use the Contact Merge application in NPSP. In order to utilize this new merge feature, you need to enable the Standard Matching and Duplicate Rules (as shown above).
- Click the App Manager. Type Contact Merge into the quick find box.
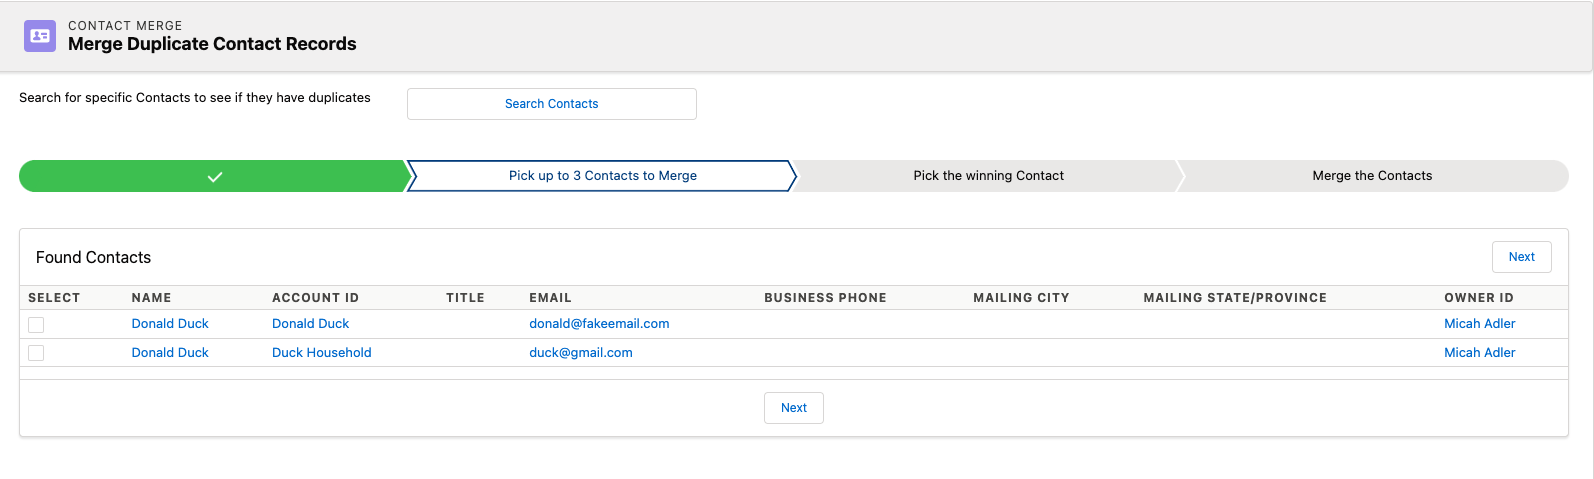
- Click on Contact Merge → Click on See Duplicate Contacts. This will show you all of the duplicate contacts in your organization.
- On the next screen, you will see all of your Duplicate Record Sets. You can click on Pick, and merge up to three records at one time.
- Finally, you can search for duplicates with the Search Contacts button.
- Just type in the Contact you want to search for and select the Contacts you would like to merge.
2. Building Relationships and Prospects
Nonprofits frequently approach donors for repeat donations. Relationships will help you build a Leadership Team, which I will discuss further in Section 4. This Leadership Team can be composed of supporters, volunteers, directors, and employees, and will work together to conduct outreach. The new connections introduced to the Campaign through the Leadership Team will be incorporated into the overall Campaign – their input and advice will help further shape and refine the Campaign messaging and direction.
Adding new connections with Relationships will also help the nonprofit expand its pipeline with increased outreach. Please be aware that Relationships and the Relationship Viewer are offered only in Salesforce NPSP. Relationships are essential to bringing new prospects to a campaign.
Relationships and Relationship Viewer
Relationships are connections between individuals that you know, and it’s important to note that Relationships only work with the Contacts. In order to create a relationship you need to do the following:
1. Enter the record page for a contact → Click on the New button on the relationships related list. You may need to add the Relationships related list to the contacts layout.

2. For Relationships → Contact, Status, and Related Contact are required fields.
3. First add the Status. You have the choice of Current or Former → Add a Related Contact (which is a lookup field).
4. Next click on the Type. This is a picklist that can be customized and includes options such as Family, Friends, Colleagues, etc.
5. Finally, click on the arrow at the top of the screen – this is where the magic happens.
6. If you click on the relationship viewer, you can see the new relationships graphically.
7. From here, you can click on (1) View Contact Record, (2) Create New Relationship, or (3) Recenter on this Contact.
There is one final tip for this section – Salesforce has actually created a custom Visualforce Page that you can put in the contact layout to visually display the relationships on the contact page.
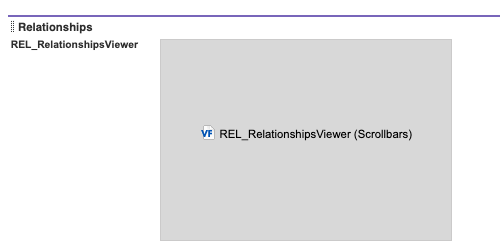
In order to put the Visualforce Page into the contact record, you need to do the following:
- Go to Contact in Object Manager → Click on Page Layouts.
- In Page Layouts you will see Visualforce Pages on the left hand side of the menu. Click on the page → Drag the Relationship Viewer onto the Layout.
- You can adjust the Visualforce Page Properties (as seen below) by clicking on the Relationship Viewer in Layouts.

Adding New Prospects with Leads
Having a lot of prospects is a good thing, but keeping track of them can become difficult, especially if you are inundated with extraneous data. Luckily, Salesforce is designed to track prospects, offering a complete 360-degree view, as well as the ability to automate and standardize your lead processes.
We have already discussed how to get your current information into Salesforce. Now, we will focus on how to get new information into Salesforce.
Leads are extremely important for fundraising, as organizations need to know exactly who they are connecting with. I would recommend putting new prospects (not connected to any of your current contacts) in the Lead category. For instance, if you have a list of individuals who currently have no connection to your organization, they should be uploaded as Leads in the first instance – you can use the general Salesforce Import Wizard to upload them.
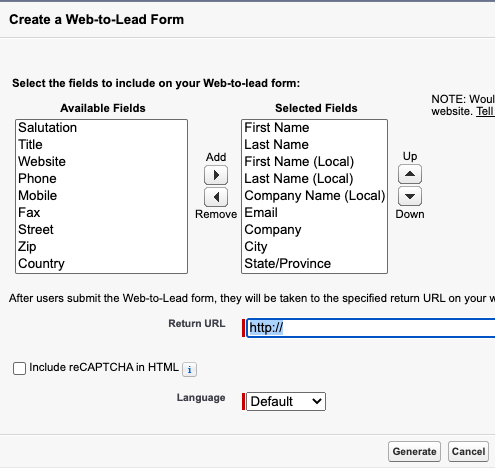
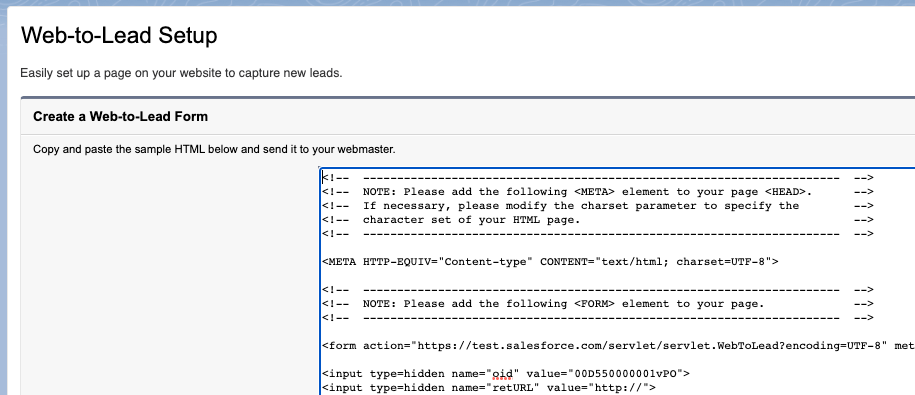
Another tool you can use to create new prospects (not connected to individuals already in your database), is the standard Web-to-Lead form.
Set up Web-to-Lead
1. Setup → Web-to-Lead and then enable Web-to-Lead. You can also use reCaptcha, which will result in less instances of spam.
2. Press the Create Web-to-Lead Form. You can choose which fields you want to display → Press Generate and Salesforce will Create your Web-to-Lead form in HTML.
3. Delete the notes in the HTML and put the HTML on your website and voilà – you have a web form that is connected to Salesforce.
Another simple method, if you use WordPress, is to use a program called Brilliant Web-to-Lead for Salesforce. This is a free plugin that works very well.
3. Outreach
You send out emails, you send out marketing materials, and you can have a website. All of these activities (and data) should work together to help you achieve your goals and move your campaigns forward. In Salesforce, Campaigns and Opportunities record all of this important information, helping you to keep track of your annual donors and preventing you from accidentally spamming existing donors.
You can use email templates to create professional, standardized messages, and then use the send list email option on the Campaign list view to email single or multiple prospects.
Email Builder and Email Templates
Create a Permission Set:
- Go to Setup and type Permission Set → Click New.
- Add in the Label: Email Builder Permission. The API Name will fill in by itself → Enter the License Name Salesforce → Add in a Description and press Save.
- Enable the Access to Drag and Drop Content Builder and the Manage Public Lightning Templates permissions and press Save.
- Add the Email Builder Permission to the Permission Set Assignments on the User.
- Type in Template and click on Email Templates below the App Manager on the left side.
- Click on Email Templates → New Email Template.
- Add in the Email Template Name and Description and Subject and press save.
- Press the Edit in Builder button on the right hand side (up near the top of the screen).
- Next is Drag and Drop – you can add in buttons, HTML, Images, Rich Text, Rows.
- Images: You can add an image that you download or you can use an image URL.
- Text: If you add in Text you can also add in Merge Fields.
- Buttons: You can add more than one button per row.
- Background: Change the Background colour by clicking on the background colour and adding #FFFFFF. This will make the background white.
- You can also view your email as it would appear on a mobile phone or desktop.
Salesforce Campaigns and Send List Emails
Users will need the Marketing User to be ticked on their user record to be able to see the Add to Campaign button on both the Reports and Contacts page.
- Create a Campaign and activate it.
- Create a Report with all of your potential recipients. Put the report in a folder.
- Run the report → Click Add to Campaign. This will add the contacts on the report to the Campaign. You can also add Leads in the same way.
- Create an email template for the email you plan to send out in this Campaign.
- Go to Campaign and click on the Campaign name you created.
- In the Campaign, click Send List Email. This is located in the related list under Campaign Members.
- Add the template you intend to use and press Review → Press Send or Schedule to Send. Schedule to Send will allow you to send out the email at a later time.
- Create an email report to track the emails sent out. Go to Reports → Click on New Reports → Click on HTML Email Status. Create a report and use the Subject to filter the records sent out. Instead of using the filter Equals to your desired subject, you should use Contains and the desired Subject. You will be able to see how many times people opened the email.
4. Leadership Team
Your Leadership Team is composed of the people who care about your organization. This team may include individuals who are your employees, outside supporters, or volunteers – anyone you are able to incorporate into the Campaign. Your Leadership Team will improve your charity by bringing in diverse ideas and individuals, and eventually, donations too. Your Leadership Team will work together with your organization to obtain your campaign goals.
Salesforce integration includes the following: Sharing Email Templates and Gmail Extension.
Sharing Email Templates
Email Templates for your employees and Leadership Team can keep your team on the same page. The new email template builder is not only perfect for sending out marketing emails, it also works well for helping your employees and Leadership Team to send out emails to prospective donors.
Once you have created an outreach letter, you can share it across your team with email templates. In reality, it is difficult to get everyone on board with a well-vetted email to a potential donor. In this way, you don’t have to worry about chance. Instead, you can give employees and the Leadership Team a plan. Just remember to enable the permissions to use the email template builder for each user, as described above.
In order to share the email template, all you need to do is put the email template in a Public Folder.
- Before you Build the email template you are asked to Select Folder.
- Click on Select Folder → then click on Public Email Templates → then Select Folder and Save.
- The new Email Template will now be available to all your Salesforce users.
- The key now is to get your Development Department to use Salesforce, but you do have other options if you are facing adoption issues, especially if you use Gmail or Outlook.
Use Salesforce Gmail Extension with Templates
- As shown above, you can configure your Gmail Extension in Salesforce.
- In Gmail, all you need to do is start a new email and you are given the Email Template option on the Chrome extension.
- Add one of the templates listed on the right side and add the contact you are sending the email to by adding the contact to Send To and press Insert. Don’t worry, it won’t send out immediately.
- Salesforce will give you a prompt to check the merge fields to make sure everything is filled in as you intended.
5. Stewardship
In order to get more donations, you need to have a process that encourages fostering long-term relationships and repeat donations – this requires stewardship. Your organization needs to maintain the relationship with your donors, otherwise, you may find that after you get one donation, the donor leaves.
Utilizing the Path for Stewardship
Keep your team on the same page as the Salesforce Path. In Opportunities, you can create a Path which will help you with the initial outreach to your supporters. Here, we are creating a separate Opportunity Record Type called Stewardship, in order to follow up with a current supporter. In this case, the Path will ensure that your employees and Leadership Team go through the same process each time when following up with your supporters.
- First you go to setup → enter Object Manager–> click on the opportunities object and go to Field and Relationships → Stage → add Steward, Thank you, and Follow up items to the Picklist.
- After you do this, go back to Setup → Sales Process → Click on New → Use the Master and make a Sales Process named Stewardship.
- Go back to setup and then Object Manager → Opportunity Object → Record type → Click New → Existing Record type → Master → Record Type Label = Stewardship, Sales Process = Stewardship and click on Active.
- Go back to Settings and create a New Path → Path Name: Stewardship → API Reference Name fills in automatically → Choose the Opportunity Object → Opportunity Stage → Record Type – Master — Picklist → Opportunity → Record Type = Stewardship and the Picklist will = Stewardship. Make sure that all the values in the Picklist are available in the Stewardship Record Type.
- When you create a new Steward Opportunity, you will see the path for Stewardship, as seen below.

Steward Supporters with the Email Templates
As you would expect, sending thank you emails is the key to retaining your donors. However, just sending an email is not enough. With the email template builder and the methods described above, your team can start with a vetted email to a supporter. In addition, each employee or Leadership Team member can thank the donor for their support, as well as personalize the message.
Steward with Activities and History
Keeping the history of your fundraising activities is crucial. Questions to ask include:
- Who received an email?
- Which email was sent to the individual and how did they respond?
- Were there too many emails sent to this individual?
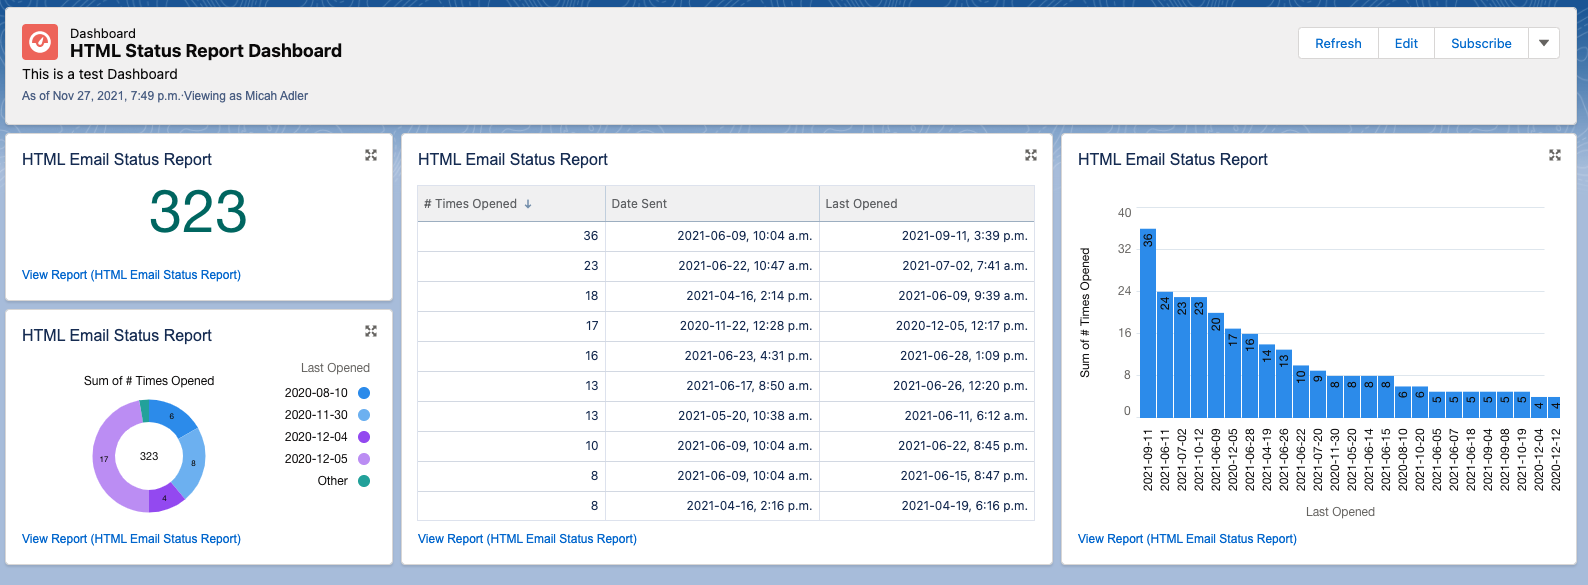
We can answer these questions with reports and dashboards. In order to track emails in reports, you need to create an HTML Email Status Report.
The report, which can be filtered by subject, will show you if the email was opened, when it was first opened, and how many times it was opened, as well as other relevant information.
You can use this HTML Status Report to create a Dashboard where you track all of your Email Campaigns.
Salesforce NPSP also provides many useful out-of-the-box reports and dashboards, which show you key KPIs. Reports such as Total Donations Last Year, Open Opportunities By Stage, All Households with Donations from last year do show up, but unfortunately not this year’s LYBUNT report. It is always better to check out these dashboards first, rather than reinvent the wheel.

Summary
I hope you found this walkthrough helpful. I truly believe that anyone can fundraise, given the correct tools. It is so important for nonprofits to have access to these tools – in order to build capacity and serve your communities better, you need money. For many nonprofits, fundraising is viewed as burdensome or aspirational. However, in reality, it is absolutely necessary.
The benefits of effective fundraising are obvious and go far beyond monetary value – fundraising facilitates much-needed outreach, allowing you to hear from and evolve with your supporters. As someone who has spent a large amount of energy and time in the nonprofit sector, I want to see these important nonprofits succeed.
Remember, you can do this! I have given you a plan, which, if followed methodically, will help you find and secure your much-needed funding in 2021 (and beyond).

Comments: