

It’s been over a month since GDPR came into effect, and for many marketers, the preparation scramble seems like it happened in an another life.
Building a double opt-in mechanism was part of the necessary GDPR preparation. Double opt-in, also known as ‘confirmed opt-in’, ensures that people joining your marketing database are granting you their ‘explicit consent’. It’s likely you’re familiar with how this process works; after submitting a subscription form, the prospect is sent an email to confirm their identity and permission. Unfortunately, it isn’t automation that doesn’t come out of the box – however, a silver lining – you have the flexibility to build and control double opt-in how you want.
Double opt-in set up, breathed a sigh of relief… now what? The flexibility that building your own double opt-in brings, also means that you should be optimising the flow to convert prospects from being initial subscribers to mailable prospects. It’s the type of conversion you need to master in order to grow your mailable marketing database.
This post will cover a couple of double opt-in flows, running for at least 6 months. I will provide some context, detail the conversion rates, and share tips on how to set up your process with monitoring and optimisation in mind.
What this post won’t talk about, is how to optimise your emails. This is for two main reasons. Firstly, the web is saturated with content on email copy and design best practices. Secondly, you know your industry best, what kind of copy bites for your audience, and how you want the design to portray your brand.
Double Opt-in Investigation
I took a look at two double opt-in flows I had built. As I mentioned, these had been running for some time (around 6 months).
Flow A – Subscription form:
This is a simple ‘Sign up for updates’ form, that asked for basic details (name, email).
- An autoresponder email is sent immediately after submitting.
- If the prospect doesn’t double opt-in, a 2nd email is sent 2 days after.
Flow B – ‘Contact us’ form:
This is a form for prospects to submit a specific request for a high value product and/or service. The form asked for name, email, category (of the request), phone number, comments.
- An autoresponder email is sent immediately after submitting.
- If the prospect doesn’t double opt-in, a 2nd email is sent 1 day after.
- If the prospect still doesn’t double opt-in, a business dev. rep. will ring the prospect and encourage double opt-in on the same day, or day after.
To summarise, both flows share two conversion points in common: a 1st email, and a 2nd email (follow-up). Flow B has an additional step, where users phone the prospect in a last effort to gain consent.
Below is a table of the conversion rates:
| 1st Email | 2nd Email | Phone Contact | |
| Flow A | 72% | 12% | n/a |
| Flow B | 54% | 5% | 67% |
The results are interesting, and I could speculate on which of the many factors are causing what impact – but instead I will share the tips on how to set up your process with monitoring and optimisation in mind.
Set-up Tips for Optimisation
As I explained in the introduction, I won’t be covering how to optimise your emails – but instead, some pointers specific to Pardot setup.
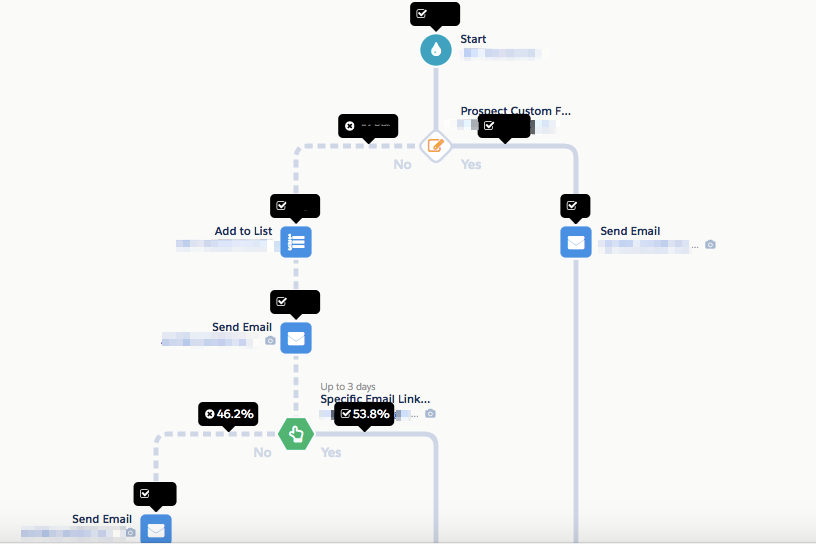
Tip 1: Put it in Engagement Studio
A double opt-in flow comprises of a few elements: a custom redirect, lists, and an email template. Yes, you can build this without Engagement Studio, but it ends up disappearing into the shadows of your Pardot account. With Engagement Studio, you gain the visualisation, and clear % conversion from one step to the next.
! If your numbers don’t match up, there are plausible reasons why: the prospect opted-out/email hard bounced, the associated lead/contact was deleted in Salesforce (NB: will show [crm_deleted] on the prospect record).
Tip 2: Increase the frequency
Speed makes a big difference, and leaving too long in between the 1st autoresponder and the 2nd chaser is loses momentum. Attention spans are shorter than ever, and even 48 hours is enough for a prospect to forget they signed up.
Try changing up the ‘wait’ times in between email sends in Engagement Studio.
Tip 3: Date Fields
Double opt-in date fields are necessary for GDPR, to timestamp when consent was granted. You should also consider setting up a Single opt-in date field too, to monitor how long prospects have been pending double opt-in.
Turn this legal obligation into clever automation.
Tip 4: Change up the Channel
As we have seen in Flow B, mixing in other contact channels, such as phone calls, can be an effective way to convert those unresponsive prospects! Not every double opt-in flow will have the luxury of human bandwidth to make phone calls, however for prospects interested in a high value service, it’s worth pulling out the stops for their consent. It would be frustrating if a lead recycling/remarketing campaign falls flat because confirmed consent was never given.
Use Salesforce Campaigns with custom Campaign Member statuses such as ‘To be called’, or even Salesforce Tasks to push attention to the Salesforce users making the calls. Both are integrated into Engagement Studio. Just remember to add the context on why double opt-in is important (internally) and a compelling call script (customer-facing).
Summary
This post has covered a couple of double opt-in flows for context, and 4 tips that I have put in place in order to monitor, and ultimately optimise, Pardot double opt-in flows. Don’t forget about experimenting with your email copy and design, and to document changes you make (there are great experimentation tools you can invest in). Good luck in increasing your mailable marketing database – in both quantity and quality!
