

One of the most frequent questions I get as a Salesforce Admin is “what do I do with this Contact now that this person has left their job?”. It’s a really interesting question, because the answer can vary based on what your company’s processes require, if there are any at all – how your duplicate rules work is another factor, along with sourcing and attribution.
The technical part of what Salesforce should do is the easiest part of managing Contacts who’ve changed jobs. In this article, we’re going to go over the business decisions you will need to make, and the Flow that I like to use for this process.
The Business Decisions
Let’s set up our example scenario: a sales rep is prospecting for Don Smith at an agricultural company. This week, the sales rep messaged Don on LinkedIn, and Don replied, “Sorry, Ms. Sales Rep, I no longer work there. Now I work at Food Growers Inc.”.
This is a pretty common scenario, but sales reps almost never bring it up to admins, because they assume they already know what to do. In fact, the answer can seem so obvious that even when I bring this up as an admin, people assume they already have a process for their company, and everyone knows it.
But in fact, if you ask 10 sales people at the same company what to do in this scenario, you’ll get ten different answers. Some of the answers I’ve gotten over the years are:
- Respond to the message with “Ok, thanks” and then do nothing (yes, that really happens).
- Change the Account name on the Contact.
- Delete the Contact, make a new Lead or Contact.
- Do nothing on the Contact, make a new Lead or Contact.
And then, of course, you get users who will admit they should probably do something, but aren’t sure exactly what to do – they have asked their peers who didn’t know, so they just ignored it and moved on. (I’m also using Sales here as an example, but similar scenarios can happen with Customer Support, too.)
So, what’s the “right” process here? It depends on your business, but here are the things you need to consider:
- Duplicates: What does your company consider to be a duplicate in Salesforce? The most common method is to use Email Address as a unique identifier. If you do this, the new record would not be considered a duplicate, because the Contact will have a new Email Address for their new job.
- Lead or Contact: When this person leaves, do they need to be qualified again? Do you want to have a full history from Lead with Conversion to Contact? This person probably doesn’t need to be educated about your product or service, so my preference is always to go directly to Contact.
- Attribution: Should this Contact turn into an Opportunity, how will you track attribution? What is the Source of this Contact?
- History: Do you want to know which old Contact this person came from? If so, you will need a custom field – perhaps a lookup called “Old Contact” or a text field for the old Email Address.
- Data Loss: Contact records have a lot of data tied to them – everything from all the data in the fields, the Contact Field History, related Tasks, Events, and even Campaigns. Deleting Contacts (especially legitimate ones) is risky, and I never recommend deleting records like this.
- Field Changes: Modifying the Account Name and Email Address can seem like the right thing to do for users. But the problem with doing this is all the related history that is only relevant to the old Account then stays with that record as it moves to the new Account. Things like logged meetings and campaigns in particular can cause confusion in the future.
Start With This Process
The process and flow I’m going to outline here is a good place to start. It helps to prevent data loss, maintain good data quality, and provides attribution to Sales. The justification for that attribution in this scenario is:
- Sales reaches out to a known Contact with an existing relationship.
- The Contact responds and provides a new email/company name.
Nobody is forcing the contact to respond. They don’t even work at their old company anymore, so there’s no benefit to them to respond and provide a new email. The only reason they would provide that information is if they have a good relationship with the Sales rep, and they like the product.
This is a good place to start for building this flow in a Sandbox, but don’t make this decision for your own business without working with your stakeholders first.
The new process for when a Contact moves to a new Company/Account will be:
- User becomes aware of the job change.
- User clicks “Move to New Company” custom button on Contact.
- A screen appears where the user is required to enter the new Account record, and new Email Address. Optional fields for Job Title, etc. are available.
- The Flow then updates the old record (opt out, unqualified status, etc) and also creates the new Contact Record under the new Account.
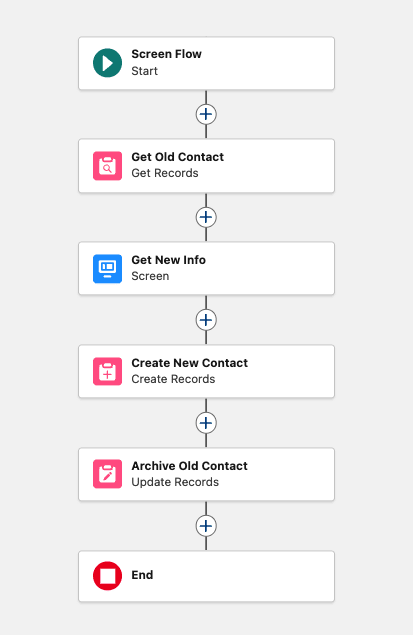
The Flow
This is an easy one, just a single path, no decisions or additional conditions. We’ll go through each component so you can see how it is built.
Create a Simple Variable
This variable is for the Id of the Old Contact:
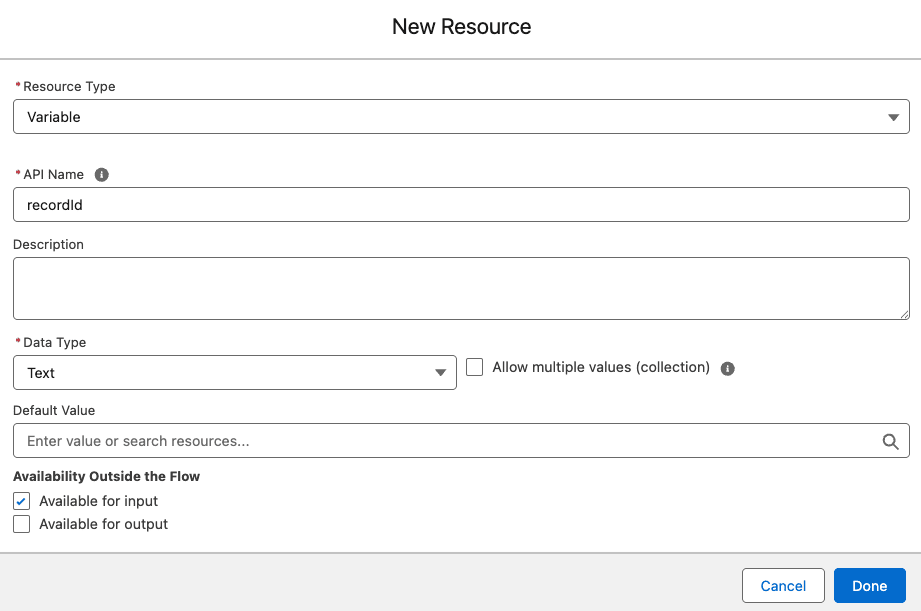
In the API Name, make sure you type in recordId exactly like you see it here – same case, no extra spaces or characters. Set up everything else like you see in this image, including checking “Available for input”.
Get Old Contact
We need to get the data from the old Contact for a couple of reasons. First, so we can use that to pre-populate some values and save time for the user, like First Name and Last Name, which are unlikely to change. Second, so we can return to the old Contact and archive it at the end of our Flow.
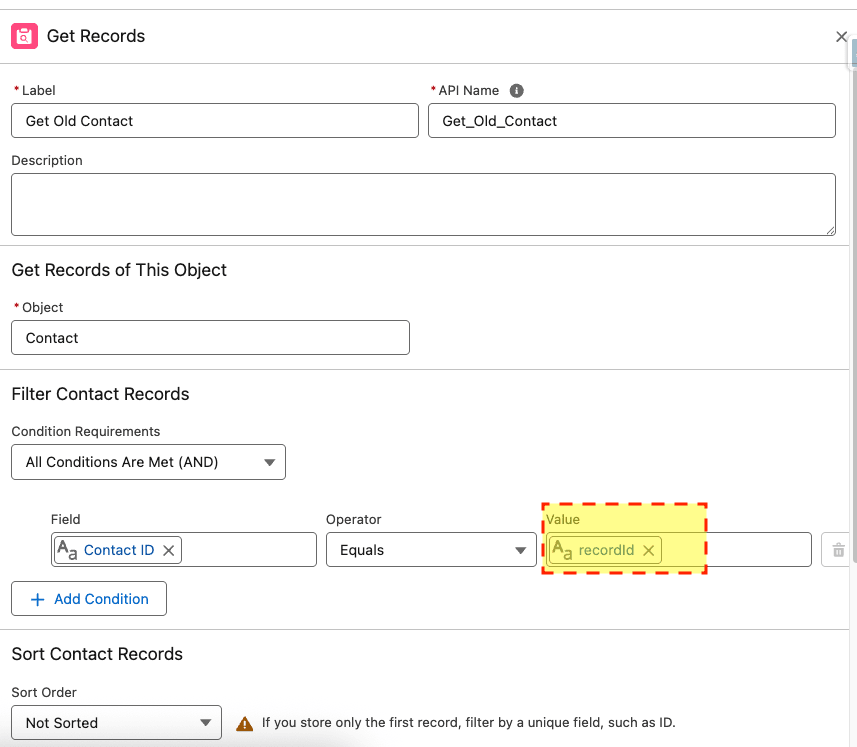
Pay special attention to the area highlighted in yellow. This is where you’re going to select that Simple Variable you created earlier.
Get New Info (Screen)
This is the only screen component in the Flow, and this is where your users will enter the information for the new Contact.
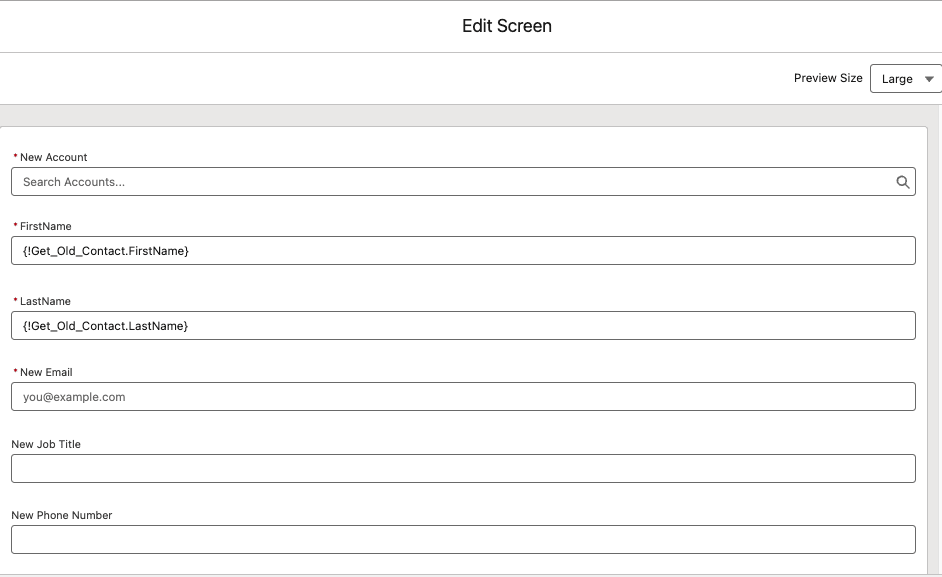
There are a few important things to pay attention to here. First, notice that Account Name, First Name, Last Name, and Email are all required fields. Remember that our goal is to have good data, and incomplete information is not good data, so don’t forget these and any other required fields you may have. Another thing to notice is that First Name and Last Name are pre-populated for the user – these are not likely to be different. They’re editable, so the user can change them as needed, but most of the time, they can just skip these two fields.
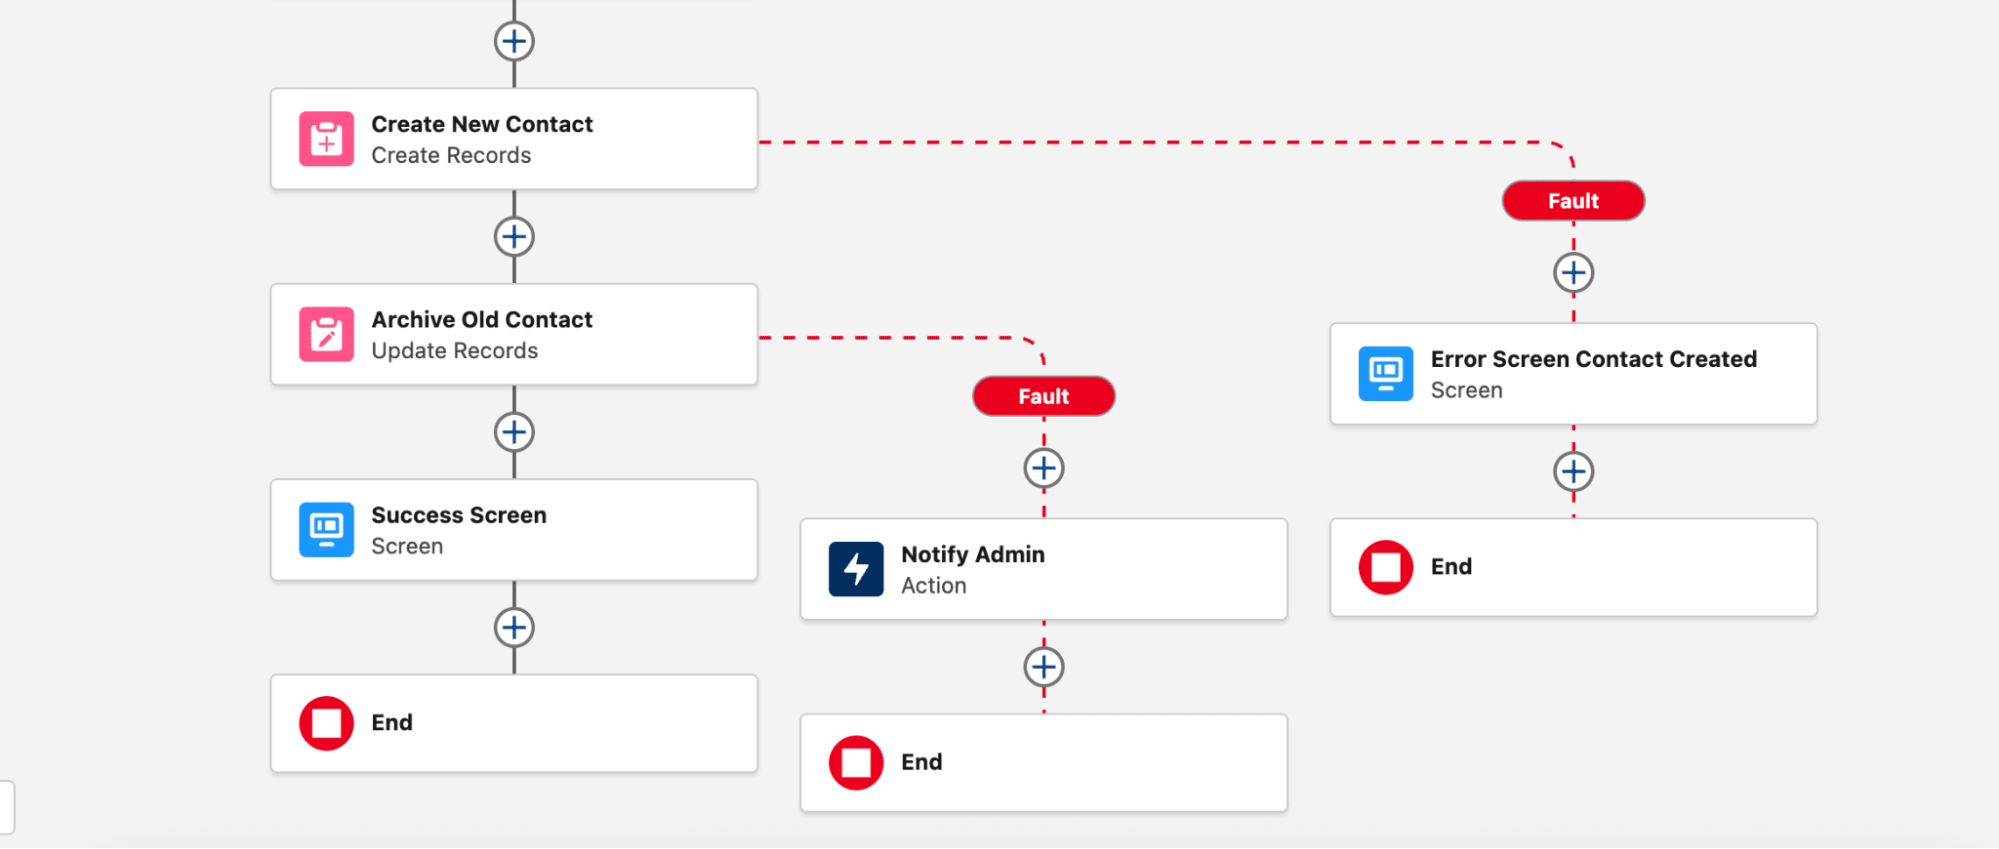
Create the New Contact Record
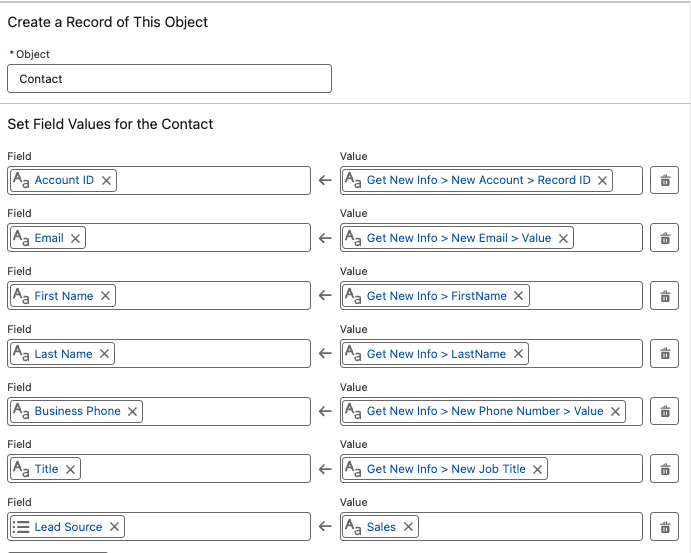
This is the part of the Flow that will actually result in a new Contact Record. You’ll notice here that there are six fields from the prior screen, but the seventh field was not on the screen. That’s because in this scenario, we’re always attributing these new Contacts to “Sales” with the Sales Lead Source. You should do whatever your business requires, but keep in mind that you can populate additional fields that were not a part of the screen.
Archive the Old Contact
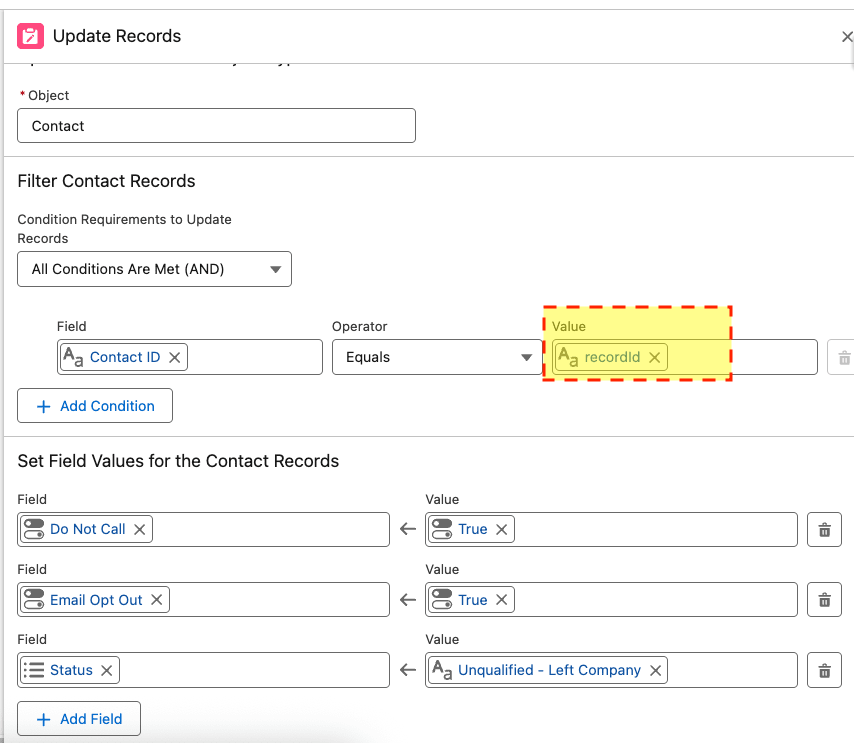
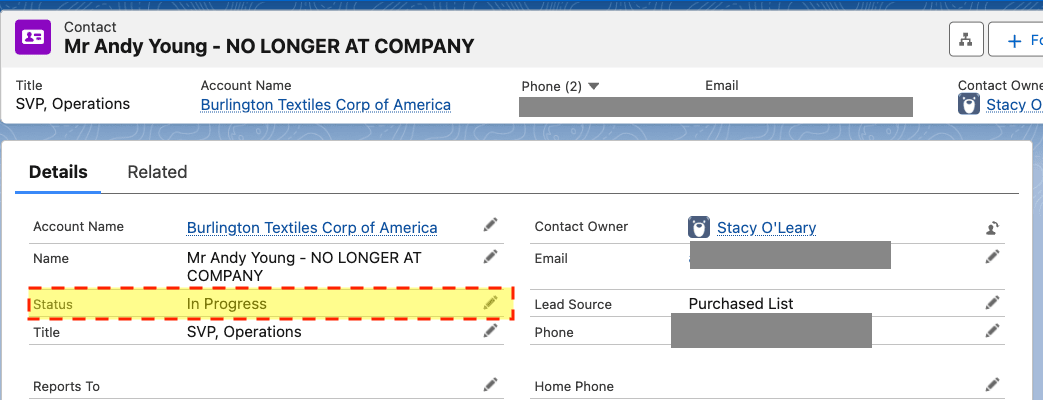
I’m using the word “Archive” here to mean updating a Contact so that it is saved, but no longer used for Sales or Marketing purposes in the future. In this example, all we’re doing is updating the “Do Not Call”, “Email Opt Out”, and “Status” fields. If you have additional fields, you may like to update those as well. I’ve seen people append phrases like “No Longer At Company” to the Last Name field – if you do that, make sure you actually append and don’t overwrite the last name. And don’t forget to use the Simple Variable you created earlier, highlighted in yellow.
Finally, once all of these steps are completed, save and activate your Flow. Also, it goes without saying, but do this in a sandbox first!
Custom Button
The custom button is what your Users will actually click on to trigger this flow. Navigate to the Contact object, and click “New Action”.
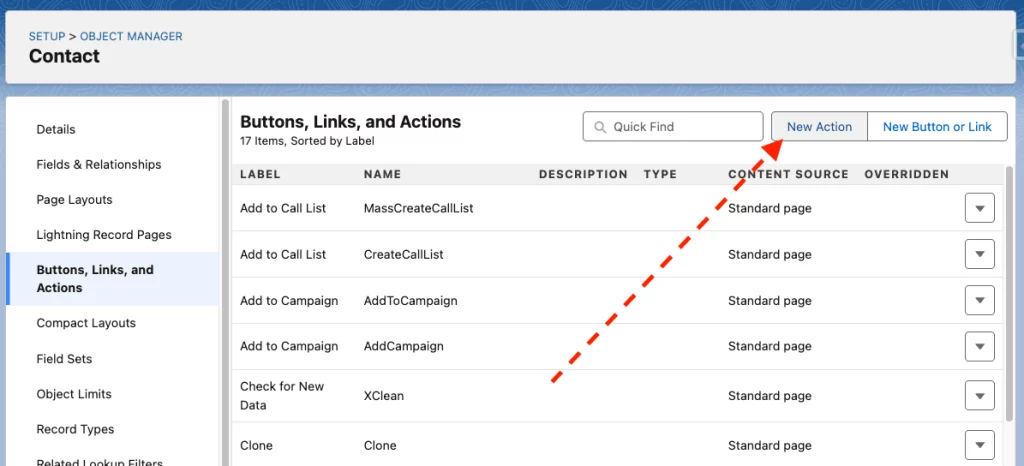
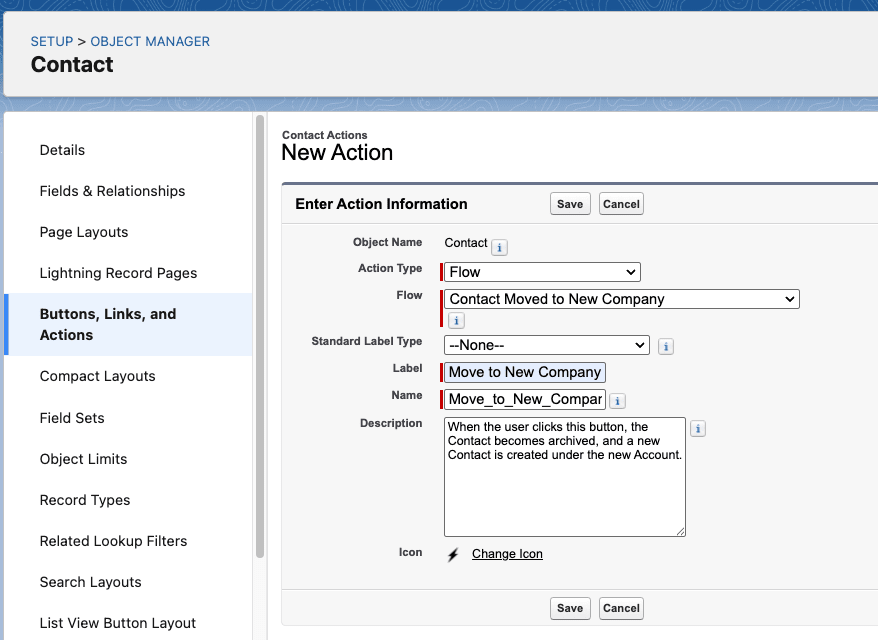
- Action Type = Flow.
- Flow = (the name of the Flow you just created and activated).
- Label, Name, and Description = fill out accordingly.
Add to Lightning Page
Once the Button has been created, you can now add it to your Lightning Page (or Page Layout, if you’re still using those).
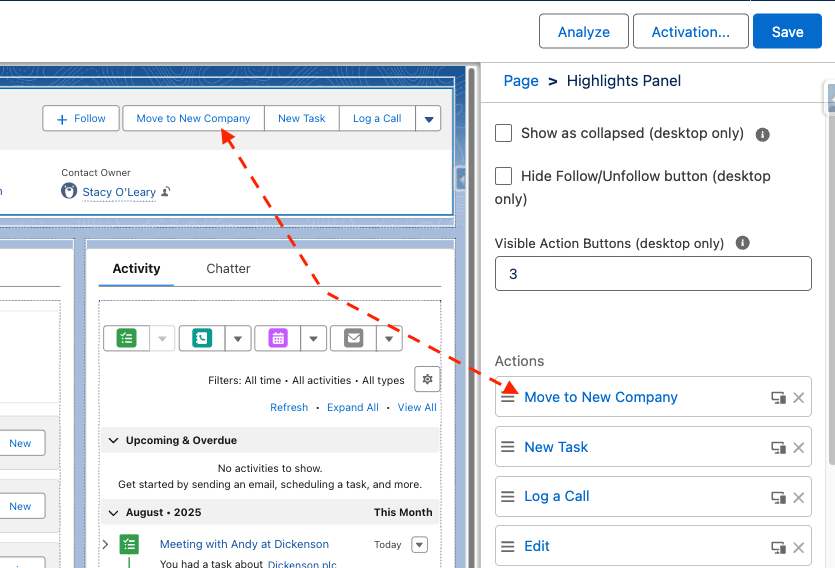
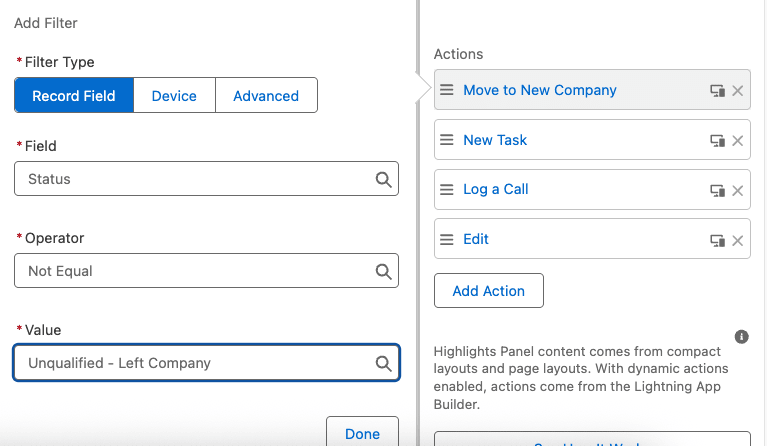
One optional feature that I like adding is a Rich Text Component, which makes it immediately obvious that the user should not be working on a record:
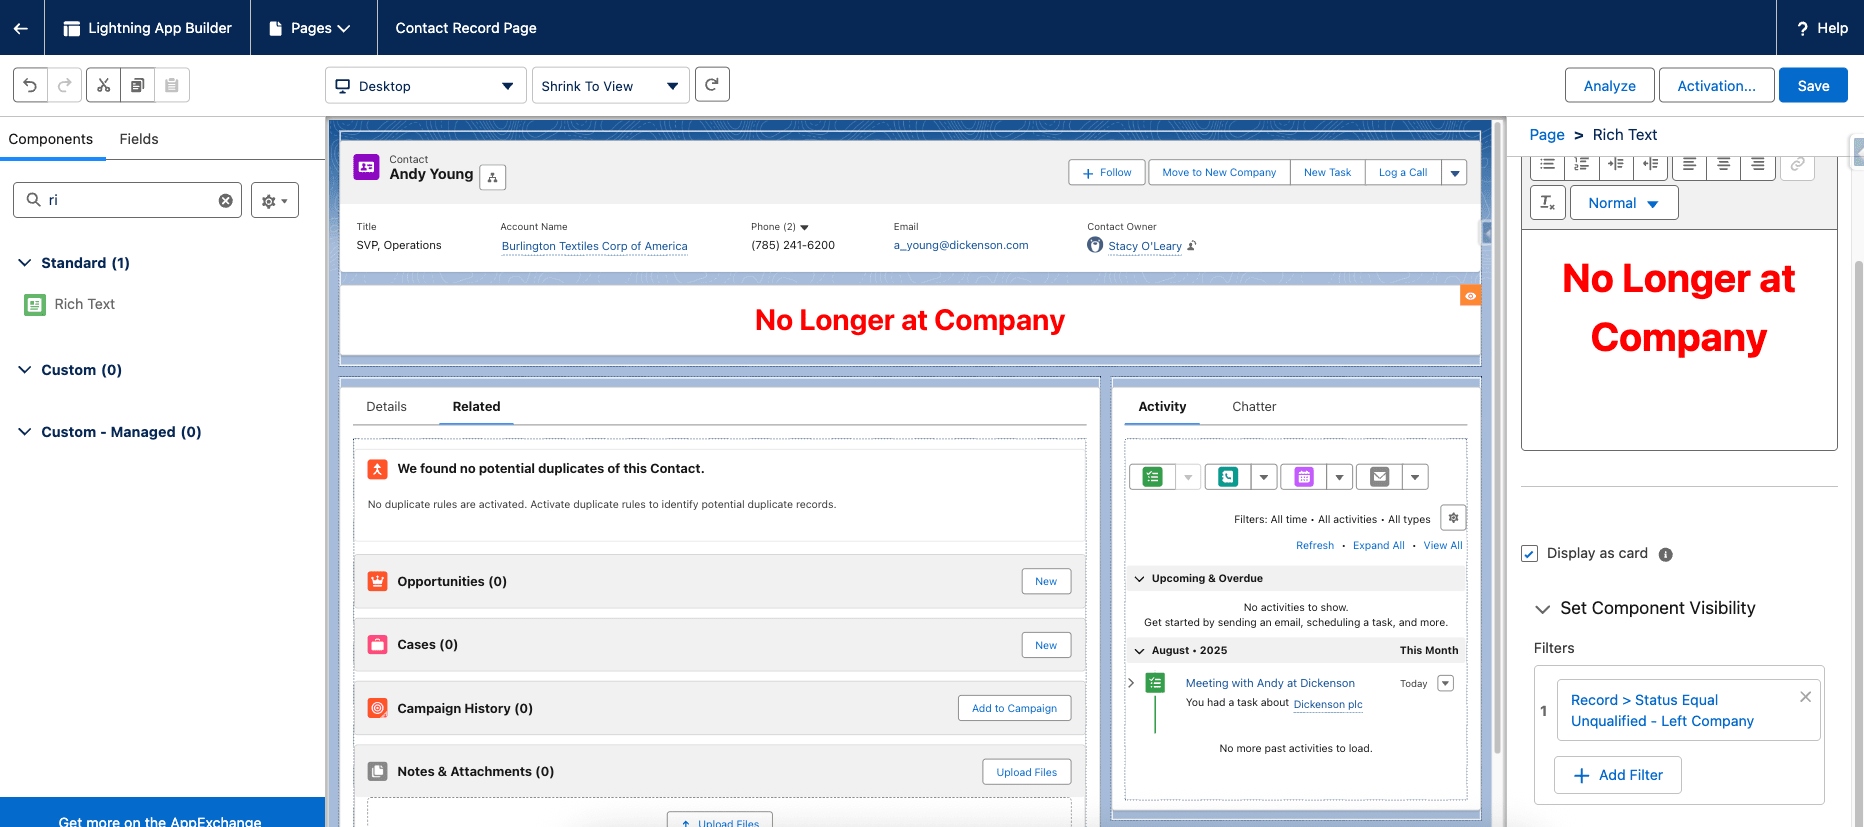
By adding a visibility filter that says “Status = Unqualified – Left Company,” the component will only appear when that condition is met. And by adding the component to the wide, upper middle section, we ensure that it will always be visible to the user, even if they scroll further down the page. You can also add a visibility filter to the “Move to New Company” button. Once the Contact is archived, that record will not need to be “moved” again, so the button is no longer necessary.
Clean up Old Records
Another optional step is to clean up your existing records. Run a report to see what Contacts you have that indicate the Contact has left the company. Look for phrases in the First or Last Name like “Gone” or “No Longer at Company” or whatever your particular business uses to indicate. Bulk update your Opt Out fields, and figure out if you also need to bulk update their Status, or any other fields.
Create a Process and Training Document
I always recommend training in three parts:
- Documentation – a PDF or internal article that can be shared with Users
- Video – a training video walking the users through the steps
- Live – a live training where users can ask questions through the process
Summary
While it’s not a complicated Flow to implement, this type of automation will save you many hours in the future and help protect your data in the long term. Users will have a clear and understandable process for what to do when contacts change jobs, and no data will be lost.
And the best part is there’s no real ongoing maintenance for the admin! I know you probably have more questions, so I’m going to include some of the more common ones I get here below, but as always, please feel free to reach out with any additional questions!
Frequently Asked Questions
Q: Isn’t that a duplicate?
A: A duplicate person – yes, but a duplicate record in Salesforce? No – in the example org, duplicates are based on “email exact” and since the new email is unique, there’s no duplicate.
Q: What if the new Contact already exists?
A: That would be a duplicate in this example org, and the Duplicate Rules would block the creation. The user would get an error. In that case, they would probably reach out to the admin. The old Contact could be manually archived, and the user could just refer to the new Contact going forward.
Q: What if the new Account doesn’t exist?
A: The user will need to create the Account record first. You can extend the screen flow to account for this scenario as well.
Q: What if we want a Lead instead of a Contact?
A: The process is mostly the same. Instead of creating a new Contact record, just create a new Lead record. Just make sure to assign it to the proper user or queue.
Q: What if a Lead changes jobs?
A: You can decide the process that works best for your business, but the structure of this flow is a good starting point. Because Leads are traditionally “unqualified” some businesses are more comfortable modifying the Company Name and Email directly on the Lead. Or you may opt to follow the same process by archiving the old Lead and creating a new one.


Comments: