

As Salesforce users increasingly request automation to make their workflows more efficient, admins have turned to record-triggered flows as a popular solution for automating processes. They offer the ability to do actions immediately when a record is created, updated, or deleted, reducing manual effort and ensuring everything runs efficiently.
If you’re just stepping into the world of Flows in Salesforce, I understand that it might feel a bit daunting. There’s a bit of a learning curve when dabbling in flows; however, the flexibility and power that they provide make it worth the effort. In this article, we’ll focus on record-triggered flows: what they are, their benefits, and how to create one step by step.
What Are Record-Triggered Flows?
If you’ve worked with automation in Salesforce before, you might be familiar with both Process Builder and Workflow Rules (I miss them sometimes!). You can compare record-triggered flows with Process Builder’s ability to trigger actions based on record changes, or Workflow Rules that execute when specific criteria are met. Record-Triggered Flows operate on a similar principle, but are far more powerful and flexible.
Record-triggered flows are automation processes that execute when a specific record-related event occurs, such as:
- A new record is created.
- An existing record is updated.
- A record is deleted.
These flows are powerful because they are designed to take action immediately when any of these entry criteria are met. Unlike their Process Builder and Workflow Rule predecessors, they provide a much broader range of options for handling changes in your org – from updating related records to creating tasks and sending notifications.
While Process Builder requires predefined criteria for actions to be triggered, Record-Triggered Flows go beyond that by allowing you to build complex logic directly into the flow. If you’ve read my previous tutorial, you can do a similar flow logic here, like leveraging decision elements or formulas, making them an essential tool for admins and developers looking to streamline processes without the complexity of custom code. You can think of record-triggered flows as more “real-time” than their predecessors.
Before-Save and After-Save Flows
Before we begin creating a record-triggered flow, let’s first try to understand the difference between two of its kind: Before-Save and After-Save.
Before-Save flows execute or run their actions on the triggering record itself before it is saved in Salesforce, whether it’s being created, updated, or deleted. When using this kind of flow, it is important to consider the order of execution for the object in question, as it may affect the expected outcomes of related automation. In Salesforce’s order of execution, a before-save flow runs before a before trigger, making it a nice choice for enforcing light validations like standardizing naming conventions, for example.

After-Save Flows, on the other hand, handle tasks that depend on the record being committed to the database, such as creating related records or sending emails. They execute actions after the triggering record is created or updated (not deleted!). This type of flow is more commonly used and supports a wide range of actions, including sending email alerts or custom notifications, updating the triggering or related records, or even calling out other flows.
An easy way to determine whether you need a before or after-save flow is to think whether your automation extends beyond the triggering record itself. If it does, then an after-save flow is probably the right choice.
Prerequisites
As usual, before diving in, make sure you have the following:
- Appropriate permissions to create and manage flows: Manage Flows and Run Flows user permissions that can be assigned via Profile or Permission Set > App Permissions.
- Access to Flow Builder in Salesforce Setup.
- A clear understanding of the process you want to automate: consider sketching the whole process out first as a flowchart.
For this walkthrough, let’s tackle the following use case:
TechSmart Inc. uses a custom object called Reimbursement Request to manage employee payment claims. Once a request is submitted, it goes through an approval process. To ensure a timely payout, the company wants to automatically assign approved requests to the appropriate Finance team based on the reimbursement amount.
The Finance Team is divided into three groups:
- Small Claims – Processes reimbursements below $100
- Mid Claims – Handles reimbursements from $100 to $499.99
- High Value Claims – Processes reimbursements of $500 and above
Goal: Create a record-triggered flow that sends a rejection email to the requester for rejected reimbursement requests, and assigns approved Reimbursement Request records to the appropriate Finance queue based on the amount.
In cases where a Finance team member reviews the request and identifies issues, such as incomplete or missing attachments, for example, they can update the request’s status to “Incomplete.” This should automatically trigger an email notification to the original requester, prompting them to update and resubmit the record.
Planning the Flow
Like before, let’s plan the flow first and ask ourselves questions of who, what, and when.
- Who are the users involved?
- When does the Flow run?
- What actions will be required?
The answers to these questions will help you identify whether you need a before-save or after-save flow, or map out what you need to do to solve the ‘how’ questions that may come after.
- Who are the users involved?
- The members of the Finance Team.
- When does the Flow run?
- The flow runs whenever a Reimbursement Request record’s status is changed to “Approved”, “Rejected”, or “Incomplete”.
- What actions will be required?
- The flow will reassign (change Owner) the Reimbursement Request to the appropriate Finance subteam.
- The flow will send an email to the requester for both rejected and incomplete requests.
If you came from my previous tutorial on Schedule-triggered Flows, you’ll know that next comes answering the how.
How…
- …will the Flow be triggered?
Since the flow is supposed to run when a Reimbursement Request is approved, rejected, or incomplete, the trigger should be a change in the Reimbursement Request’s status to any of the three.
- …the Flow know which Finance subteam to assign the request to?
The record’s value in the Amount field will determine whether the request is a small claim, mid claim, or high value claim.
Note: In this scenario, the approval process that sets the Reimbursement Request status is handled via a standard Approval Process (not a Flow Approval Orchestration), and the Record-Triggered Flow we’re about to create picks up when the Status field is updated to Approved, Rejected, or Incomplete. If we were using Flow Approvals instead, this logic would likely sit in an Autolaunched Flow as a background step.
Walkthrough: Creating the Flow
To begin, navigate to Setup and type “Flow” in the quick find box. When you see “Flows” in the results, click on it to view all flows in your org.
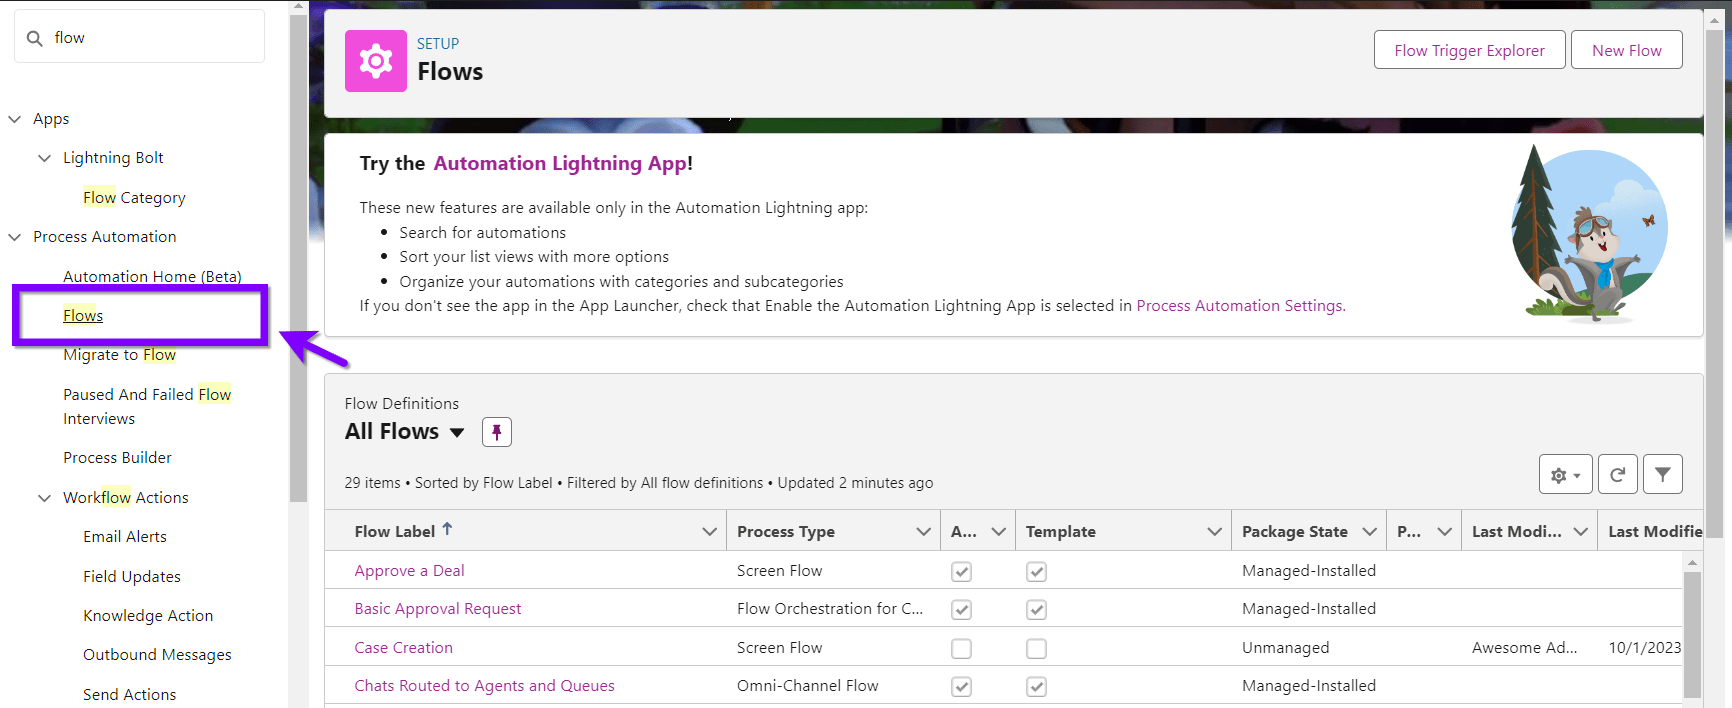
Hit “New Flow” on the upper right. This should open the Flow Builder on a new tab, with a prompt for you to choose from categories or frequently used flow types. Select “Record-Triggered Flow”.

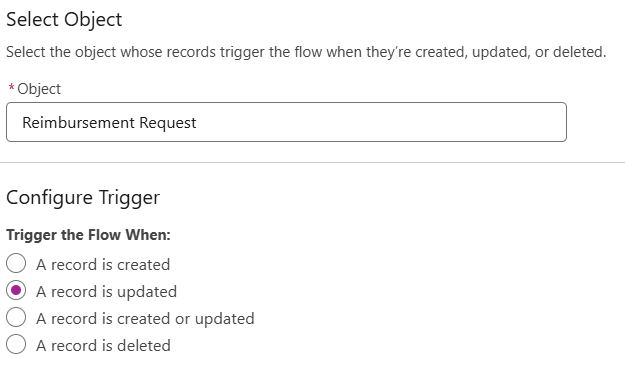
The first thing it asks is for you to select the triggering object. Since the trigger would be a change in the status of the Reimbursement Request, select Reimbursement Request as the object.
Next is to pick when to trigger the flow. Our answer to the question, “When does the Flow run?”, comes in handy here. Select “A record is updated”.
Next is setting Entry Conditions. Since we know that this is for Approved, Rejected, and Incomplete requests, select “Any Condition is Met (OR)” under “Condition Requirements” and set the Status for all three values.
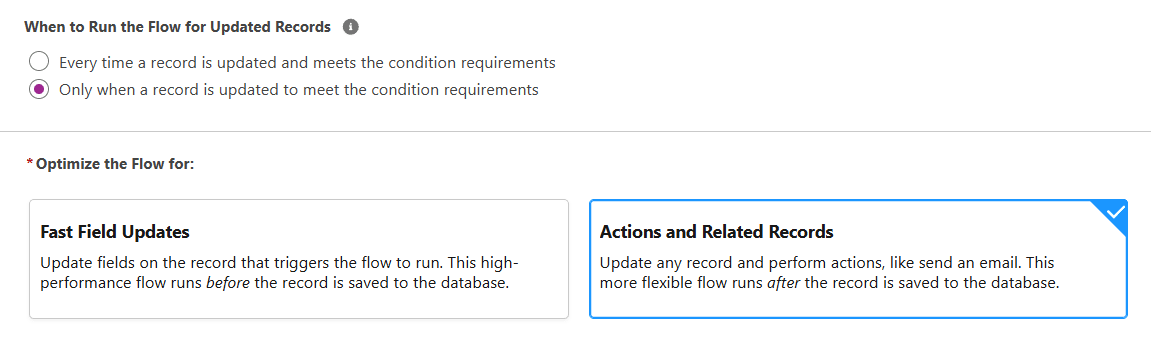
Under “When to Run the Flow for Updated Records”, select “Only when a record is updated to meet the condition requirements”. This ensures the flow will run only when the status is set from anything to whichever of our three choices. Picking the other option will make the flow run unnecessarily for any changes made on an approved, rejected, or incomplete request.

Under “Optimize the Flow for:” is where we identify whether we are doing a before-save or after-save flow. While the Flow Builder UI doesn’t exactly display the words “before save” and “after save”, the “Fast Field Updates” option indicates a before-save and “Actions and Related Records” indicates an after-save. In this case, we’re picking the latter because we want all our actions to happen after the record is already saved to the database.
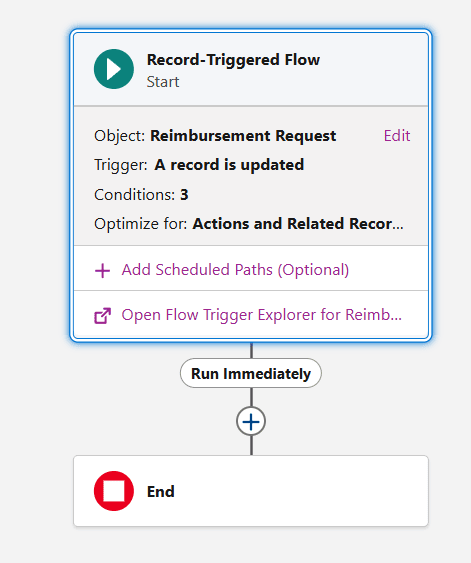
Here’s how our Flow looks so far. Click the plus sign to start the next step and add an element.
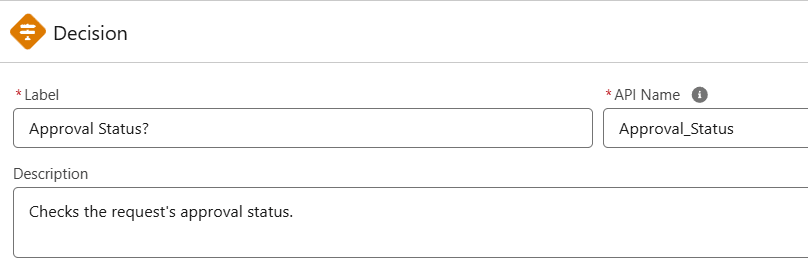
Our flow first needs to know what the status is set to, so search for and select the Decision element.
Give the decision element a label and description.
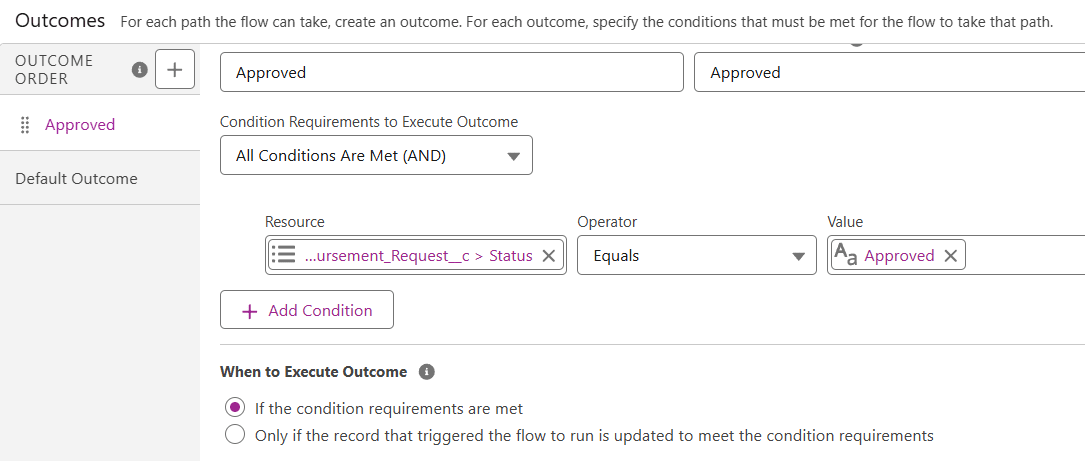
Moving on to setting up the outcomes, we know that we have three: Approved, Rejected, and Incomplete. Set the first outcome as “Approved” and set the condition to Status = Approved. Make sure to first go into “Triggering Reimbursement Request >” before searching “Status” as the field on its own isn’t searchable from the get-go.
The entry criteria are already set to make the flow run only when it’s in one of the three statuses, so there’s no need to configure that again here. Keep the “When to Execute Outcome” value as is.
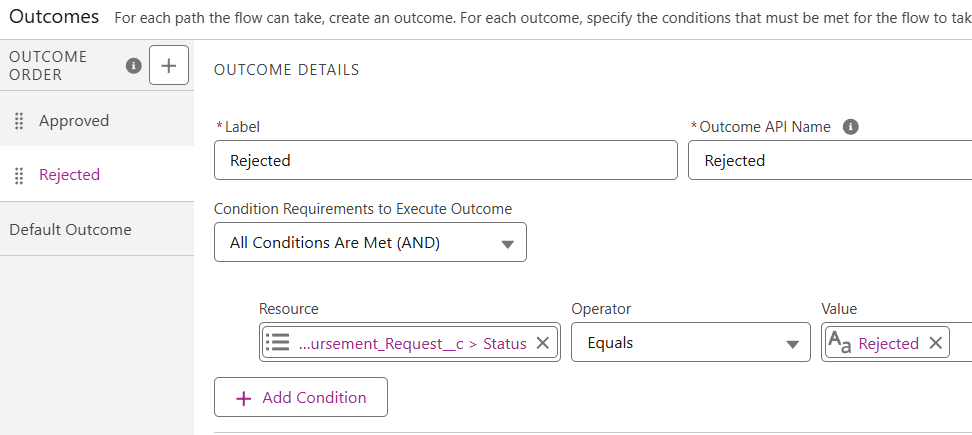
Click the plus sign beside Outcome Order to add another outcome, and name it “Rejected”. Do the same steps as we did for “Approved”.
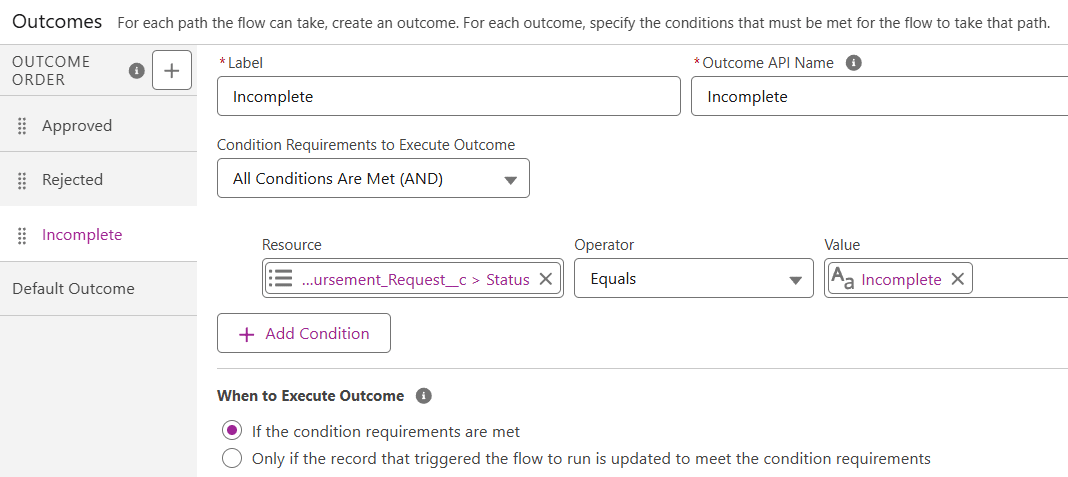
The last one to configure would be for “Incomplete”. Do the same steps as the two other statuses above, then leave the Default Outcome as is.
Here’s a quick check on how the flow should look so far:

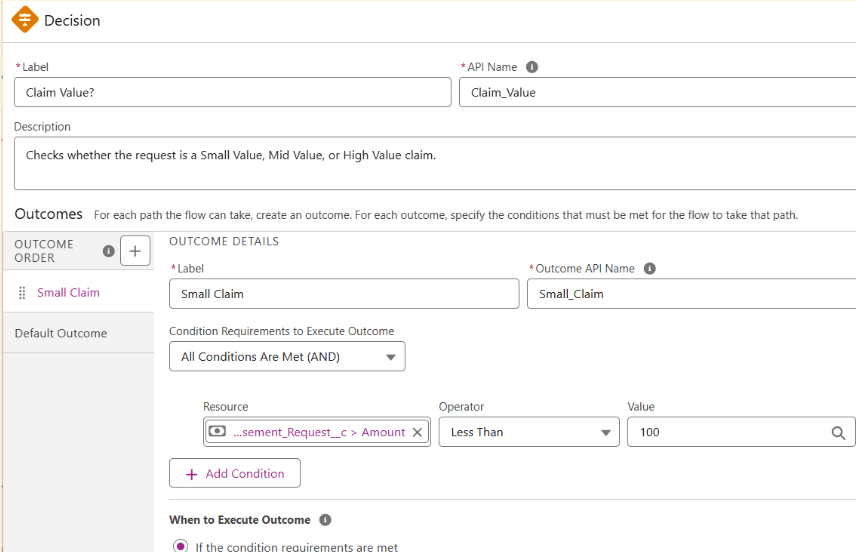
Click the plus sign under “Approved” and add another decision element. We’ll use this so the flow knows which Finance subteam to reassign the record to. Give your decision element a label, API Name, and description, then proceed to the first outcome.
For the condition requirements, set it to the triggering record’s Amount < 100, which means the flow identifies the request as a Small Claim if the Amount is less than $100.
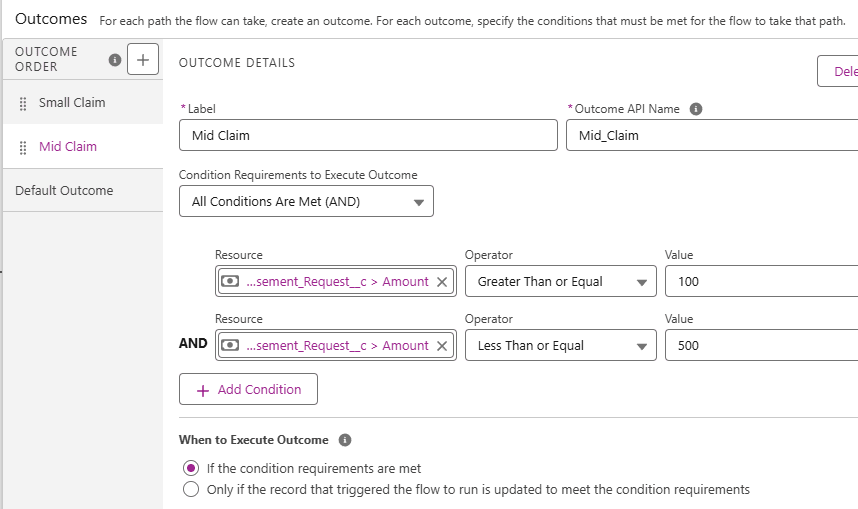
Click the plus sign beside Outcome Order and add another outcome, this time for Mid Claims. Do the same steps as above, but this time set the condition requirements to Amount >= 100 AND Amount <= 500. This means the request is a Mid Claim for any amount from $100 to $499.99.
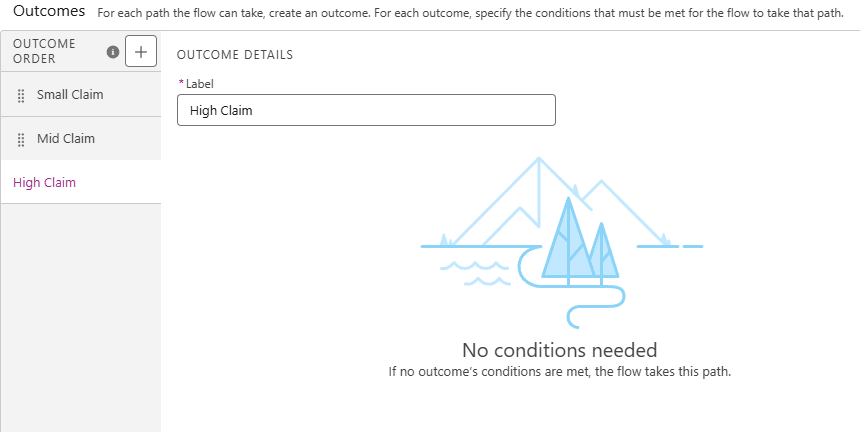
Last, change the Default Outcome’s label to indicate the path for High Value Claims. This is because any other Amount that will not satisfy our previous criteria would be anything that’s $500 or greater.
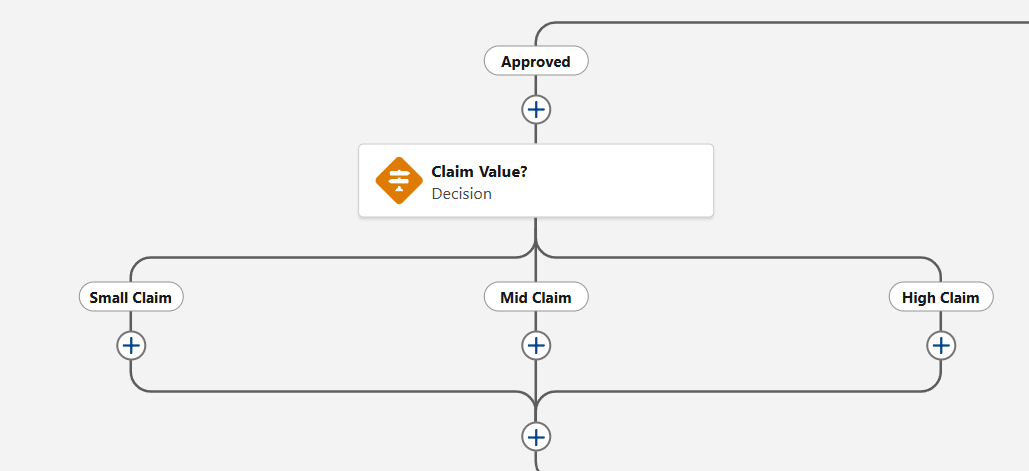
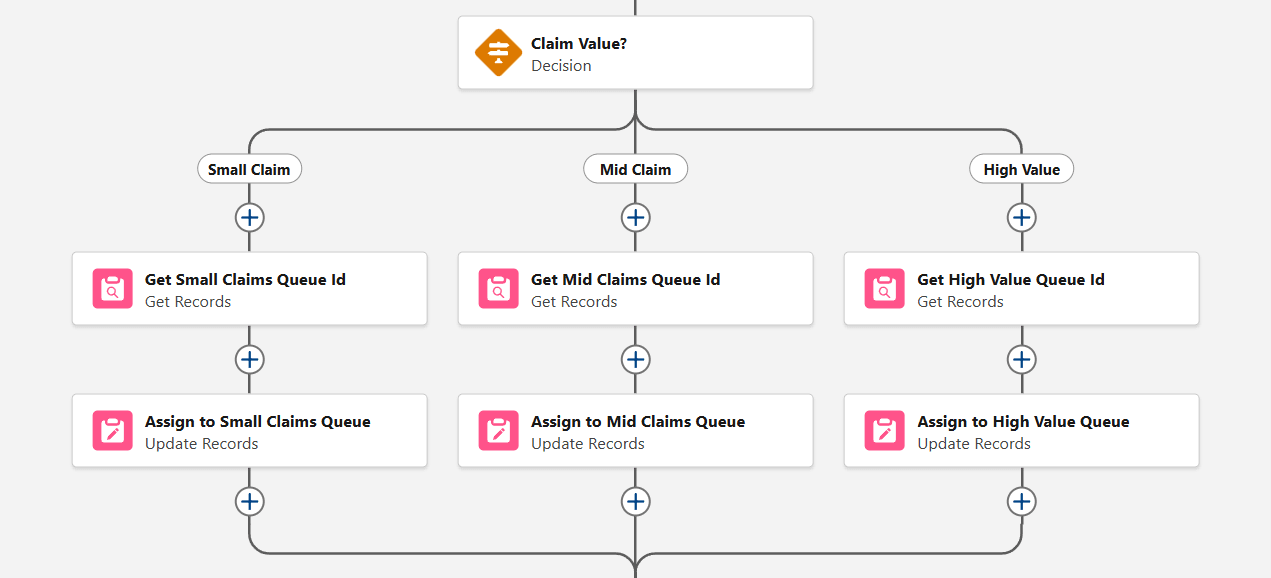
Here’s how our Approved branch should look so far:
Next, let’s understand what each decision branch must do after classifying the request as a small, mid, or high claim.
There are three Finance subteams, each handling a different type of claim: Small Value, Mid Value, and High Value. Each subteam has its own queue set up for the Reimbursement Request object. When a request’s owner is set to the appropriate queue, it will appear in that queue’s list view, ready for action. From there, all the team needs to do is review and process the request.
At this point, our flow does not know what the subteam’s queues are or how to identify them. This is why we will need a Get Records element for each branch of the decision, fetching the appropriate queue for each claim. Click the plus sign below Small Claim and select Get Records.
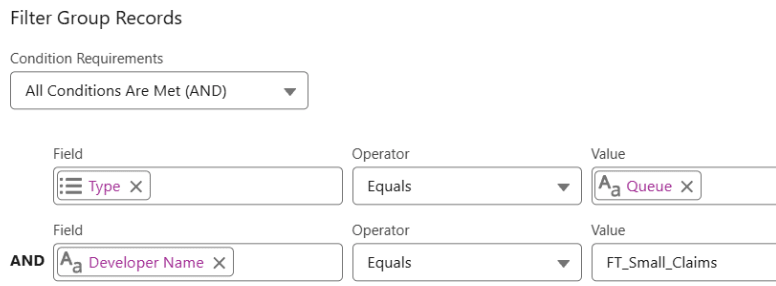
Give it a label, API Name, and description, then select “Group” as the object.

Now, “Group” is broad, as it represents a group of users. A group could be a role or even a territory. In this case, since we’re dealing with queues, we have to set the appropriate type in one of the condition requirements. Set it as Type = Queue, and then add another requirement where Developer Name = the API name of the queue. In this case, it’s “FT_Small_Claims”.
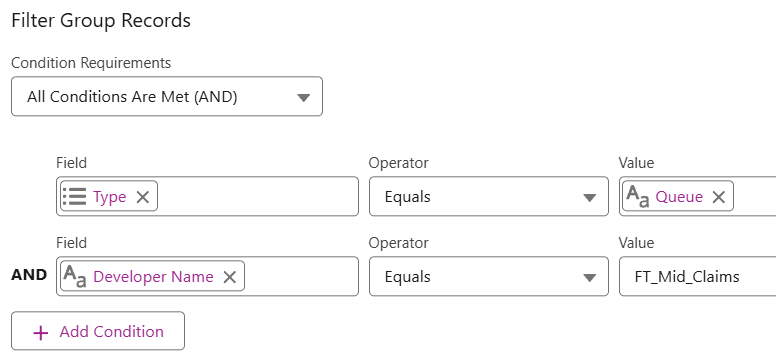
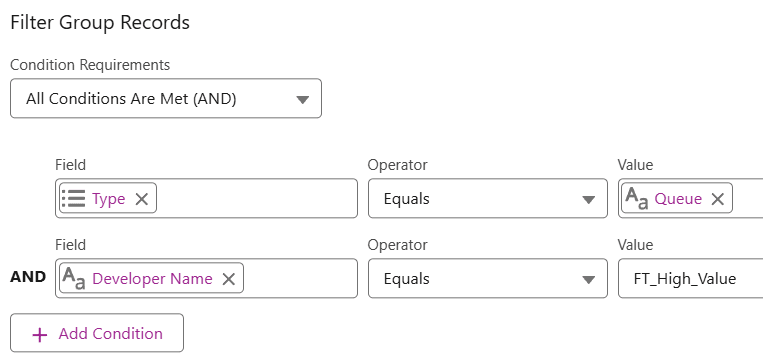
Do the same for the Mid Claim and the High Value branches.
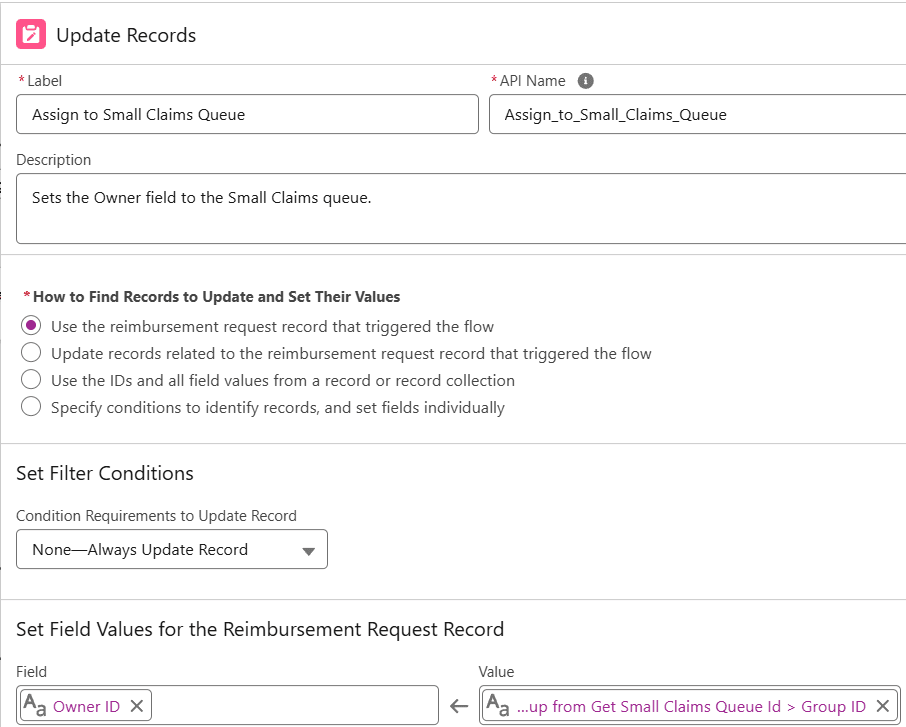
Next, it’s time to configure our action. To assign the Reimbursement Request record, the Owner field must be set to the appropriate queue. Click the plus sign under your Small Claims’ Get Records element and add an Update Records element.
Give it a label, API Name, and description, then select “Use the reimbursement request record that triggered the flow” under “How to Find Records to Update and Set Their Values”. No filter conditions, just update the Owner field value to the Id from the Get Records element in your Small Claims branch.
Next, do the same steps for your Mid Claim and High Value branches, making sure to get the Id from the appropriate Get Records element in their respective branches.
Here’s how your Approved branch should look:
Let’s move on to the next: Rejected branch.
When the Reimbursement Request’s status is Rejected, we want it to send an email to the requester regarding the reason for rejection. Click the plus sign under the Rejected branch and add a Send Email action. Give it a label, API Name, and description.
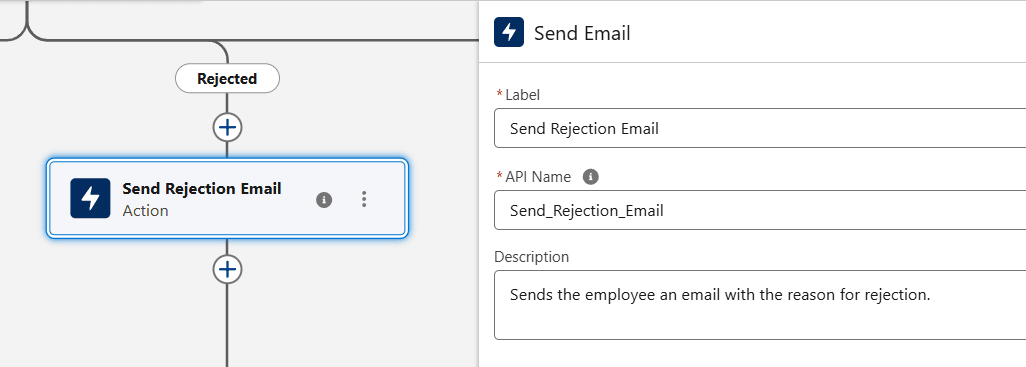
“Employee” is a user lookup field on the Reimbursement Request object, so let’s set the email of the user in that field to be the value in “Recipient Address List”. As for the sender details, the default will be the current user. Depending on your preference, select the Sender Type (in this example, I used OrgWideEmailAddress) and add in your preferred email address under “Sender Email Address”. As for the email content, use an existing email template (if you already have one) or set one up directly, like so:

For the example above, I used the rich text view and the resource lookup to add merge fields for the employee’s name, the Reimbursement Request number, and the rejection reason. Don’t forget to select “True” under “Rich-Text-Formatted Body” so your email shows up as you configured it.
For the Related Record ID, make sure to add the triggering Reimbursement Request record’s Id and set “Log Email on Send” to True so the email appears on the record.
Great! We’re off to our last branch: the Incomplete status.
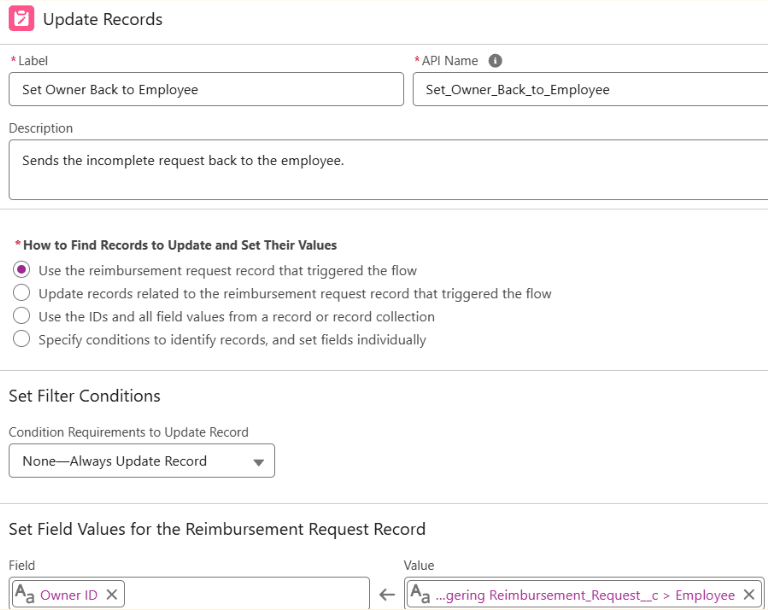
For this one, the goal is to return the record to the employee so they can revise it. This involves two actions: setting the Owner of the reimbursement request back to the employee, and sending them an email notifying them that their request is incomplete and requires their attention.
Click the plus sign and add an Update Records element. Give it a label, API Name, and description, then keep “Use the reimbursement request record that triggered the flow” selected under “How to Find Records to Update and Set Their Values”. No filter conditions, just set the value of the Owner field to the Employee.
Click the plus sign below this element, and this time add another Send Email action. Give it a label, API Name, and description, then set the recipient address list to the employee’s email address. Like the previous Send Email action, set your Sender Type and Email Address as well as email content.

Lastly, for the Related Record ID, make sure to add the triggering Reimbursement Request record’s Id and set “Log Email on Send” to True so the email appears on the record.
Check out the final flow:

Summary
In this article, we explored how to build a Record-Triggered Flow that responds to changes in a Reimbursement Request’s status (approved, rejected, or incomplete). We walked through how the flow handles each outcome, from notifying employees via email to routing records to the appropriate Finance team or back to the requester.
While this guide is highly focused on a specific use case, it only scratches the surface of what Record-Triggered Flows can do. With practice, you’ll be able to design more complex automations using combinations of different elements and actions.
Have another use case in mind you’d like us to cover next? Let us know in the comments below!
