

What if your admins had the ability to make quick updates to your code-driven features without touching a single line of code? Of course, this is something you could do with custom settings. But why stop there?
If you want to take your admin-friendly solutions to the next level, you can build a custom configuration hub to manage your custom settings. And best of all, the configuration hub can be built without any code! Let’s discuss how you can quickly improve your team’s admin experience by building a simple screen flow.
Why You Need a Configuration Hub
You may be wondering: “Why do I need a configuration hub when I can manage custom settings in Setup?”
First, let’s think about the common use cases for custom settings. Many Salesforce teams are using custom settings to store configurable business logic. Teams are also using custom settings to store on/off toggles for automations, validation rules, customization options for Lightning Web Components (LWC), and more.
Admins need the ability to easily update these settings. However, admins may not understand which setting to update for a project. The field names and descriptions for some settings could be vague or misleading. And settings for a single project could be scattered across multiple custom settings objects, making it harder to determine the exact location of each setting.
In these scenarios, the current user interface (UI) for managing custom settings records would not provide the best experience for admins. In fact, some admins might not feel comfortable going into Setup to edit these settings. They would rather have a developer make those changes instead.
Building a configuration hub can help resolve these issues. You can craft a guided experience for updating custom settings that admins will actually enjoy using.
Pro-Tip: You can also create configuration hubs for updating custom metadata, but that currently requires a bit more effort and some coding, so we will focus on custom settings in this article.
Key Benefits
A configuration hub can provide a centralized, structured location for all custom settings related to a project. It can also provide additional details and guidance on how each setting works. That way, admins will have a better understanding of each setting they can modify, and they don’t have to worry about updating the wrong settings.
This will help reduce the mental load for admins and will also reduce the need for developer involvement.
A configuration hub should even make training and handoffs a bit easier. You can teach new admins how to use the configuration hub to update key settings. You can also simplify your internal training guides so that you are referencing the configuration hub instead of listing out a bunch of custom settings records.
Pro Tip: If you are building an AppExchange application, a configuration hub will help improve the admin experience for your app. You want to make it as easy as possible for installers to set up your app, and a configuration hub can help simplify the setup process.
Configuration hubs are even helpful whenever certain business users (i.e., super users) need access to manage custom settings. This approach allows you to limit access to Setup, provide a user-friendly interface, and add guardrails so that super users can easily update the correct settings.
Now that you have a better understanding of how configuration hubs can improve the admin (and super user) experience, let’s take a look at how screen flows can help turn your configuration hub dreams into a reality.
Why Should You Use Screen Flows for Your Configuration Hub?
Instead of using LWC or another front-end framework to build out your configuration hub, you can reduce the complexity of the build by using a screen flow. Screen flows have the ability to query, create, update, and delete Custom Settings records without any code.
Screen flows offer the ability to build custom user interfaces that can easily be modified by admins. They can also be added to convenient locations such as lightning app pages or utility bar items. Let’s bring this configuration hub concept to life using a real-world example.
Real World Scenario: Configurable LWC
Imagine that you are a Salesforce Administrator working with a developer who built a custom announcement banner to show important, system-wide messages on home pages, record pages, and app pages. This reusable LWC is an awesome way to keep users informed about important updates within Salesforce, but there is one problem.
Every time the banner message, icon, or theme needs to be adjusted, it requires a code update that has to go through the whole deployment process.
In your eyes, the perfect solution would give you the ability to easily update the announcement banner without deployments or pulling in the developer. To accomplish this, you want the solution to include the following features:
- Toggle to show/hide the announcement banner.
- Configurable announcement banner message.
- Configurable styling for the theme and icon.
And you would love to do all of this without searching through Setup.
After a brainstorming session with the developer, you both determine that custom settings paired with a configuration hub can solve the problem!
You are tasked with creating the custom settings at the organization level, sending the custom setting information over to the developer, and then using a screen flow to build out the configuration hub. That way, the developer can focus on code updates to the LWC.
Creating the Custom Settings
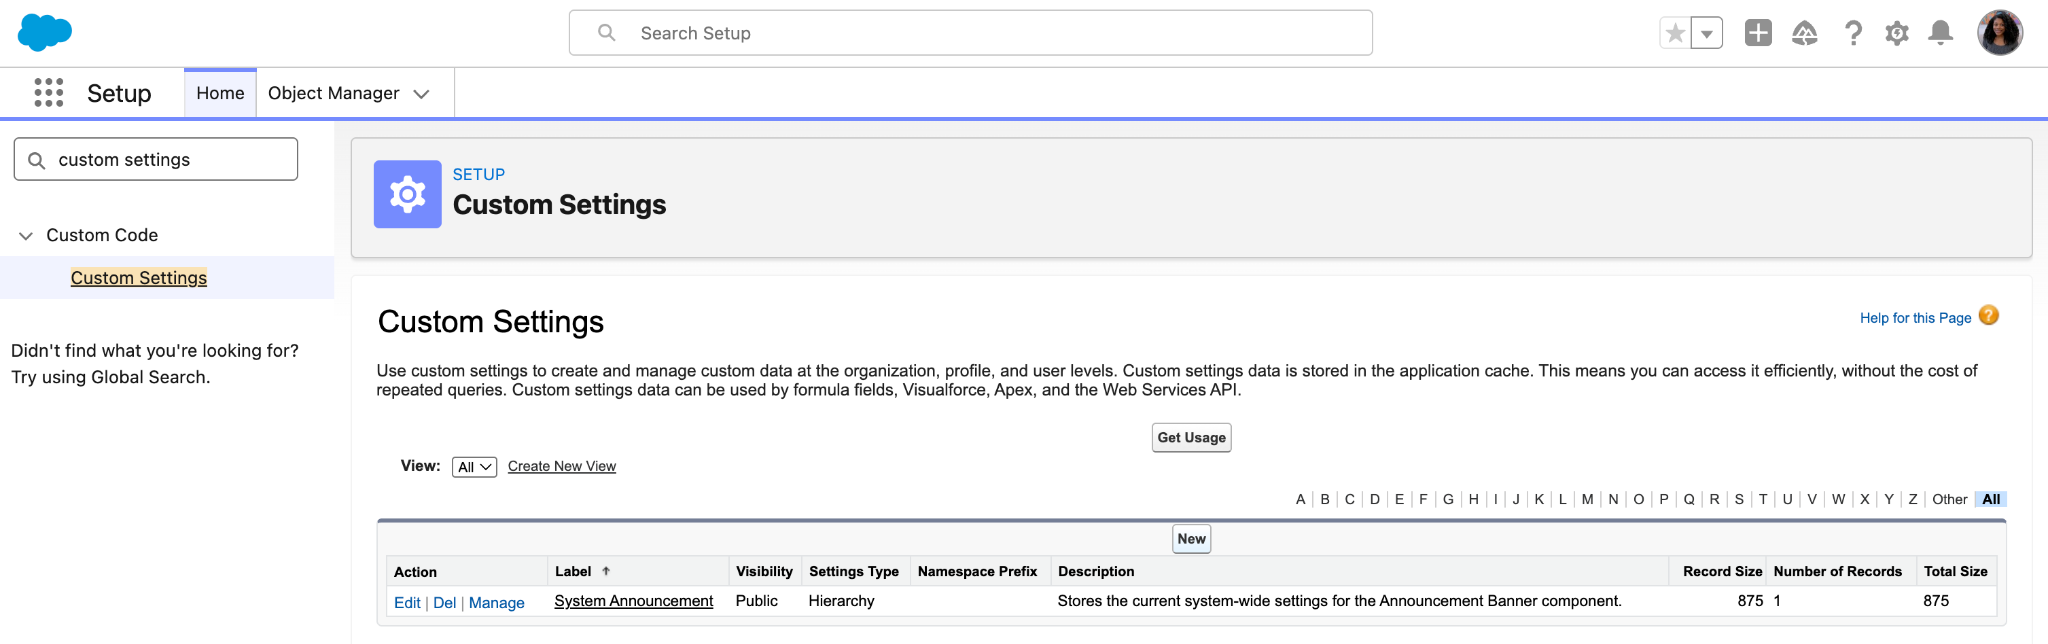
To get started, navigate to Setup → Custom Settings, then click on the New button.
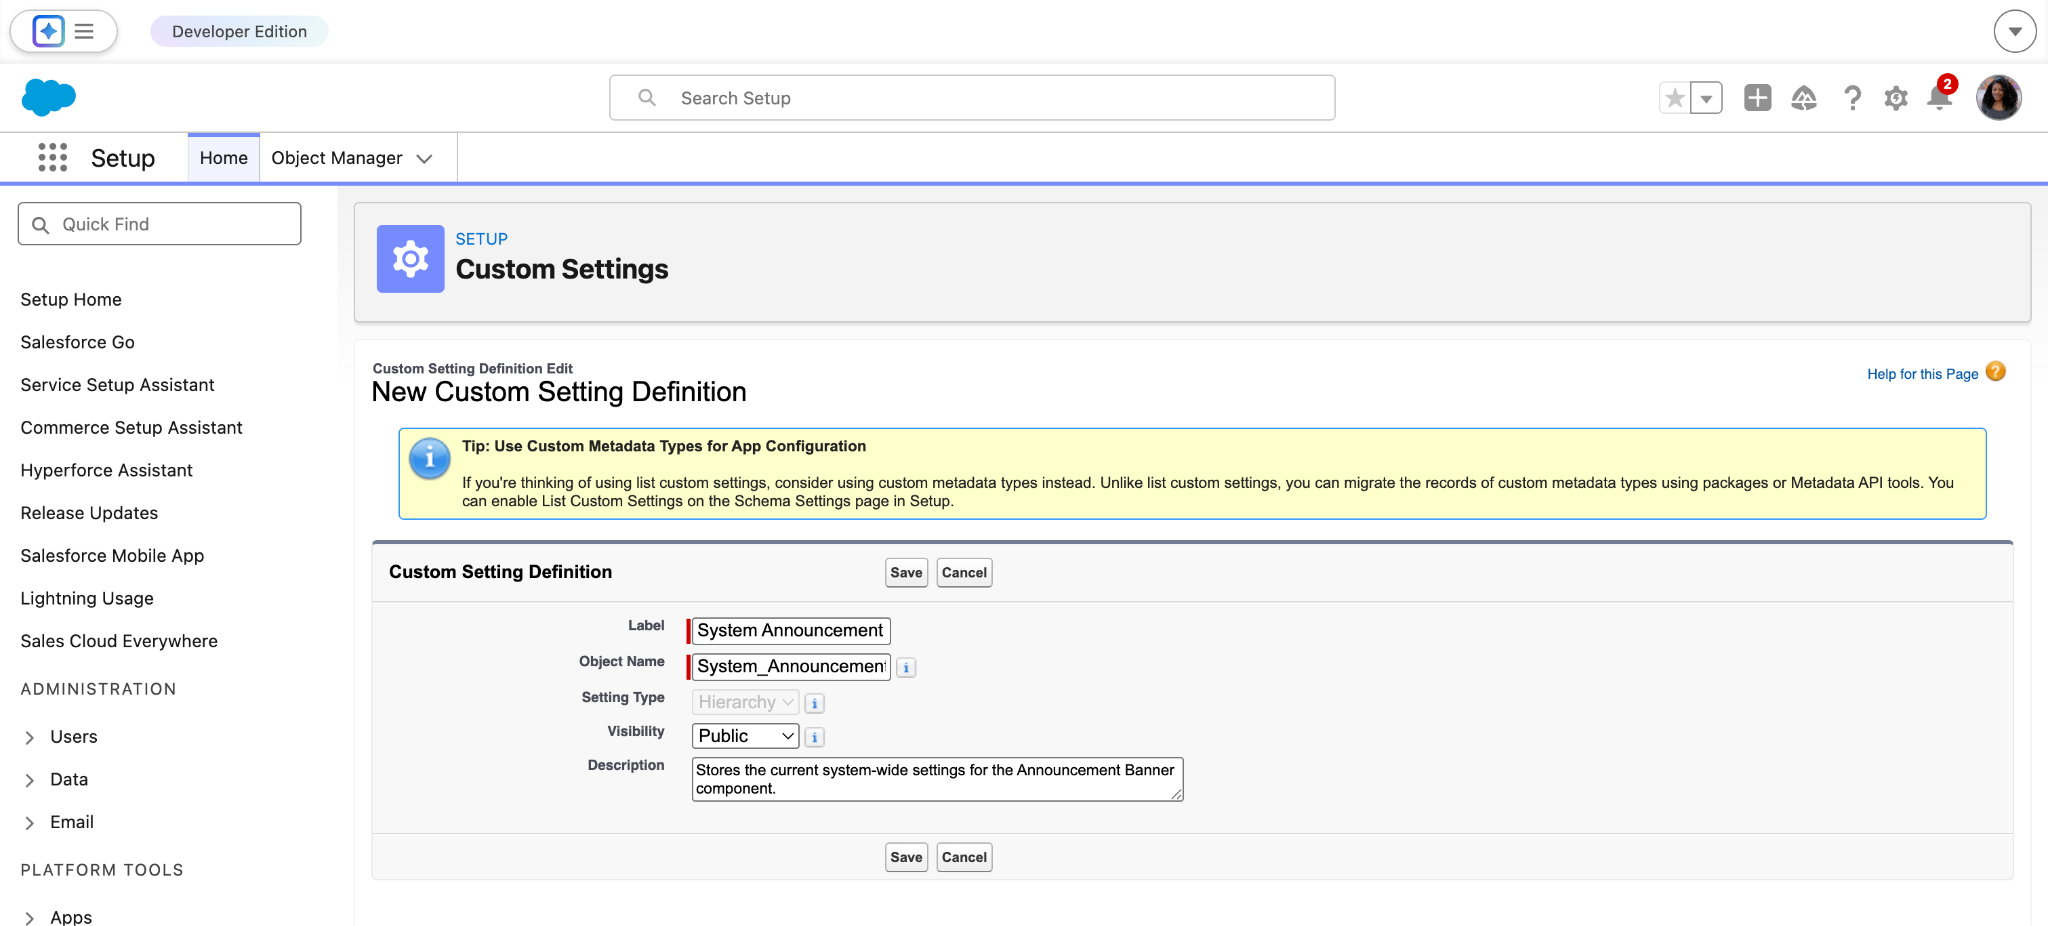
Next, fill out the “New Custom Setting Definition” screen with the following information:
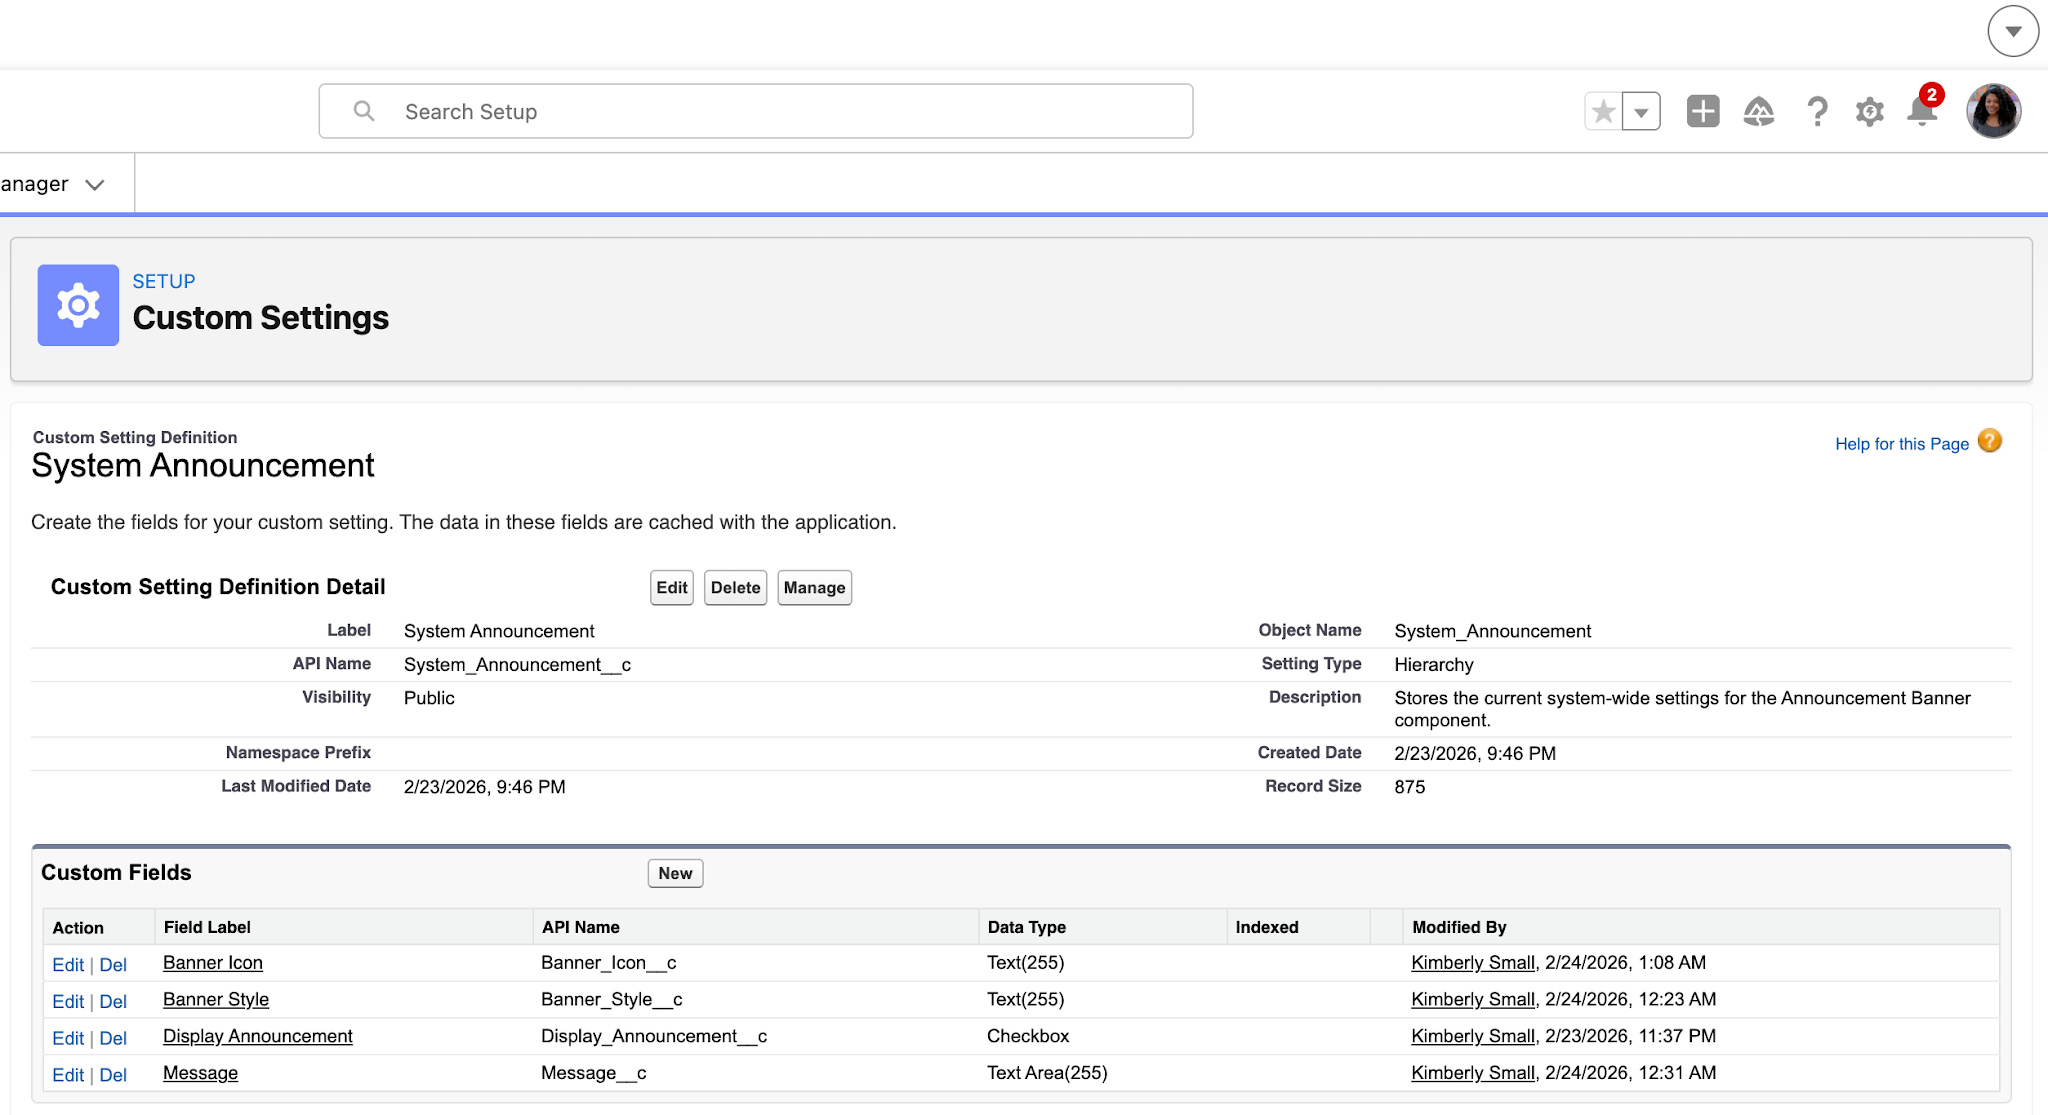
- Label: System Announcement
- Object Name: System_Announcement
- Setting Type: Hierarchy
- Visibility: Public
- Description: Stores the current system-wide settings for the Announcement Banner component.
Click Save to finish creating the custom setting definition.
From there, you will see a screen to manage the details and fields for the new System Announcement settings. You need to add some fields that can be used to configure parts of the announcement banner LWC. You plan on creating the following custom fields to meet the defined requirements:
New Custom Field: Display Announcement
- Data Type: Checkbox
- Name: Display Announcement
- Default Value: Unchecked
- Field Name: Display_Announcement
- Description: Controls whether the system announcement banner is displayed. When unchecked, the banner is hidden across all pages where the component is used.
- Help Text: Controls whether the system announcement banner is displayed. When unchecked, the banner is hidden across all pages where the component is used.
New Custom Field: Banner Style
- Data Type: Text
- Name: Banner Style
- Length: 255
- Field Name: Banner_Style
- Description: Determines the visual style of the announcement (Info, Warning, Error, or Success). Maps to SLDS alert themes.
- Help Text: Determines the visual style of the announcement (Info, Warning, Error, or Success)
- Default Value: “Info”
New Custom Field: Banner Icon
- Data Type: Text
- Name: Banner Icon
- Length: 255
- Field Name: Banner_Icon
- Description: Specifies the icon displayed in the system announcement banner. Use an SLDS utility icon name (example: utility:announcement)
- Help Text: Specifies the icon displayed in the system announcement banner. Use an SLDS utility icon name (example: utility:announcement)
- Default Value: “utility:announcement”
New Custom Field: Message
- Data Type: Text Area
- Name: Message
- Field Name: Message
- Description: The announcement text displayed to users.
- Help Text: The announcement text displayed to users.
Once the custom setting definition is ready, you send the API names and related information over to the developer so that they can get started on the code updates for the LWC.
Now, you can start building the UI for your configuration hub!
Designing a Screen Flow to Manage Custom Settings
To get started, navigate to Setup → Flows, then click on the New Flow button.
Since you are building a custom UI, select the option to create a Screen Flow.
In your flow, you start by querying the “Default Organization Level Value” System Announcement record, if it exists. You do this by using a Get Records element with the following settings:
- Label: Get System Announcement Settings
- API Name: Get_System_Announcement_Settings
- Description: Queries the System Announcement custom settings
- Object: System Announcement
- Filter: Location = Running Org ID (Salesforce.com Organization ID)
- Sort Order: Not Sorted
- How Many Records to Store: Only the first record
- How to Store Record Data: Automatically store all fields
This Get Records element produces the {!Get_System_Announcement_Settings} record variable that can be used even if the query doesn’t find an existing record at the organization level.
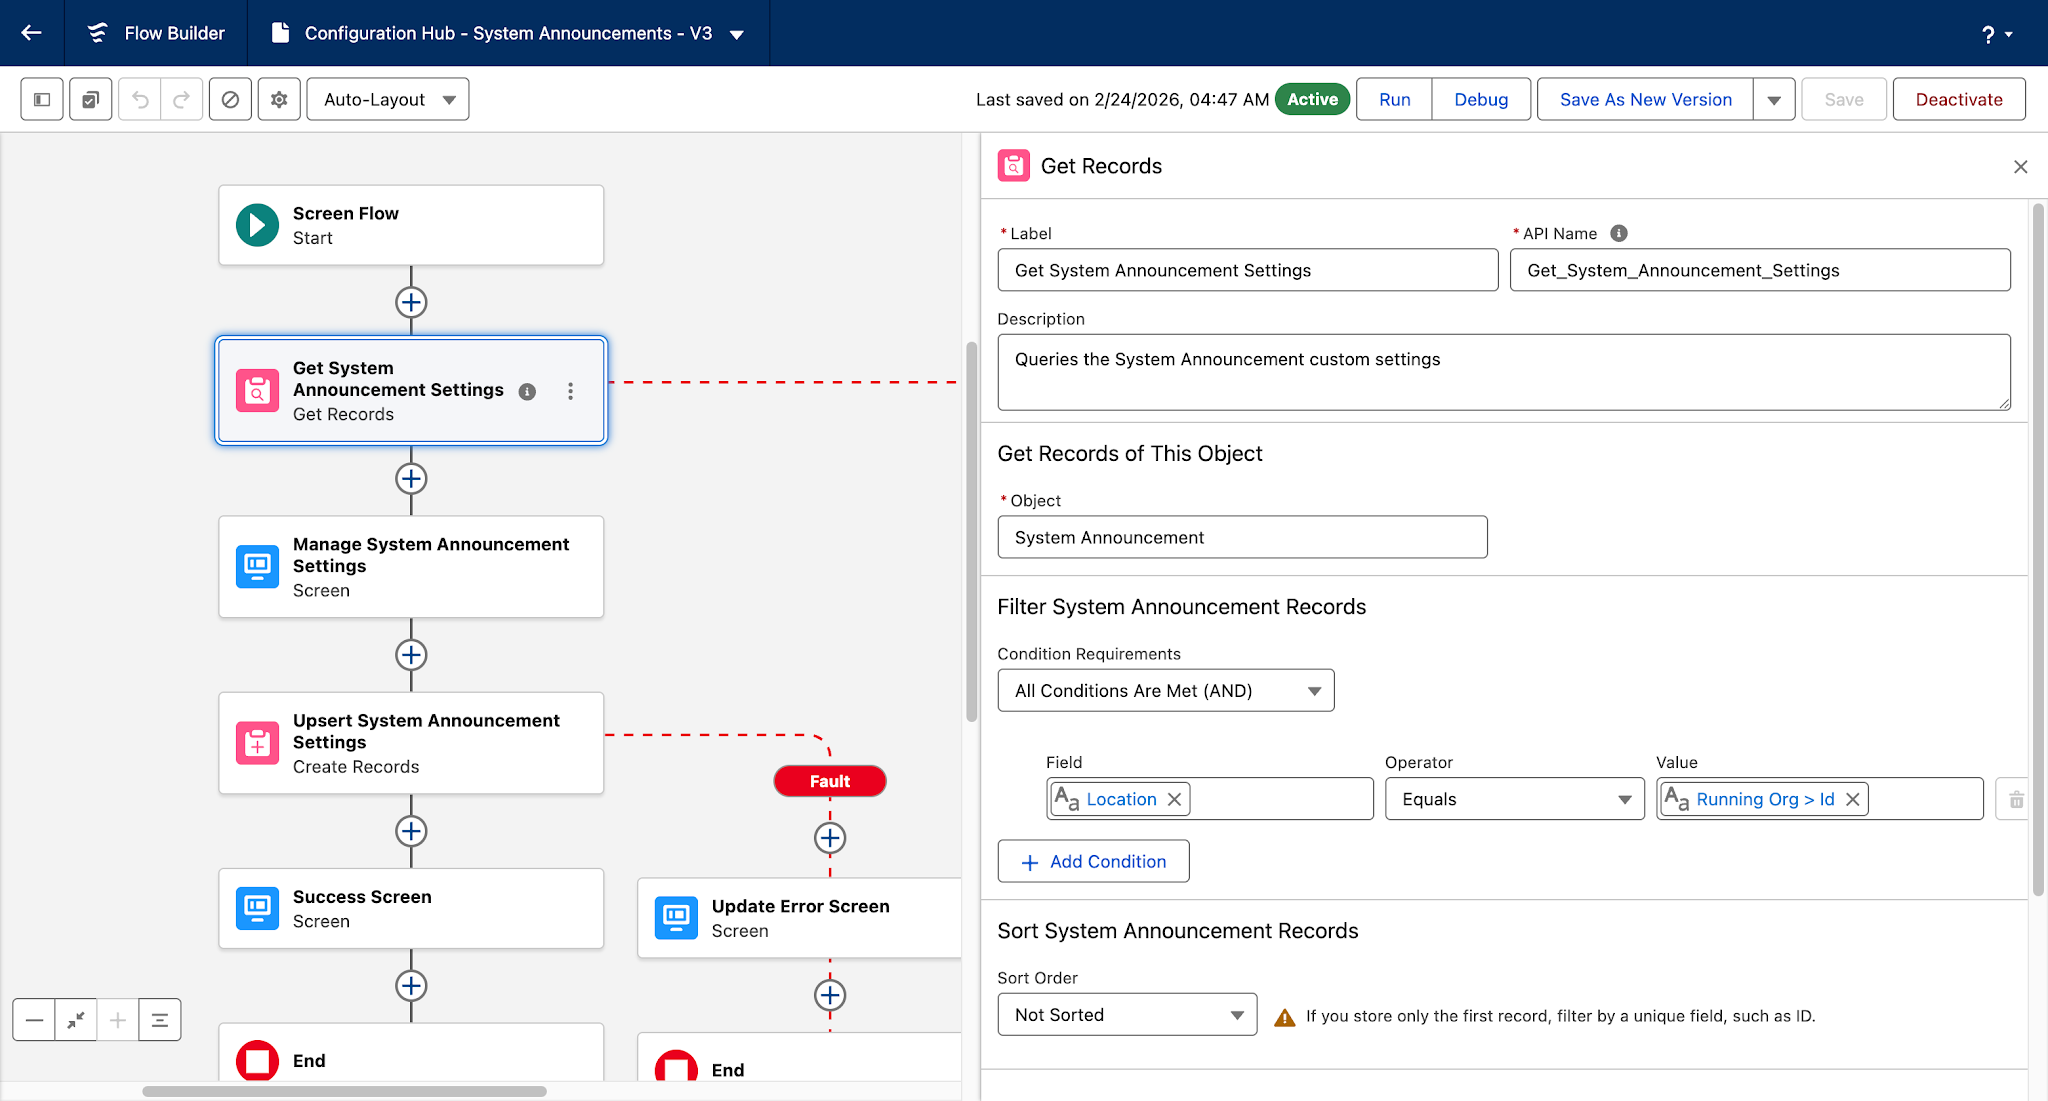
You also add a fault path that will display a message if there are any errors while retrieving the record.
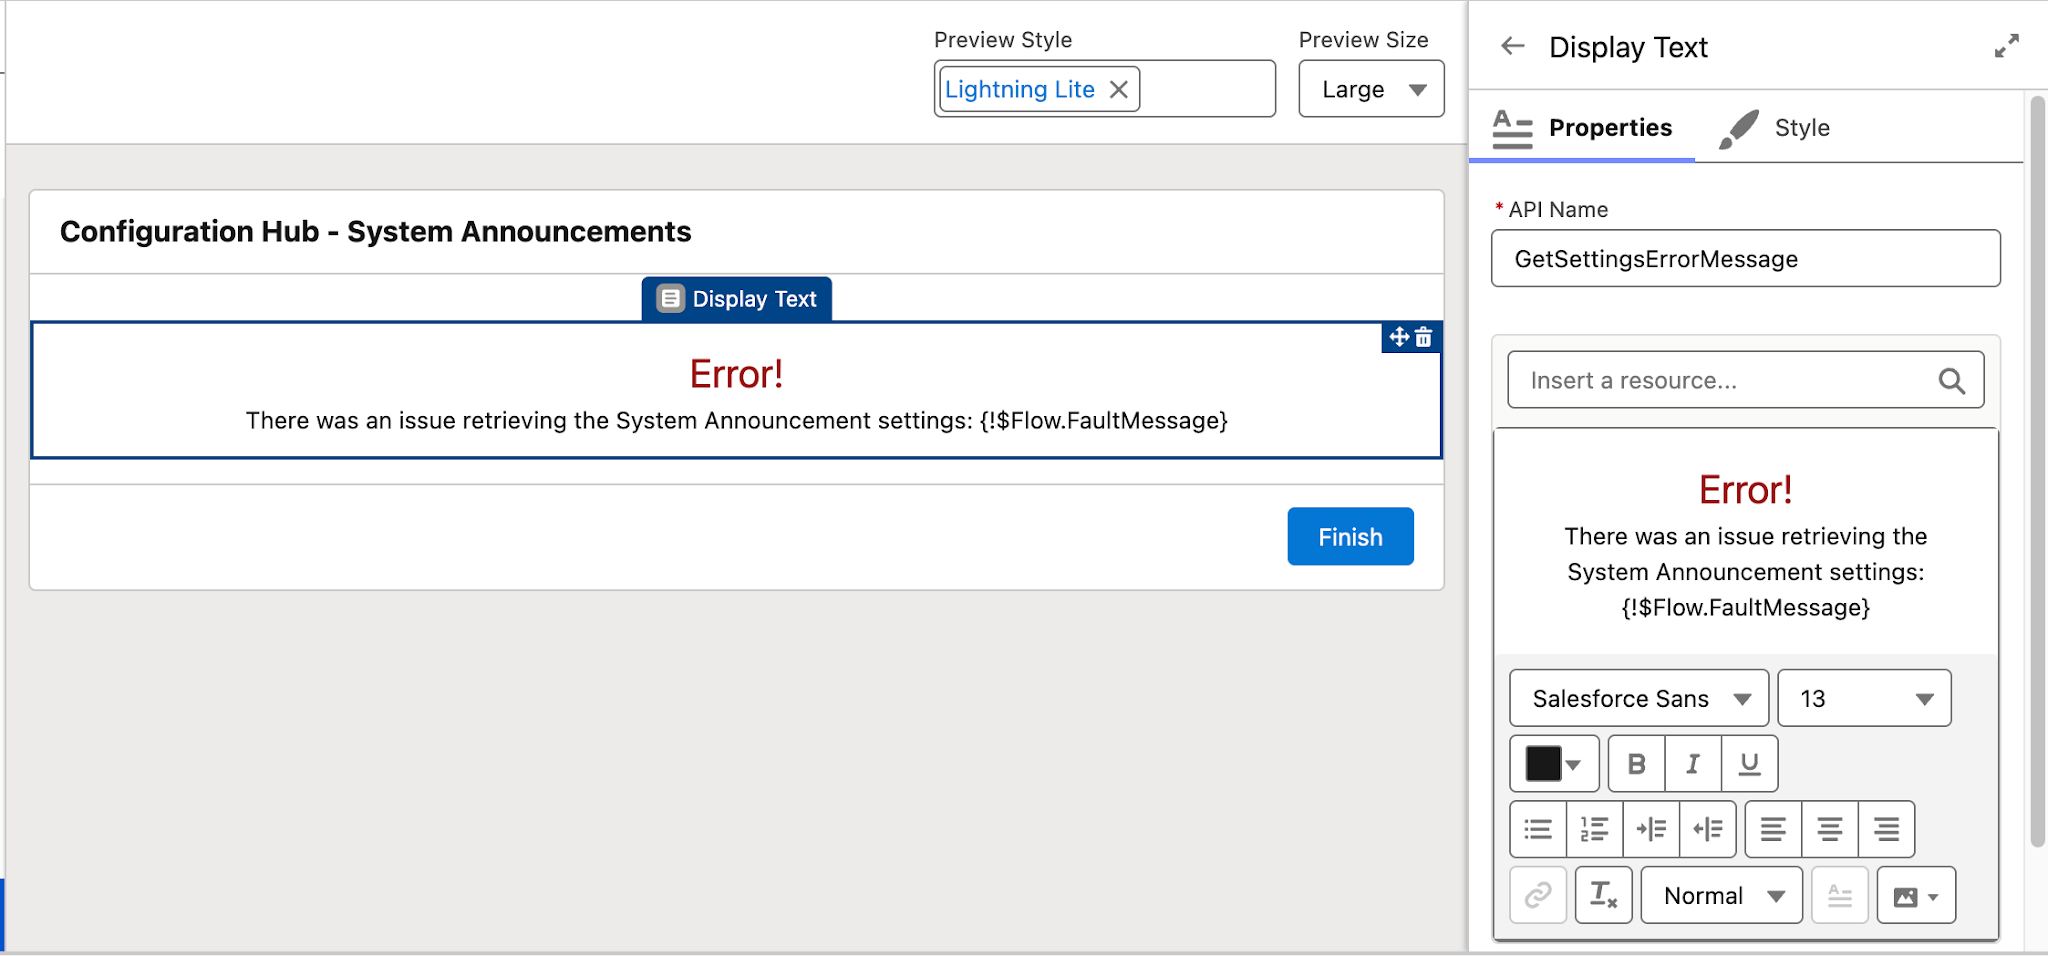
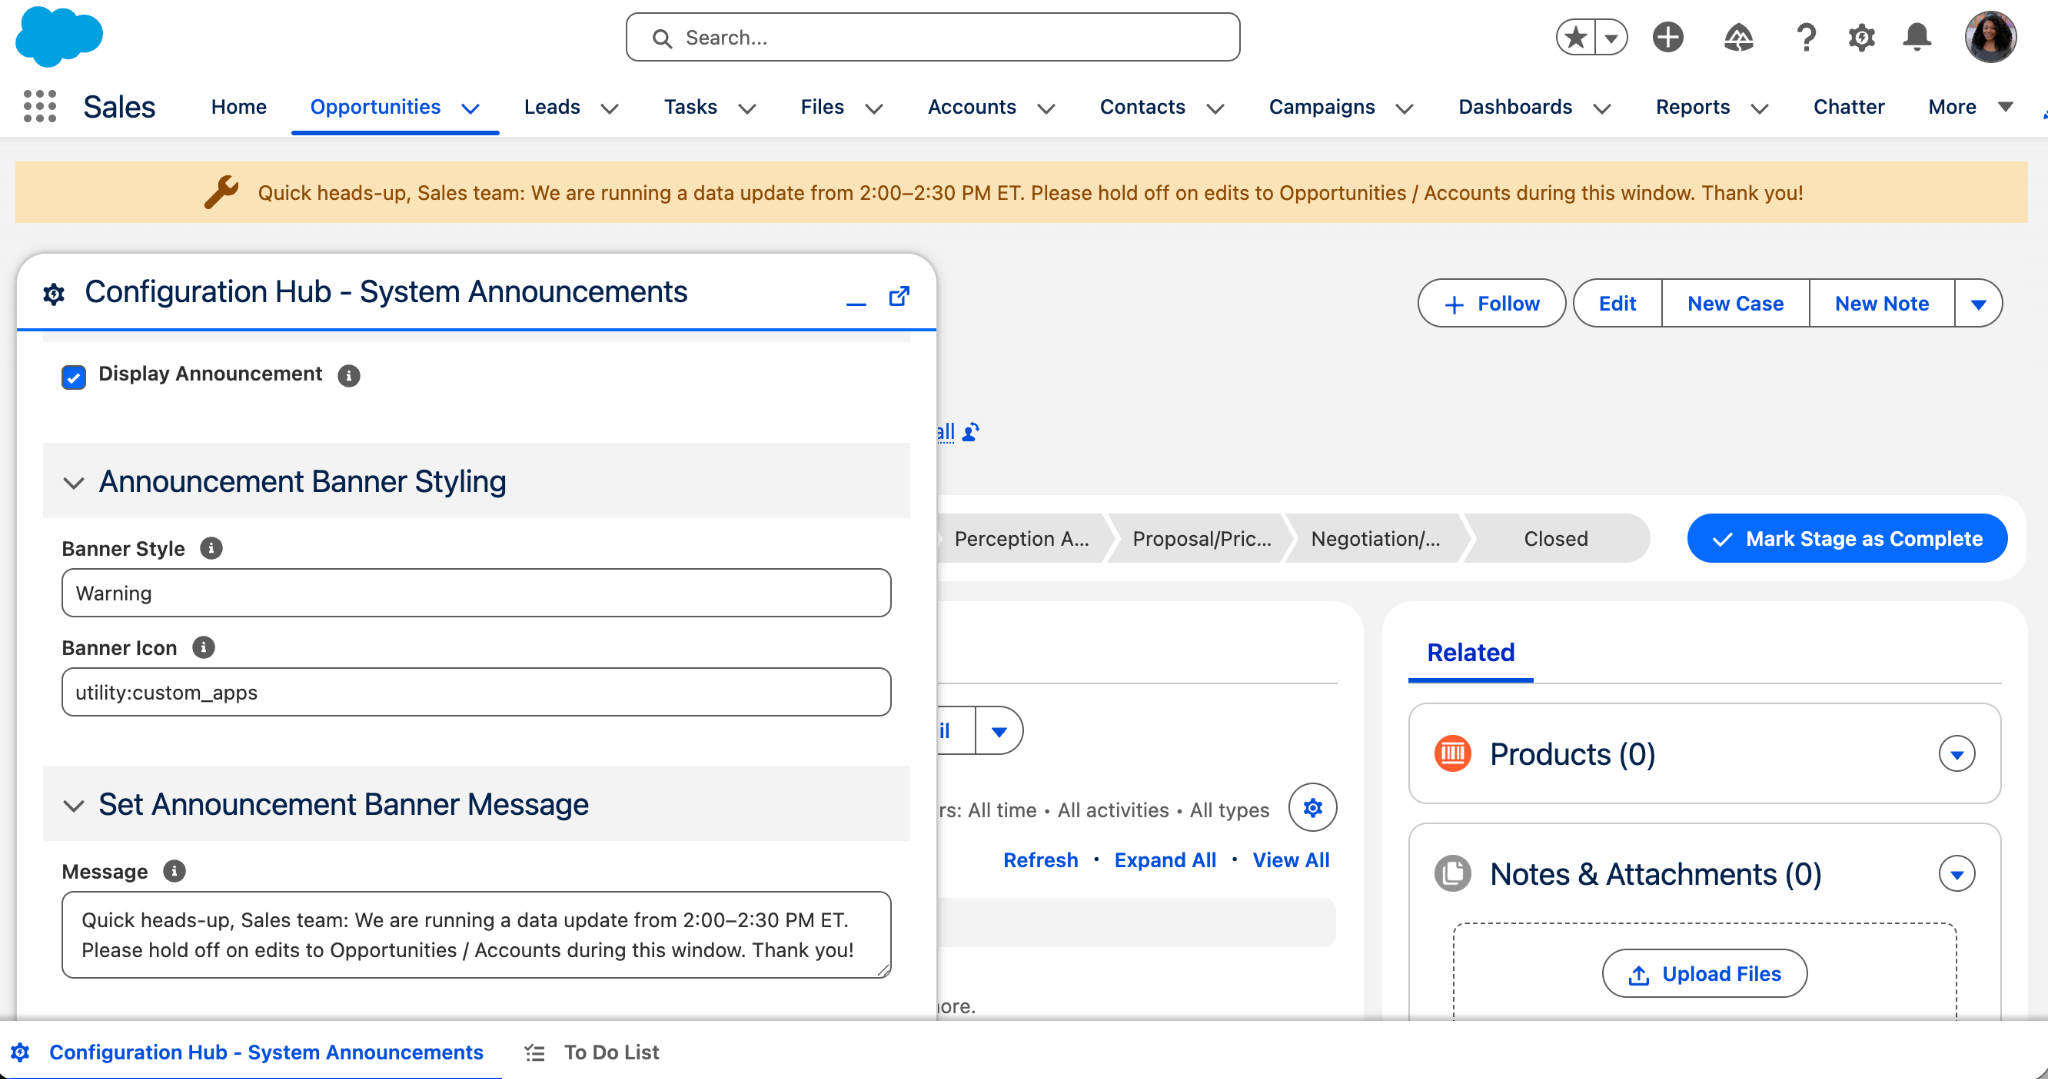
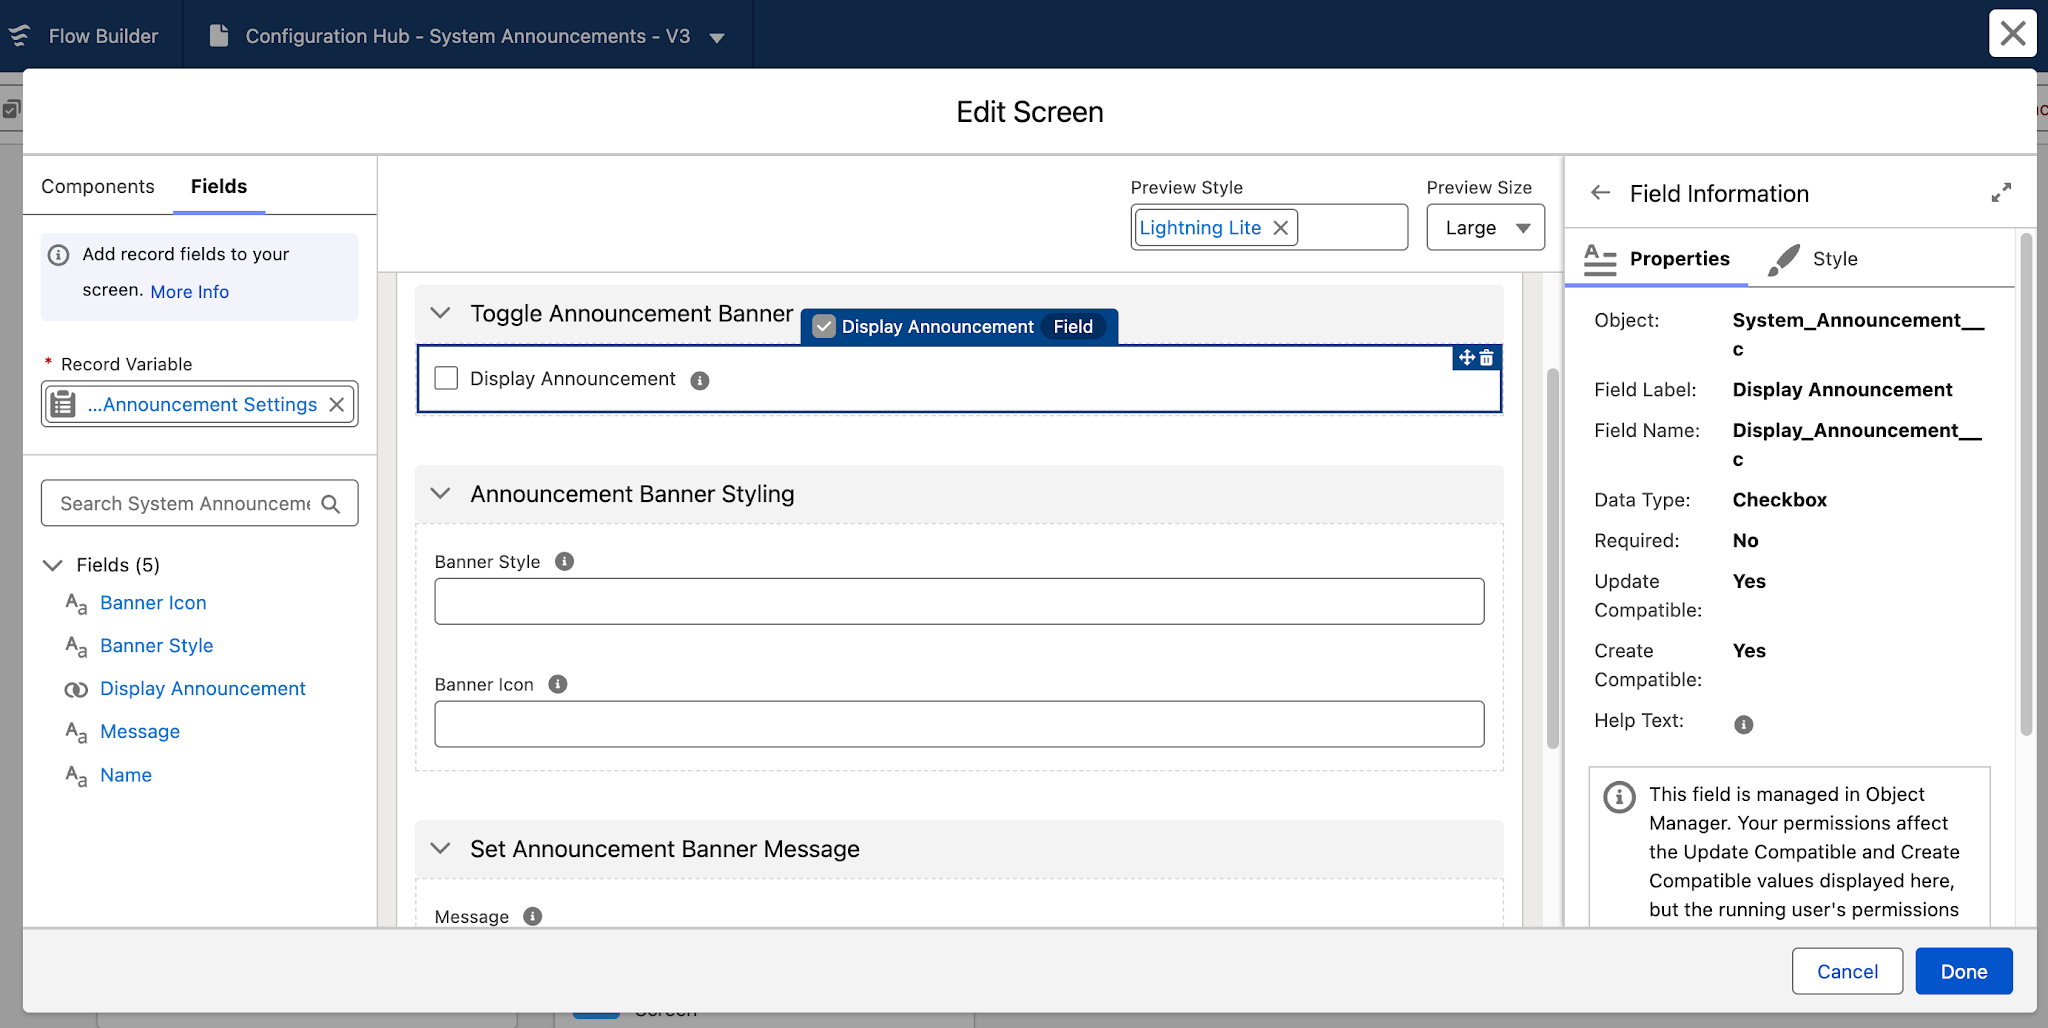
Next, you add a screen to display the main fields from the System Announcement record.
You want to make sure that anyone using this configuration hub understands what each field is used for. So start by adding the following sections:
- Toggle Announcement Banner
- Announcement Banner Styling
- Set Announcement Banner Message
Next, you select the option to “add record fields to your screen” using the {!Get_System_Announcement_Settings} record variable. From there, you drag-and-drop the fields into the corresponding sections:
- Toggle Announcement Banner
- Display_Announcement__c
- Announcement Banner Styling
- Banner_Style__c
- Banner_Icon__c
- Set Announcement Banner Message
- Message__c
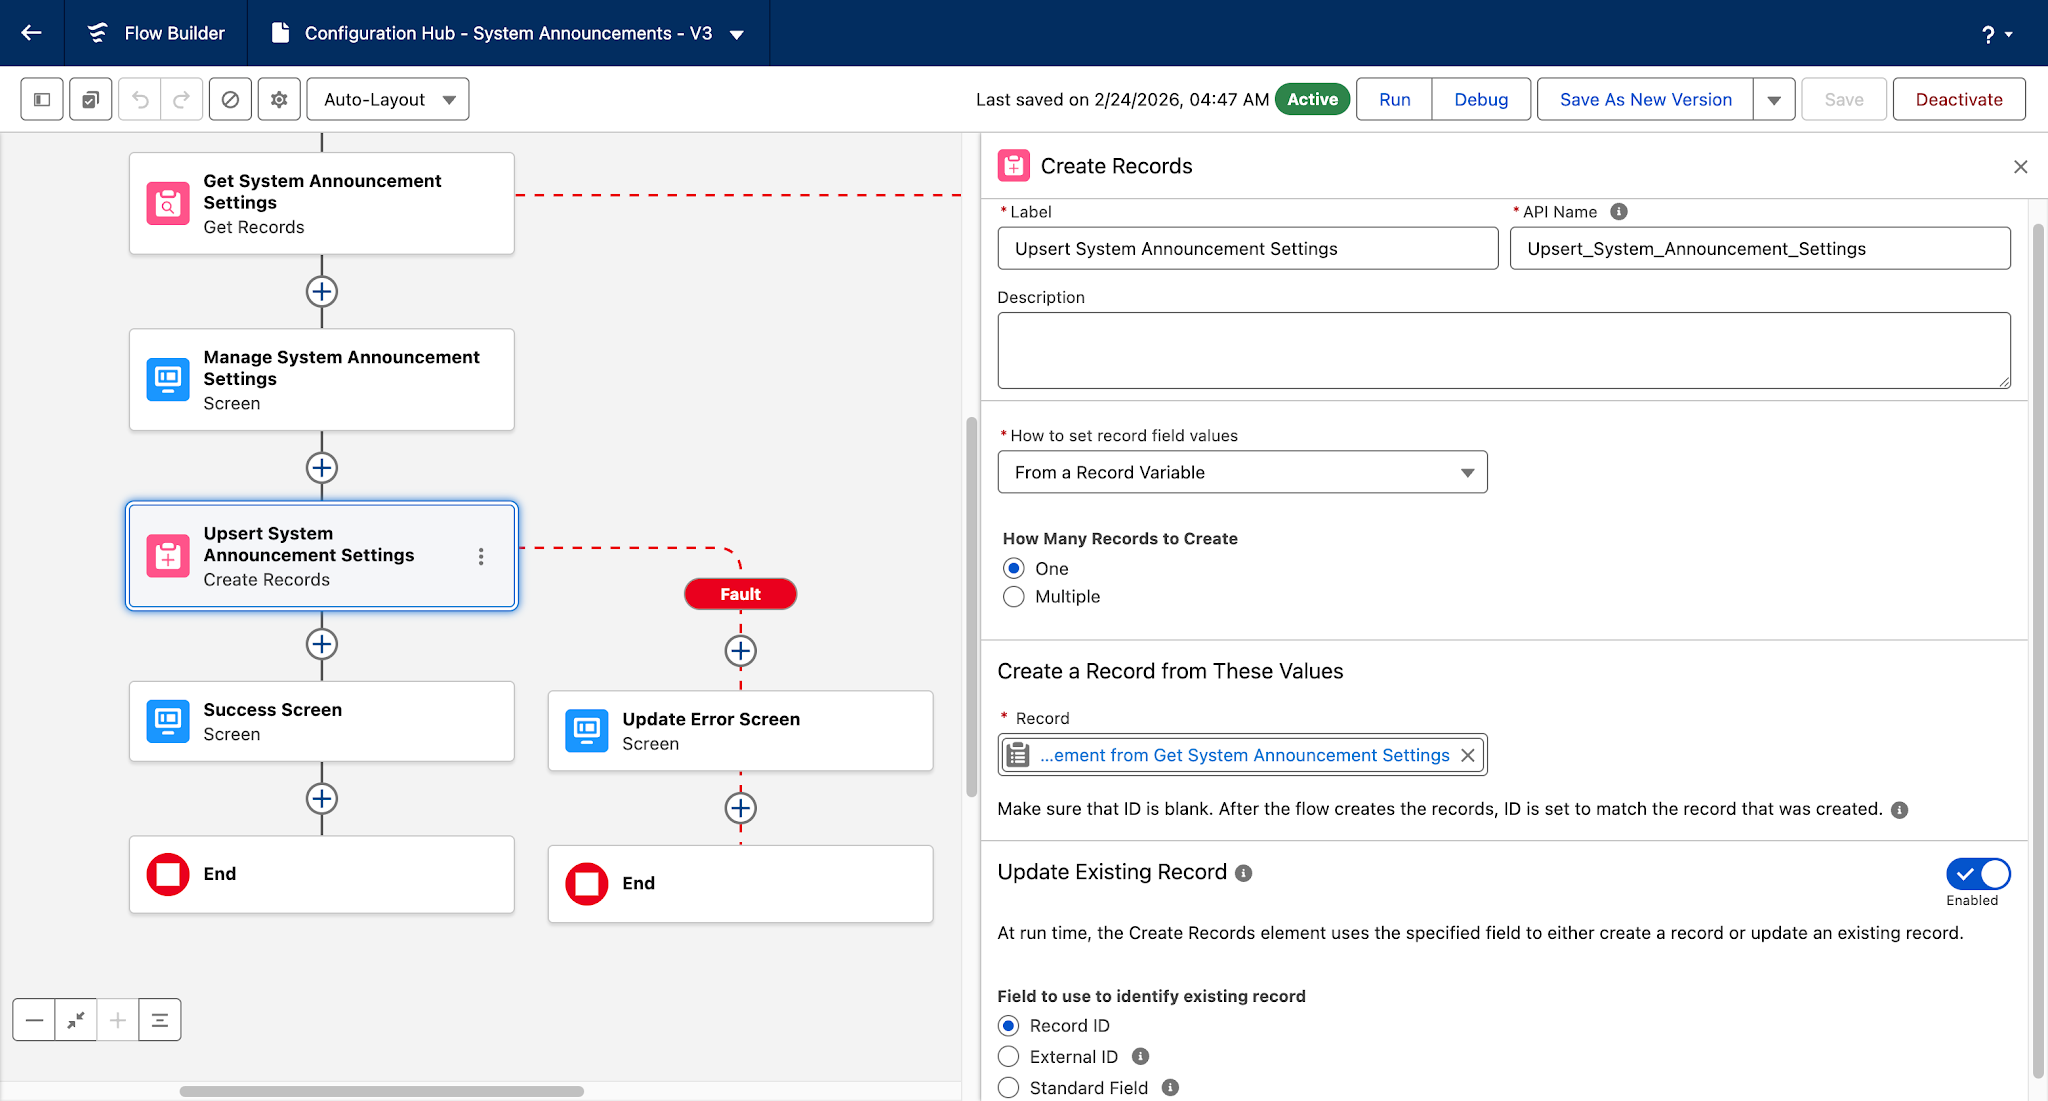
Once the screen is ready, you add a “Create Records” element that can be used to perform an upsert using the following settings:
- Label: Upsert System Announcement Settings
- API Name: Upsert_System_Announcement_Settings
- How to set record field values: From a Record Variable
- How Many Records to Create: One
- Record: {!Get_System_Announcement_Settings}
- Update Existing Record: Enabled
- Field to use to identify existing record: Record ID
This allows the flow to either:
- Create a new System Announcement settings record if one does not exist
- Update the existing System Announcement settings record
You also add another Fault Path to display a message for any errors that might occur during the upsert operation.
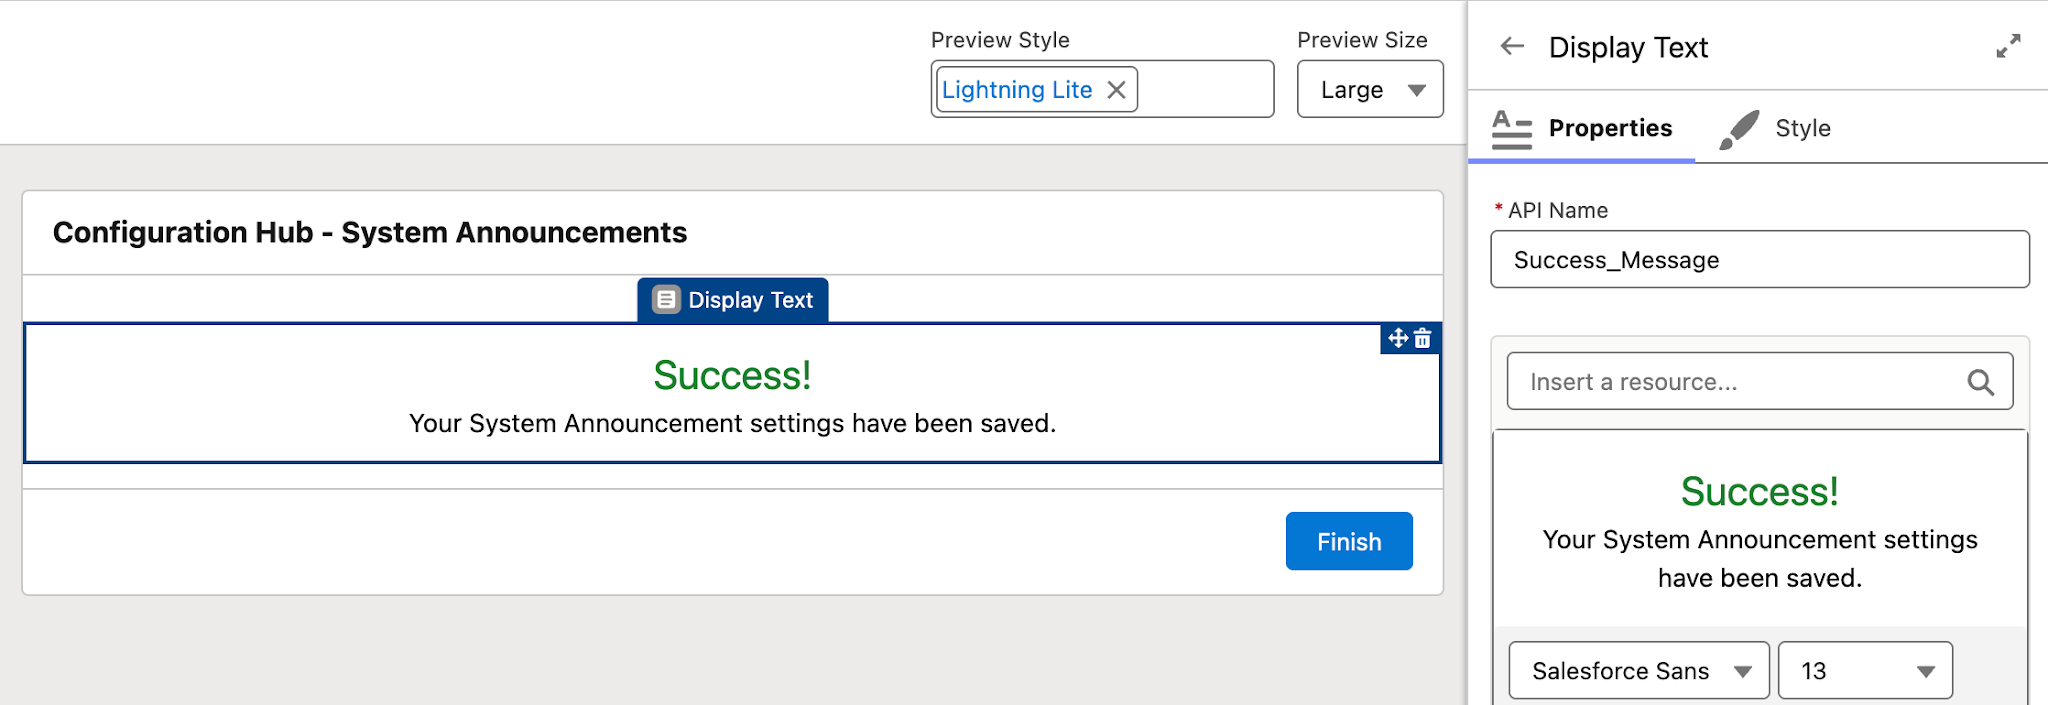
Finally, you add a screen that will display a success message if the record saves successfully.
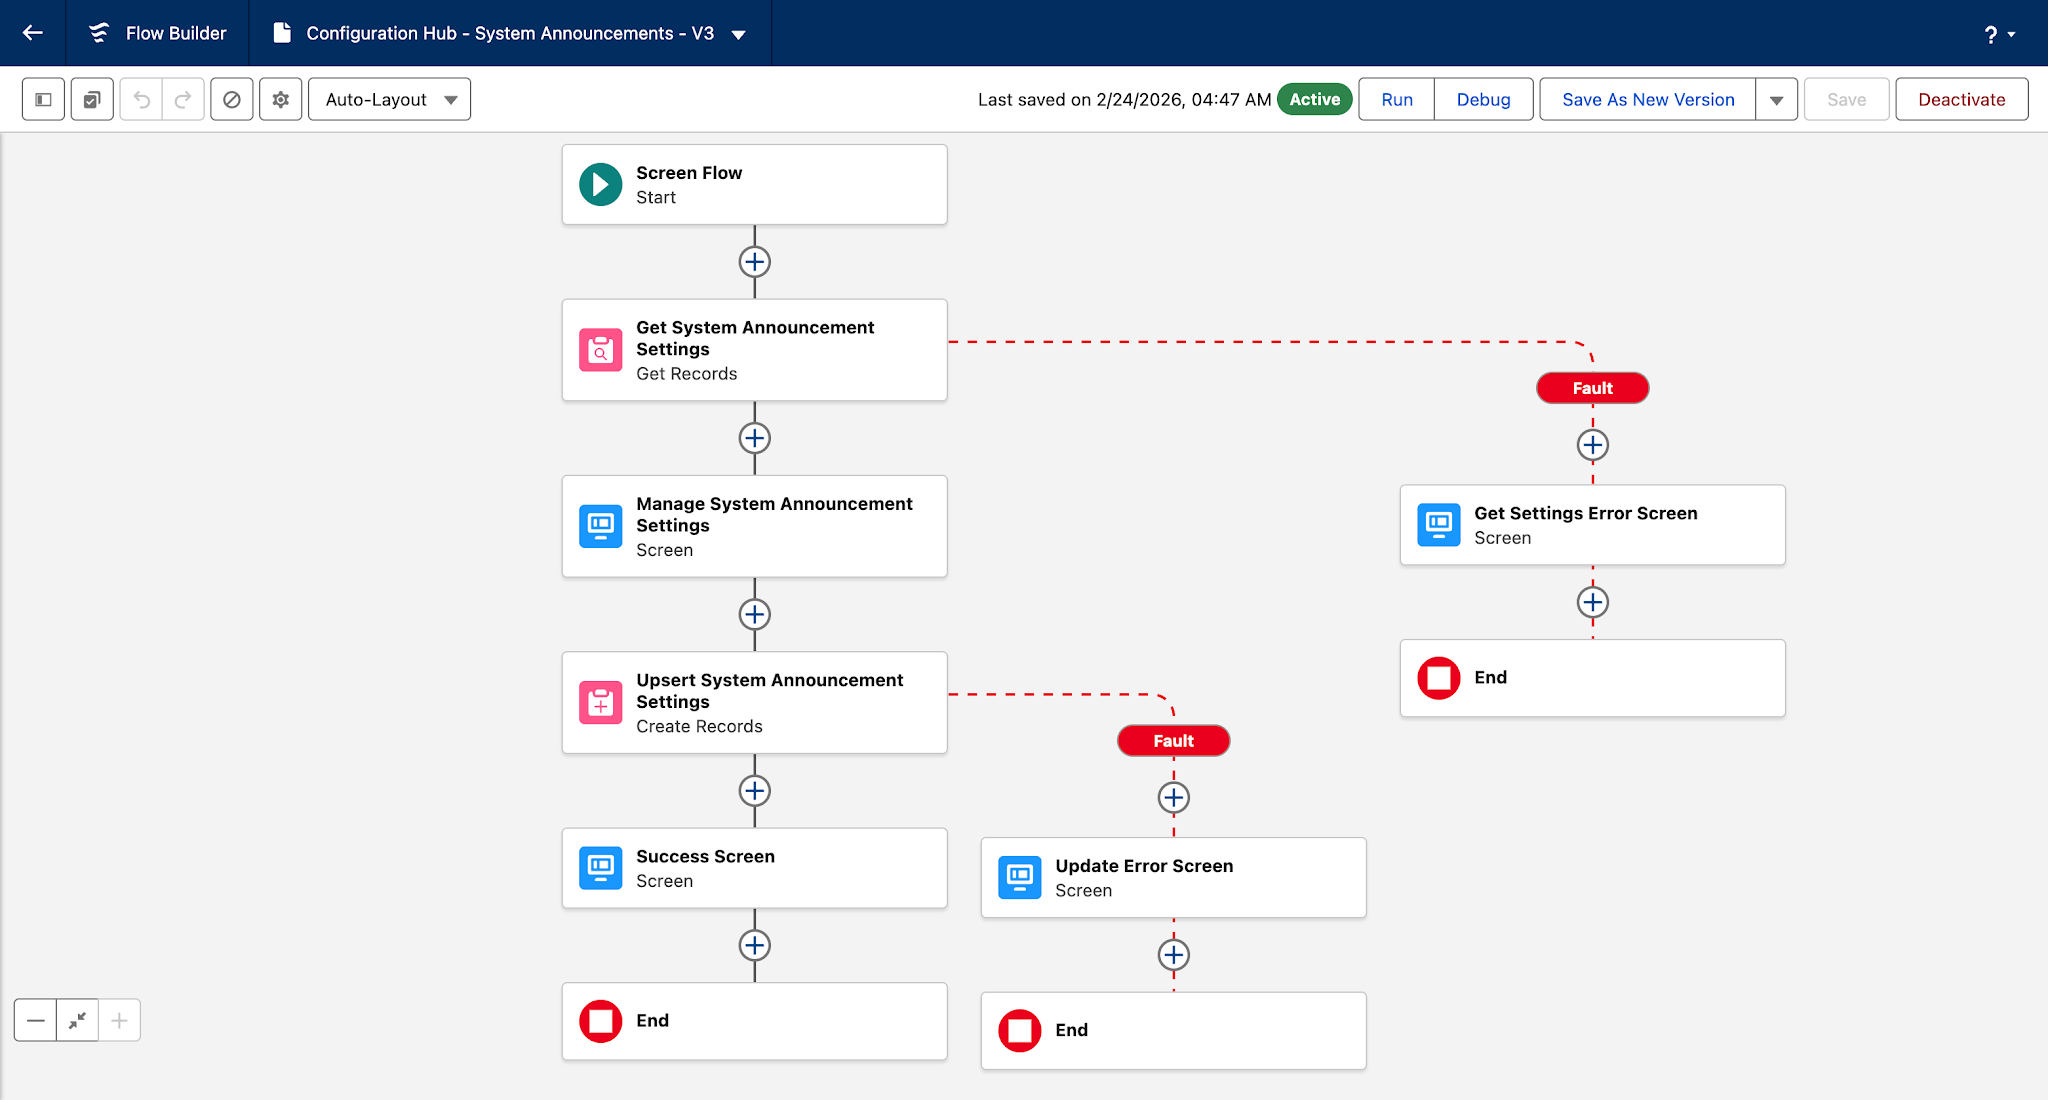
Then, you save the flow with the following information:
- Flow Label: Configuration Hub – System Announcements
- Flow API Name: Configuration_Hub_System_Announcements
- Description: User-friendly screen flow that allows admins to easily update the Announcement Banner component through the System Announcement custom settings.
Voilà! You have successfully created a screen flow to power your configuration hub. And the developer you’re working with informed you that they have updated the LWC to incorporate the custom settings you created. So, you are ready to add this flow to a convenient location!
Where to Surface the Configuration Hub
Add the Configuration Hub to a Lightning App Page
One option is to add your screen flow to a new or existing Lightning App Page. You want a dedicated location for your configuration hub, so you decide to add it to a new app page.
You do this by navigating to Setup → Lightning App Builder, then clicking on the New button.

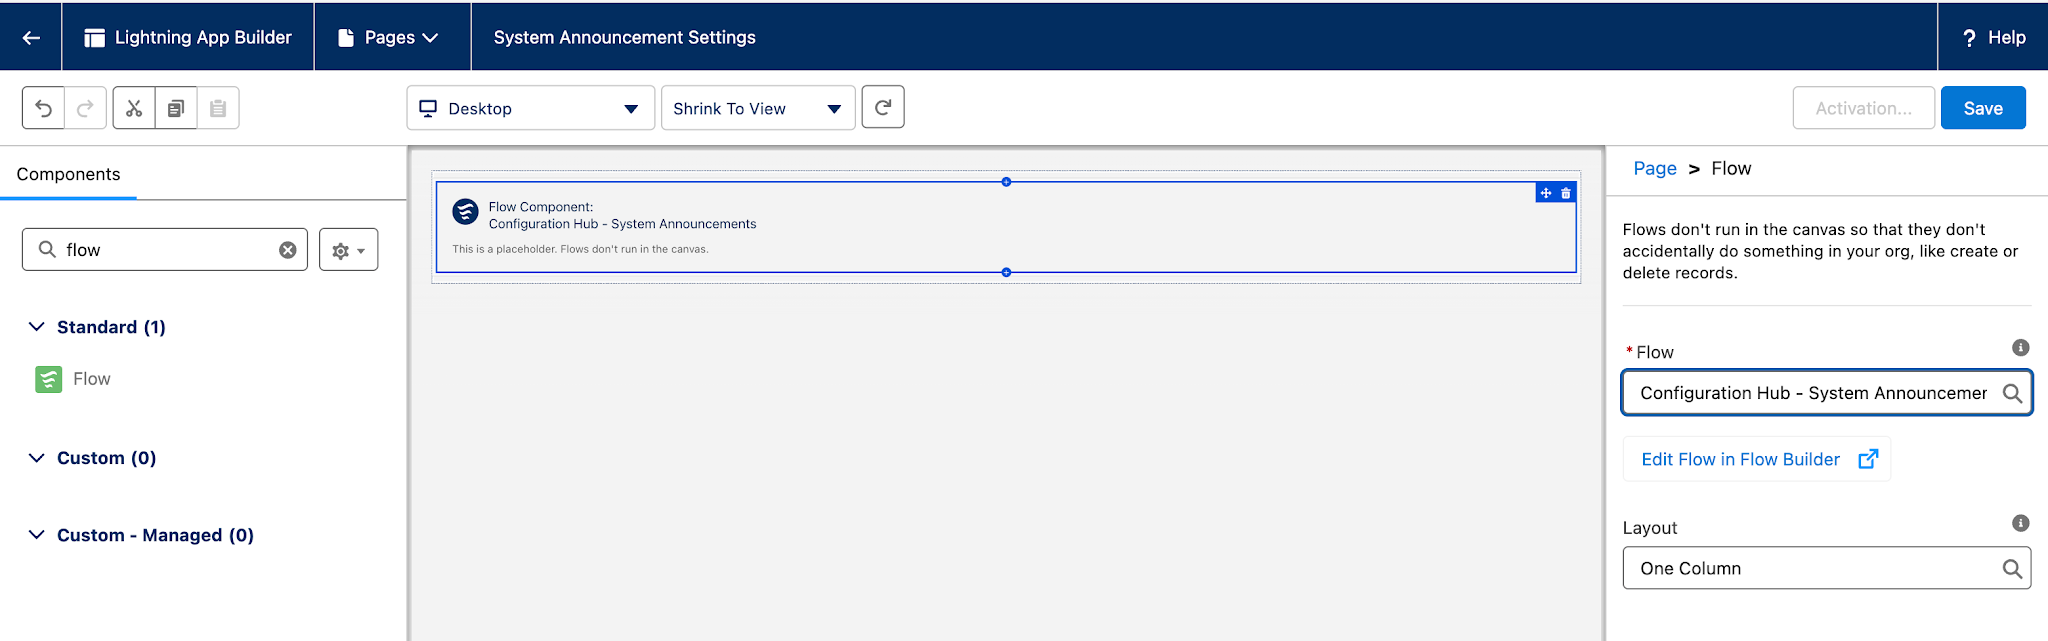
In the “Create a new Lightning page” wizard, you select to create a new App Page, you name the app page “System Announcement Settings”, and you select that you only want one region for the app page.
Next, you add a flow component to your page. You add your Configuration Hub – System Announcements flow, and select the One Column layout.
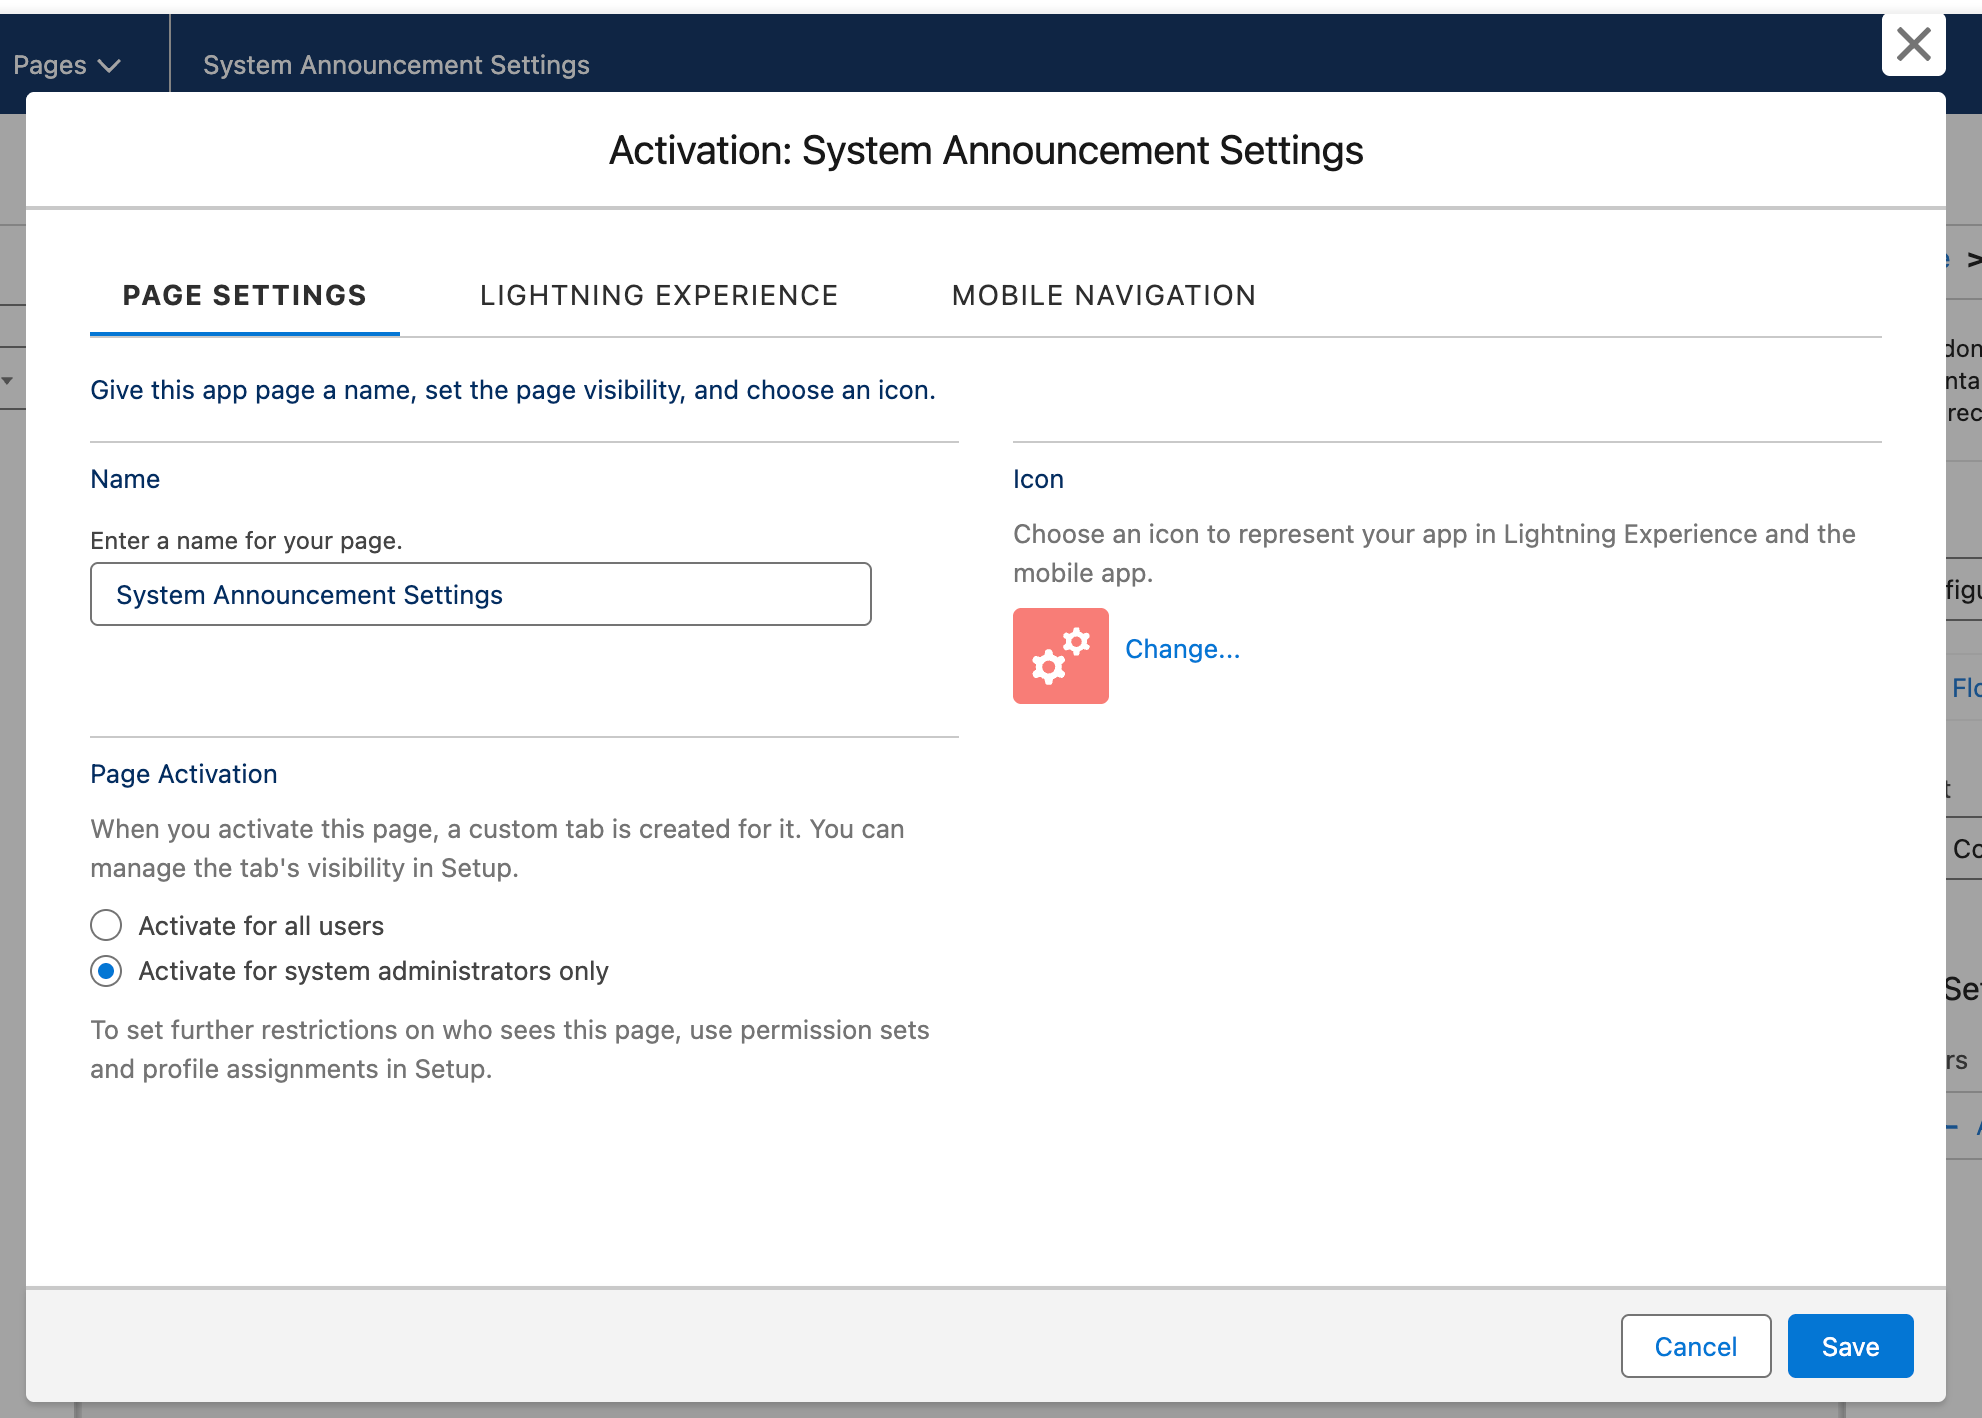
Now you’re ready to save and activate your page. On the activation screen, you select the following settings:
- Name: System Announcement Settings
- Page Activation: Activate for system administrators only
- Icon: Gears
If needed, you will add this configuration hub to specific apps in the future. But for now, you keep the basic settings.
After saving the activation, a custom tab gets created for your configuration hub. You access it by backing out of the Lightning App Builder, navigating to the App Launcher, and searching for “System Announcement Settings”.
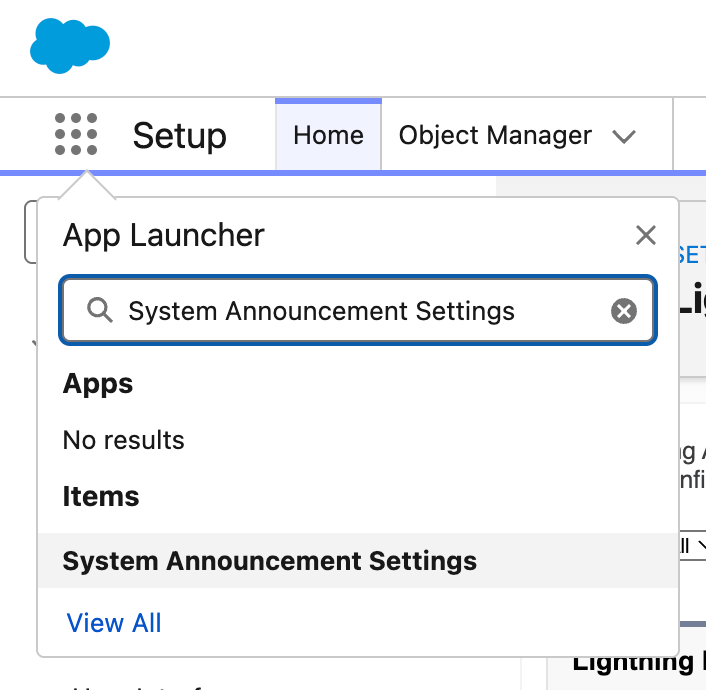
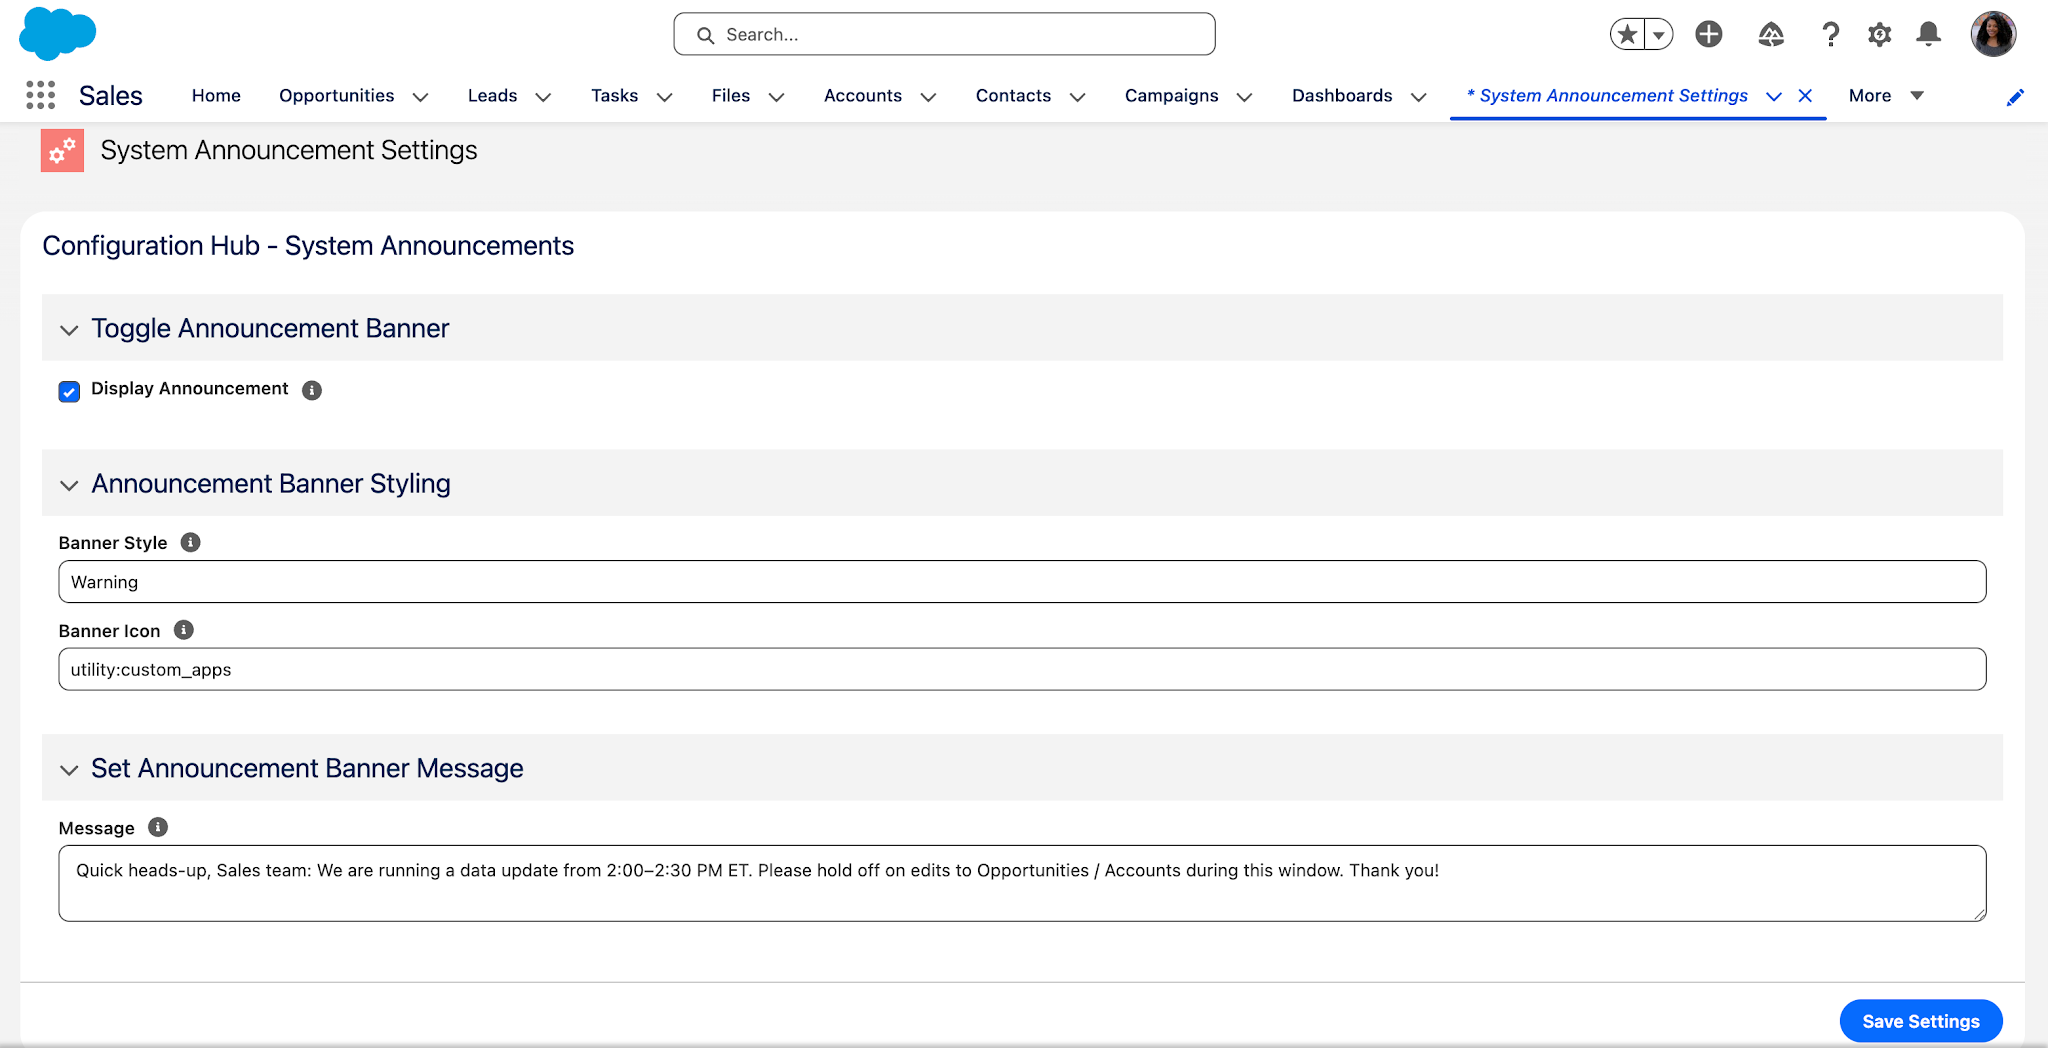
After clicking on System Announcement Settings, you see your new configuration hub! From there, you set some default values that should display in the announcement banner. After a quick review, you confirm that the configuration hub is updating the LWC as expected!
Add the Configuration Hub to the Utility Bar
You also have the option to add the configuration hub to the utility bar. You mostly use the Sales app, so you decide to surface it there.
To do this, you navigate to Setup → App Manager, then select to edit the Sales Lightning app.
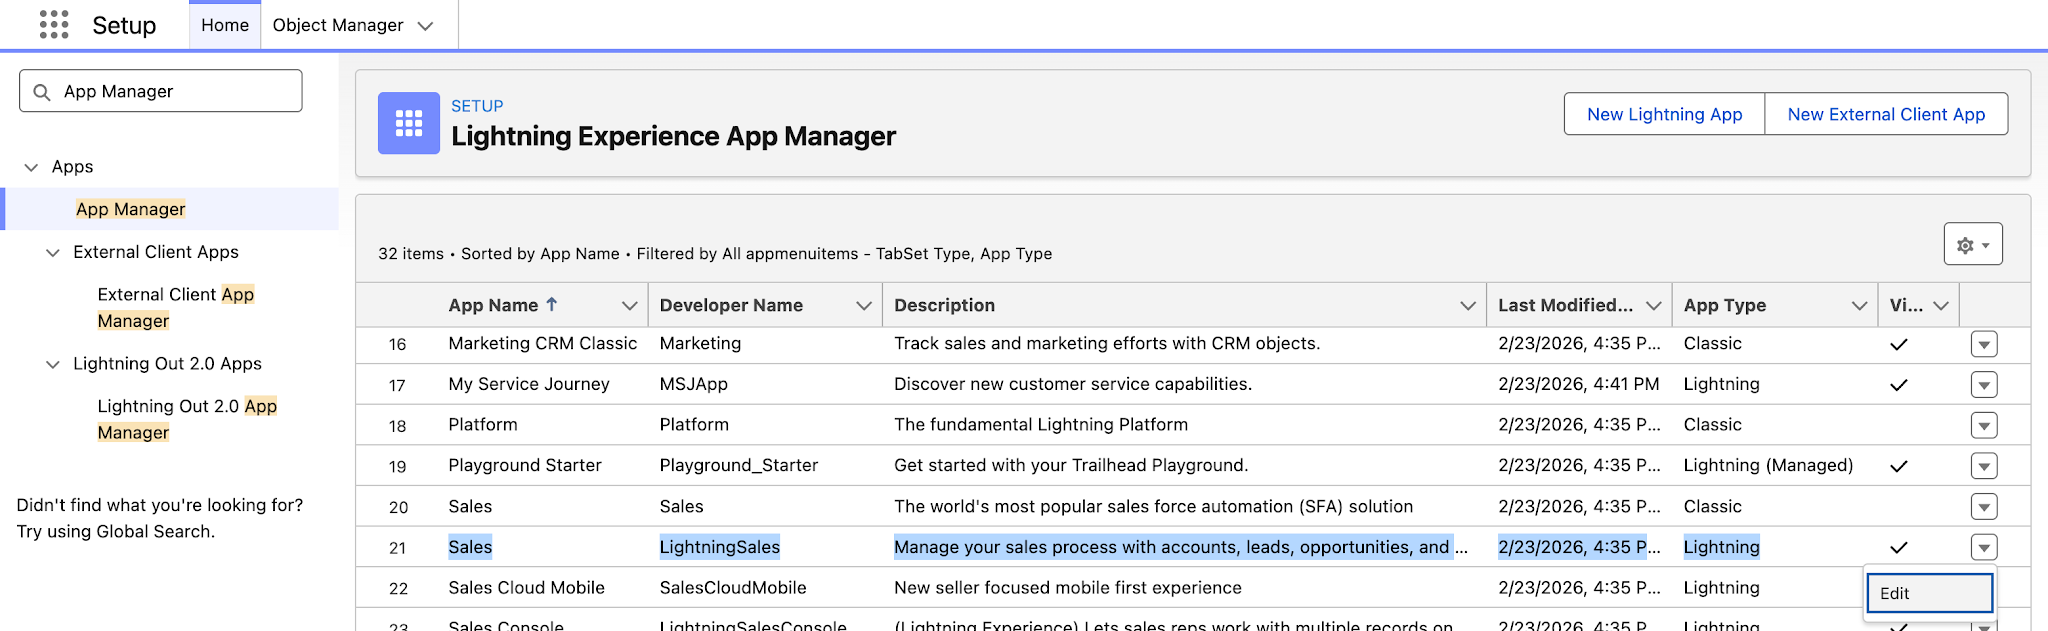
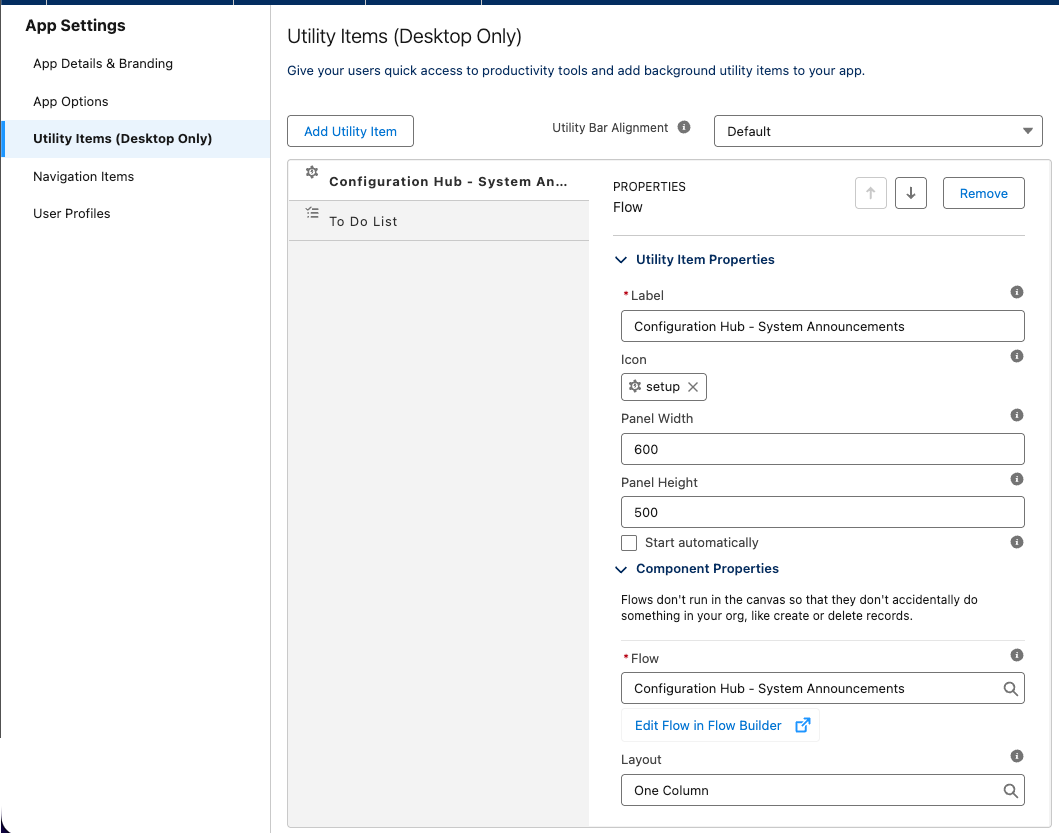
In the Utility Items section, you add your screen flow to the utility bar using the following settings:
- Label: Configuration Hub – System Announcements
- Icon: setup
- Panel Width: 600
- Panel Height: 500
- Flow: Configuration Hub – System Announcements
- Layout: One Column
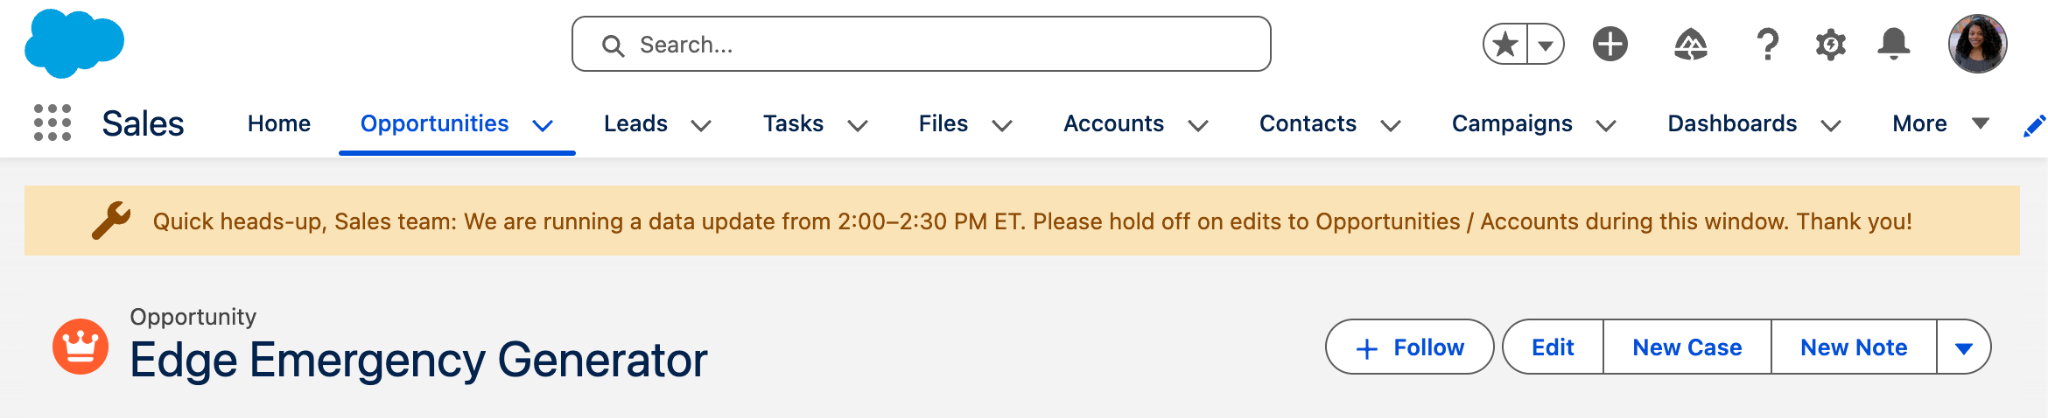
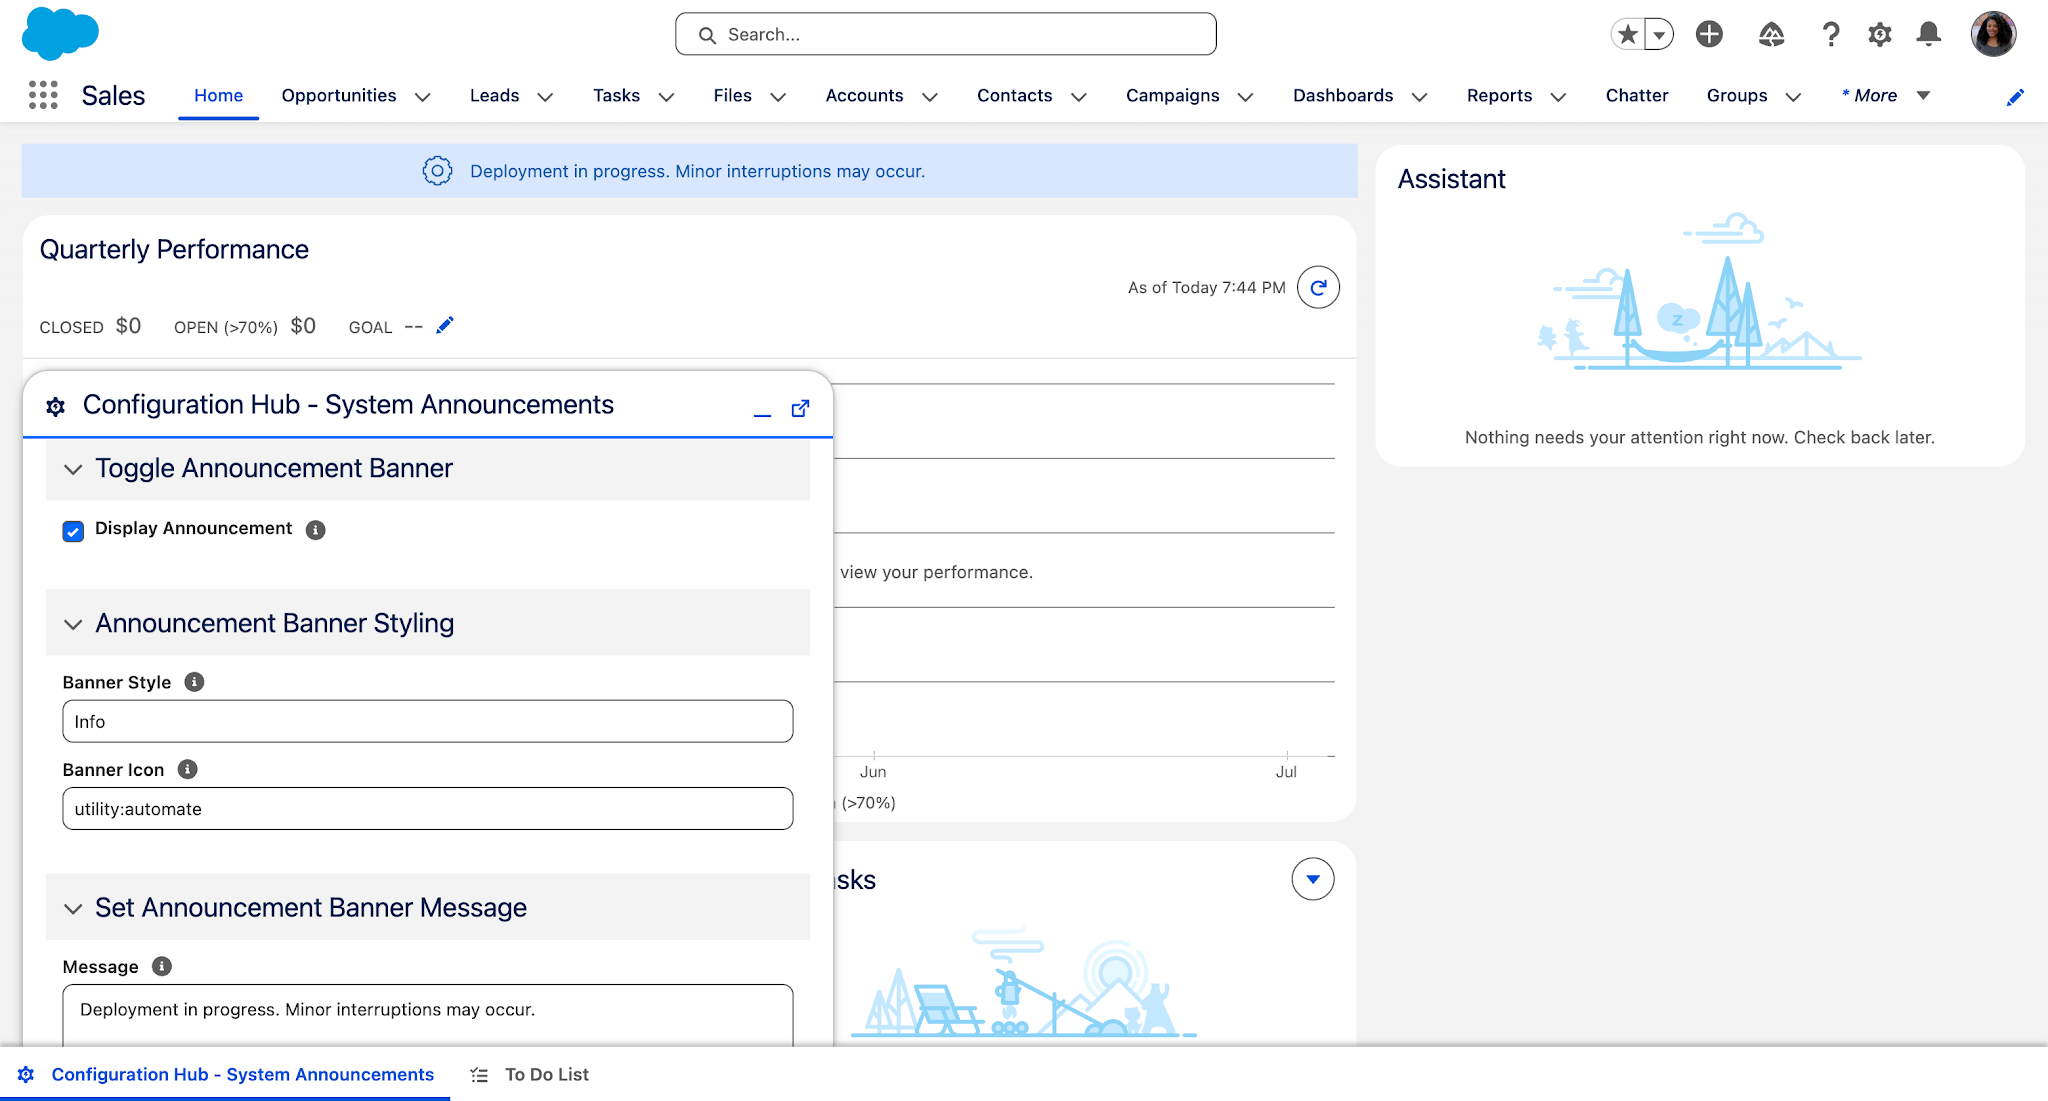
Once you save the app settings, you navigate to the Sales app to check out the configuration hub in the utility bar. It looks great! You make some updates to the settings for the announcement banner to alert users of a deployment, and you are relieved that you have such a quick way to make these changes.
Considerations and Tips
Now that you understand how to build a configuration hub, there are a few things you need to keep in mind.
First, you should limit access to these configuration hubs. Custom settings are powerful, so you only want to give admins and super users access to the configuration hub.
Next, you may need to add guardrails to ensure that bad inputs are not accepted. You want to avoid unintended changes in your org. You should determine what should be displayed as picklists vs text fields, leverage Flow’s Validate Input feature, and potentially add rollback functionality.
Finally, think of your configuration hub as a way to improve the user experience for admins. That means you need to ensure that your configuration hub is actually easier to use than going into Setup.
Ensure that you provide helpful labels, enough guidance, and properly test this configuration hub with your admins to get feedback.
Summary
And there you have it! Configuration hubs can help you improve the admin experience for your team. They allow you to simplify the process of updating custom settings, and they can be created without using any code.
Do you have a bunch of custom settings that are confusing or tedious to update? Could you alleviate that problem by using a configuration hub in your org? Let us know in the comments!