
Custom Settings can be used within Flows to allow for updating constantly changing elements of a Flow without having to jump into Flow Builder. They can also be used to grant additional functionality to specific Profiles and Users.
In this article, we’ll dig into how to set up Custom Settings and how to use them within Salesforce Flows.
What are Hierarchical Custom Settings
Custom Settings are similar to Objects, with one major benefit being that they don’t need to be queried using SOQL to be used. This means that using them doesn’t count towards SOQL Query Governor Limits.
Similar to objects, Custom Settings are built in a Row and Column format – you’ve got multiple instances of a Custom Setting (similar to an Object’s records) which are made up of Custom Fields (with similar types – Text, Checkbox, Number, etc).
There are two types of Custom Settings – List and Hierarchy. List Custom Settings are global and can be used by anyone within your org. Unfortunately, they can’t be utilised within Flows. Hierarchy Custom Settings are structured in an org, profile, and user hierarchy – you can create a default value that will be used as the org-wide fallback, then create custom values for different profiles or users. The example that Salesforce gives for when you would use both is as follows:
- If you’re working on a shipping application that requires users to fill in a country code for international shipping, you could use a List Custom Setting of all country codes. Users can then access this information without needing to query the database (ie. this doesn’t count towards your SOQL usage governor limit).
- If you’re working on a mapping application that displays account locations, the best route, and traffic conditions, but you only want to display the route and traffic conditions to a specific Profile (for example, Sales), you could use a Custom Setting. By creating a checkbox on the Custom Setting to enable route and traffic, and only setting it to TRUE on the Sales Rep Hierarchy Setting, you’re able to personalise the experience for Users running that Profile.
Setting up Custom Settings
It’s worth noting that to create and use List Custom Settings, you’ll first need to enable them within the Data > Schema Settings menu of Setup.
To create Custom Settings, head over to Setup and navigate to the Custom Code > Custom Settings menu (if you’re like me, you can also use Quick Find).
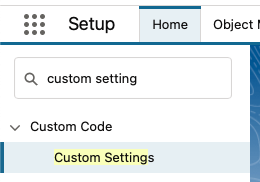
The page that is displayed is where you can find and manage your Custom Settings. I’m going to show you how to build some Hierarchy Custom Settings (I’ll use these Custom Settings later on in a Flow example, so if you’d like to follow along please do so).
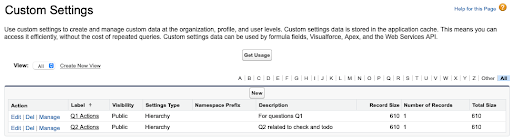
Once you’ve arrived at the Custom Settings page, click the ‘New’ button. This is where you’ll be able to create your Custom Setting Definition. I’m going to create two Custom Settings with the following details:
Label: Q1 Actions
- Object Name: Q1_Actions
- Setting Type: Hierarchy
- Visibility: Public
- Description: Relating to Question 1.
Label: Q2 Actions
- Object Name: Q1 Actions
- Setting Type: Hierarchy
- Visibility: Public
- Description: Relating to Question 2.
Once you’ve created your two Hierarchy Custom Settings, your list should look something like this (unless your org already had some Custom Settings):
Next we’re going to create two fields under each of the Custom Settings.
Under Q1 Actions, create the following fields:
Type: Text Area
Field Label: Q1 Checklist
API Name: Q1_Checklist__c
Type: Text Area
Field Label: Q1 Todo List
API Name: Q1_Todo_List__c
Under Q2 Actions, create the following fields:
Type: Text Area
Field Label: Q2 Checklist
API Name: Q2_Checklist__c
Type: Text Area
Field Label: Q2 Todo List
API Name: Q2_Todo_List__c
Here’s what Q1 Action will look like (Q2 Action will be the same, just with Q2 instead of Q1):

The Use Case
Let’s follow this scenario: You’re the Salesforce Admin, working for a food manufacturing company, and there are various processes and procedures that the directors have asked you to implement into a digital checklist.
First, the Floor Managers should have a checklist to monitor staff attendance and cleaning. This checklist needs to be completed daily, at the end of each shift.
Additionally, they’ve noted that Sales Managers will have a different daily checklist to fill out to monitor performance.
The questions for both the Floor Managers and Sales Managers will be frequently updated as policies and procedures are updated.
Each manager will require a set of guidelines (a to-do list) and will be required to select YES or NO to the questions upon completing their shifts. These responses must be recorded and there will be reports generated on these responses at a later date.
You’ve decided that the simplest way to do this will be to build a simple ‘Compliance Checklist’ Custom Object with an Auto-Number Naming Convention (CC-{000000}) to record the responses. There will be two questions, so to keep things simple you’ve created only two Custom Fields on this new object – Q1 Response, and Q2 Response – both of which are Picklist fields with two values – YES and NO.
You’ve also recognised that a single Flow can be created to handle the requirements that directors have given you. Custom Settings are great for when things like these questions change frequently, or when different teams will require a different version of the checklist.
Preparing Custom Settings for the Flow
The Custom Settings that we created above will be used in this example. If you’ve not created them, and you want to play along, you should do so now.
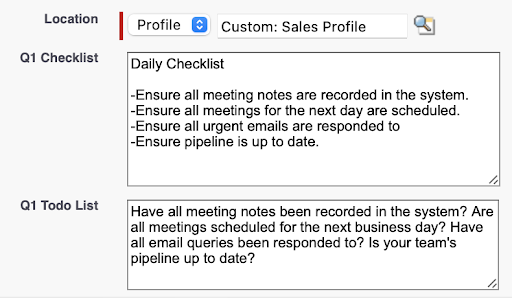
We’ll need to set the Default Organization Level Value for each Custom Setting. This will be the fallback that is used when no Profile or User override is created. Set the following values for Q1 Actions and Q2 Actions – these were given by the directors from the use case above:
Q1 Actions
Q1 Checklist: Have the floors been cleaned? Have the benches been cleaned? Have the cloths been washed? Have the utensils been sanitised?
Q1 Todo List: Daily Checklist:
- Floors to be swept and bleached.
- Benches to be wiped down with hot, soapy water.
- Cloths to be washed in hot, soapy water and hung to dry.
- Utensils to be cleaned in hot soapy water and left to air dry.
Q2 Actions
Q2 Checklist: Did all staff show up to their correct shifts? Did all staff check in and out as they arrived and left? Did all staff follow managers’ directions?
Q2 Todo List: Staff Checklist:
- All staff are to show up for their shifts on time.
- All staff are to check in and out as they arrive and leave their shifts.
- All staff will follow all managers’ directions.
If you’ve done this correctly, your Q1 Action will look like this, and your Q2 Action will look similar:

The Sales Managers need to fill in an entirely different set of questions than the rest of the business. This is where the value of using Custom Settings inside of a Flow really shines. To override the default questions, all you need to do is create a new Custom Setting record specific to the Sales Manager Profile.
Navigate to the Q1 Custom Setting, click ‘Manage’, and then click ‘New’. This will take you to the New Custom Setting Record page. Specify the Profile and the question that is relevant to the Sales Team, and click Save.
Because the Custom Setting has a User > Profile > Organizational hierarchy, this means that Users with the Sales Profile will be shown different questions to everyone else. Because you’ve used the information within the Custom Setting, you don’t need to customise the Flow any further for this to function – the Custom Setting’s hierarchy will drive the correct information to the correct user automatically.
Building the Flow
Next, we need to create the Flow. Head over to Flow Builder (Setup > Process Automation > Flows > New Flow), create a Screen Flow, and select Auto-Layout (you can use Freeform if you’d like, but I’ll be using Auto-Layout).
This is going to be a very simple Flow that has just two elements – a Screen Element and a Create Records element.
You’ll need to create some Formula Resources to access the Custom Settings within the Flow. These are located within the {!$Setup} Global Variable.

Create the following 4 Formulae:
API Name: Q1_Checklist
- Data Type: Text
- Formula: {!$Setup.Q1_Actions__c.Q1_Checklist__c}
API Name: Q1_Todo
- Data Type: Text
- Formula: {!$Setup.Q1_Actions__c.Q1_Todo_List__c}
API Name: Q2_Checklist
- Data Type: Text
- Formula: {!$Setup.Q2_Actions__c.Q2_Checklist__c}
API Name: Q2_Todo
- Data Type: Text
- Formula: {!$Setup.Q2_Actions__c.Q2_Todo_List__c}
Once the 4 Formulae have been created, click the + button and add a Screen Element. Label the Screen “Mandatory Management Checklist”. Add the following components to the screen:
- Display Text 1
- Display Text 2
- Picklist 1
- Display Text 3
- Display Text 4
- Picklist 2
Then populate the following metadata into each of the components you’ve created above:
Display Text 1
- API Name: Q1Todo
- Content: {!Q1_Todo}
Display Text 2
- API Name: Q1Checklist
- Content: {!Q1_Checklist}
Picklist 1
- Label: Q1 Response
- API Name: Q1_Response
- Data Type: Text
- Multiple Options: No
- Component Type: Picklist
- Choices: Yes/No (Create a Picklist Choice for each, display ‘Yes’ in the Choice Label and Value of Yes, and ‘No’ in the Choice Label and Value of No)
Display Text 3
- API Name: Q2Todo
- Content: {!Q2_Todo}
Display Text 4
- API Name: Q2Checklist
- Content: {!Q2_Checklist}
Picklist 2
- Label: Q2 Response
- API Name: Q2_Response
- Data Type: Text
- Multiple Options: No
- Component Type: Picklist
- Choices: Yes/No (Use the same picklist values you created in Picklist 1)
Wonderful! The Screen element has been created. The screenshot below should show what your finished product looks like:

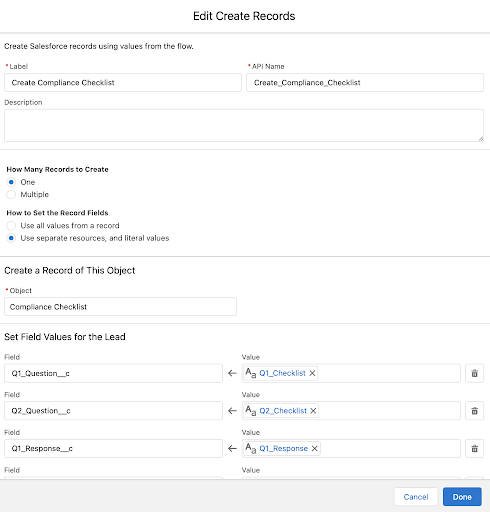
The last thing you need to do is create a Create Records element. This will record both the question that was asked and the response that was given. It is contextually recorded, in case historic values need to be reviewed. Use the following values in the Create Records:
- Label: Create Compliance Checklist
- API Name: Create_Compliance_Checklist
- How Many Records: One
- How to Set Fields: Separate Resources
- Object: Compliance Checklist
- Field 1: Q1 Question
- Value 1: Q1_Checklist
- Field 2: Q2 Question
- Value 2: Q2_Checklist
- Field 3: Q1 Response
- Value 3: Q1_Response
- Field 4: Q2 Response
- Value 4: Q2_Response
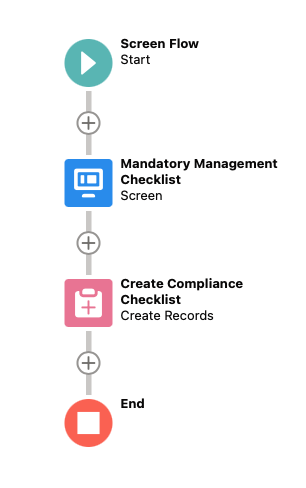
Once your Flow is complete, it should look like this:
Congratulations! Your Flow, which utilises Hierarchy Custom Settings, is complete! Now you can choose how to expose it to your relevant Managers – a Utility Bar item might be a good idea as it will make it easy to access from any screen.
Because you’ve used Custom Settings to store the questions, and added both the question asked and the response given in the Compliance Checklist record, you’ll be able to see exactly what question was displayed, the response that was given, who answered the questions, and when they did it (using the standard Created Date and Created By fields). You’ll also be able to display different questions depending on which User or User Profile is assigned to the person running the Flow.
Summary
In this article, you’ve learnt about Custom Settings – List and Hierarchy – and how to use Hierarchy Custom Settings in Flows. Now if you, or someone who isn’t familiar with Flows, needs to change the questions that are exposed, all they need to do is update the values in the Custom Settings.