


Do you send automated email alerts, triggered by Flow or Apex, or are you using “send list email”? Could your reps and agents be sending individual emails from Salesforce? You send the emails out, but how do you ensure they are received and don’t end up in a spam bucket? Do you know if these emails are being trusted by the recipient’s email service provider?
There has been an extra section added at the end of DKIM to do with Salesforce’s 2026 Verified Domain requirement. Please ensure you complete the DKIM section first!
Email is ‘so 2005’, and yet the volume of emails sent doubled during the Covid pandemic, and growth is still being sustained. Security enhancements are being made to improve reputation and delivery. Just like with Salesforce’s MFA rollout, you need to be making changes or you could find yourself out in the cold.
Avoid Getting Caught Out

We’re going to walk through how to set these up:
- Compliance BCC: Understand what’s being sent out from Salesforce – an easy win.
- SPF: Prove that Salesforce has the authorization to be sending email on your behalf.
- DKIM: Organizations can take responsibility for transmitting a message by signing it in a way that mailbox providers can verify. Prevents your emails from being altered between being sent by yourself, and being received by the recipient’s email server.
- DMARC: Tells other systems to reject the email if it’s not from a trusted source, therefore, email domain owners can protect their domain from unauthorized use (“email spoofing”).
Read more detailed definitions of each of these terms, plus how email authentication works in the guide below:
These ‘protocols’ can be set up separately from one another, meaning that you can implement one at a time, and test using the tools provided at the end of this guide. We’ve given each a rating so that you can prioritize each according to the time/resources you have available.
Salesforce BCC Email
Rating: Easy
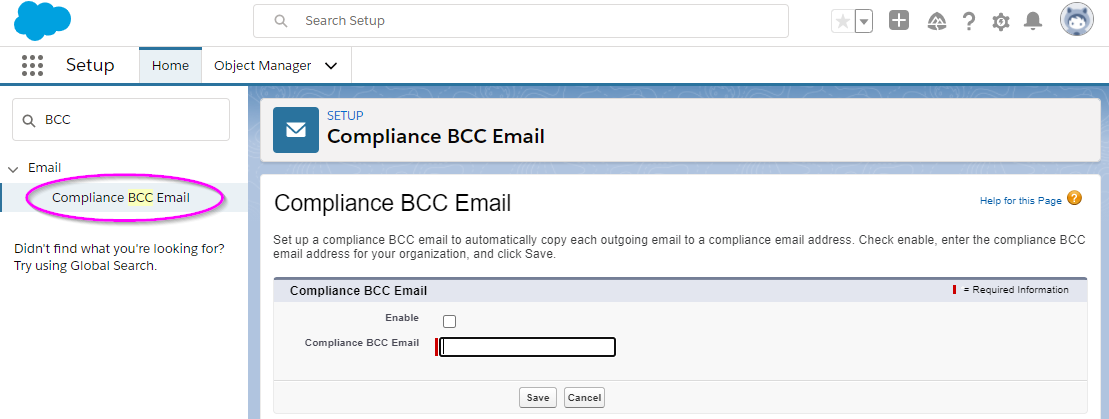
The title may sound officious, but Compliance BCC is really handy for troubleshooting.
Salesforce BCC email helps you to track what’s being sent out from Salesforce. As the name suggests, yours or a nominated email address is added as a BCC recipient, therefore, copies of all the emails that Salesforce sends out will land in your/the nominated inbox. This gives you visibility even into email alerts (sent by Flow/Apex), Chatter messages, and individual emails (with the exception of password reset or import complete notifications).
Visibility is useful when tasked with troubleshooting. If someone says “X hasn’t received Y email”, it’s easy to check the whole message, straight away.
Use your email provider’s search functionality to identify the email in question. Email inbox searches are far easier than sifting through Salesforce Email Log Files. From the inbox, you can view the whole message body, and you aren’t restricted to 30 days’ history (realizing, in horror, that an email has been sent out incorrectly for months!)
Like backups, Salesforce BCC email needs to be set in advance – there’s no use in setting it up after an “incident”.
- Create a separate email address: You don’t want these emails cluttering your inbox. You may have to ask your IT department to help you set up a new email alias. I normally use compliance.bcc@companyname.com, and hide it from the organization/internal address lists, if possible.
- Navigate to: Setup → Email → Compliance BCC Email. Paste in the email address.
Salesforce SPF Records
Rating: Medium
Sender Policy Framework (SPF) proves that another server (e.g. salesforce.com) has permission to send email on your behalf (i.e. yourdomain.com).
Emails that you send from Salesforce are less likely to be marked as spam; you are certified to be sending from this domain.
Warning: When editing DNS, a mistake can severely affect the entirety of your domain services (e.g., email, file sharing, website), so take a backup of ALL the existing DNS settings beforehand! Don’t do this last thing on a Friday and perhaps get (any) colleague to double-check and ensure there are no typos in the setup.
You’ll need access to your domain’s DNS record, otherwise, liaise with your IT department to ask them to set this up on your behalf (and point them to this section of this blog). There’s no Salesforce configuration required.
- Log in to the control panel for your domain DNS host
- Look for the line with:
v=spf
If it is there, you already have other domains sending on your behalf. It may look something like this:
v=spf1 include:_spf.google.com ~all
(This example would be applicable for Salesforce, but you may need to use another “include” statement for your mass mail tool such as Campaign Monitor or Mailchimp)
You would then need to modify it so it has:
include:_spf.salesforce.com
And it then becomes:
v=spf1 include:_spf.google.com include:_spf.salesforce.com ~all
Or, if there is no existing SPF record, then add the following:
Record name: (your domain - e.g. salesforceben.com)
Record type: TXT
Content/Value: v=spf1 include:_spf.salesforce.com ~all
Note: The ~all at the end results in a soft SPF fail (it’s a squiggle ~ not a – and they have different impacts!) While an email not from the listed sender isn’t authorized, it’s also not explicitly unauthorized; this is the most common setting – useful if you’re not 100% sure which other platforms/parties are sending out emails on behalf of your domain.
The TTL (time to live) – the last column in the screenshot below – can be set to 600 instead of the default, 14440 (it’s time in seconds, in case you were wondering). This helps regulate how often your DNS settings are checked. After a day or two, when all is still working, then you can put it back to 14400.
In the end, your DNS panel should look something like this:

Or it could look something like this (depending on whether your DNS service needs you to include the domain name or not – it will be obvious from the other DNS records that already exist):

Salesforce DKIM
Rating: Medium
DomainKeys Identified Mail (DKIM) proves that no one altered your email en-route from the sender to the recipient’s email server. DKIM came along after SPF, and so is a progression in how tamper-proof emails are.
DKIM is also part of the DNS settings of a domain. If you don’t have access to your DNS settings, you’ll need to liaise with your IT department to ask them to set this up on your behalf.
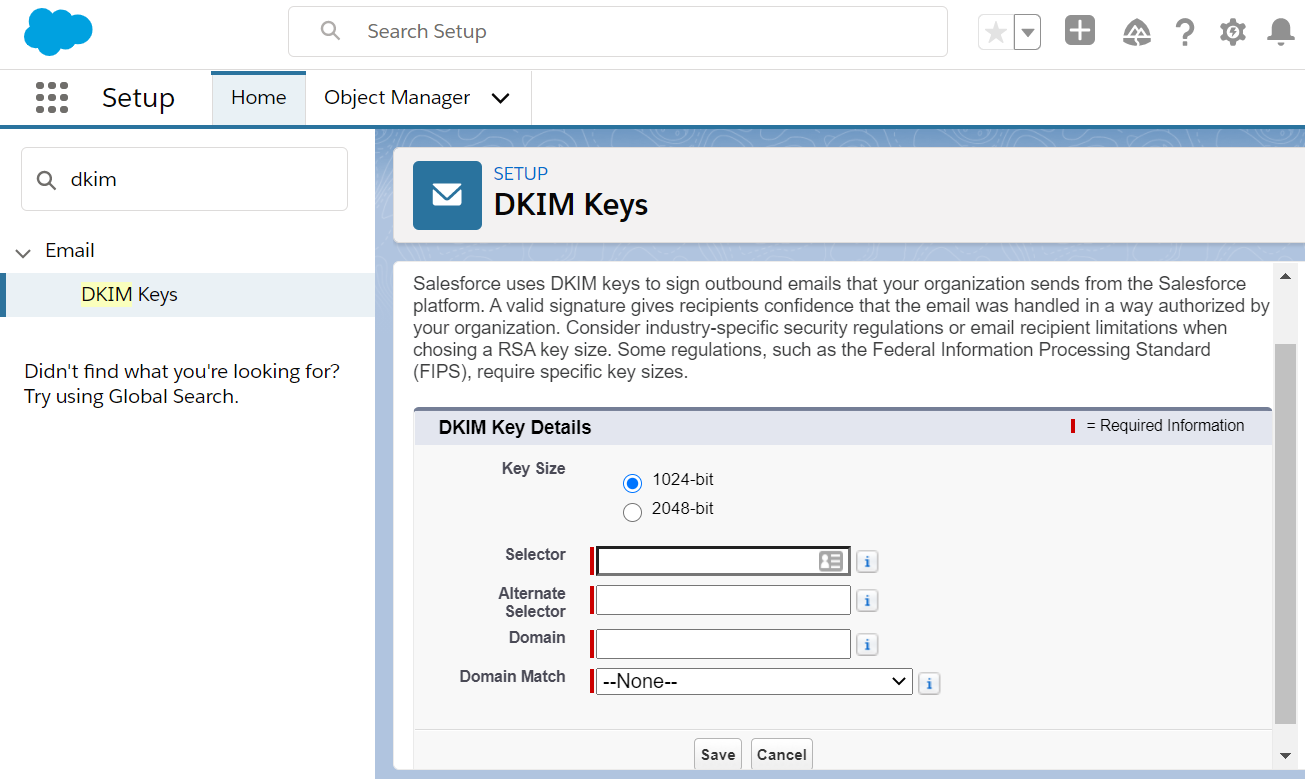
DKIM Salesforce Setup
Navigate to: Setup → Email → DKIM Keys. There are five items:
- Key Size: For security – and bigger is better! Select 2048-bit (1024-bit is for old DNS systems. You’ll encounter an error if it becomes a problem).
- Selector: Type “sf1” (you can type other things, just my recommended tip is to avoid using a full stop!)
- Alternate Selector: Type “sf2” (same reason as above).
- Domain: The domain name from which you are sending out emails (e.g., salesforceben.com).
- Domain Match: If you send an email from the “main” domain (e.g., example@salesforceben.com), without any subdomain (e.g., example.subdomain.salesforceben.com) then “Exact Domain” is fine. Otherwise, choose one of the other options as appropriate.
After pressing Save the screen will look something like this:

DKIM Domain Setup
Now we turn to your DNS, which could involve liaising with your IT department.
- Where it says CNAME record, take the first part, before the domain name (highlighted above, in pink). This then becomes “Record Name” in the DNS settings.
- The part after “CNAME” in the screenshot above becomes the target/content/value in the DNS settings (3rd column in the screenshot below, from the domain hosting company’s DNS setup screen).
It will look something like this. The TTL (time to live) can be left as the default value.

Or it could look something like this (depending on whether your DNS service needs you to include the domain name or not – it will be obvious from the other DNS records that already exist):

The same is true of the trailing dot at the end of “salesforce.com”, which the sharp-eyed amongst you would have spotted. Most DNS control panels I see don’t need this, but presumably, some do.
- Save the settings
- Wait 48 hours for those settings to propagate (this is important)
- Pop back into Salesforce, to the DKIM Keys screen. Click on the relevant “selector” (see pink highlight on the screenshot below)
- Press “Activate”
- Ok… one thing extra. Sending from multiple domains? You will need to repeat this, per domain.

Note: After 48 hours have passed since the DNS settings are changed, and if the “Activate” button is not showing – that’s your sign that the DNS has not been correctly set up. Occasionally, it can take Salesforce longer than 48 hours (in which case you need to log a Case with Salesforce).
Resources: Salesforce & DKIM
Salesforce Verified Domains
Salesforce has one further requirement to verify that emails coming from their systems are authentic. To set this up, there are a few easy steps:
- Log into Salesforce and go to Setup, then type “Authorized Email Domains” in the left hand search bar.
- If your mail sending domain doesn’t appear, press “Add” and add it.
- Note the “verification code” which will now be listed alongside your domain.
- Once your domain is listed, then you need to update your DNS settings. If you don’t have access to this, your IT team will be able to point you in the right direction.
- Add a new TXT record to your name. For the target/content/value itself put the “verification code”. The TTL (time to live) can be left as the default value.
- Once done, wait an hour, come back to the same Salesforce screen, press “Edit”, tick the “Verify domain ownership”, and press Save.
Salesforce DMARC
Rating: Complex.
SPF shows that the sender is valid, and DKIM shows that the email hasn’t been interfered with – but, what about the rest of the emails that appear to be coming from your domain? Are they forgeries (anyone can Print Screen a letterhead), or should the email still be considered valid?
Domain-based Message Authentication, Reporting, and Conformance (DMARC), tells the recipient email server what to do.
DMARC only works when you have set up both SPF and DKIM records, ideally for all sources sending emails from your domain.
Note: DMARC setup should be viewed as a separate project, with the appropriate time and resources allocated to get it right. Once the setup is completed, DMARC will require monitoring for the first two weeks (at a minimum), ideally, with a plan in place should the main point-person is away.
This sits outside of “only” Salesforce. Again, this involves configuring your DNS. You may want to ask your IT department first whether this has been set up. Proceed with extreme caution – getting this wrong can adversely impact email sending across your entire organization.
To construct the DMARC string there are a few basic parts:
- v=DMARC1
This is the DMARC version number; we’re currently on version 1, so this is easy!
- You have three different policy options:
- p=none
This is where the server receiving the email lets the email through, even if the email doesn’t align with the SPF and/or DKIM information; initially, this is recommended in case you haven’t identified all the email-sending sources.
- p=quarantine
This is where the server receiving the email is recommended to quarantine the email if the email doesn’t align with the SPF and/or DKIM information.
- p=reject
This is where the server receiving the email is recommended to reject the email if the email doesn’t align with the SPF and/or DKIM information.
3. How to treat DKIM
- aspf=s
- aspf=r
SPF policy can be “strict” or “relaxed”; if strict then any emails sent without SPF being correct will be rejected.
4. How to treat DKIM
- adkim=r
- adkim=s
As with SPF, DKIM policy can be “strict” or “relaxed”; if strict then any emails sent without DKIM being correctly set up will be rejected.
5. Pass Through Rate
- pct=100
This is the percentage of emails that have to meet this policy; when going live with DMARC, or changing between settings, you can ramp it up slowly from 1% upwards to avoid falsely rejecting emails. As a form of testing, it’s very useful. pct=100 means that 100% of emails need to meet the policy and is the default.
6. How to treat SPF and DKIM for reporting purposes
- fo=0
For email provider to send a report if both SPF and DKIM fail (“relaxed”, the default setting)
- fo=1
For email provider to send a report if either SPF or DKIM fail (“strict”, our recommendation)
7. Aggregate Reporting
- rua=mailto:example@salesforceben.com
By providing an email address you’ll get emailed an aggregate report about all email traffic (usually daily, although you can add the following which will control the frequency with the time listed in seconds: ri=86400).
8. Forensic Reporting
- ruf=mailto:example@salesforceben.com
By providing an email address you’ll get emailed a real-time forensic report about each email failure; useful when first setting up DMARC to see what’s being rejected when perhaps it shouldn’t!
9. Report Format
- rf=afrf
- rf=iodef
This is the report format used for failure reporting; typically this is run through an automated tool (e.g. GLock Apps, but there are many others too) so you can identify and act on any issues.
The good news is that there are many DMARC generators to help you out here. Worthwhile using as you don’t want your emails adversely affected after all the effort you’ve put in! The page also includes testing tools. I particularly liked Email Industries which has an example implementation strategy for DMARC towards the bottom of their article.
The other part is TTL (time to live), as earlier, you may initially want this set to 600 seconds and then raise it back to 14400 seconds when you are happy that all is well.
Your end record may look something like this:
email deliverability salesforce
Record Name: _DMARC
Type: TXT
TTL: 600 or 14400
Content/Value:

v=DMARC1; p=none; rua=mailto:reports@salesforceben.com;

ruf=mailto:reports@salesforceben.com; fo=1; adkim=s; aspf=s;
pct=100; rf=afrf; ri=86400; sp=none
email deliverability salesforce

You referenced an email address during the setup process. You can receive information about delivery troubles, for example, a daily report from several mail providers. If you send a high volume of emails, investigate getting a reporting tool, options are detailed here.
Salesforce Email Relay
Email relay uses an email server to route emails sent from elsewhere (in this case, Salesforce) through your company’s mail service – indispensable when you don’t want your users to miss on crucial notifications sent from Salesforce.
Testing Salesforce Deliverability
You may want to use DMARC.org’s resources to test your SPF, DKIM, and DMARC setup. DNS changes can take up to 48 hours to propagate, so do remember to be patient!
Email authentication with the Salesforce platform doesn’t stop here! If you are using a marketing automation platform, such as Pardot (Account Engagement), Marketing Cloud, or other providers that integrate with Salesforce, check out the guide below:
Summary
While you are setting up Salesforce deliverability for success, it’s wise to understand the differences between deliverability and mailability. While both concepts aim to explain why an email can or can’t make it into the recipient’s inbox, the terms differ in a number of ways. Mailability describes if you are allowed to email the individual in the first place – think consent, valid email address. Deliverability describes if your email will make it past the filters assessing whether your email is worthy for the recipient’s inbox.
Huge thanks to Gauhar Kassymbek, Matt Morris, Michiel van Gaalen and Tobi Fondse for their input on this article!


Comments: