

Email authentication enables your organization to send emails safely. It helps recipient email servers identify if an email sent from a real account and the sender is authentic and not spoofed in any way.
If you are going to send emails from Pardot (Account Engagement), Salesforce, or Marketing Cloud, on behalf of your organization’s domain, then you need to have SPF, DKIM, and DMARC configurations completed.
In this guide, we will review each authentication method, and provide a step-by-step guide to implementing SPF and DKIM policies across the three platforms: Pardot (Account Engagement), Salesforce, and Marketing Cloud.
Email Authentication Definitions
- Protocols: Email authentication protocols were developed as a way to strengthen the security of SMTP (Simple Mail Transfer Protocol) and combat the rise of spam, as SMTP itself doesn’t include authentication mechanisms. The following protocols have their own configuration and need to be implemented carefully and verified prior to sending emails from each platform.
- SPF (Sender Policy Framework): An email authentication technique used to prevent spammers from sending messages on behalf of your domain. As a sender, you will be required to add SPF records in your DNS to allow Pardot or Salesforce to send emails from your organization’s domain.
- DKIM (DomainKeys Identified Mail): A protocol that allows an organization to take responsibility for transmitting a message by signing it in a way that mailbox providers can verify. Similar to the SPF configuration, DKIM requires you to publish a public key in your DNS and the recipient email server will use this information to accept emails with the corresponding private key.
- DMARC (Domain-based Message Authentication, Reporting, and Conformance): An email authentication protocol designed to allow email domain owners to protect their domain from unauthorized use (often referred to as email spoofing). This protocol advises the recipient email servers on how to handle emails that are coming from your organization’s domain. (This topic is not covered in this article, as it applies to all mail servers sending emails on your behalf. Learn more about DMARC configuration).
How Does Email Authentication Work?
While SPF verifies that the email is sent from an authorized sender (the sender can be Pardot, Marketing Cloud, or Salesforce), DKIM authenticates the email by comparing and validating public and private keys.

This can be compared to gaining access to a nightclub. The club’s policy is that you must provide a photo ID on entry to prevent other people from trying to enter using your name (on the guest list).
Why Implement Authentication Protocols?
There are multiple reasons to implement these protocols:
- Successfully implemented SPF, DKIM, and DMARK can protect your business’s brand image, customers, and potential prospects.
- These email authentication methods prevent spoofing attempts, and mail servers can stop delivering emails that are not directly generated by your organization.
- They also impact your email deliverability. If you do not configure the email authentication protocols properly, the likelihood of missing client inboxes and your email ending up in the spam folder is high.
Preparing for SPF/DKIM Setup
Before starting the SPF and DKIM configuration process, you need to talk to your organization’s IT department – find a list of domains available to use in the new platform to learn about the process of making changes in DNS.
Make sure to align on timelines and let them know about your implementation deadline. Depending on your IT policy, this can take anywhere from 2-4 weeks.
How to Set Up SPF and DKIM in Pardot (Account Engagement)
1. Navigate to Pardot Settings and the Domain Management tab, then click Add New Domain.

2. Enter the domain name and click Create domain.
3. Once set up, click Expected DNS Entries and copy the SPF, DomainKey_Policy, and DomainKey Domain and Entry values. You’ll send these to IT in Step 6 below.

4. Optional: While you are configuring SPF and DKIM settings, you can also create a tracker domain and send your request in a single ticket to your ID department. Scroll down to the Tracker Domains section on the Domain Management page and click Add Tracker Domain.

5. On the same page, take note of the validation key. You’ll send this to IT in Step 6 below.
6. Update the red text below with corresponding information from your instance and send it to your IT team.
Hello [name],
I’m working with the marketing team to implement Pardot, our new marketing automation platform. We will be using Pardot to send communication to our customers and prospects from @yourdomain.com. To guarantee great email deliverability and personalized URLs, we need to make the following changes:
We need to set up SPF, DKIM, and CNAME so Pardot is authorized to send emails on our behalf.
- To set up SPF, please add the following to DNS entries:
- Type: TXT
- Entry: v=spf1 include:aspmx.pardot.com ~all
- If there is already an existing SPF record in the DNS entry, simply add the following to it: include:aspmx.pardot.com
- To set up DKIM, please create DNS entries for DomainKey_Policy and DomainKey
- DomainKey_Policy
- Domain: _domainkey.yourdomain.com
- Type: TXT
- Entry: t=y; o=~;
- DomainKey
- Domain: [insert host record here]._domainkey.yourdomain.com
- Type: TXT
- Entry: [insert host record here]
- DomainKey_Policy
- To set up the tracker domain, please create the CNAME and TXT records for go.yourdomain.com
- CNAME
- Domain: go.yourdomain.com
- Address: go.pardot.com
- TXT
- Domain: @
- Entry: [insert validation key here]
- CNAME
Please let me know when these steps are completed so that we can complete the setup process within Pardot. Feel free to reach out with any questions.
Best,
Marketing Operations
7. Once you hear back from the IT team that the DNS entries are added, follow these steps to validate and confirm the changes.
- Navigate to Pardot Settings and the Domain Management tab, then click Check DNS Entries under the Email Sending Domains section. If the correct DNS entries are added, you should see the following screen.

- To validate the Tracker domain, click validate under the Tracker Domain section. If CNAME is configured properly, you should see the following screen.

8. If the validation fails for some reason, you can use platforms like mxtoolbox.com to compare the entry values you provided to your IT team versus what they added to DNS. Enter your domain name in the following pages, and you will see the existing entry values in DNS.
- To review the SPF records, visit https://mxtoolbox.com/spf.aspx You can follow similar steps to check DKIM and DMARC records. If the SPF is successfully configured, you should see v=spf1 include:aspmx.pardot.com ~all instead of v=spf1 -all

- You can follow similar steps to check DKIM and DMARC records.
- Alternatively, you can ask for a screenshot of published DNS records from your IT team and check the published records. The screenshot from the DNS interface may look like the following.

Note: Entries in the Value column will be unique to your Pardot (MCAM) instance.
This is one piece of advice for getting your Pardot account in tip-top condition – check out the guide on The DRIP below for more items to add to your checklist.
How to Set Up SPF and DKIM in Salesforce
There is a full guide available on Salesforce Ben that covers this process in depth, including the background context – we’ll give you an overview in this guide.
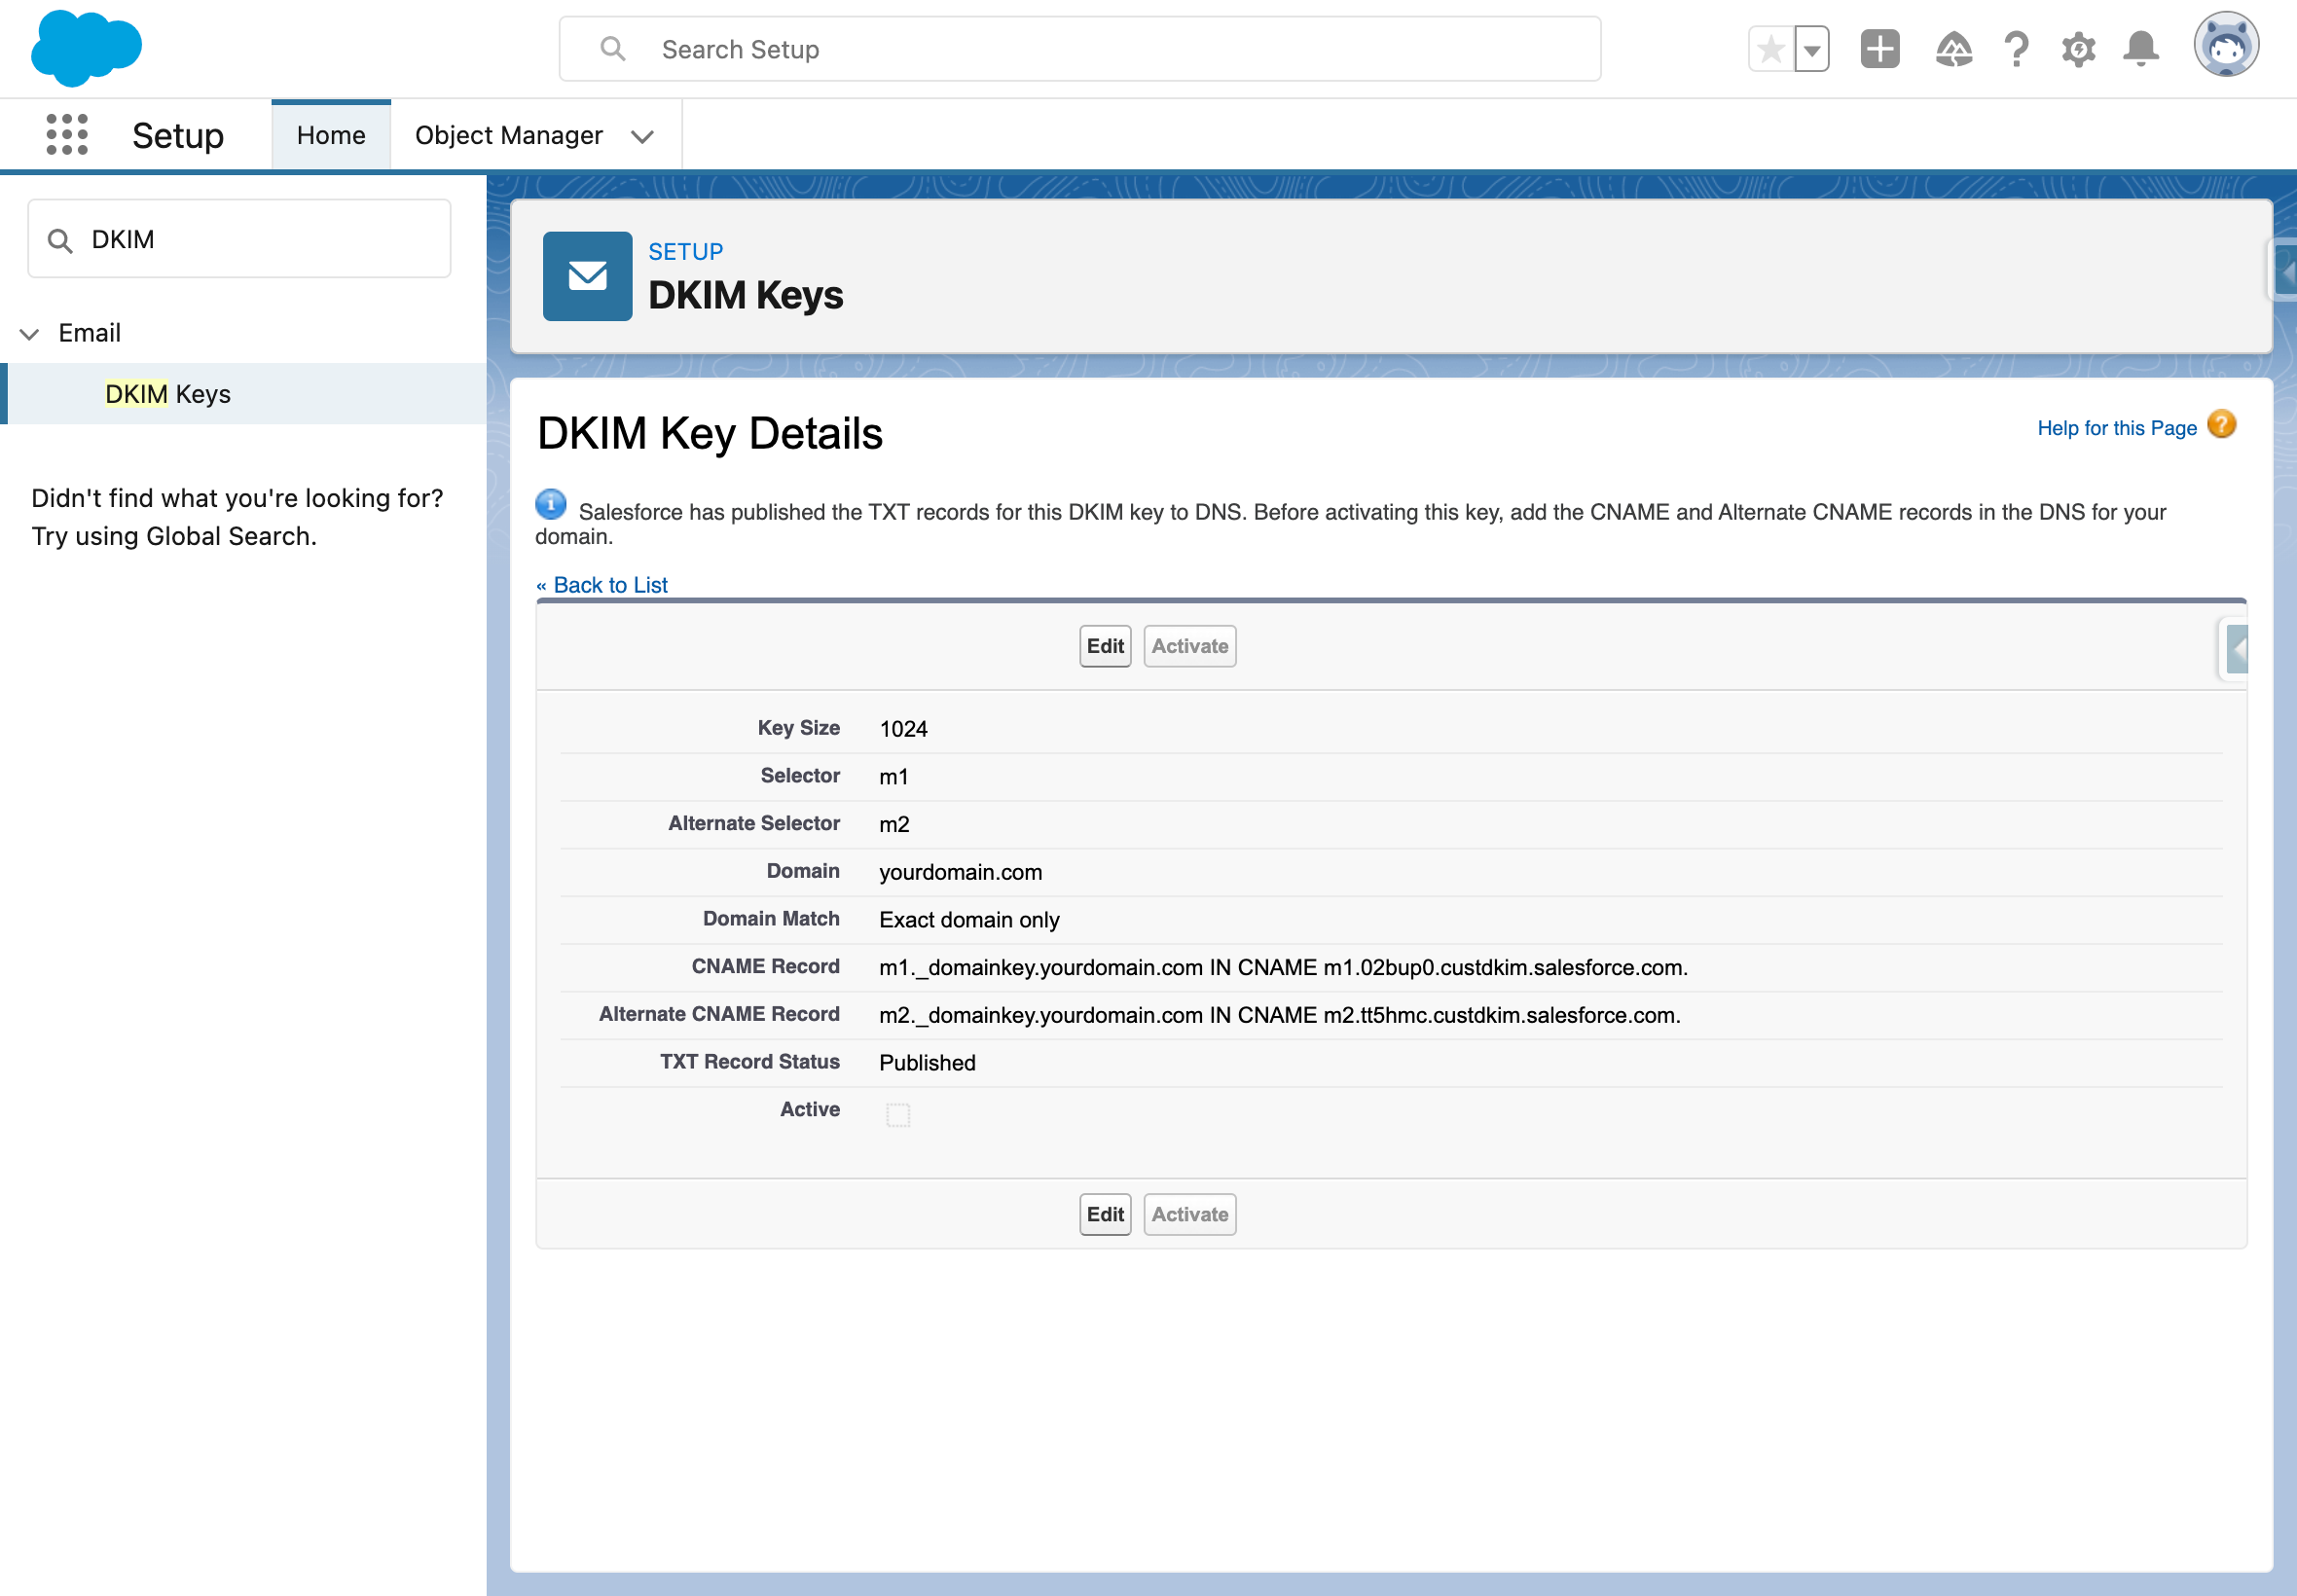
1. Access Setup and search for “DKIM”, navigate to DKIM Keys under Email, and then click Generate New Key.
2. Enter Selector, Alternate Selector, and Domain for the required field. Select the preferred Domain Match policy.
3. Once published you should see the following message “Salesforce has published the TXT records for this DKIM key to DNS. Before activating this key, add the CNAME and Alternate CNAME records in the DNS for your domain.” Copy the CNAME and Alternate CNAME record values. You’ll send these to IT in step 4 below.
4. Update the red text below with corresponding information from your org and send it to your IT team.
Hello [name],
I’m working with the Salesforce team to enable Salesforce to send emails from @yourdomain.com. To guarantee great email deliverability, we need to make the following changes.
We need to set up SPF and DKIM so Salesforce is authorized to send emails on our behalf.
- To set up SPF, please add the following to DNS entries:
- Type: TXT
- Entry: v=spf1 mx include:_spf.salesforce.com ~all
- If there is already an existing SPF record in the DNS entry, simply add the following to it: _spf.salesforce.com
- To set up DKIM, please create two CNAME entries
- CNAME Record
- Domain: [insert host record here]._domainkey.yourdomain.com
- Type: CNAME
- Entry: [insert host value here]
- CNAME Record
- Alternate CNAME Record
- Domain: [insert alternate host record here]._domainkey.yourdomain.com
- Type: CNAME
- Entry: [insert host value here]
Please let me know when these steps are completed so that we can complete the setup process within Pardot. Feel free to reach out with any questions.
Best,
Marketing Operations
- Once you hear back from the IT team that the CNAME entries are added, navigate back to the DKIM Keys page. It may take 72 hours until DNS changes are propagated. If Salesforce finds relevant CNAME entries in DNS, then the Activate button will be clickable. Click Activate and you can now start sending out emails from Salesforce.

- If the Activate button is still grayed out after the IT team confirms the configuration and 72 hours has passed, you can use the DKIM Record Lookup tool to validate these records. You can also review the published DNS record via a DNS interface. This view will be accessible only by your IT team and you can ask to get a screenshot of it.

Note: Entries in the Value column will be unique to your Marketing Cloud instance.
How to Set Up SPF and DKIM in Marketing Cloud
The email authentication process is different in Marketing Cloud, compared to Pardot and Salesforce.
Sender Authentication Package (SAP)
The first step when setting up Marketing Cloud email deliverability is to configure your Sender Authentication Package (SAP) (your organization needs to purchase one from Salesforce, so reach out to your Account Executive to learn about the options). SAP will enable you to:
- Send authenticated emails from Salesforce, on behalf of your domain (ie. email.company.com).
- Set click-path in links and image location to your company domain.
- Assign a dedicated IP* to your SFMC setup.
- Configure reply mail management.
*although shared IP configuration is also possible, the steps outlined here focus on dedicated IPs.
SAP requires you to decide on a domain or subdomain to be assigned for use by the SAP team. Both SPF and DKIM authentication will be configured by Salesforce as a part of the SAP package.
IP Warm-up Period
When SAP is set up, you need to “warm-up” your IP address.
When email servers receive email from your new IP address, they need some time to get used to you. They assess your domain based on the volume of emails you send, and how users engage with your emails.
As a rule of thumb, start off by sending a low volume of emails to more engaged email addresses, and then increase the volume over time. This could mean starting with smaller or individual Journey Builder sends before starting your bulk sends.
The maximum volume you can initially send differs by email domain. This Salesforce document advises you on how to build up sending volume by domain – however, in the wider market, there is no consensus on ramp-up volumes.
Dedicated IP and Reputation
When using a dedicated IP, your deliverability is dependent on your sender reputation (and yours alone). Build your reputation over time – avoid sending practices that damage your reputation, as these can have long-lasting effects.
Critical factors that impact your reputation are:
- Subscriber engagement: How do your subscribers react to your emails over time? Do they open the email, and engage with your message – or, move it to their trash folder, or submit spam complaints?
- Legitimacy: Is the receiving domain able to validate you are entitled to send from the sending domain you are using?
- Blacklists: Are you on blacklists?
- Frequency: How many emails are sent in a specific timeframe? The tolerance will be higher for ‘regular’ senders versus ‘new’ IPs.
- Compliance: Are you honoring CAN-SPAM and other regulations? These state standards for email content, such as including a physical mailing address, and an unsubscribe link. How did you acquire the email address data?
- SPAM Trapped: How many emails bounce, or are caught by spam filters?
If you misbehave, your emails can get reported, resulting in your IP being blacklisted or temporarily suppressed. If you suspect there are reputation issues, check if your IP address is on any blacklists. If you are blacklisted, you can ask to be removed from the list.
Troubleshoot Marketing Cloud Email Deliverability Issues
Marketing databases could originate from legacy systems (not able to determine their source), or you are reluctant to exclude/remove data. Here’s how to identify and troubleshoot issues:
Email Studio Reports: These reports track the performance of your email and analyze domain issues. Investigate
- Bounce Rate and Delivery Rate: Block bounces (bounce because of a complaint, blacklist, or content issues), and hard bounces (unknown domains and users) are tell-tale signs of bad list quality and domain/reputation issues. Aim for delivery rates >99,5% – anything below 98% indicates you have a deliverability problem!
- Click rate: A healthy click rate indicates that your emails are being received, and subscribers are engaging with the content. Some receiving domains don’t report back deliverability to Salesforce Marketing Cloud (this can happen when you are blocked by Microsoft-related domains).
- Tracking Report of a Job ID (My Tracking): Gives you the basics (volume, bounces, clicks, etc.) of an email send. You can select multiple sends/job IDs to compare results. Journey builder also has email analytics when you click on your email component in a Journey.

- Email Performance by Domain and Email Performance for All Domains: Gives you a breakdown, per domain, for a specific send. This is useful to analyze if you have domain-specific deliverability issues.

- Bounce Event Extract File: Gives you detailed SMTP error codes for each email bounce. This is generated from Automation Studio activities, select: New → Data extract (further instructions here). Note: This feature needs to be enabled by Salesforce support.
- Spam Complaints Over Time: If you receive spam complaints from your subscribers, and the amount of exceeds a threshold, this can result in a (temporary) ban. Some email service providers (Hotmail, Gmail, Yahoo) have obvious ‘spam compliant’ buttons on their interface.
Log a Case with Salesforce Support: Salesforce Support will usually give generic guidance. Do your ‘homework’ to narrow down the poor deliverability patterns, and be specific in your case description. If you have domain-specific issues, they can help you analyze, and even contact the email service provider to mitigate them.
Mitigate Marketing Cloud Deliverability Issues
- Recency and frequency: Only email to people who have opted-in, and are engaged with your brand. You can define your own ‘recency and frequency’ rules, for example, ‘Has clicked >5 times the last 6 months’ or ‘Has received <5 emails in the last 7 days’. Alternatively, you can take advantage of Einstein Email Frequency to leave it down to AI to calculate ‘oversaturated’ subscribers in a more sophisticated way.
- Suppress subscribers: With no engagement over the past x months/years, you should suppress these subscribers from receiving emails. You don’t have to immediately delete these subscribers; create a journey, or run a campaign on all inactive subscribers to assess whether they re-engage.
- Content Detective: Test your email to assess whether the content will trigger spam filters in real-life.

- Add DMARC to your DNS: Both SPF and DKIM authentication will be configured by Salesforce as a part of the Sender Authentication Package. What about DMARC? This isn’t included in SAP, so needs to be implemented separately. Who can make the modifications will depend on whether you have chosen to manage your domain DNS yourself or have delegated this to Salesforce.
- Data Cleanup Services: Use these services to check whether email addresses are still valid.
- Throttling: Avoid sending large email volumes all at once. Send throttling will enable you to scale back volumes.
Final Thoughts
Email authentication is an essential part of communicating safely with recipients. If you are still struggling to validate your SPF or DKIM records in Salesforce, Pardot, or Marketing Cloud, please send us a quick message, and we’d be happy to help you troubleshoot.