

If you’ve ever built (and rebuilt) flows, you’ll know the pain of keeping track of versions. You make a small tweak to a Decision element today, then two weeks later, you’re left wondering: what exactly did I change again?
I can definitely relate – I’ve once had a flow that ballooned to literally 17 versions of the same process! As I was writing and working through my Flow learning journey, experimenting with how different elements connect and interact, it was inevitable that some attempts would not work as intended. And so, each failed test meant creating yet another version.
Well, now we’ve got the Flow Version Comparison tool to the rescue! In this article, we’ll explore how it works, what you can learn from the comparison results, and how to share them with others.
Do We Even Need This?
100%. The real frustration comes when something goes horribly wrong in the latest version of the flow. I had to figure out which of the earlier versions worked better, and that felt like hunting for a needle in a haystack. I eventually learned that writing detailed descriptions was crucial (and should be treated as best practice as you build), but even that was not a reliable way of tracking what actually changed.
Version bloat has been one of the longest-running frustrations for Flow builders. Even with careful descriptions, it’s easy to lose track of what actually changed.
According to Adam White, Product Manager at Salesforce, this was exactly the problem the new Flow Version Comparison tool was designed to solve. Builders needed a way to quickly spot differences between versions instead of relying on memory or descriptions.
Until now, spotting the differences between Flow versions hasn’t been efficient at all. The ability to compare versions across Flows has been one of the most consistent requests from the community, and Salesforce is finally delivering on it with the recent Winter ‘26 release.
Using the Flow Version Comparison Tool
You can now compare versions not just directly from the Flow Builder, but also from the Automation app.
In Flow Builder, when you click the dropdown to view all versions of the flow, you’ll see a new option to compare versions.

In the Automation app, clicking the dropdown to the right of your Flow (as long as it’s not Active and has two or more versions) from the Flows list view has a “Compare Versions” option too.

Once clicked, you are then asked which versions you’d like to compare. In this example, we’re comparing Version 2 (your base flow) with the latest, Version 3 (your target flow).
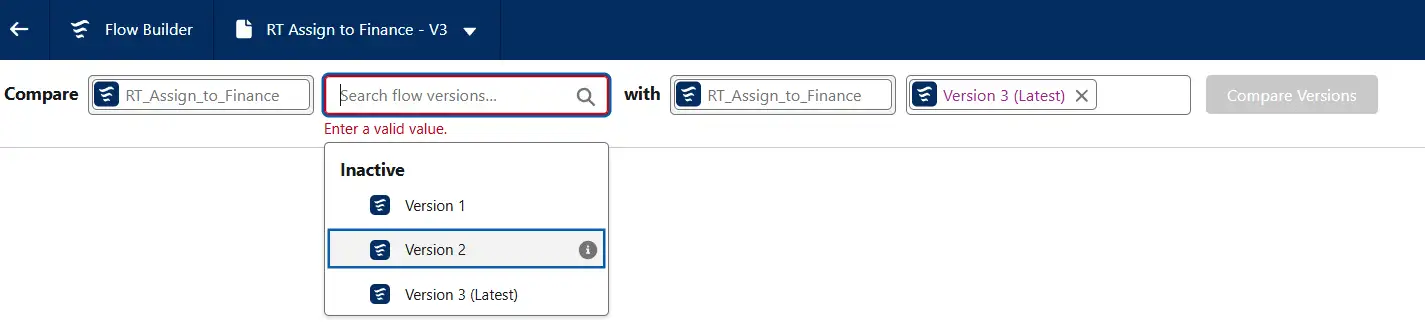
Click “Compare Versions”.
The Comparison Results’ header already gives you an overview of the differences between the versions. For example:

- Analysis Time: shows the date and time the comparison was made.
- Last Modified Date / Last Modified By: who last updated the target flow in your comparison, and when.
- Status of each version.
- Number of added items: number of elements or resource changes that exist in the target flow but not the base flow.
- Number of Updated items: any changed properties that exist in the target flow.
- Number of Changed connectors: the way an element links to the next (or previous) element in the flow has been updated, even though the element itself hasn’t been modified.
- Number of Removed items: number of elements or resource changes that exist in the base flow but not the target flow.
You also get a table of all the changes made between the two versions, including the type of change as well as the element or resource’s API name.

It’s also worth noting how Salesforce determines whether something is “new”, “removed”, or “changed”. Each element in a flow is uniquely identified by its API name and type.
So, for example, if the type of an element changes (e.g. a Decision becomes an Assignment) but it keeps the same API name, Salesforce sees that as the old element being removed and a new one being added. Or if the API name itself changes, the system also treats it as a removed element in one version and an added element in the other.
In short, the technical identity of each element is looked at (not just what it looks like in the Flow Builder) to decide what counts as a change.
To view more information about changes to an element or a resource, click View Details from the Change Details column. For example, clicking View Details for the Start node shows:

It looks like the condition requirements were changed. Previously, there was custom logic, but now it’s simplified to use OR instead. The null check was also removed. I love how the formatting makes it easy to spot these changes at a glance, with additions highlighted in green and removals shown in red with strikethrough.
The two flow versions in this example were pretty simple and had minimal changes done between them, but for more complex flows with several changes, your comparison table will have much more to share:

And similarly, if both your base and target versions are identical, no comparison results will appear (there aren’t any changes to show after all!).
Your comparison results table only shows changed items by default. If you’d like to see all items (whether or not they’re changed), click the gear icon from the upper right and deselect Show Only Changed Items.

Your table should then show all elements in your flow, but it’s still easy to identify which ones were changed thanks to the Change Type column.

Limitations
Currently, the Details view doesn’t support every element or data type. For now, it can’t display details for:
- The Transform element.
- Transform view within Actions.
- Related records fetched by a Get Records element.
- AI for Decision elements.
- If a data type isn’t supported yet, it simply appears as Unviewable Value.
Sharing Comparison Results
This part is perfect for collaboration and communication, because you can share direct links to Flow comparison results! Each comparison result has a unique URL that includes query parameters identifying the flow and its two versions that are being compared. So when someone opens the link, they’ll be taken straight to the same comparison view you’re seeing.
Here’s a sample comparison results URL:
https://yourDomain.my.salesforce.com/flowBuilder.app?flowId=301YT0000000000000&compareBaseFlowId=301YT0000000000001&compareTargetFlowId=301YT0000000000002
flowId is the unique ID of the Flow you’re comparing. If this isn’t included, Salesforce just opens the New Automation window instead. compareBaseFlowId, on the other hand, is the version ID of the base Flow, while compareTargetFlowId is the version ID of the target Flow.
If one of the version IDs is for some reason missing or invalid, don’t worry, because the comparison page will still open. It’s just that the Flow version with a missing ID will appear empty, so you’ll just need to select valid versions from the UI before proceeding. And note that if you make edits to the Flow directly from the comparison results page, those query parameters are cleared, so your shared link will no longer reflect that specific comparison.
Final Thoughts
The Flow Version Comparison tool is one of those features that seems like a simple new feature on the surface, but actually solves a surprisingly painful problem. It makes you wonder how we ever managed without it, and it’s like a breath of fresh air for anyone who’s stared at two flow versions, wondering what actually changed, or spent way too long clicking through versions and elements trying to spot the difference (me included).
While it isn’t perfect yet, it does exactly what it needs to do for the vast majority of use cases. And even though many may feel like Salesforce has been pushing all Agentforce over the past several months, it’s thoughtful features like this that remind us how Salesforce still does listen to the community.
Version control in Flow just got a whole lot easier, and honestly, it’s about time.

Comments: