In my day-to-day job, I mostly work with Aura and Visualforce – both happen to have their own versions of components. To sharpen my Lightning Web Component (LWC) skills, I built a few components to get to grips with some of the fundamentals of the new paradigm of component development.
If you think about it from a distance, Visualforce, Aura, and LWC all try to solve the same problems from an end-user’s perspective. Yet they differ greatly in technical particulars, which is why I wanted to explore concerns like internationalisation, user input, or error handling, as they are central aspects.
In this article, we will be looking at six topics in particular. They will cover all aspects mentioned and should help to provide insight on how to deal with each of them:
- Component Lifecycle
- 3 ways to work with CSS and styles
- Handling many Input Fields generically
- Apex Exceptions
- Custom Labels
- Things not yet available in LWC
So much for an introduction, let’s dive straight into some examples and code. Just to make sure we are on the same page, I will be talking a lot about parents and children, so I think an explanation might be helpful:
The idea behind any type of component is to live inside of (and next to) other components. If a component lives inside another component, it is considered a child. A component containing another component is considered a parent. A component can be a child and a parent at the same time.
1. Getting Hands-On with all Component Lifecycle Hooks
A fundamental question about parents and children in components is: who comes first? Parent or child? LWC sides with the ‘intuitive way’ (like Visualforce): parents are instantiated first, then children. If you grew up with Aura on the platform, you are accustomed to a completely different component life cycle – Aura initializes children first, amongst other things.
Other important questions are: What’s the first opportunity for my own code to run in the whole lifecycle? And what’s available for my implementation code and when? In LWC-terms: Which lifecycle hooks exist and which private or public properties can be accessed in each?
This, of course, is explained and visualized in the developer documentation:

If, like me, you learn from doing, such flow charts make most sense after having built a few components. Since component lifecycle is so vital, I encourage you to follow along with this step over here, by pulling the console up – don’t get used to it, though, all other components in this article need to run in Salesforce and are available on GitHub.
My first example component is a simple container for two instances of the same child component. The children leverage public getters and setters and print out the current weekday and the next week day. You can hide the next weekday part via a button. The component has roughly the following structure:
<template>
    <c-date-viewer>
    <c-date-viewer>
    <c-throw-error>
    <toggleButton>
    <AdditionalControls>
</template>
In the component code, for each component lifecycle hook like connectedCallback() or renderedCallback() the same things happen: We check for access towards properties or child components and print where we are and what we can do to the console.
Here’s the result:
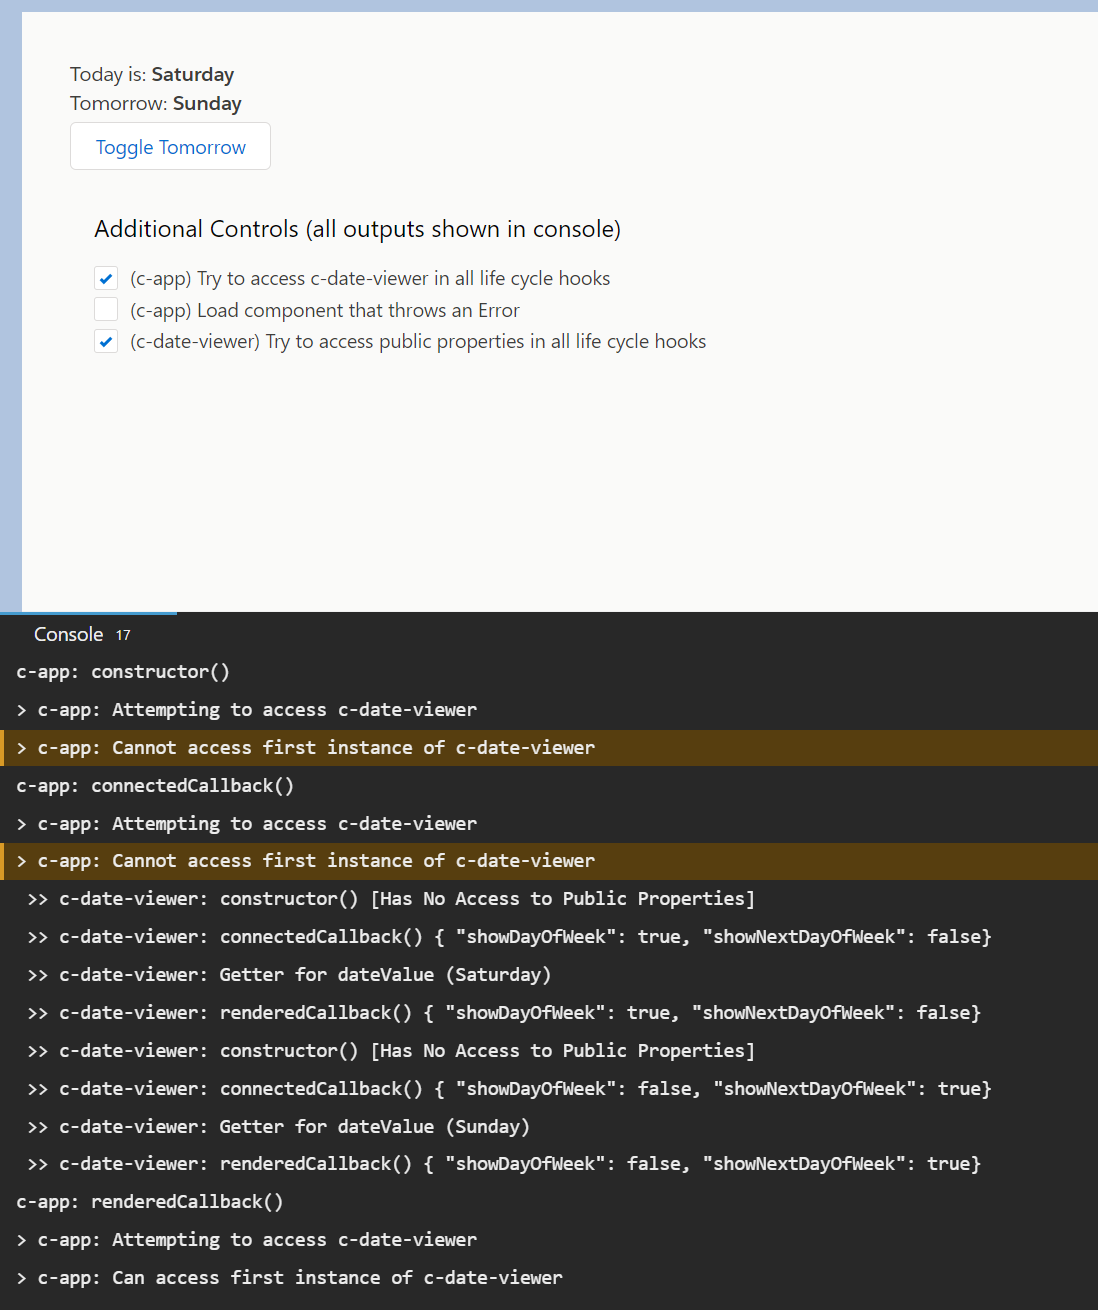
Since LWCs are basically Javascript Classes, the classes’ constructor runs before anything else. An attempt to access child components or public properties in the constructor is not successful. Before this gets too wordy, here’s the summary of what happens when and what you can/cannot do in each part.
- Parent Constructor runs first:
- No access to child components or public properties
- Access to private properties
- Access to imports
- Access to document
- Parent ConnectedCallback runs – that means, the parent is inserted into the DOM (‘web page structure’, sort of):
- No access to child components
- Access to public properties
- Access to imports
- Access to document
- Child1 Constructor
- Child1 ConnectedCallback
- Child1 Getters
- Child1 RenderedCallback
- Child2 Constructor
- Child2 ConnectedCallback
- Child2 Getters
- Child2 RenderedCallback
- Parent RenderedCallback:
- Access to all component parts
Public properties on children are set after they have been successfully connected to the DOM. The Parent rendered and finished last – only after all children have been created successfully.
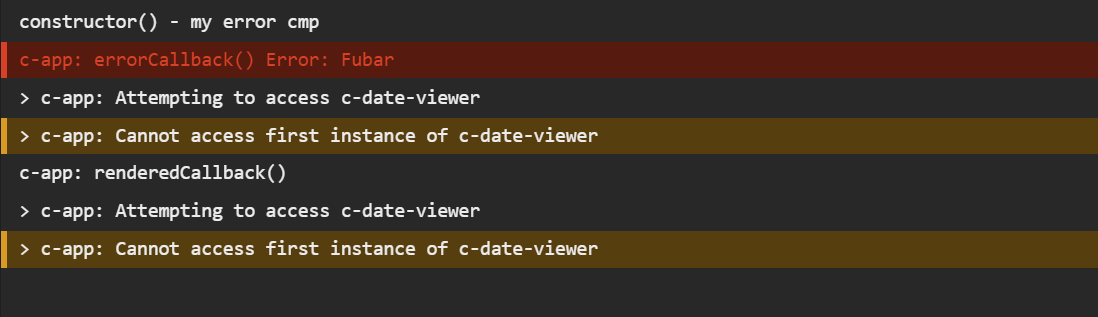
But what if something goes wrong with one of the children? That’s where comes in and here’s what’s happening: With no errorCallback(), the framework throws an exception for you and execution stops – nothing more happens.
With an errorCallback(), the parent renders empty, which means the renderedCallback() is executed after the errorCallback(). This leaves room to handle an error more gracefully if desired.
2. Adding Styles Programmatically
I am a huge fan of the lightning design system (SLDS) because it removes friction from the end user experience and offers outstanding guidance on how a component should behave and appear. The design system covers a huge variety of styling needs – paddings and margins and many more – without having to create any custom CSS of our own.
If styling is depending on user input or needs to be determined programmatically, there are three ways to achieve this. Assume the following LWC and that we want to give the section a red background:
<template>
    <section>
      <p>Content</p>
    </section>
</template>
Apply an existing CSS class
This means you already have a class in mind that you want to apply to an element. It’s either from SLDS or within your custom CSS file:
.red-background {
  background-color: red;
}
In both cases, you can use the following code in the renderedCallback to achieve your goal:
  renderedCallback() {
    let section = this.template.querySelector("section");
    section.classList.add("red-background");
  }
Use the style attribute in markup
The style attribute on HTML elements makes it easy to pass a string as styling instruction. Be careful as this can muck up carefully crafted CSS, yet it’s totally ok in simple use cases if you control the content of {computedStyle}.
<template>
    <section style={computedStyle}>
      <p>Content</p>
    </section>
</template>

connectedCallback() {
    this.computedStyle=`background-color: red;`
  }
Apply CSS properties programmatically
If we want to use a color picker to let end users pick a color of their own, then using CSS variables is the way to go. With each css variable, we can also set a fallback value:
.dynamic-background {
    background-color: var(--background-color, red);
}
And in your Javascript file:
connectedCallback() {
    const css = document.body.style;
    css.setProperty("--background-color", "green");
  }
3. How to Handle Many Input Fields
Sometimes we cannot rely on a lightning-record-edit form because the inputs we want to create are not dependent on a Salesforce record. For simplicity’s sake, we create an example with a bunch of text fields:
<template>
  <template for:each={inputs} for:item="inputName">
    <lightning-input
      type="text"
      key={inputName}
      name={inputName}
      label={inputName}
      onchange={onInputChange}
    ></lightning-input>
</template>
The trick – or rather the convention – is to rely on the input name to be your property name as well. Then you can wire up something like this:
import { LightningElement } from "lwc";

export default class ManyInputs extends LightningElement {
  inputs = ["textOne", "textTwo", "textFour", "textFive", "textSix"];

  onInputChange(event) {
    this[event.target.name] = event.detail.value;
    console.log(`Value for textOne: ${this.textOne}`);
    console.log(`Value for textTwo: ${this.textTwo}`);
    // ...
  }
4. Myths Around Exception Handling
The best practice for sending Exceptions to the client are still AuraHandledExceptions (for security reasons, I’ll explain why, shortly) and I always wondered what the differences were between a system exception, a custom exception or an AuraHandledException from a browser’s/client’s perspective.
If you google Aura Handled Exception you end up in the Aura part of the documentation and that brings you to an article by Philippe Ozil which was also written for Aura and is now completely outdated. Not only in regards to changes in LWC – as the follow-up article by Aditya Naag Topalli suggests. What’s the fuss about? Unfortunately, nothing.
To cut a long story short, there is only one tiny difference between an AuraHandledException, a Custom Exception or a System Exception.
An AuraHandledException sends no stack trace information to the client. So if you are particularly wary about the client not getting to know any server-side implementation details – which can be a security concern – then AuraHandledException is the way to go for LWC and Aura. In both paradigms you will need to handle exceptions manually – no messages will pop up automatically upon a server related error. This error pop-up service existed only for Aura and stopped existing altogether with the advent of LWC.
To play around with Exception in Aura and LWC, please refer to the demo component on GitHub.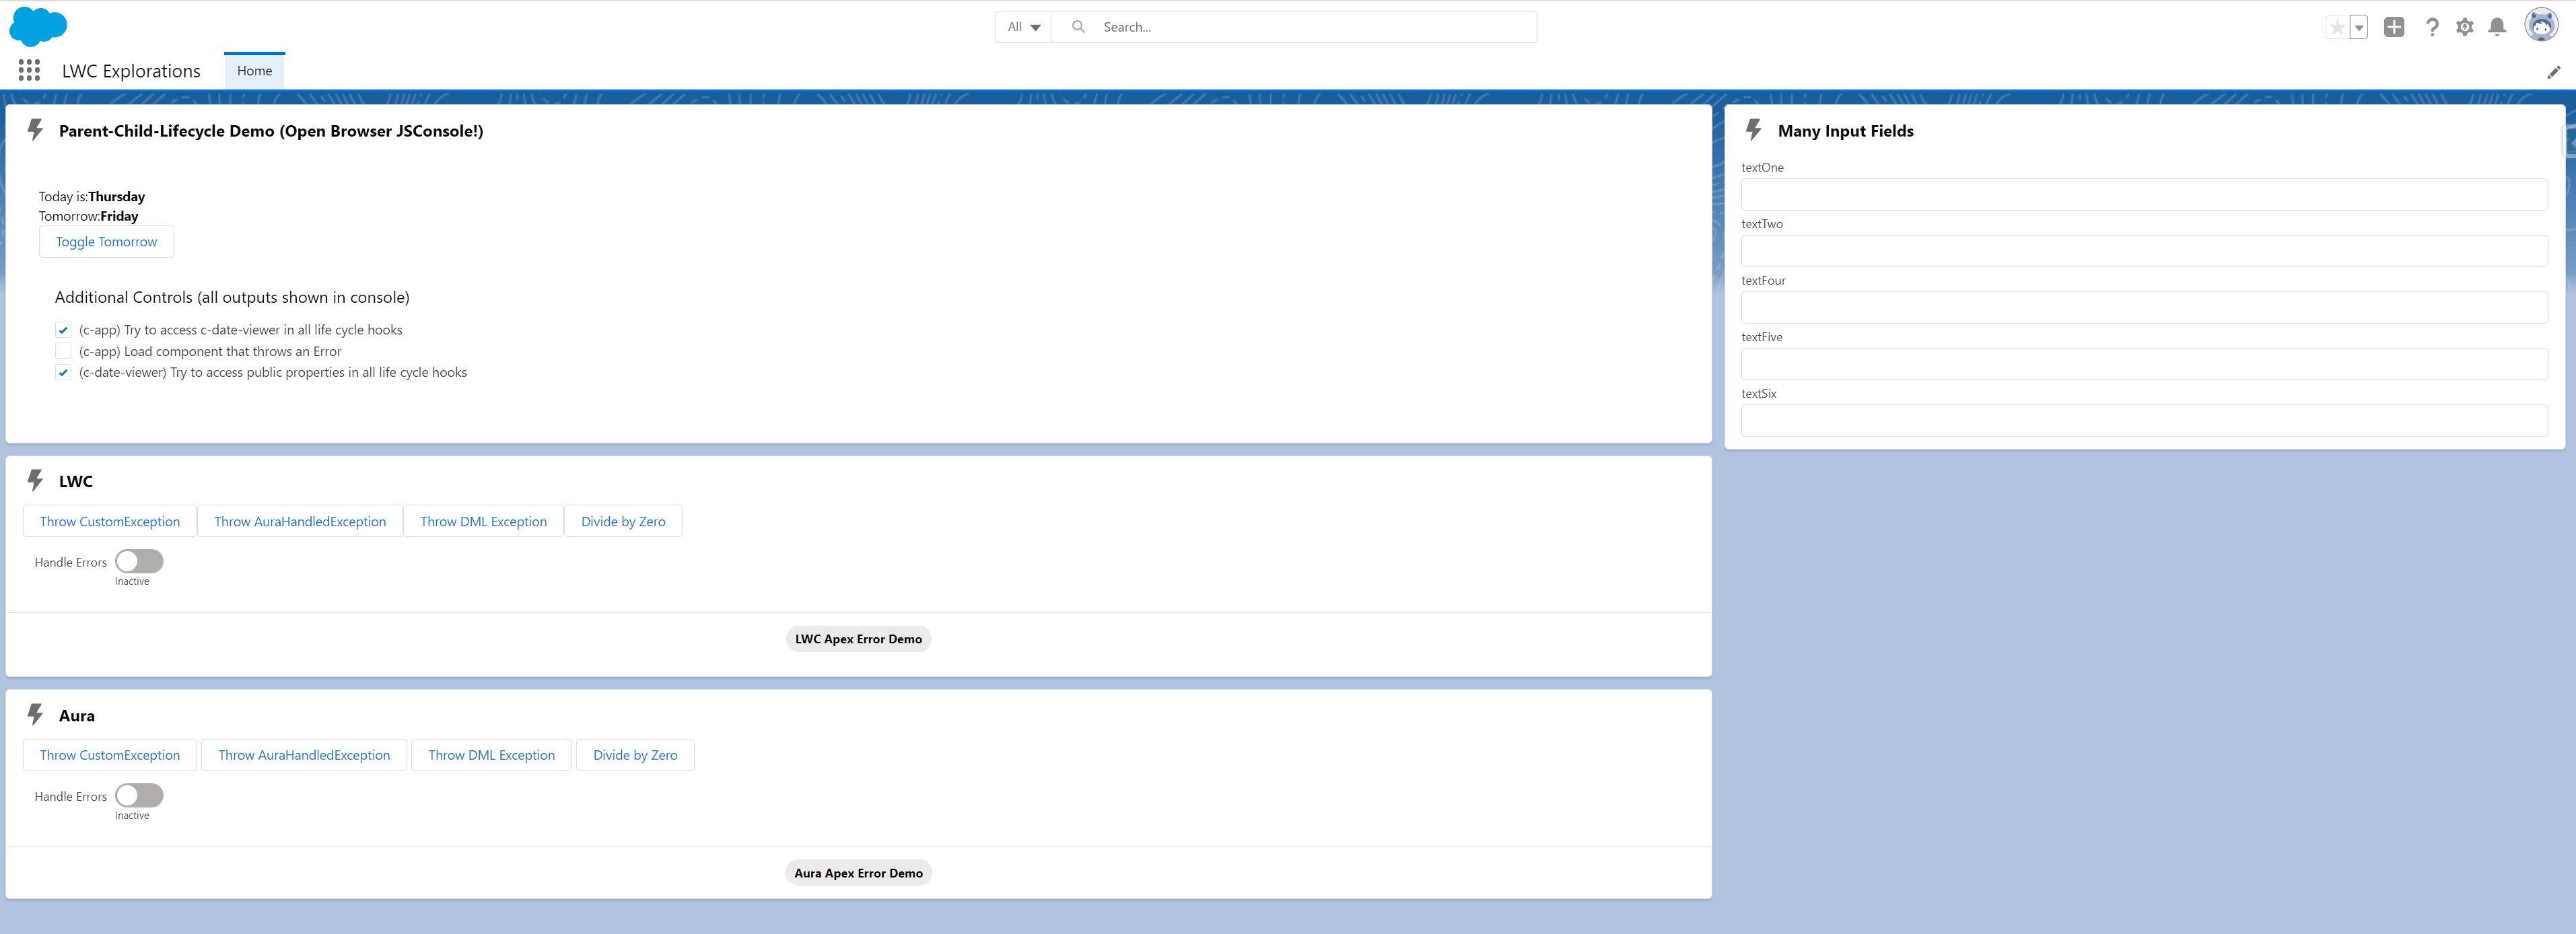
Make sure to also check out this utility component from the LWC Recipes Demo. Apex Errors are not the only type of errors that can occur. Different LWC and/or Browser APIs offer somewhat different error responses. The utility helps extract the relevant parts for all sorts of error objects.
5. Decluttering Custom Labels
One of the upsides of LWCs is their metadata-awareness. If you import a custom label for multi-language support into your component, the custom label cannot be deleted as long as it is referenced in the LWC Javascript File.
Here’s the downside: As an ISV, I have many, many labels that need to be taken care of. In Visualforce and Aura, I have direct access to labels in the markup/html part of the respective component. In LWC I need to import every single label on its own and hook that import into a property:
import { LightningElement } from "lwc";
import CUSTOMLABEL from "@salesforce/label/CustomLabelDemo";

export default class CustomLabelDemo extends LightningElement {
  customLabel = CUSTOMLABEL;
}
And then use that property in the markup/HTML part of the LWC:
<template>
    My Label: {customLabel}
</template>
There is no way around this and, if you have many custom labels like I do, it gets cumbersome.
In order to keep at least the class header short and crispy and avoid cluttering it with custom labels, we use an additional labels.js file per component, which lives in the component folder and can be auto-generated from e.g., a CSV file. Here’s what it looks like:
import label1 from "@salesforce/label/c.label1";
import label2 from "@salesforce/label/c.label2";
import label3 from "@salesforce/label/c.label3";

export const customLabels = {
  label1,
  label2,
  Label3
};
We use the Custom Label API Name in all places, in the consuming component we only have to do one single import:
import { LightningElement } from "lwc";
import { customLabels } from "./labels.js";

export default class CustomLabelDemo extends LightningElement {
  labels = LABELS;
}
This approach also leads to a clear indication when a custom label is used in contrast to a regular property. All custom labels start with: labels:
<template>
    My Label: {labels.label3}
</template>
6. Winter 22: One major restriction (almost) gone, others still in place
Salesforce is actively working on a new client-side security architecture called “Lightning Web Security” – it is currently in public beta. The new engine will – amongst other things – grant us developers the possibility to use components from another namespace in our own component code. Think of global Visualforce or global Aura Components – if an AppExchange provides those, we can build our own code around them. With Lightning Web Security, LWCs will get this option, too.
The namespace gap is being closed more than two years after the initial release. It is not the only gap: a few service components are still not available for LWC. For each of these use cases we need to create Aura Components:
- lightning:utilityBarAPI – lets a component interact with the utility bar
- lightning:unsavedChanges – makes it easy for developers to notify users if they want to navigate away without saving
- lightning:overlayLibrary – a way to create modals and more: create helpful and beautifully styled pop over Messages
- LWCs can be used for quick actions as of now, but they cannot be used to override standard actions like “New Record” or “Edit Record” yet.
I am certain that standard action overrides will be delivered eventually but I don’t expect the others to be arriving anytime soon.
Security is at the heart of another change that you should know about. If your children send CustomEvents with the intention of reaching their parents (which is considered crossing Shadow DOM Boundaries) they must use composed in addition to bubbles:
onButtonClick() {
    this.dispatchEvent(
      new CustomEvent("importantButtonClickEvent", {
        bubbles: true,
        composed: true
      })
    );
  }
Summary
We jumped from topic to topic in a seemingly rhapsodic way, offering best practices here and some wisdom there. In fact, we covered some serious ground by touching a few central elements of component development in general, and LWC in particular. Not only did we learn a bit about the component life cycle for LWCs, the same pattern can be used to familiarise oneself with the next level component framework Salesforce may be releasing in the future. Input Handling, Styling, Errors, Internationalisation – all these are central topics for any kind of web development.
If you want to dive into the code or learn more on LWC or Javascript development in general, check out the resources below:
- Github With Samples from this Article
- Winter 22 LWC Release Notes
- New to Javascript? I learned with: You don’t know JS
- Learn to build like pros: Salesforce’s LWC Recipes
- Test your skills: LWC super badge

Comments: