

Using Salesforce Shield’s Event Monitoring can be overwhelming when first starting out. There are a large number of events as well as attributes they provide, so it can be hard to know what you are supposed to do with them. Not much advice or guidance has been given in the past; however, that tide is changing with Salesforce Developer Advocate Dave Norris releasing one of the most comprehensive write-ups of the tooling to date.
In this article, we will be focusing on using only Transaction Security Policies – part of Event Monitoring – to implement canary record detection. The art of designing these policies is responding quickly and only looking up information without writing any. Security concerns, such as sharing rules do not apply, your policies will execute with access to everything. To get us warmed up, we will start with a simpler non-canary example exploring how to create your own policies in Apex and demonstrating their utility. You can use a fresh Trailhead Playground to follow along.
A Quick Recap on Canaries
There are two types of canaries we target the use of with Salesforce: field and record, with a solid early detection system relying on both. Field canaries are attractively titled fields left out of business as usual, which, when added to a list view, report, API query, screen, etc., detect those digging for additional information. We covered how to implement them in the prior article, as well as in a short video. Being easier to implement and maintain it is recommended to start there.
Today, we’ll be covering record canaries, which are typically more complex to implement as they require code rather than clicks. Record canaries often appear no different than other records in your system, but trigger when accessed. You mix them throughout your standard records to detect anything from staff looking at records they shouldn’t be all the way to shutting down mass data exfiltration by an attacker, fast.
Creating a Custom Transaction Security Policy
For this example, our fictional company has decided to implement the default, out-of-the-box, Data Sensitivity Levels available from Salesforce and has applied them to object fields. You can find the default Data Sensitivity Levels by looking for Data Classification Settings in Setup.
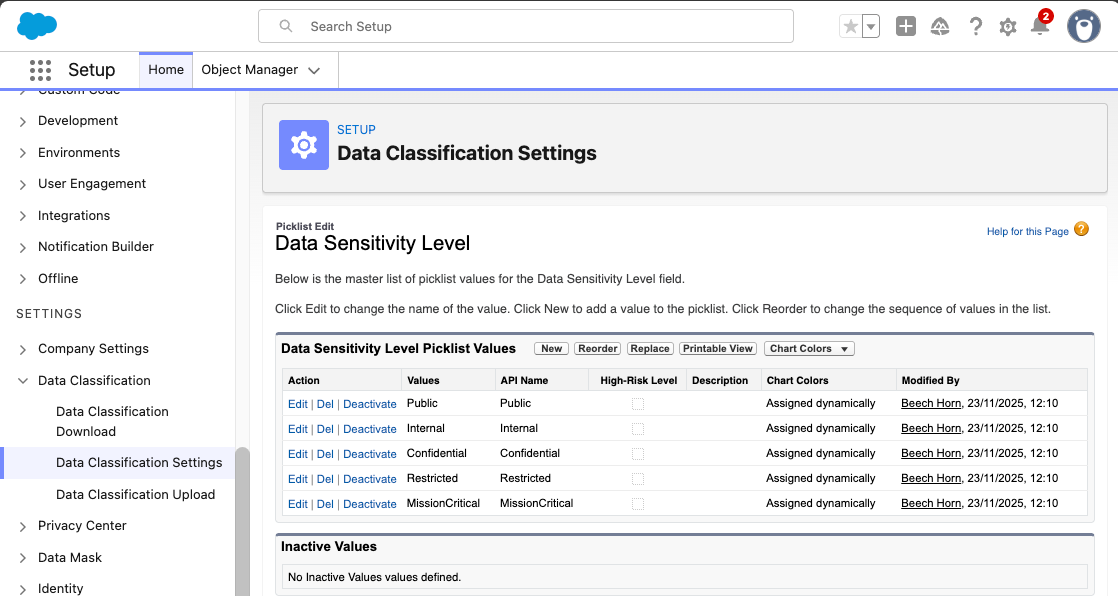
The new company policy we will be implementing requires any field with a classification of Restricted and above to not be shown on List Views.
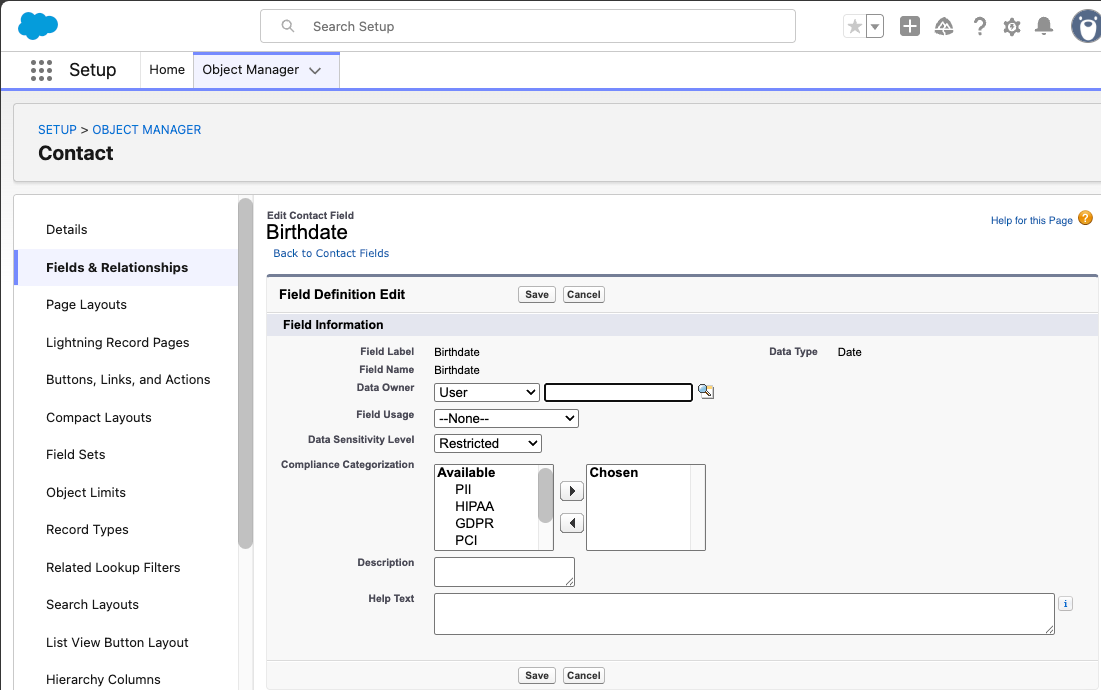
To illustrate this, we will configure the Birthdate field on Contact to be Restricted and create a new Age field, which will be set to Confidential, a lower sensitivity classification.
On a List View, you should be able to add the Age field, but not the Birthdate date field. To achieve this, go into the Contact object in Object Manager, then Fields & Relationships, the field called Birthdate, and finally, select Edit. We then want to change the Data Sensitivity level to Restricted.
The Age formula field can now be created on the Contact object using a Number type, a Confidential Data Sensitivity Level, and using the following formula:
IF(
    NOT( ISBLANK (Birthdate) ),
    IF(
        (
            DATE( 2000, MONTH (Birthdate), DAY (Birthdate) )
            <=
            DATE( 2000, MONTH (TODAY()), DAY (TODAY()) )
        ),
        YEAR (TODAY()) - YEAR (Birthdate),
        YEAR (TODAY()) - YEAR (Birthdate) -1
    ),
    NULL
)
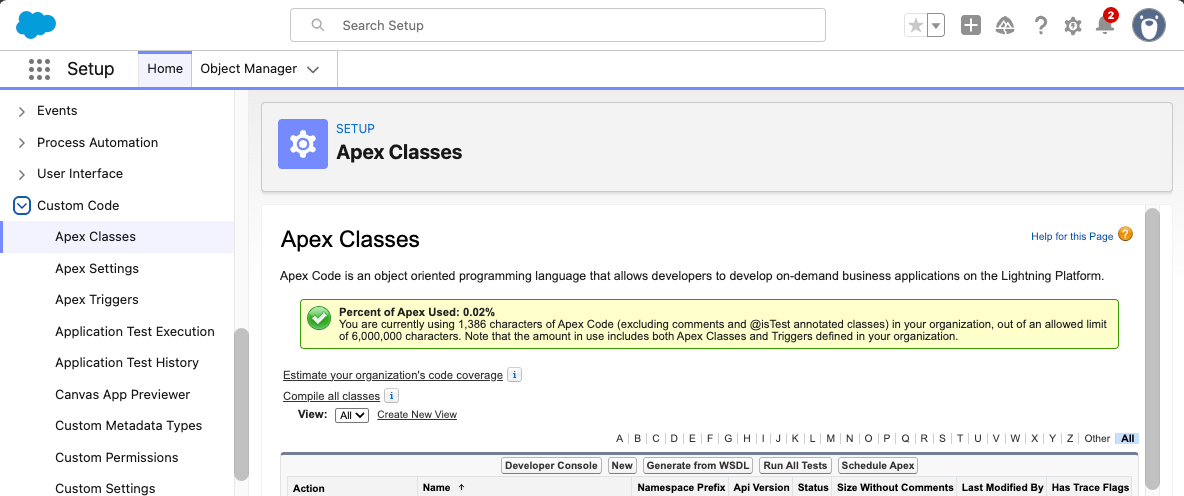
Create an Apex class to test if any fields on a ListView have a Data Sensitivity Level of Restricted or MissionCritical. If it’s been a while since you last used Apex, one of the easiest ways to do this is to look for Apex Classes under Custom Code in Setup and select New.
When implementing TxnSecurity.EventCondition: you simply return a boolean value of true if the Transaction Security Policy should apply in the evaluate method that accepts the event as an SObject.
We’ll use the QueriedEntities and ColumnHeaders. These are comma-separated lists on the ListViewEvent that determine if any fields meet the SecurityClassification we are looking for. It looks for one or more matching FieldDefinition records in order to trigger our policy:
public without sharing class RestrictFieldsOnListViews implements TxnSecurity.EventCondition {

    static final Set<String> SECURITY_CLASSIFICATIONS = new Set<String>{
        'Restricted',
        'MissionCritical'
    };

	public boolean evaluate(SObject event) {
		ListViewEvent lvEvent = (ListViewEvent) event;

     		String queriedEntities = lvEvent.QueriedEntities;
     		String columnHeaders = lvEvent.ColumnHeaders;

     		if (queriedEntities  == null || columnHeaders == null) {
     			return false;
     		}

		List<String> entities = queriedEntities.split(',');
		List<String> fields = columnHeaders.split(',');

		return [
			SELECT COUNT()
			FROM FieldDefinition
			WHERE EntityDefinitionId IN :entities
			AND DeveloperName IN :fields
			AND SecurityClassification IN :SECURITY_CLASSIFICATIONS
			LIMIT 1
		] > 0;
	}
}
Transaction Security, found in Setup under Security → Event Monitoring, has to be enabled to use Transaction Security Policies:

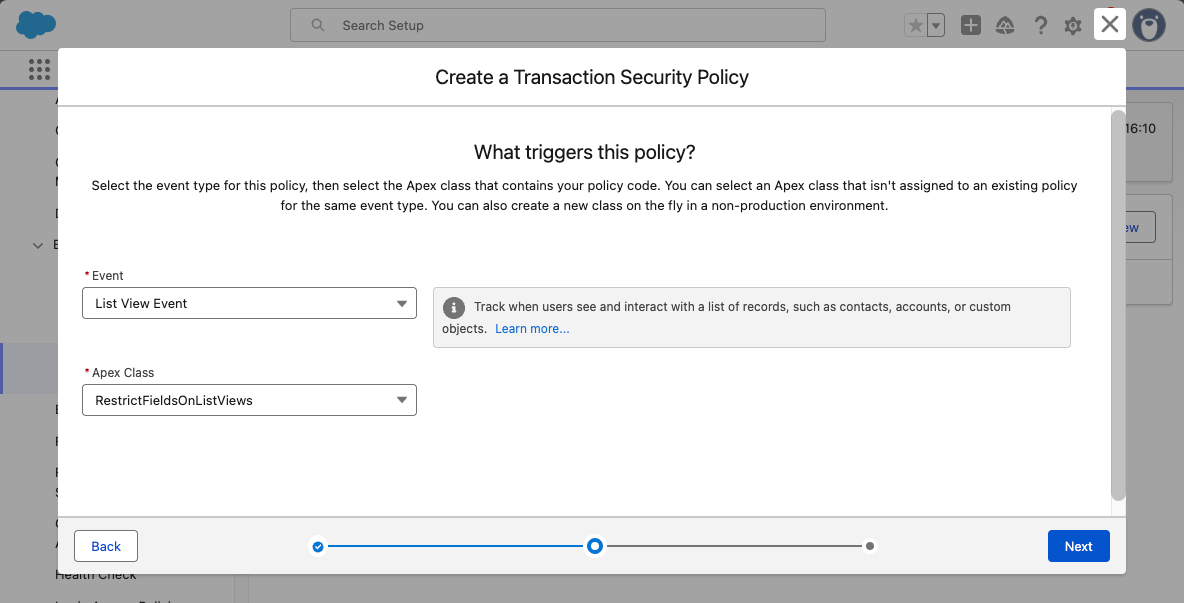
Now we create our Transaction Security Policy by selecting the New button. We will be selecting Apex for code over clicks in this example. Select the List View Event and the new Apex Class we just created.
Finally, the action to take is defined. Whilst a recipient is required, the notifications themselves are not, so if you’re happy with just blocking an action, feel free to leave them unspecified. We’ll just block the action if the policy fires and provide a custom block message back to the user.

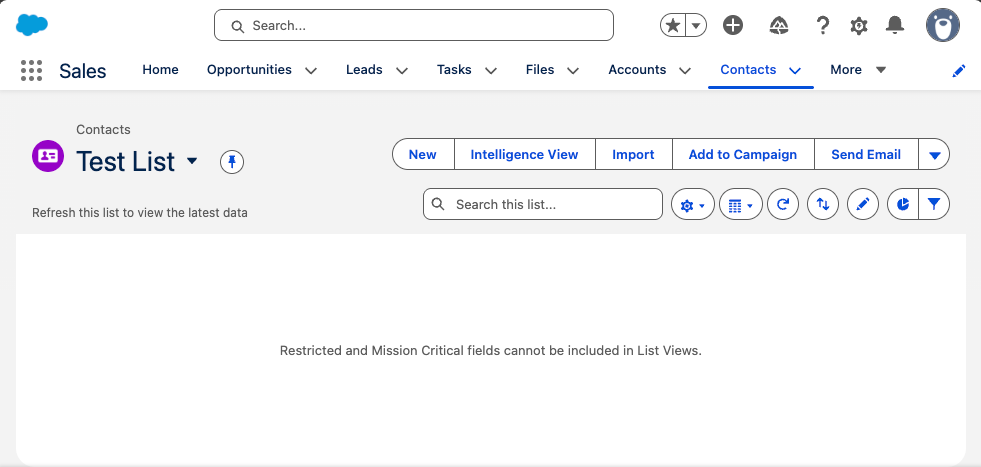
Now, the moment of truth! Create a new list view for Contacts and add the Birthdate field. You should see a message like this:
Success! Congratulations on implementing a custom Transaction Security Policy. You can extend this to be dynamic with security classifications. However, be aware of the impact upon speed and latency the additional processing requires. The EvaluationTime attribute of the ListViewEvent can be captured by Event Monitoring’s logs or an event subscriber and used to determine the performance impact in milliseconds of your Transaction Security Policy code.
You may need to consider techniques to reduce sophistication and introduce Platform Cache depending on your requirements.
Creating Simple Canary Record Detection
Now that the warm-up is complete, we will be creating canary record detection for ApiEvents. With the recent focus on rogue Connected Apps, prompt detection of unauthorized behavior is the difference between being a security hero and a security zero. Similar principles apply to other types of Event, and you can create generic policies that can handle more than one – that’s an exercise for another day.
For this simple example, we will use a Custom Object to hold canary record ids and see if they match any of the ids found in API queries. In a real-world scenario, you will want to ensure access to this object is heavily restricted and ideally has a less obvious name.
We will be building upon this example in the next section, adding more sophisticated detection of canary records without the need for a Custom Object tracking records ids. However, this is a perfectly viable method whilst keeping complexity low if this is all you need for your purposes. Do not feel bad for keeping things simple where you can.
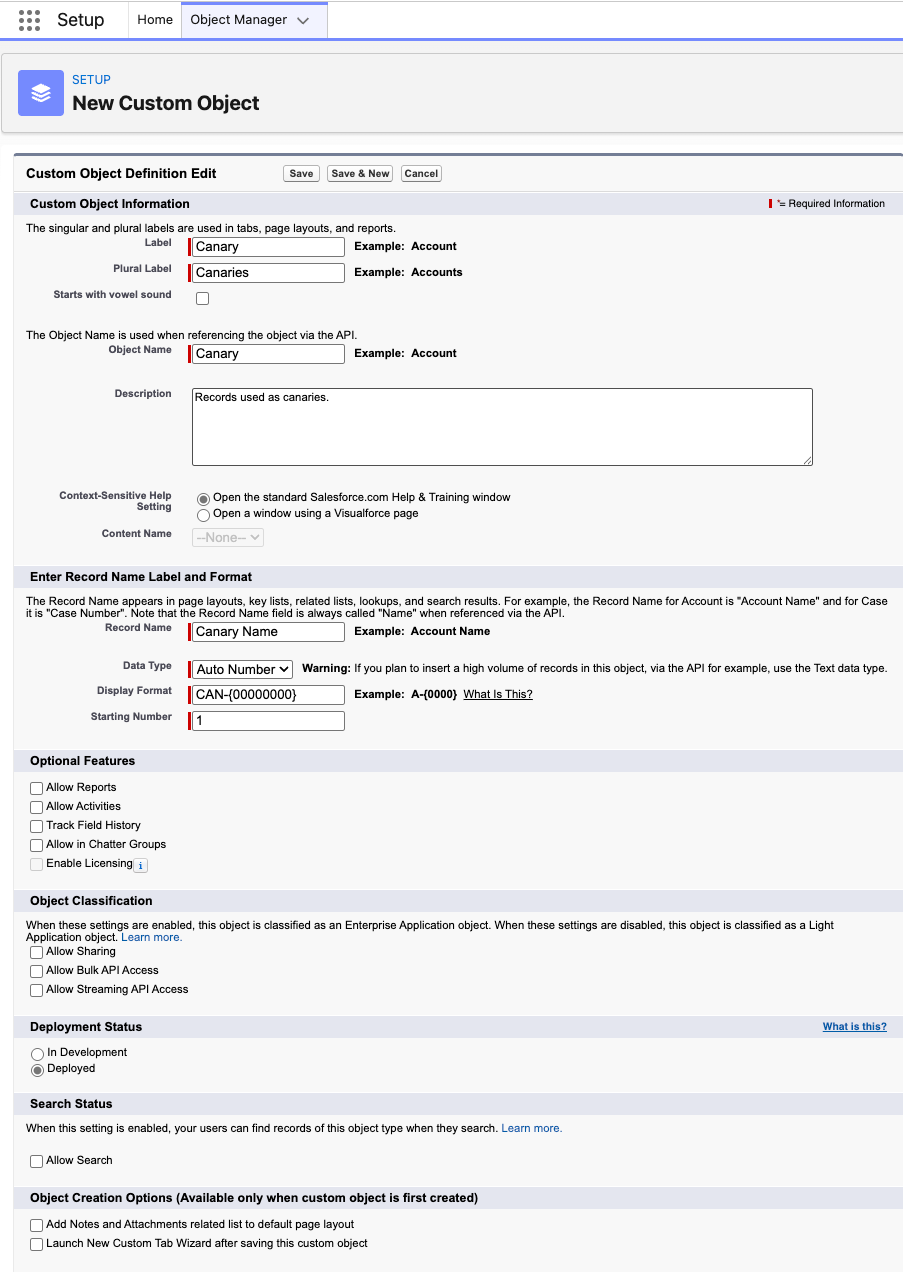
Consider using an Auto Number when creating your custom object for ease of reporting in the future, otherwise you are looking at typical object creation:
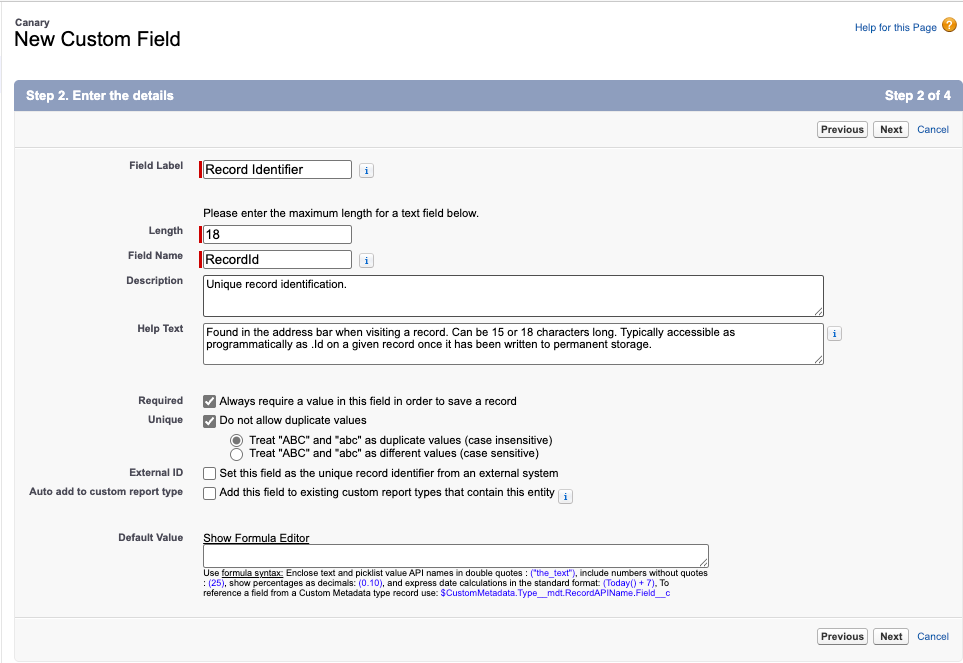
A new field is then required to store the record ids of our canaries.
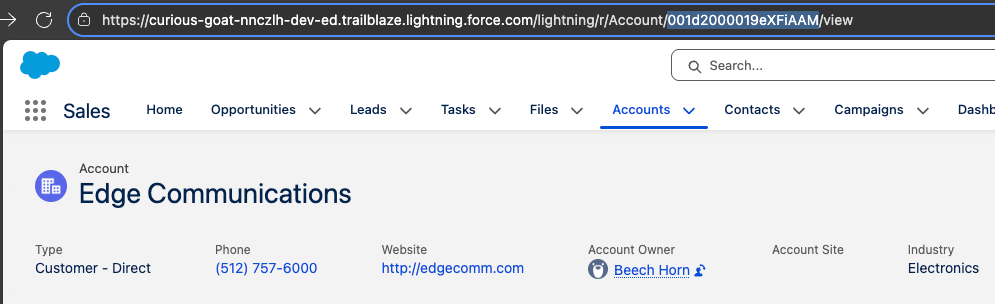
In order to test, we need at least one record added. In this example, the Edge Communications Account will be our test. The RecordId shown will be different for your own org and can be found in the address bar when visiting the record.
There are many ways to insert the RecordId into the new Canary Custom Object. Here, I am using a simple line of Anonymous Apex – use whichever method you’re most comfortable with.

Record Ids in ApiEvents
Our policy will be using the ApiEvent for detection. As is common with Event Monitoring, the format appears to be designed for ease of generation rather than ease of consumption. If we look at the example formats for extracting record ids we have the following.
SOAP and REST API Example:
{
  "totalSize": 1,
  "done": true,
  "records": [
    {
      "attributes": {
        "type": "Account"
      },
      "Id": "001xx000003DMvCAAW",
      "Contacts": {
        "totalSize": 3,
        "done": true,
        "records": [
          {
            "attributes": {
              "type": "Contact"
            },
            "Id": "003xx000004U7xKAAS"
          },
          {
            "attributes": {
              "type": "Contact"
            },
            "Id": "003xx000004U7xLAAS"
          },
          {
            "attributes": {
              "type": "Contact"
            },
            "Id": "003xx000004U7xMAAS"
          }
        ]
      }
    }
  ]
}
Bulk API Example:
{
  "totalSize": 3,
  "done": true,
  "records": [],
  "recordIds": [
    "001xx000003GYiBAAW",
    "001xx000003GYiCAAW",
    "001xx000003GYiDAAW"
  ]
}
Whilst you are free to parse the JSON and handle the extraction from either format yourself, now is a great time to introduce a new tool which can result in less code, higher performance, and an easier life as a developer…
DataWeave
One of my favorite MuleSoft features made its way to Salesforce in Winter ‘23 – DataWeave. It is a data manipulation language of choice, slicing and dicing CSV, JSON, XML, and now Apex objects. There is a superb interactive training playground to learn the syntax which can then provide considerable time savings when manipulating formats in future.
The VS Code support for DataWeave’s use in Apex can be hit or miss, so I will take you the long way round in case it is feeling more miss at present. If you’re unfamiliar, or it has been a long time since your last use of VS Code, then Salesforce has a Trailhead Quick Start to get you started.
If you prefer another IDE then you may need to translate a few of the instructions. Otherwise, you should be good to follow along.
Create a folder named dw in force-app/main/default with a new file called apiEventRecordsToRecordIds.dwl, which we’ll use to convert the JSON to Apex for the Records field on ApiEvent:
%dw 2.0
input records application/json
output application/apex
---
if (records.records?) records.records..Id else []
++
if (records.recordIds?) records.recordIds else []
We also need to provide a matching apiEventRecordsToRecordIds.dwl-meta.xml file to deploy:
<?xml version="1.0" encoding="UTF-8"?>
<DataWeaveResource xmlns="http://soap.sforce.com/2006/04/metadata">
    <apiVersion>65.0</apiVersion>
    <isGlobal>false</isGlobal>
</DataWeaveResource>
A right click on either file in VS Code should now allow you to Deploy This Source to Org.
A Transaction Security Event Condition is now required to check each ApiEvent and look for record ids returned that match our canary record ids. Just like before, this will be a custom Apex class with the same implementation and call signature but now instead using our DataWeave script:
public without sharing class DetectCanariesOnApiEvents implements TxnSecurity.EventCondition {

    public boolean evaluate(SObject event) {
        ApiEvent apiEvent = (ApiEvent) event;

        DataWeave.Script dwscript = new DataWeaveScriptResource.apiEventRecordsToRecordIds();
        DataWeave.Result dwresult = dwscript.execute(new Map<String, Object>{
            'records' => apiEvent.Records
        });
        List<Object> objs = (List<Object>)dwresult.getValue();
        Set<String> recordIds = new Set<String>();
        for (Object obj : objs) {
            recordIds.add((String)obj);
        }

        return [
            SELECT COUNT()
            FROM Canary__c
            WHERE RecordId__c IN :recordIds
            LIMIT 1
        ] > 0;
    }

}
Finally, we’ll create a new Transaction Security Policy like before, but this time targeting ApiEvent and our new DetectCanariesOnApiEvents Apex class. In terms of Actions we’ll not take any, but instead send an In-App notification. In a production environment, you may prefer an email to your security team instead.
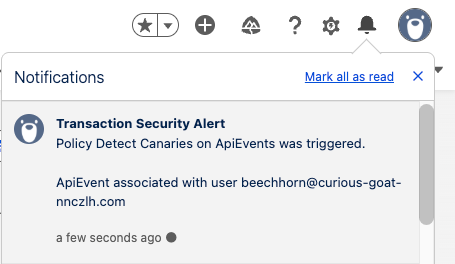
If we use an API to query our Edge Communications account, such as Showing All Data when viewing the record page in Salesforce Inspector Reloaded, we’ll see our In-App notification appear:
This is a good time to take a step back and consider how much ground you have covered so far if this is your first time writing custom transaction security policies, DataWeave, and implementing Canary detection then there have been a lot of new technologies in quite a short space of time, and if you’re looking for a good place to pause and come back, now is it.
Dynamic Canary Record Detection
Maintaining a list of record ids is a simple and effective method of Canary record detection, but what if you want something a little more dynamic? Let us use custom Metadata to define what field/value combinations are required per-object to flag a Canary record dynamically.
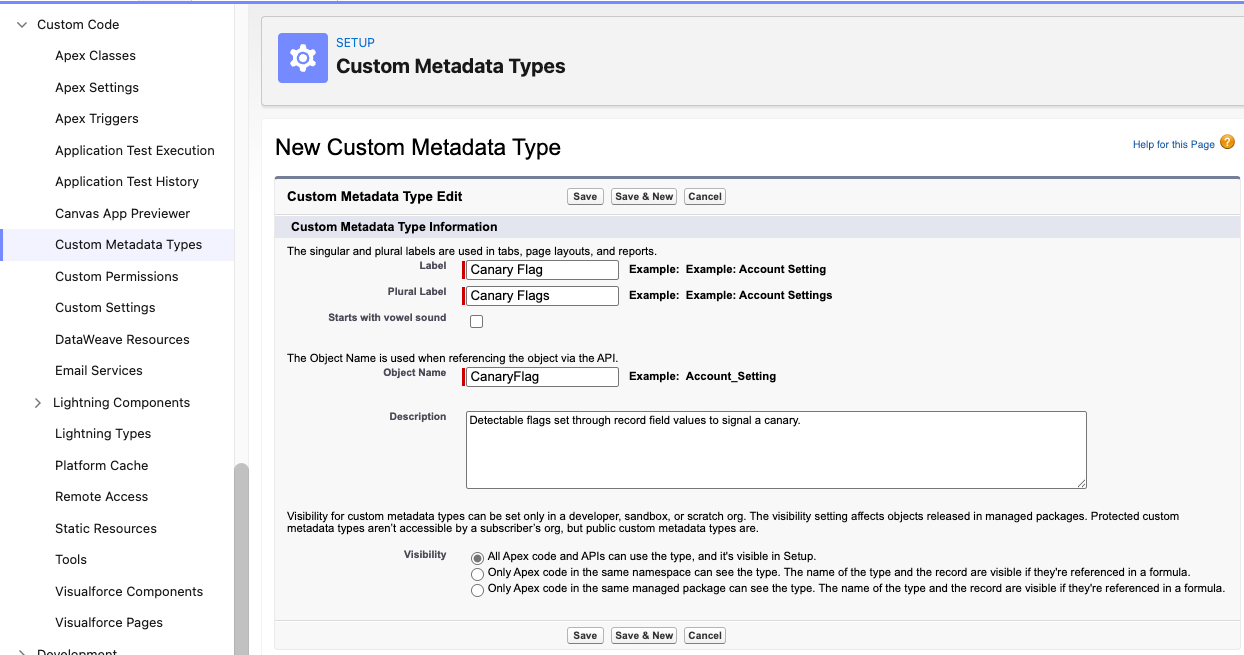
In setup under Custom Code, you’ll want to select Custom Metadata Types and create a new one for holding Canary Flags:
Create three custom fields on our custom Metadata object to hold the details of our Canary flags:
Object__c: TEXT(40)Field__c: TEXT(40)Value__c: TEXT(255)
We will now insert a record using the NumberofLocations__c field found on Account in a Trailhead Playground as our flag of choice when a value of -1 has been set. In no circumstances should there ever be a negative quantity of locations, making detection easy and avoiding false positives.
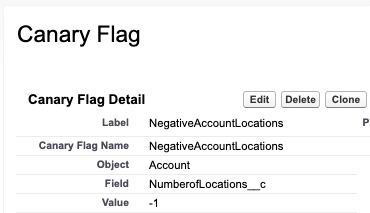
Canary Flag record showing an Object of Account, Field of NumberofLocations__c and a Value of -1.
Now we need to replace the contents of our DetectCanariesOnApiEvents Apex class with:
public without sharing class DetectCanariesOnApiEvents implements TxnSecurity.EventCondition {

    public boolean evaluate(SObject event) {
        ApiEvent apiEvent = (ApiEvent) event;

        DataWeave.Script dwscript = new DataWeaveScriptResource.apiEventRecordsToRecordIds();
        DataWeave.Result dwresult = dwscript.execute(new Map<String, Object>{
            'records' => apiEvent.Records
        });
        List<Object> objs = (List<Object>)dwresult.getValue();

        Map<String, Set<Id>> recordsByPrefix = new Map<String, Set<Id>>();
        for (Object obj : objs) {
            String recordId = (String)obj;
            if (recordId.length() == 18) {
                String recordPrefix = recordId.substring(0, 3);
                Set<Id> ids = recordsByPrefix.get(recordPrefix);
                if (ids == null) {
                    ids = new Set<Id>();
                }
                ids.add(recordId);
                recordsByPrefix.put(recordPrefix, ids);
            }
        }

        if (recordsByPrefix.isEmpty()) {
            return false;
        }

        Map<String, Set<Id>> recordsByEntityName = new Map<String, Set<Id>>();
        for (EntityDefinition entityDefinition : [
            SELECT QualifiedApiName, KeyPrefix
            FROM EntityDefinition
            WHERE KeyPrefix IN :recordsByPrefix.keySet()
        ]) {
            String entityName = entityDefinition.QualifiedApiName;
            recordsByEntityName.put(entityName, recordsByPrefix.get(entityDefinition.KeyPrefix));
        }

        Map<String, Map<String, Object>> canaryFlagsByEntityName = new Map<String, Map<String, Object>>();
        for (CanaryFlag__mdt canaryFlag : [
            SELECT Object__c, Field__c, Value__c
            FROM CanaryFlag__mdt
            WHERE Object__c IN :recordsByEntityName.keySet()
        ]) {
            Map<String, Object> canaryFlags = canaryFlagsByEntityName.get(canaryFlag.Object__c);
            if (canaryFlags == null) {
                canaryFlags = new Map<String, Object>();
            }
            canaryFlags.put(canaryFlag.Field__c, canaryFlag.Value__c);
            canaryFlagsByEntityName.put(canaryFlag.Object__c, canaryFlags);
        }

        for (String entityName : canaryFlagsByEntityName.keySet()) {
            Map<String, Object> canaryFlags = canaryFlagsByEntityName.get(entityName);
            for (FieldDefinition fieldDefinition : [
                SELECT QualifiedApiName, DataType
                FROM FieldDefinition
                WHERE EntityDefinition.QualifiedApiName = :entityName
                AND QualifiedApiName IN :canaryFlags.keySet()
            ]) {
                String fieldName = fieldDefinition.QualifiedApiName;
                Object fieldValue = canaryFlags.get(fieldName);
                if (fieldDefinition.DataType.StartsWith('Checkbox')) {
                    canaryFlags.put(fieldName, Boolean.valueOf((String)fieldValue));
                } else if (fieldDefinition.DataType.StartsWith('Number')) {
                    canaryFlags.put(fieldName, Double.valueOf((String)fieldValue));
                } else if (fieldDefinition.DataType == 'Date') {
                    canaryFlags.put(fieldName, Date.parse((String)fieldValue));
                } else if (fieldDefinition.DataType == 'Date/Time') {
                    canaryFlags.put(fieldName, DateTime.parse((String)fieldValue));
                }
            }
        }

        if (canaryFlagsByEntityName.isEmpty()) {
            return false;
        }

        for (String entityName : canaryFlagsByEntityName.keySet()) {
            Map<String, Object> canaryFlags = canaryFlagsByEntityName.get(entityName);
            Set<Id> recordIds = recordsByEntityName.get(entityName);

            String soql = 'SELECT COUNT() FROM ' + entityName + ' WHERE Id IN :recordIds';
            Map<String, Object> bindVariablesMap = new Map<String, Object>();
            bindVariablesMap.put('recordIds', recordIds);
            for (string fieldName : canaryFlags.keySet()) {
                Object fieldValue = canaryFlags.get(fieldName);
                soql += ' AND ' + fieldName + ' = :' + fieldName;
                bindVariablesMap.put(fieldName, fieldValue);
            }
            soql += ' LIMIT 1';

            if (Database.countQueryWithBinds(soql, bindVariablesMap, AccessLevel.SYSTEM_MODE) > 0) {
                return true;
            }

        }

        return false;
    }

}
Wow, that’s a lot of Apex! Firstly, if you spot improvements, such as additional field DataType conversions, speed optimizations, or outright quality control, please feel free to comment below. Whilst this is a simplified example, if others are building upon it, then sharing is caring. You can modularize the code, add support for other events, and make it your own for your org.
We retrieve the record IDs as before, find the objects (entities) associated with those records, look up the canary flags for those objects, convert the values from strings to the correct field type, and then verify that all canary flags for an object match any of the records being returned. The SOQL logic can be altered to look for any flag instead of all flags needing to match.
If you now set the NumberofLocations__c on an Account to -1 and access it via API you’ll receive the In-App Notification we configured earlier. No more needing to track individual record ids.
With this technique, we can create new Canary flags, add them to our Metadata and utilize a single dynamic policy for detection. All that is left is configuring genuine API usage to explicitly filter out Canary flags on every query and be ready to act when an intruder trips up unawares.
Final Thoughts
Implementing Canary Records through Salesforce Shield’s Event Monitoring and Transaction Security is a powerful yet underused approach to protecting your organization’s data. By leveraging Apex-based Transaction Security Policies, you gain the ability to detect and respond to potentially malicious activity before it causes damage.
This article demonstrated a step-by-step journey, from creating basic field restriction policies to implementing advanced, dynamic canary detection using custom metadata and DataWeave. Along the way, we learned how Transaction Security operates beyond traditional sharing rules, how DataWeave can simplify the extraction of record IDs from complex API payloads, and how metadata-driven logic can future‑proof your threat detection strategy.
Even a simple canary record setup can provide significant visibility, alerting security teams to abnormal or unauthorized access patterns. For larger, more mature environments, dynamic detection methods allow constant adaptation as data models change. The key takeaway is balancing sophistication with maintainability: start simple, understand your event data, and incrementally build more intelligent monitoring layers as your organization’s needs evolve.
In short, canary record detection transforms curiosity into proactive vigilance: turning Salesforce from a data platform into a cornerstone of your enterprise security strategy.