

Record Types in Salesforce are one of the most misunderstood and misused features. They can offer a lot of benefits, but people also tend to make assumptions about what they can do, or get overexcited and try to use them for everything when they may not be necessary.
When you use record types in Salesforce correctly, you can improve data quality, reduce manual effort, streamline processes, and make it easier for end users to focus on their real work. This guide will explore the world of Salesforce Record Types, including when and how to use them effectively.
What Are Salesforce Record Types?
Salesforce Record Types are a way of grouping many records of one type for that object. These can be applied to any standard or custom object, and allow you to have a different page layout, fields, required fields, and picklist values.
They should be used for records that have the same concept, but need to be different in execution.
As mentioned above, record types can be created on any standard or custom object in Salesforce, allowing you to configure different:
- Page layouts
- Fields
- Lightning Pages
- Required fields
- Picklist values
“Record Type” can be used as a criteria in validation rules, formula fields, flows, and more.
When a user creates a record, a pop-up will prompt which record type they wish to use:


Why Use Salesforce Record Types? (The Benefits)
There are ideal use cases for record types, while at other times, record types may not be the right option.
The reasons to use record types include:
- Reduce the number of fields on the page.
- Improve data quality – sometimes users are forced to fill out record types which can lead to poor quality.
The reason is nearly always the same; record types make life easier for the end user, showing them what they need, as well as none of the stuff they don’t need to see. They tell the user what is required for that specific Type without bothering them with fields that are irrelevant. But most importantly, you need to also understand when not to use Record Types.
Examples of Record Types in Salesforce
Again, Record Types should be used for records that have the same concept, but need to be different in execution.
Let’s look at a non-Salesforce example – the category ‘Transportation’. There are many types of transportation, but for this example, let’s say our options are:
- Cars and Trucks
- Motorcycles
- Airplanes
- Trains
- Boats
One of the only things these have in common is that they are all modes of transportation – otherwise, there’s almost nothing similar about them. This is the logic you want to keep in mind when thinking about record types.
Each of the Salesforce scenarios reflect our ‘transportation’ example above – they are the same in concept, but the execution and process of each will be different:
- Opportunities: Based on Revenue Type, e.g. New Business, Existing Business, Renewal Business.
- Quote Type: For example, Direct, Distributor, Reseller.
- Leads: For example, Customer Lead, Partner Lead.
- Campaigns: Hosted Event, Email Campaign, Tradeshow.
Campaigns definitely meet the criteria of needing record types because each of these campaigns differ in how they are executed. For example, for “Hosted Event” and “Tradeshow”, I could need more information around the cost of the event, location, etc. For an “Email Campaign”, on the other hand, there’s probably very little to no cost involved, and no location required. Therefore, those fields would be irrelevant.
Also, if you are using Account Engagement (Pardot), you must select one record type to sync the correct campaigns from Salesforce to Account Engagement.
- Cases: “Bug”, “Product Question”. If a customer needs help with a bug, I would need steps to reproduce the bug, or I would need to ask for screenshots. On the other hand, with a Product Question, I only need to know which Product, and what the question is. As they’re both records of the same object, I can still report on SLAs in one place.
- Custom object example: A recruiting company has one custom object called “Open Positions”. The fields you need to fill out for an entry-level position are different from an executive-level position.
How to Create Record Types in Salesforce
Once you have decided to implement record types in Salesforce, it’s time to think about what the differences of each type actually are. This goes without saying, but your initial build should be in a sandbox – once you have built and tested, deploy your record type to your production environment (which I’ll cover later in this guide).
Step 1: Document the Differences
List all of the important fields that must be filled out on your records, and then document what the differences are for each planned record type. You may want to map this out in a format that makes sense to you, but here’s how I approach this exercise.
Let’s use Support Cases as an example. My company wants to have four record types for Support Cases: Suggestion, Problem, Question, Other. Depending on the type, we need different picklist values, different default values, and different requirements on the page layout.

Step 2: Custom Fields
Create all the custom fields you will need, and add all the picklist values you plan on using in all of your record types.
Step 3: Object Processes
This section applies to record types on Cases, Leads, and Opportunities. If you’re working with any other object, including custom objects, you can skip this step.

As above, these objects have an additional special requirement: You must create the corresponding “process” for each object. The process controls the main Status/Stage field for its object.

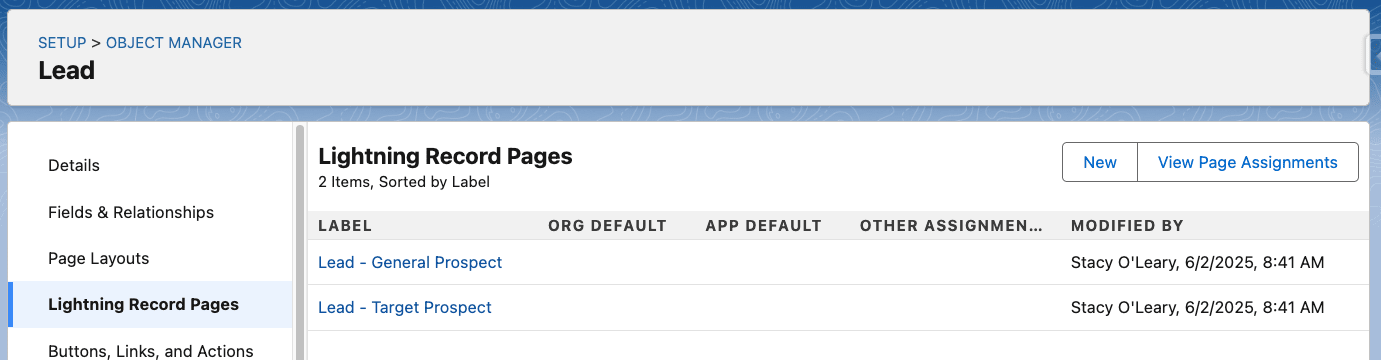
Step 4: Create Lightning Record Pages or Page Layouts
Now create your Lightning Record Pages (or Page Layouts if you’re still using them). You will likely need one Lightning Record Page per Record Type, but review your field requirements and assign as needed. Arrange your fields and sections in a way that makes the most sense for that Record Type.
Step 5: Create Record Types
Now you can create your record types. You will need to enter the details about this record type, and don’t forget to select the correct Process, if needed (from Step 2).

Make sure you add a description – this will help your users decide which record type to choose. Then you’ll need to select the profiles that will be able to use this record type, and if this record type should be the default.

Step 6: Record Type Lightning Page Assignment (or Page Layout Assignment)
Review your Lightning Pages (or Classic Page Layouts, if you’re using them) and verify they are assigned to the proper Record Type.

Step 7: Record Type Picklists
This is the fun part! Notice that we can click on the name of each record type. You will also see a list of all the picklist values on the object. This is where you’re going to choose which picklist values are available on each record type, and which one is the default.

Here’s our Suggestion record type, and all the picklists I can make selections for:

Notice the same picklist, but two different record types. “Priority” has two different default values, and two different sets of options for the user, depending on the record type.
Step 8: Test It Out
Create some test records in each record type, and make adjustments as needed.
Record Type Tips and Considerations
Bear these considerations in mind both before you build and after you deploy record types:
- When adding picklist values in the future, you’ll need to remember to also add them to the proper record type (and process, if needed – refer back to Step 3).
- You cannot use Inline Editing on a list view when record types are present, unless that list view has a filter displaying only one record type.
- You may need to remind your users to filter on record type when creating reports.
- You cannot use record type to determine visibility – see the Salesforce idea here. When you assign a record type to a profile, you’re really just giving the potential ability to create that record type.
- Put descriptions everywhere – if you have a community and are asking community users to create a record with a record type, be aware they may be able to see the descriptions!
- When you assign a record type to a profile by default, you are assigning the record type that appears by default in the picklist, just like the default value of any other picklist.
How to Deploy Salesforce Record Types Correctly
Once you have built and tested, it’s time to deploy your record type to your production environment. This can be straightforward if it’s a new object, but has additional considerations for an object already in use.
Setting the Scene: Get a Move On!
No, that’s not me trying to hurry you along – that’s just the name of my fictional company! Get a Move On! manufactures custom boats, cars, motorcycles, and small airplanes. We’ll use a custom object in their Salesforce org called “Vehicles”.
These are the record types they have created:

Step 1: Create an Outbound Change Set
After you’ve created the record types, add them to your Outbound Change Set. Just go to the Change Set you created earlier and click Add. Record Types can be found under Component Type → Record Type. Just check the boxes next to the ones you need, and then click Add to Change Set.


Step 2: Create Custom Fields
Note: If you were following the “How to Create Record Types in Salesforce” section, you will have already done this.
Next, you’ll want to create any custom fields in the sandbox you might want for each record type.
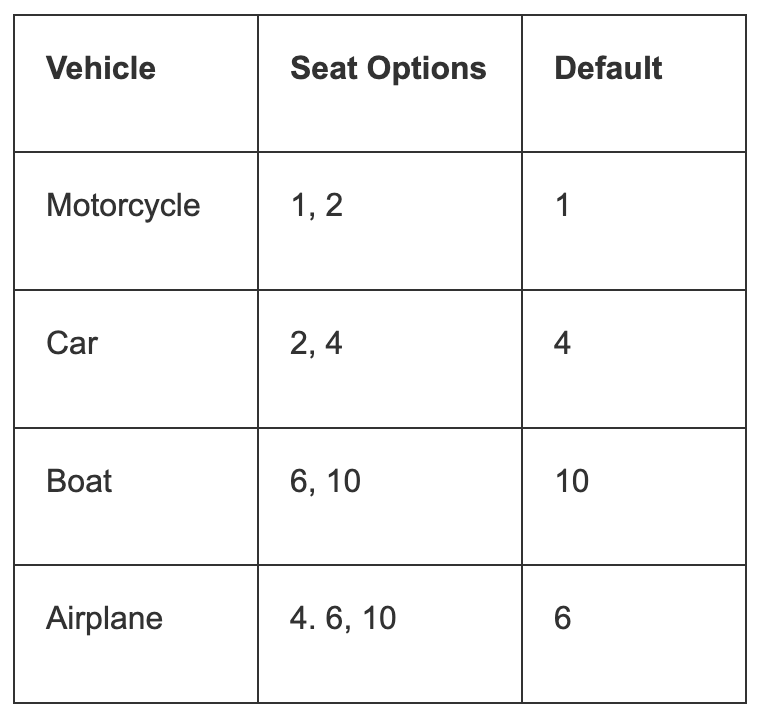
Another quick note about picklists and record types – picklist fields can be further customized to have only certain values available on a picklist. In this example, my record types are a few different types of Vehicles. Each vehicle only has only certain seating options, but we don’t want to make a special “Seats” picklist for each record type.
All we need to do is select the record type in question, and then customize a single “Seats” picklist with the only selectable options for that record type.

Here’s the Seats picklist for all of my company vehicles together:
In the Record Types section, you’ll need to click on the name of each record type, select the picklist you want to modify, and then choose the available options and the default value.

Step 3: Page Layouts and Lightning Record Pages
Note: If you were following the “How to Create Record Types in Salesforce” section, you will have already done this.
Once all your fields are ready, you can start working on your Page Layouts and Lightning Record Pages. Make sure you add them to your change set when you’re finished.

Step 4: User Profiles
You’ll also want to add any profiles to your change set, as needed:

When you include your Profiles in your change set, your picklist dependencies should come over to production along with everything else. However, if they do not, or if you do not want to include Profiles in your change set, you can always set your picklist dependencies again once deployed to production. (I always treat the sandbox just like I would treat the production org, so I set visibility for record types, fields, etc, as if I were in production.)
Step 5: User Testing
Now is a great time to have your end users do some Sandbox testing – make sure the Record Types work the way they expect and make any additions or further customizations.
Once your testing is completed, you should create some training documentation for your end users, and notify them about when you will be going live. You will want to explain the purpose of Record Types, and how they are used in your org. I recommend a training video and a PDF guide, in addition to a live training. Every person’s learning style is different, and providing a variety of training formats allows the user to choose the one that works best for them.
Step 6: Deploy!
Now you’re ready to deploy your record types to production! This can take a little while, so take a lunch break or go for a walk while you’re waiting. You will get an email when this is completed.

Once the change set is in Production, you can validate and deploy it.

Things you will need to do once the record type is in production:
- Do more testing to make sure that everything functions properly.
- Ensure it is visible and ready for your end users.
Step 7: Existing Records
If you add record types to an object that already has records, you’ll have some extra homework to do.
You’ll need to clean up your existing records to make sure the picklist values align with the intended record type (if you’ve customized them), and then you can use something like Workbench or the DataLoader to update all existing records to the proper record type.
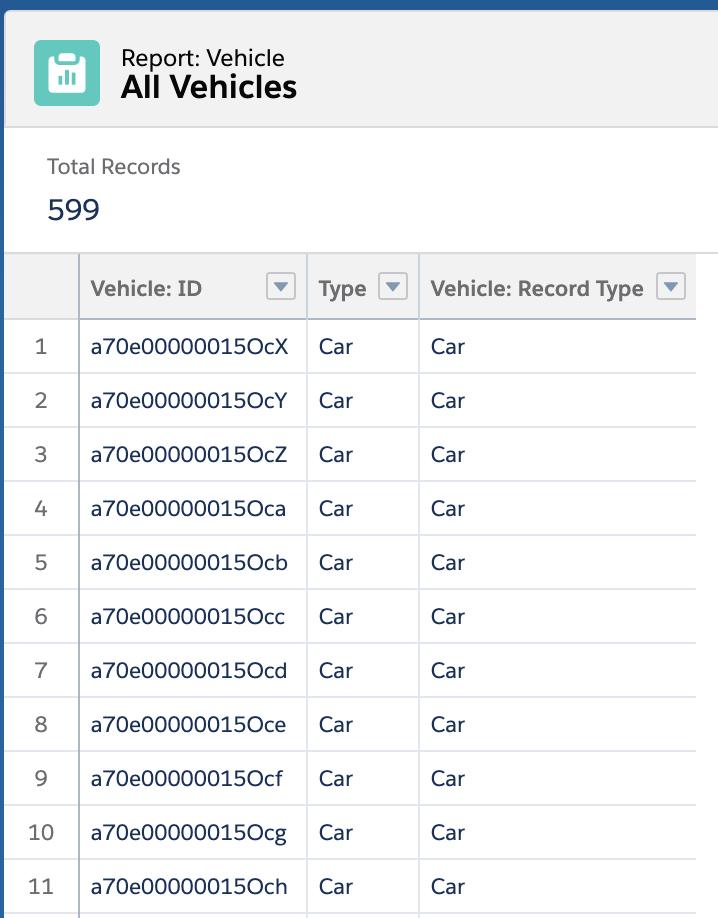
In this example, let’s say this was an existing object (Vehicles) with only a picklist to determine if it’s a Car, Boat, Airplane, or Motorcycle. So my old plain picklist exists, and 599 existing Vehicle records exist. You’ll need to run a report of all existing records, and just include the ID column and the old picklist. (In some scenarios, you may need more than one field to determine what the new record type should be.)

Next, you’ll need to get the new ID of each record type you created. You can get the ID from the URL string (it’s a bit more obvious in Classic) and add it on to your CSV in a new column.
Make sure you remove any columns that are unnecessary. Remember, at this point, all you’re trying to do is to update existing records with a new record type, so you only need the ID of the existing record, and the ID of the new record type.

Import using your favorite import tool: the Salesforce Wizard, Data Loader, Workbench, etc. Once your import is complete, you should be able to see in Salesforce all the existing records now have the proper record type.
If you no longer need that original picklist, this is a good time to follow whatever your org’s policy is for removing old fields.
When Not to Use Record Types
When a new client brought me on board a few years ago, I was definitely shocked to see how many record types were in place in the org – this org hadn’t really had a dedicated admin before, so I wasn’t surprised it was a little messy.
On one object in particular, they had four different record types. When I looked at each record type, I was confused to see that there was absolutely nothing different about each one. Since the whole purpose of record types is to make life easier for users, and improve data quality, I knew this could be a quick win that would be highly visible to the users.
I took a couple of weeks spending time with the team who used that object, and I asked them a lot of questions. I observed them working, and how they used the object. I also enabled field history tracking to get documentation on what they were actually doing. In the end, I found that we were able to reduce the number of record types from four to three, and set default picklist values, as well as different page layouts. The end users were happy; their data quality improved, and the amount of manual labor was reduced… and everybody lived happily ever after!
Just to recap:
- Find out which users interact with the specific object.
- Observe how they work with the object.
- Enable field history tracking to see documentation.
- Identify opportunities to reduce the number of record types.
Remember, you don’t want to be that person with four record types that all have the same picklists and page layouts! You also don’t want to be the person using ten record types, when really, each should be a different custom object altogether.
Accounts is an object I have seen many times with record types that had absolutely nothing different about them. It seems like a good idea, a “Customer” Account record seems like it would be vastly different from a “Partner” Account, which again, seems pretty different from a “Vendor” Account. However, when you actually sit down and look at the required fields for each, we find there are only a few, and they’re mostly the same.
For an Account, we might need to know:
- HQ Address
- HQ Phone Number
- Website
- Type (Customer, Partner, Vendor)
- Industry
- Start Date (the date they became a Customer, Partner, or Vendor)
Most of what we need to know about a given Account is handled on its child objects (Contacts, Opportunities, Contracts, Assets/Subscriptions, etc.), so really there is almost no difference at the Account object level!
I see this same pattern on Contacts as well, but there’s even less of a difference there. For Contacts, we generally need to know Name, Email, Phone, Job Title, Role, and perhaps Address.
Does it matter that the person is a Vendor, Partner, or Customer? Not really – you most likely need the same information no matter what type of person they are.
Planning Salesforce Record Types: 6 Questions to Ask
When you’re looking at an object, and trying to decide if record types are necessary, think about the following questions:
- What object are we discussing?
- What are the types that might need different record types?
- How is each type different?
- What fields are required or needed on the page layout for each?
- What picklists might need to have different values (but still use the same picklist)?
- Do I need to run reports on these objects together most of the time?
Here’s an example of two Opportunity Record Types: New Business and Annual Renewal:


They may look mostly the same, but actually, there are several differences. There are different required fields: new Business requires Lead Source and Primary Campaign. However, Annual Renewal doesn’t require those because the customer is already a customer. Instead, an Annual Renewal requires the Prior Contract number. And you may notice, that while “on New Business Amount” is not required, it is required on the Annual Renewal. “Next Step” is required on the New Business, but optional on the Annual Renewal.
Cleaning Up Salesforce Record Types
So, what if you (or someone else) went ahead and created record types when they weren’t the best option?
Assessing what purpose your record types have, and removing those that don’t deliver any benefit, is an admin job that shouldn’t be forgotten about – it’s a dirty job, but someone has to do it!
Let’s imagine this scenario…
You come to an existing Salesforce org as a new hire or as an admin. During your first call with the sales team, you learn that the users are frustrated by unnecessary clicks, bad page layouts, and general confusion on the Opportunity.
After looking around the Opportunity, you notice their Opportunity object has five record types. Right away, this seems excessive – and it might be. But nobody, not even a seasoned, expert administrator can make that call from this information alone.
Step 1: Investigate (Ask Users)
Find out what you’re working with now by answering these questions:
- How many records are under each record type?
- Is each record type tied to a specific page layout?
- How many page layouts are there?
- Ask the users, “What is the purpose of each record type?” (Tip: ask more than one user.)
- Are there any differences between the picklist values on each record type?
- Are there major differences in the page layouts? Think organization and required fields.
Like many of my Salesforce recommendations, a big portion of this task is not actually in Salesforce – it’s about talking to your users and asking questions; what they perceive the differences to be, or if they even find them useful. You’ll know a record type is good when you hear things like:
- “The Renewal ones we have to fill out all this stuff, the New Business ones don’t have that.”
- “My manager makes sure we always choose the right record type”
- “The Product dropdown menu looks different for some of them…”
You’ll know they aren’t getting much benefit, or using them correctly, or set up incorrectly when you hear phrases like:
- “I have no idea what the point is, everything looks the same to me.”
- “I choose “Renewal” but then I still have to fill out the “New Business” fields!”
- “I don’t know, I just choose whatever and go on.”
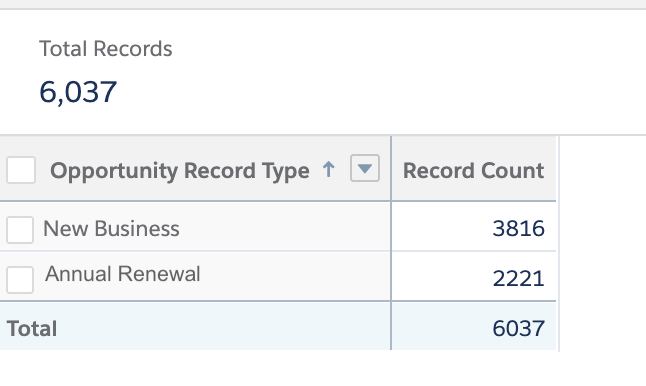
Step 2: Investigate (Pull Salesforce Reports)
You’ll probably want to run a few reports. I ran this report showing how many record types have been created yearly, which shows me what is and isn’t being used:
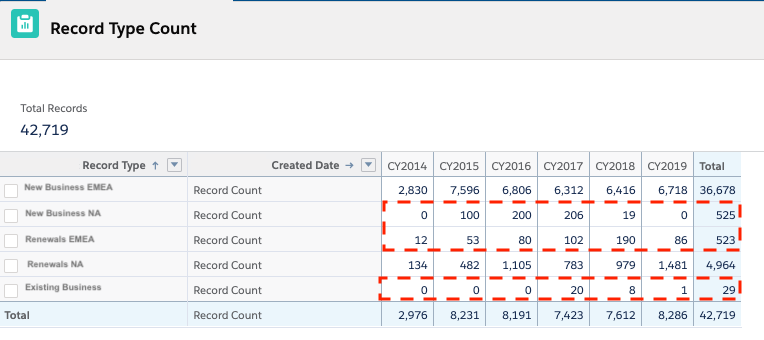
You can see that there are three record types that aren’t being used at all (or being used very little).
You will also want to run a report that groups by record type and looks at picklist values. Are each of the picklists customized to each record type? And if not, do they need to be?
Step 3: Planning and Making Decisions
Next, you’ll need to map out the ideal, clean plan for using record types going forward. The end result here is that you will have a map of the differences of each record type. While doing this, you’ll also need to decide which record types to delete.
In my above scenario, I want to consolidate down to two record types: “New Business” and “Renewals”. So we’ll just rename the two with the highest volume and plan to delete the other three. My new map will only have those two record types.

Step 4: Make Changes to Record Types
Important Tip: Make sure field history is enabled for any fields you’re going to modify in the process of cleaning up, and also use Data Loader to do an “Export All” before you begin. If the worst-case scenario happens and you get rid of something in error, you’ll be able to see your changes in the Field History, and also have an external doc you can use for reference or backup.
- Ensure you have a corresponding page layout for each of the record types you’re going to keep and update them accordingly.
- Update any picklist values and default fields, for each record type you’re going to keep. You may need to update your sales processes if you have multiples.
Since we’re going to be getting rid of three record types, those are the ones I will focus on mass updating first. Just run a report filtering by the record type you want to remove, include the ID as a column, and mass update any field values that don’t match the new map you created earlier. Make sure you also migrate each record over to its new corresponding record type.
Once you have done this for each of the record types you want to remove, you should see that there are no more records under the record type you want to delete.
Step 5: Delete the Salesforce Record Type (+ Considerations)
The final step is to delete the record type from Salesforce. But before you do, read through these considerations:
Default Record Types on Profiles: You may need to adjust the default Record Type on your Profiles before deletion. Either change the default record type, or change it to “Master”. Changing the record type on the standard profiles is a bit more tricky, but it can be done. I can’t take the credit for figuring this one out, but the original answer can be found here.
Automation: Flows, Apex code… anywhere a record type might be referenced should be updated to either the proper new record type, or no record type at all. It may take you some time to look through here, and you can always look into specialized tools that do metadata search of Salesforce.
Reports, Filters, List Views, Rollup Summary Fields: You’ll need to update each of these as needed. If you have a large org, you may want to consider making a general enhancement update and a quick demo on how a user can update their own report or list view filters.
Sandbox First: As always, any changes you make to Salesforce should be fully tested and reviewed in a sandbox before moving to production. The goal of cleanup projects like these is to make life easier for the end user, not harder. Working in a sandbox first gives you the ability to find any error messages or stumbling blocks along the way, fix them, and better prepare for the changes to your production org.
Then go to the record type, and click Delete. Yes, it’s really that easy! The most important part of this process is backing up your data before you begin. Export All and Field History are fast, easy, and free. If you happen to have a full copy sandbox, go ahead and refresh it before you begin. There are plenty of paid services on the AppExchange as well.
Deleting anything in Salesforce can bring on a panic attack for even the most experienced admins, but if you take care, document your process, and have a backup, you’ll have clean record types and happy users in no time!
Summary
Record Types are one Salesforce feature that can be incorrectly implemented. Depending on your learning and organizational style, you may want to complete your decision making on a whiteboard, or even in Excel.
You may need to sit down and complete a working session with your end users; remember, you might be the expert Salesforce Administrator, but they are the experts in their day-to-day work, and only they know what they need and what will be useful. And, no offense to the managers out there, end users are often a better resource for day-to-day work than managers!
After you’ve talked to the end users, next talk to the manager and find out their vision for how things should be, or what they imagine an easy user experience would be. With both perspectives, plus your own Salesforce skills, you will be able to implement Record Types in the most effective way possible. And as always, create and test in a sandbox first. Also have your end users try out the new record types in the sandbox before deploying to production.


Comments: