


Validation Rules in Salesforce verify that the data entered by a user meets certain criteria before the user can save the record. Salesforce Admins set up the rules as statements, which act like yes/no questions – the answer must be no to all of them. If not, an error message appears, where the admin has explained what the user must do to correct the record, before clicking “Save” again.
If you’re feeling a little lost, don’t worry. This guide will help you learn when to use validation rules and how to create them, as well as providing 14 examples for Sales and Service Cloud.
When Should I Use Validation Rules?
Use validation rules to maintain user input data or system modified records.
- User input data: Where users may be prone to making mistakes or cutting corners, or when you need data to be in a certain format.
- System modified records: Changes to data triggered by imports, automated processes, integrated systems, etc. will need to abide by validation rules*.
*Having said that, validation rules are a safety net that these processes, ideally, should not bump up against. Admins should prepare/design automation/integrate systems respecting active validation rules. As we will see later, you can also write validation rules to bypass system modified records.
The most famous example is “Closed Lost Reason” on Opportunities. Imagine that you want to track why potential sales fell through. Your sales reps change the Opportunity Stage to “Closed Lost” but forget to select a reason – stop right there! The rep is prompted to fill in the field and then saves the record successfully.
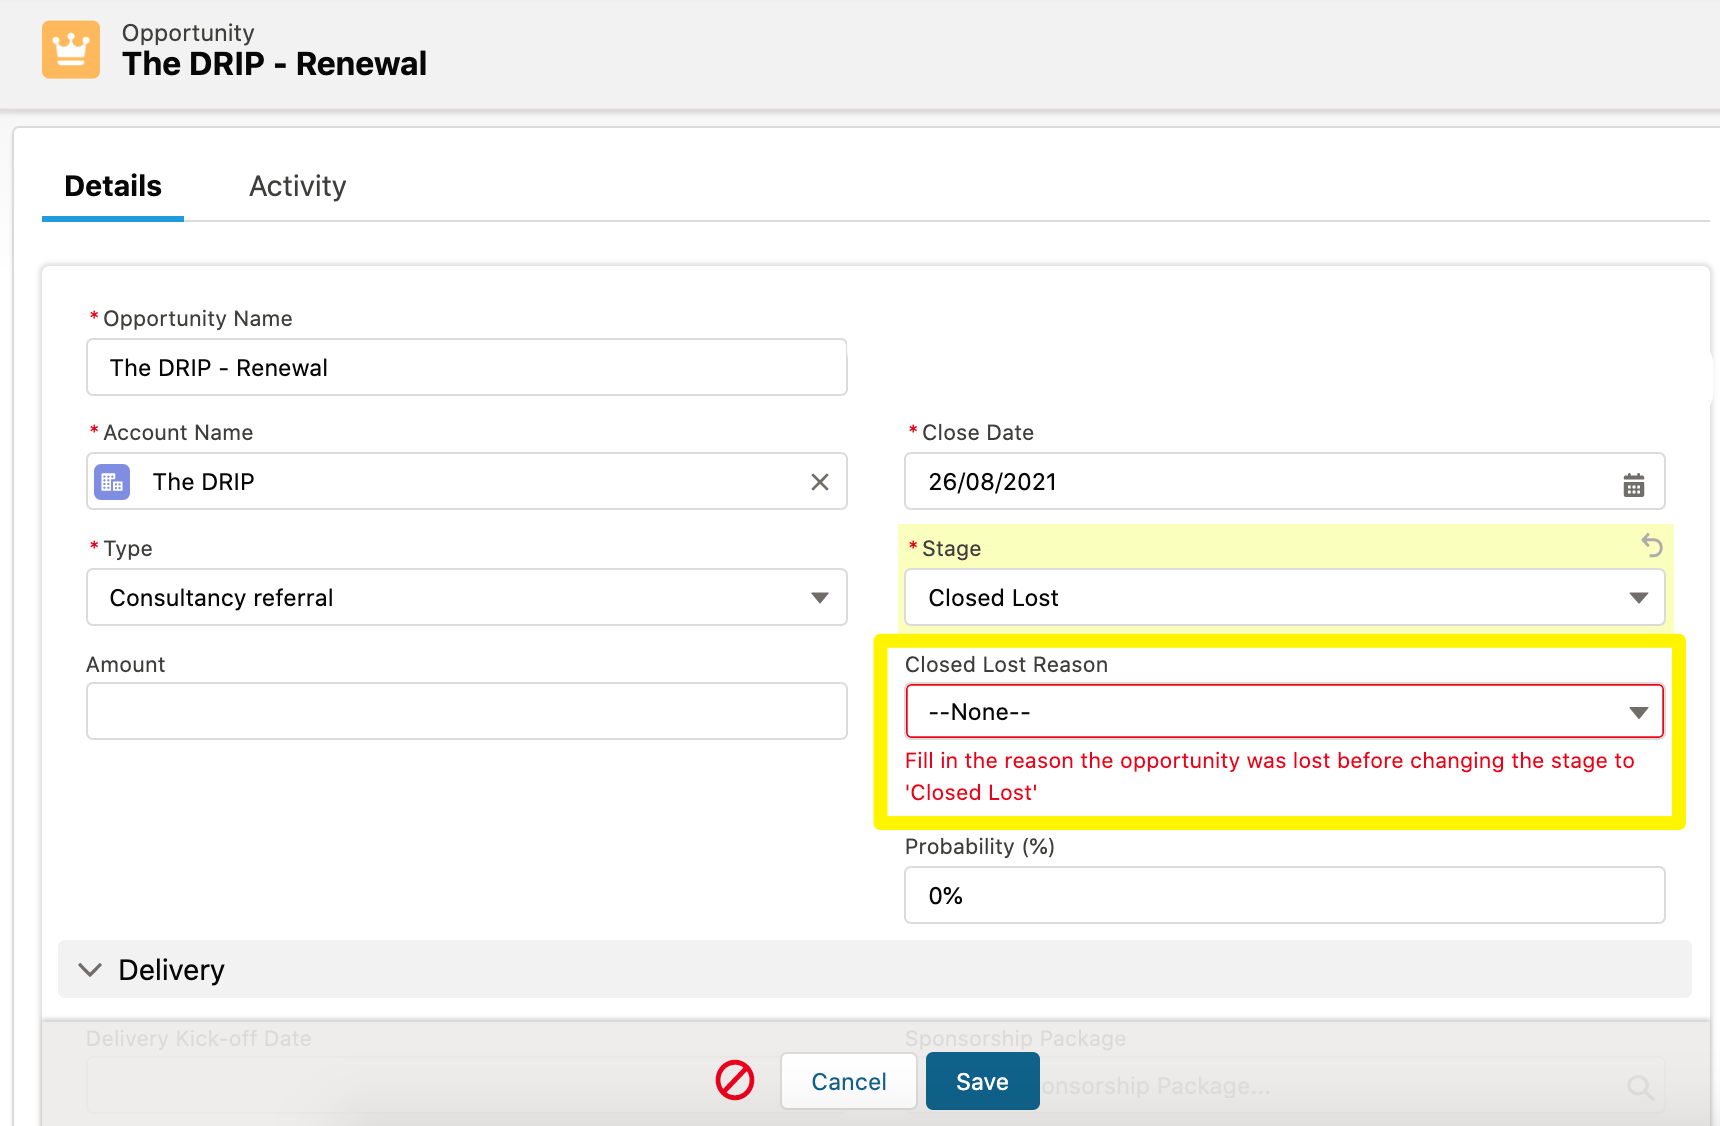
A validation rule saves the day by preventing reps from closing an Opportunity while the “Closed Lost Reason” field is blank.
Validation Rules vs. Required Fields
Why not simply make the field required? Required fields are ‘all or nothing’; you must complete the field for the record to be created. Validation rules kick in only under certain conditions.
In the Closed Lost Reason example above, we don’t require that field to be completed until the Opportunity Stage is being changed to “Closed Lost”. It wouldn’t make sense for the ‘Closed Lost Reason’ field to be required at any other stage of the pipeline. The ‘Stage’ value is the condition.
How to Create a Validation Rule in Salesforce
Validation rules can be broken down into three parts:
- Name and Description
- The Rule (the Error Condition Formula)
- The Error Message
Let’s see how the ‘Closed Lost Reason’ validation rule example looks from an admin’s perspective.
1. Name and Description
A clear name and description is very important – a small part of your org documentation that will benefit others who want to understand the purpose of the rule, and/or to modify it in the future.
Keep it short and simple! You may find that the description could be the same as the error message (step #3), but also add any context about who the rule was requested by, or what data issues the rule is preventing.

2. The Rule (the Error Condition Formula)
Setting up the validation rule itself is the trickiest part of this process to grasp. Even though I’ve worked with the Salesforce platform for years, I still need to refer back to validation rule reference guides (hopefully you, too, will bookmark this page!).
“Error Condition Formula” is the fancy name for the rule. Here is where you will tell Salesforce “if this happens | then that must be true“, for example:
“If the Opportunity ‘Stage’ is ‘Closed Lost’ | then the ‘Closed Lost Reason’ field must not be blank”
I will give you a tour around each of the buttons above the formula box. Then you’ll be able to practice Validation Rules using the 14+ examples that follow.
Insert Field
This opens a pop-up that lists fields in the object you are writing the validation rule for.
Tip: Use this button! Sure, it does save time, but also many validation rule errors are caused by field names being slightly different than you may have guessed.
Remember, what you see on the record is the “Field Label”; Validation Rules and other formulas use the “Field API Name“.
In fact, Opportunity Stage is a perfect example. The API Name is “StageName”, not Stage:
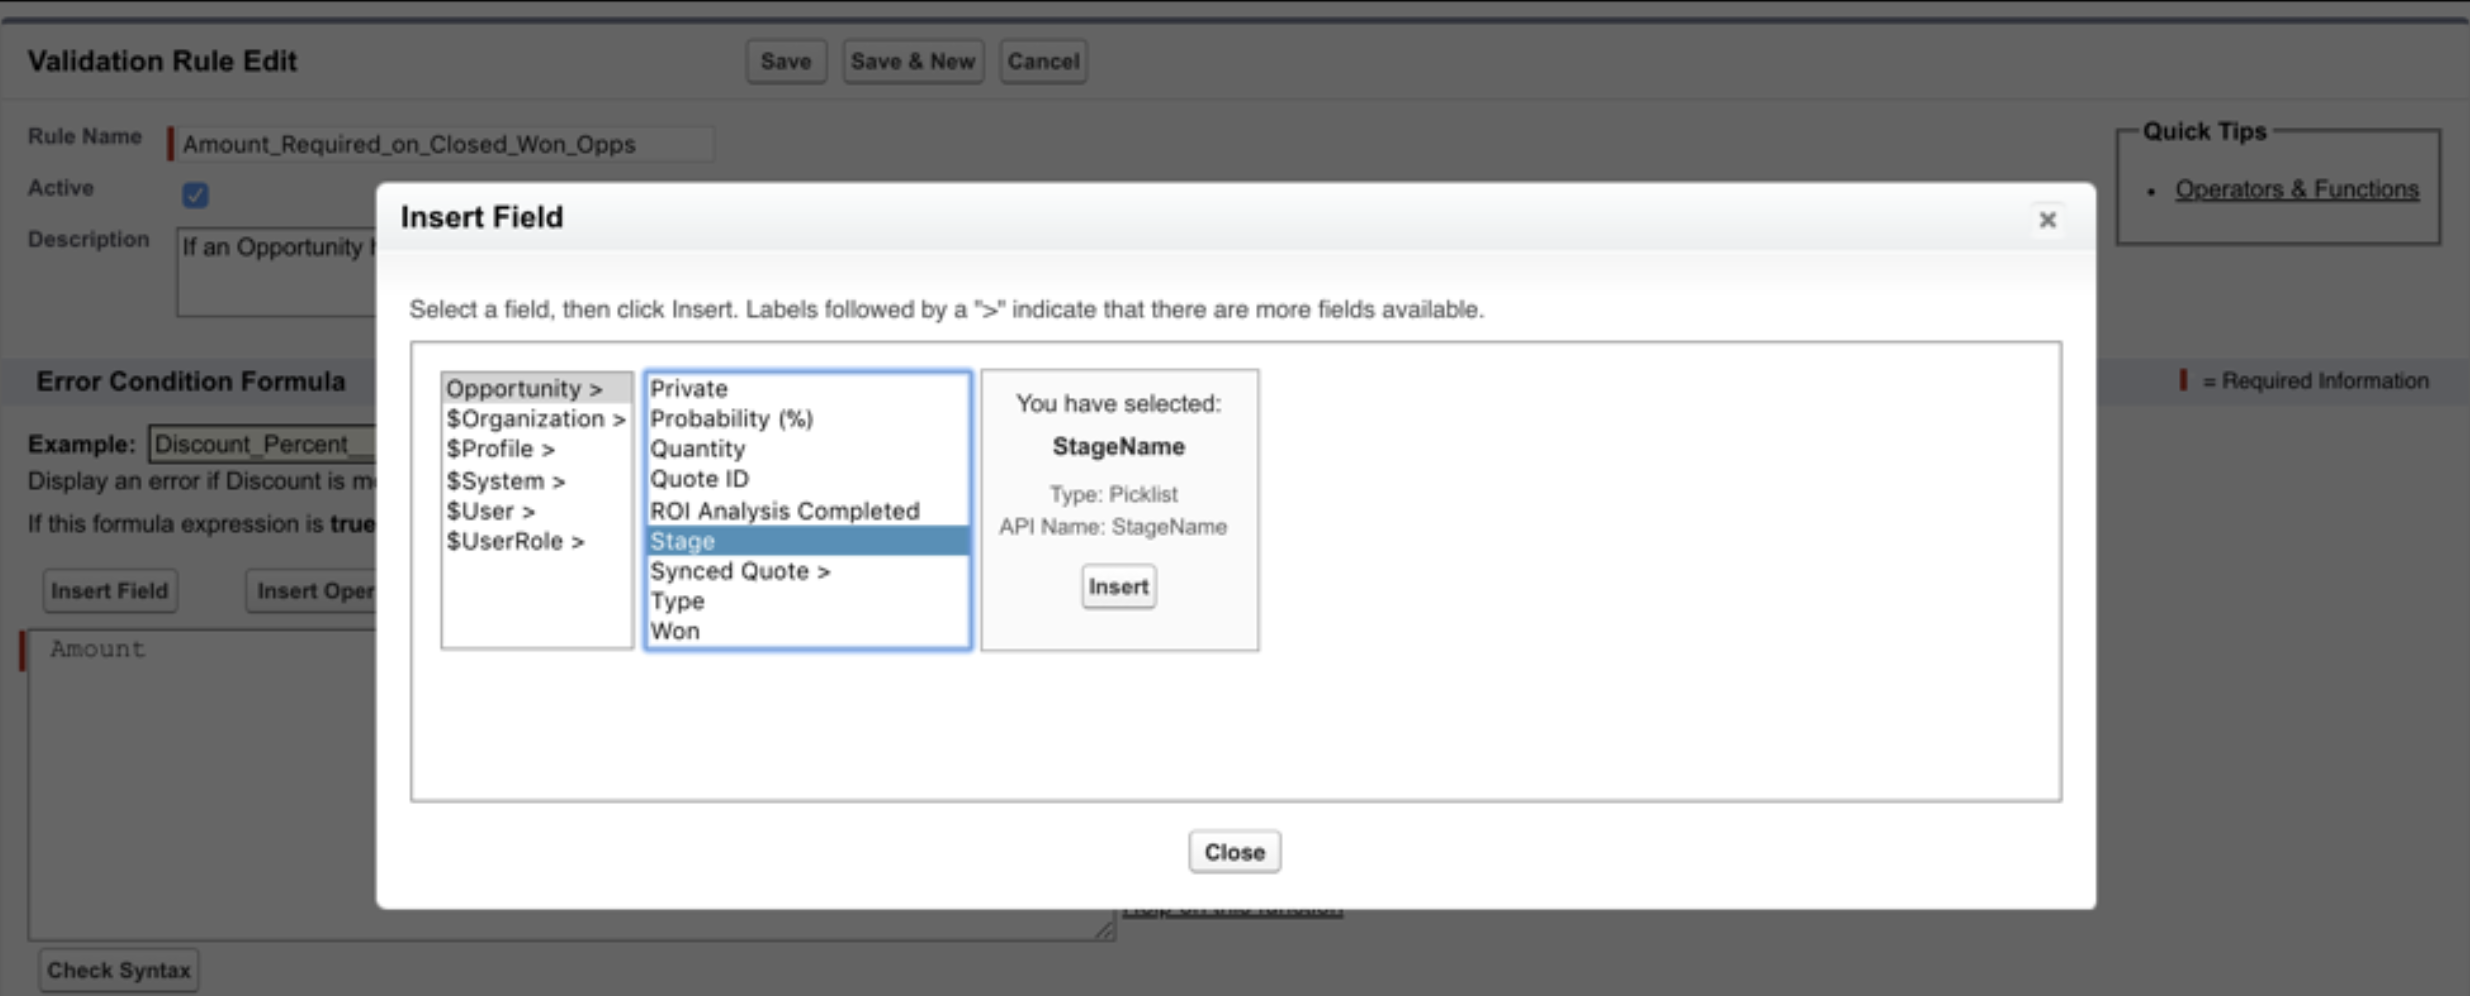
Once you have located your field, use the “Insert” button to drop it into the formula.
Insert Operator
This opens a dropdown menu that lists operators, such as + (add), <> (not equal), etc.
You will be familiar with most because they follow standard mathematics syntax.

The key ones you need to know, which will stitch your formula statements together, are:
- && (and)
- || (or)
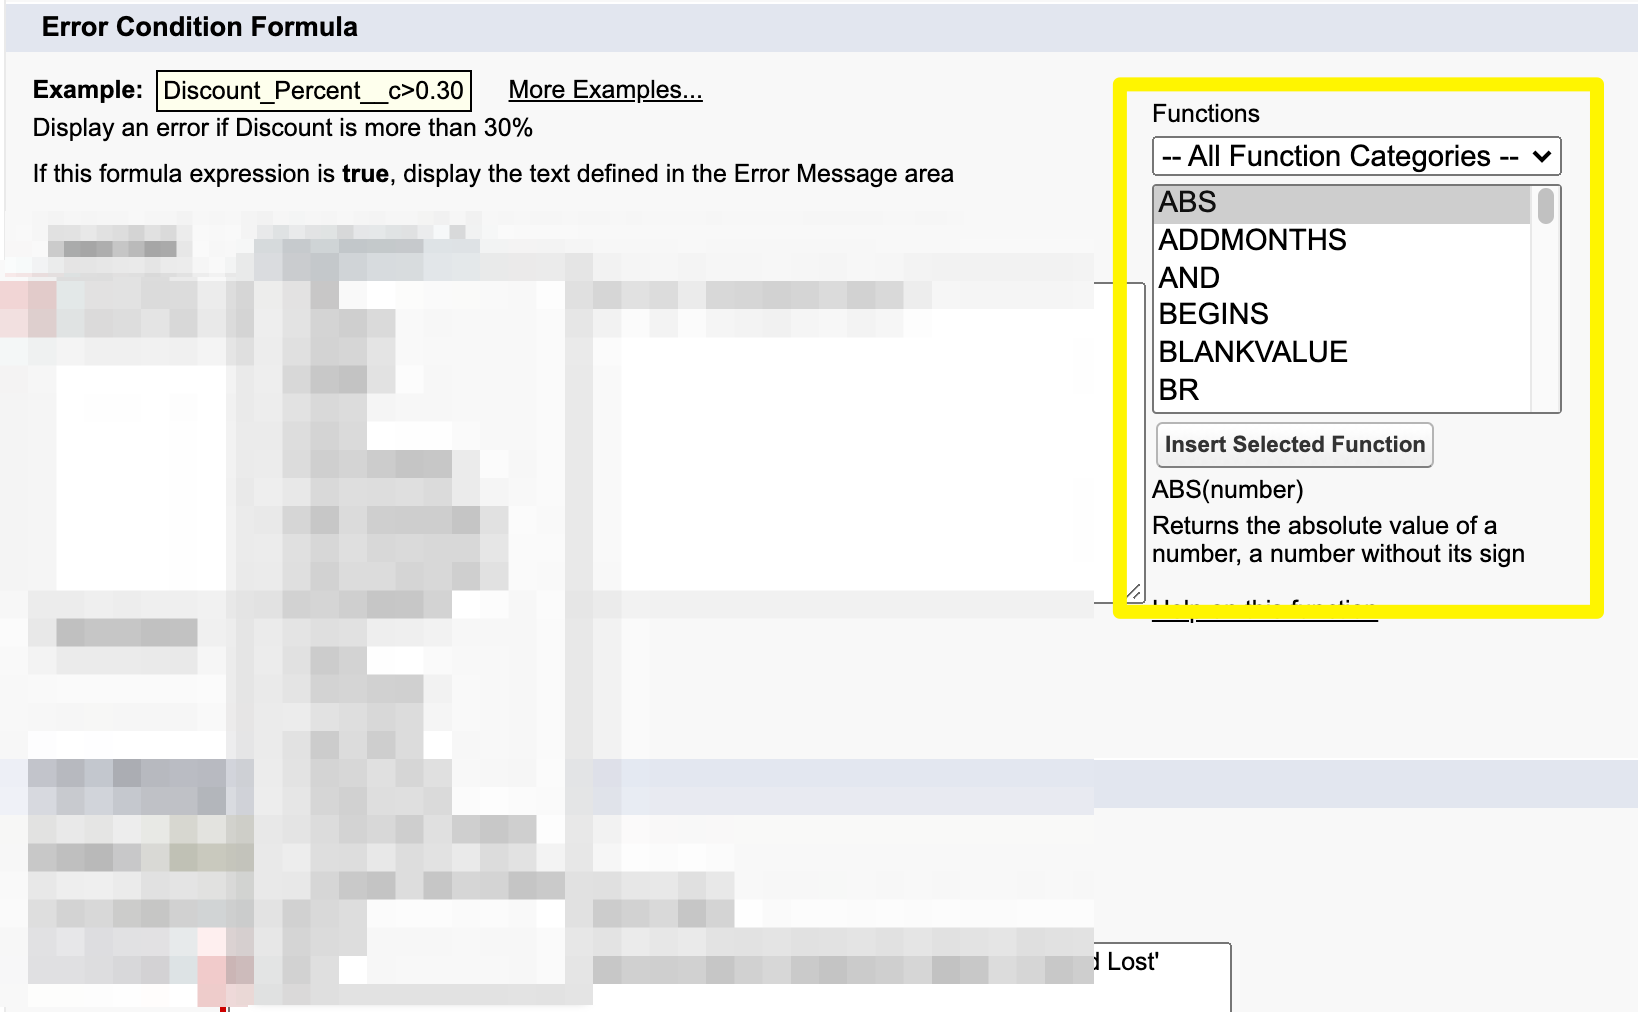
Insert Selected Function
This menu lists functions that you may be unfamiliar with.
There are different types of functions (view a full glossary here). Luckily, by selecting one, a description appears below the list.
The most commonly used functions are:
- ISBLANK(field) returns “True” if the field is blank.
- ISPICKVAL(field, specific picklist value) returns “True” if a picklist value in a field matches the picklist value in the formula.
- TEXT() converts a picklist value to text, a quirk for writing formulas that ask if a picklist field is blank/not blank.
- AND() returns “True” if all the items or functions are “True”.
- OR() returns “True” if any of the items or functions are “True”.
When to use && and ||, or AND() and OR()? We’ll come back to this later!
Check Syntax
This checks if the rule has been written correctly. Salesforce will even tell you what the problem is.
The most common issues are you:
- Are missing a parenthesis “)” somewhere.
- Misspelled a field name.
- Used the wrong function.
3. The Error Message
This error message will appear when a user does not meet the requirements set out by the validation rule. This is how the admin explains what the user must do to correct the record, before clicking “Save” again.
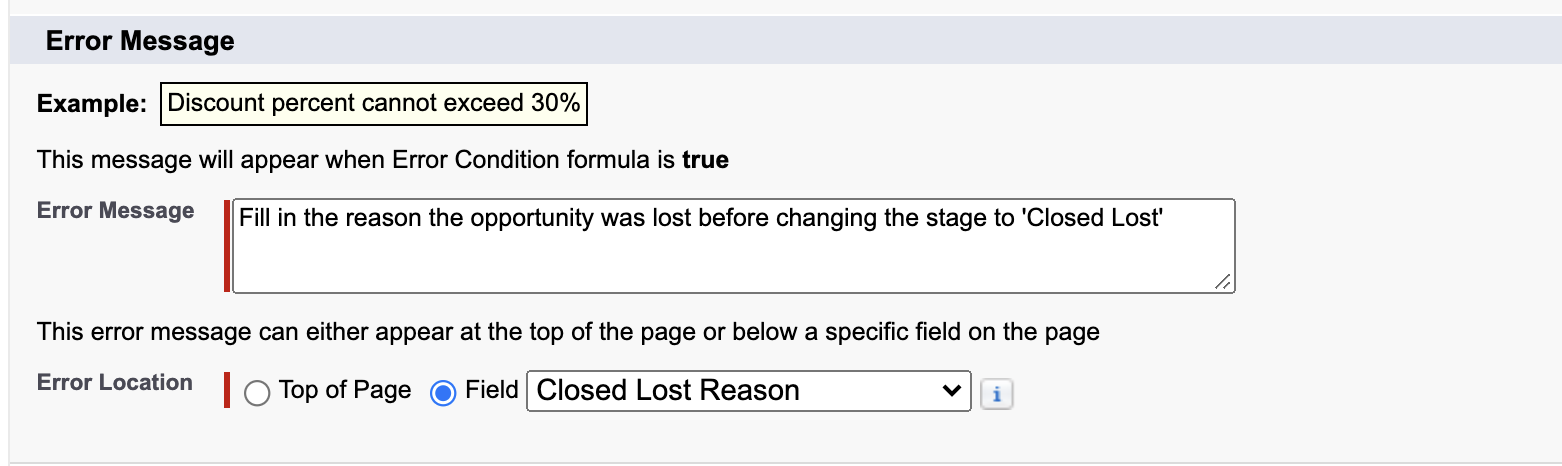
The error message location can appear at the top of the page or above the specific field causing the failed save. If there’s only one field the rule references, I recommend you locate the error message on the field (otherwise, locate it at the top of the page).
Finally, activate your rule by checking the “Active” checkbox!
Sales Cloud Validation Rules
Sales reps aren’t the greatest fans of data input. To keep your Salesforce data quality on track, use validation rules to guide users while working with Sales Cloud objects.
Which information can sales reps realistically complete themselves based on customer conversations? Enforcing fields such as “Annual Revenue” isn’t the best idea, seeing as a) users won’t want to search for that information online, and b) you can leverage data enrichment tools for more accurate data.
Stick to what sales reps should be asking during conversations, or what can be determined by using common sense (e.g. the “State” field can only be “Alabama” if the country is “United States”).
Here are examples for Accounts & Contacts, Leads, Opportunities, Contracts, and Orders.
Information Required by Account Type
Accounts & Contacts
Take basic Account validation rules further by creating multiple validation rules based on a specific field.
Example: You require different information depending on what the ‘Account Type’ field value is.
If they are a ‘prospect’, we need less information filled in than if they are a ‘customer’. For customers, we need a full billing address, but not yet if they are a prospect.
As each line of the address is a separate field, we need to use OR() to catch the record if any of the address fields are missing:
AND(
OR(ISBLANK(BillingStreet),ISBLANK(BillingCountry),ISBLANK(BillingCity),ISBLANK(BillingState)),
(Text(Type) = "Customer"))
While this is a quick fix, it’s not the most helpful for your users. Alternatively, look into one of the options in the next section.
Example: you require different information depending on the Account Record Type. You may use Record Types to separate customer and partner accounts.
Use the Validation Rule above, switching:
(Text(Type) = "Customer")
To: (RecordTypeId) = [INSERT ID])
Country Validation Rules
Accounts & Contacts
Validation on the “Billing Country” field is one of the most important validation rules you can implement on the Account.
If you let employees enter a country name as free text, different formats and spelling mistakes will become an admin headache.
Take the United States of America – you will find people could switch between the USA, U.S.A, US, and United States.
There are a few ways to solve this problem.
- Salesforce Autocomplete Address Fields: a Salesforce feature where suggested matching results appear when a user begins typing an address.
- AddressTools: this AppExchange app instantly solves the problem, too, however there’s much more to this tool beyond the Salesforce functionality, so I recommend you check out our full review.
Required Fields for Lead Conversion
Lead
Lead records usually have minimal information because this is the start of a Business Development rep’s (BDR) relationship with them. As qualification progresses, a BDR will get to know more about them.
Once a prospect is qualified (the BDR is satisfied they have an interest in purchasing your product/service), the record is converted.
Example: You require contact information (phone number, email) to ensure the qualified lead can be contactable. You also want BDRs to pass on a “Rating” to the next rep that will be handling the opportunity stages.
IsConverted
&&
OR(
ISBLANK (Phone),
ISBLANK (Email),
ISPICKVAL (Rating, “”)
)
Accounts created only through Lead Conversion
Example: You would like all records to go through the lead stages to ensure they have been properly qualified. Therefore, reps shouldn’t be creating accounts directly, skipping the lead lifecycle, as a result.
If you block users from creating Accounts, they won’t be able to convert Leads either – that’s why you need a Validation Rule!
Step 1: Create a lead formula field
A field that captures the lead created date means that the record must have existed as a lead in the first place. Create a lead formula field that adds the value of the standard ‘Lead created date’ field.
Create a date field on the Account object.
Then, map the Lead formula field to the Account date field.

Step 2: Create the Account Validation Rule:
ISBLANK ( LeadCreatedDate__c )
Bonus: this validation will carry over the Lead’s created date to the Opportunity, meaning that you can calculate the total time it takes – from first interaction to won business – for the first deal with them.
Required Fields for Closed Won Opportunities
Remember the validation rule that asks for information before a Lead can be converted?
Change ‘IsConverted’ to ‘IsWon’ and use the same Validation Rule to ensure the fields required to close an Opportunity are filled, helpful for handing over from the sales team to a post-sales/onboarding team.
Limit to one open Opportunity at a time
One Account can have multiple Opportunities associated (one-to-many relationship).
Example: You would like each Opportunity to be closed (won/lost) before a new Opportunity is created, so that the Account is only engaged in one sales process at a time.
Step 1: Create an Account roll-up summary field
To count the number of open Opportunities:

Step 2: Create the Opportunity Validation Rule:
Account.NumberofOpenOpportunities__c > 1
Won Opportunities must have an Amount greater than 0
The “Amount” field is populated either by products being added to the Opportunity, or users manually entering the number.
Example: You want to avoid blank or $0 values in the closed business reporting.
OR( ISBLANK(Amount), Amount <= 0 )
Contract End Date must be after the Contract Start Date
Use this Validation Rule on Contracts (or any other object, like Campaigns) where two date fields represent a duration, and can be edited by users.
Example: The End Date must be after the Start Date.
StartDate > EndDate
Order Products cannot be modified for “Activated” Orders
Example: Once an Order has been placed (Activated), you don’t want its related Products to be modified. Otherwise, what’s delivered or billed for will be different from what your reports reflect.
ISPICKVAL (Order.Status, “Activated”)
Service Cloud Validation Rules
Service agents have enough to juggle while assisting customers on the phone, email, chat, or the many other channels they are expected to monitor.
Which information should an agent complete that keeps a solid audit trail of the customer’s issue, and the service they delivered? This information capture should be purposeful to provide feedback to other parts of the organization, such as product development, sales, or marketing. Also, validation early on in the case management process can benefit reps later in the process by narrowing down or automating processes, so look out for those opportunities.
Cases cannot be edited when owned by a Queue
Salesforce Queues prioritize, distribute, and assign records for teams who share workloads. This is ideal for support teams who can pick up Cases from the Queue when they have the capacity, reducing the time a customer has to wait.
Example: Once an agent picks up a Case, they should assign it to themselves (and change the Case Owner field). This means that Case activity won’t be associated with that user – both the good and the bad!
LEFT (OwnerId,3) <> “005”
This simple validation rule will prevent a user from editing the Case when it’s owned by a Queue. What’s it mean? All user record IDs start with 005!
Bonus: Use this validation for Lead Queues too!
Case Origin cannot be edited
Example: You want to prevent users from changing the “Case Origin” field after the Case has been created.
ISCHANGED (Origin)
&&
NOT( ISNEW() )
If Case Status is not ‘New’, the Contact cannot be blank
Example: You want the agent to fill in the customer contact that has raised the support request (linking it to the respective Contact record).

NOT (ISPICKVAL (Status, ’New’))
&&
ISBLANK (ContactId)
Required fields to close a Case
Example: When agents wrap up Cases, you want certain fields to be completed for reporting reasons.
The rule below will require the user to input the reason, type, subject, and description.
IsClosed
&&
OR(
ISPICKVAL (Reason, “”),
ISPICKVAL (Type, “”),
ISBLANK (Subject),
ISBLANK (Description)
)
‘IsClosed’ is a checkbox field that groups different closed statuses together (regardless of whether the outcome was successful/unsuccessful). Like we saw in the first “Closed Lost Reason” example, you can request information at different stages during the Case management process by using the “Status” field:
OR(
ISPICKVAL (Status, ‘Working’)
&&
OR(
ISPICKVAL (Reason, “”),
ISPICKVAL (Type, “”)
),
IsClosed
&&
OR(
ISBLANK (Subject),
ISBLANK (Description)
)
)
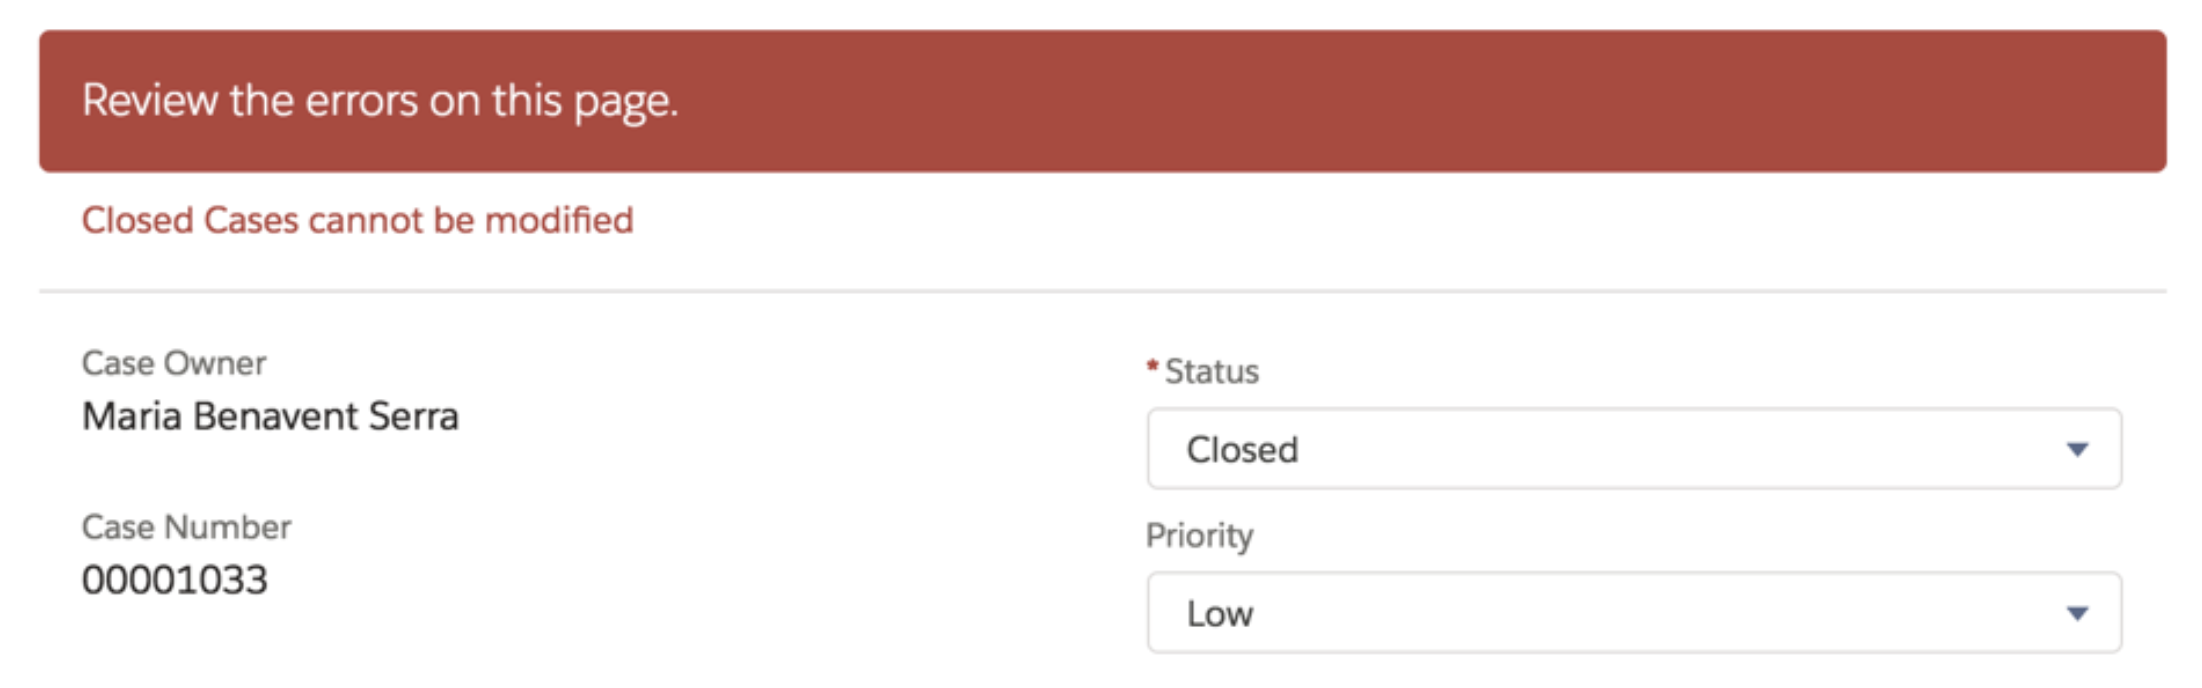
Closed Cases cannot be modified
Example: Once a Case has been closed, it should not be updated or reopened.
The rule is breathtakingly simple:
IsClosed
Tip: You can link Cases through the “Parent Case” field. If a support issue needs to be reopened, users can create a new Case and link the new case to the previously Case.
Top Tips for Working with Salesforce Validation Rules
Validation Rules that Bypass System Modified Records
Ideally, admins should prepare/design automation/integrate systems respecting active validation rules. However, having a way to toggle which users should bypass validation rules is very useful.
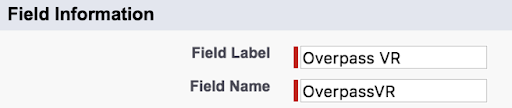
Step 1: Create a checkbox field on the User object.
You can call it “bypassVR__c”, “overpassVR__c”, or something more meaningful to you.
Step 2: Edit User records.
Check the checkbox field for all users who should avoid the validation rules.
Step 3: Add the condition to validation rules.
Enter the following into every validation rule you create in your org:
&& NOT(OverpassVR__c)
Note: You can also use “User Profile” in validation rules to apply this to a group of users who share the same profile.
&& and ||, or AND() and OR()
As promised, I’m now going to answer this burning question. Here is the same formula, written in different ways:


Which should you use? Answer: it’s mostly up to personal preference. However, if your rule contains multiple statements, you should use AND() and OR() because indenting and using separate lines will help identify syntax issues.
Summary
This guide has covered when to use validation rules and how to create them, as well as examples that are ready for you to implement in your org.
Hopefully you have a solid understanding of how to modify these validation rules to your own requirements in your org, including any custom fields you may have.
The examples in this guide have mostly focused on required information. Next you should explore the ways validation rules can be used with calculations, or used for data formatting.


Comments:
Comments are closed.