

In the dynamic world of Salesforce development, where changes fly fast and metadata makes or breaks business logic, the ability to compare orgs’ metadata is crucial.
Managing multiple Salesforce orgs can feel like navigating a maze; one wrong turn, and you risk configuration drift, deployment headaches, or even compliance issues. Salesforce Admins and Developers know the pain all too well.
Do you remember that sinking feeling? The one where you’ve tested meticulously in a sandbox and deployed flawlessly to production, only to discover missing custom fields, inconsistent workflows, and confused users reporting ghost behaviors.
Sound familiar? What if you could eliminate these surprises forever?
This article dives deep into a custom GitHub Actions workflow that transforms metadata comparison between two Salesforce orgs from a tedious chore into an automated art form. From concept to code, we explore why it matters, how it works, and best practices to make it shine in your DevOps pipeline.
Why Compare Orgs at All?
Before diving into the “how,” let’s talk about the “why.”
Salesforce sandboxes, dev environments, and production orgs often drift out of sync.
Manual comparisons are tedious, error-prone, and often overlooked until problems arise. Automating this process transforms it from a bottleneck into a breeze, empowering teams to:
- Spot differences instantly between environments.
- Eliminate the “It Works on Sandbox” Syndrome while ensuring consistency across every org.
- Accelerate deployments with confidence.
- Maintain compliance and audit trails effortlessly.
- Enable true CI/CD for Salesforce by providing the metadata validation layer that pipelines require.
- Support scaled development, complex org landscapes, and distributed teams.
Real-World Scenarios: Where This Workflow Excels
1. Pre-Deployment Audits
Verify differences before releasing and prevent accidental overwrites of new changes.
Scenario: Your development team has been working on a major feature in a sandbox environment. Before moving these changes to production, you need a clear understanding of what will be modified.
How the Workflow Helps: Run the workflow to compare your feature sandbox with production. The resulting diff report highlights not only the intended updates but also any unexpected metadata changes that occurred during development.
2. Post-Deployment Verification
Confirm that all intended metadata reached the target environment.
Scenario: After a deployment, you want to ensure that every planned change actually made it into the target org.
How the Workflow Helps: By comparing the source and target orgs post-deployment, you can quickly verify that all changes are present and accounted for.
3. Merge Conflict Prevention
Spot overlapping changes between environments before they become conflicts.
Scenario: Multiple teams are developing different features in separate sandboxes. You need to identify potential conflicts before merging changes.
How the Workflow Helps: Use the workflow to compare different development environments. It will reveal overlapping or conflicting changes, allowing you to address them before they escalate into larger issues.
4. Compliance and Governance
Maintain clear visibility into metadata evolution.
Scenario: Your organization must keep a documented record of all changes between environments for compliance.
How the Workflow Helps: The workflow generates permanent records of metadata differences, supporting audit trails and making it easier to meet documentation requirements.
The Workflow Under the Microscope
Let’s unpack how this workflow works.
Our workflow architecture implements the following optimized process flow:
- Secure Authentication: Securely connects to both source and destination orgs using alias references for flexibility, while leveraging GitHub secrets for secure, automated login.
- Project Isolation: Creates isolated Salesforce projects for each org.
- Metadata Extraction: Retrieves metadata using a pre-configured package.xml.
- Comparison Engine: Performs recursive diff operations on the metadata to highlight every difference.
- Result Processing: Generates reports and maintains the results as an artifact for future reference.
Prerequisites
Before setting up the workflow, ensure the following are in place:
1. Set Up Your GitHub Repository:
Log in to your GitHub account and create a new private repository for your Salesforce project, as shown below:

2. Generate Your Salesforce Org’s Authentication URLs:
- Ensure you have Salesforce CLI installed on your system.
- Run the following command in your terminal to connect to your source and destination orgs and generate the respective authentication URLs:
> sf force:auth:web:login --alias <OrgAlias> --instance-url <OrgURL> --set-default
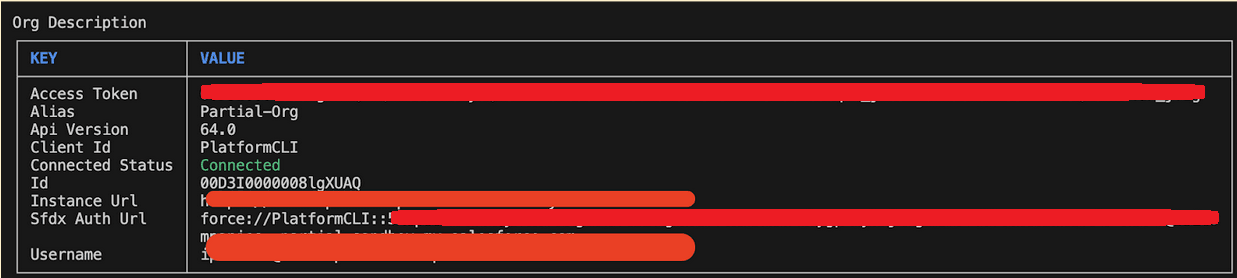
Connecting to the source org:
> sf force:auth:web:login --alias "Partial-Org" --instance-url "https://myorg--partial.sandbox.my.salesforce.com/"
A new browser tab will open, asking you to log in to your Salesforce account. Enter your login details, and after successful authentication, you can close the tab.


Once authenticated, the following message is displayed in your terminal:

Connecting to the destination org:
> sf force:auth:web:login --alias "Production-Org" --instance-url "https:// myorg.my.salesforce.com/" --set-default

3. Execute Commands
Next, execute the following command in both the source and destination orgs:
> sf org display --target-org <OrgAlias> --verbose
Example:
> sf org display --target-org "Partial-Org"-–verbose
> sf org display --target-org "Production-Org" –-verbose
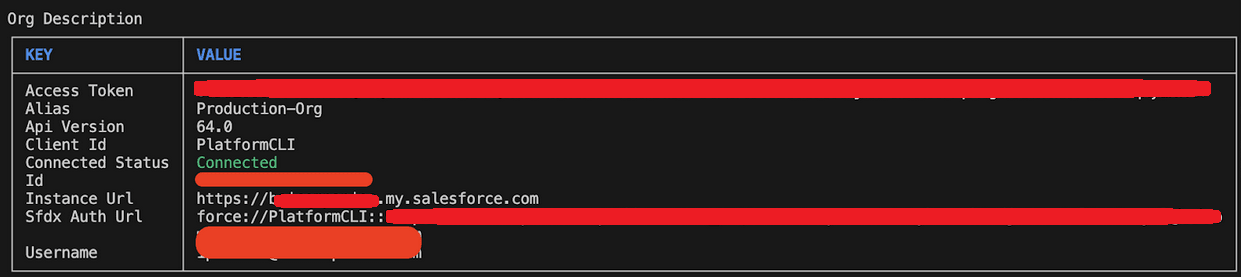
Record the extracted values shown after Sfdx Auth Url for both the source and destination orgs.
Note: The Sfdx Auth Url property is a master key to connect to your org. This should be kept very safe and only stored in a secure place. Leaking this secret can compromise the security of any environment.
4. Add Secret Variables to GitHub
Navigate to your repository’s Settings → Secrets and Variables → Actions. Click on New repository secret to add the following secret:
| Secret Name | Description |
|---|---|
| SRC_ORG_SFDX_URL | SFDX authentication URL of your source org. |
| DST_ORG_SFDX_URL | SFDX authentication URL of your destination org. |

5. Grant Workflow Permissions
Activate the ‘Allow all actions and reusable workflows‘ option to grant access to actions and reusable workflows.

6. Optional Configuration
To customize which metadata components are compared, create a config folder in your repository and include a package.xml manifest file. For example, to compare only LWC components, use the following configuration:
<?xml version="1.0" encoding="UTF-8"?>
<Package xmlns="http://soap.sforce.com/2006/04/metadata">  <version>55.0</version> <!-- Requires API 45.0+ for LWC -->
<types>
<!-- Retrieve ALL LWCs -->
<members>*</members>
<name>LightningComponentBundle</name>
</types>
</Package>
7. Pipeline Configuration
- Create a new file named “Compare_Orgs_Metadata.yml” in your repository’s /.github/workflows/ folder.
- Copy the supplied YAML code snippet into the new file.
- Save and commit your changes.
name: Compare Orgs Metadata
on:
  workflow_dispatch:
    inputs:
      SRC_ORG_ALIAS:
        type: string
        description: "Alias for the Source Salesforce org"
        required: true
        default: "SrcOrgAlias"
      DST_ORG_ALIAS:
        type: string
        description: "Alias for the Destination Salesforce org"
        required: true
        default: "DstOrgAlias"

env:
  SRC_ORG_ALIAS: ${{ github.event.inputs.SRC_ORG_ALIAS }}
  DST_ORG_ALIAS: ${{ github.event.inputs.DST_ORG_ALIAS }}
  METADATA_DIR: ./metadata-projects
jobs:
  compare_metadata:
    runs-on: ubuntu-latest
    steps:
      - name: 'Checkout Repository'
        uses: actions/checkout@v4

      - name: 'Install Node.js'
        uses: actions/setup-node@v4
        with:
          node-version: 20

      - name: 'Install Salesforce CLI'
        run: npm install @salesforce/cli --global

      - name: Verify Salesforce CLI
        run: |
          npm update --global @salesforce/cli
          sf plugins:update
          sf --version

      - name: 'Authenticate Source & Destination Orgs'
        run: |
          echo "${{ secrets.SRC_ORG_SFDX_URL }}" | sf org login sfdx-url --alias $SRC_ORG_ALIAS --set-default --sfdx-url-stdin
          echo "${{ secrets.DST_ORG_SFDX_URL }}" | sf org login sfdx-url --alias $DST_ORG_ALIAS --set-default --sfdx-url-stdin
          sf org list

      - name: 'Create Source Project with manifest, Navigate to the Source project folder, Download metadata using SFDX'
        run: |
          # Generate project and manifest
          sf project generate --name "src-org-metadata" --manifest

          if test -f "./config/package.xml"; then
             echo "./config/package.xml file exists"
             cp ./config/package.xml ./src-org-metadata/manifest
          fi

          cd "./src-org-metadata"

          # Retrieve metadata
          sf project retrieve start --target-org $SRC_ORG_ALIAS --manifest manifest/package.xml

      - name: 'Create Destination Project with manifest, Navigate to the Destination project folder, Download metadata using SFDX'
        run: |
          # Generate project and manifest
          sf project generate --name "dst-org-metadata" --manifest

          if test -f "./config/package.xml"; then
             echo "./config/package.xml file exists"
             cp ./config/package.xml ./dst-org-metadata/manifest
          fi

          cd "./dst-org-metadata"

          # Retrieve metadata
          sf project retrieve start --target-org $DST_ORG_ALIAS --manifest manifest/package.xml

      - name: 'Compare Source and Destination Metadata'
        run: |
          (diff -rq ./src-org-metadata/force-app ./dst-org-metadata/force-app | grep -E "differ|Only" || echo "No differences found") > metadata-diff.txt
          echo "Diff completed."

      - name: 'Write diff to GitHub Summary'
        run: |
          cat metadata-diff.txt
          echo '## Metadata Diff' >> $GITHUB_STEP_SUMMARY
          cat metadata-diff.txt >> $GITHUB_STEP_SUMMARY

      - name: 'Upload Diff Artifact'
        uses: actions/upload-artifact@v4
        with:
          name: metadata-diff
          path: metadata-diff.txt
Workflow Architecture and Step-by-Step Analysis
The workflow named “Compare Orgs Metadata” is configured to run manually through GitHub’s workflow_dispatch trigger. This enables users to explicitly initiate the process when needed, providing control over execution timing.
1. Input Parameters
The workflow accepts two essential string inputs that must be provided at runtime
SRC_ORG_ALIAS: Specifies the alias for the source Salesforce org, with “SrcOrgAlias” as the default value. This serves as the reference point for comparison.DST_ORG_ALIAS: Defines the alias for the destination Salesforce org, defaulting to “DstOrgAlias”. This represents the target org being compared against the source.
2. Environment Configuration
The workflow establishes three critical environment variables:
SRC_ORG_ALIASandDST_ORG_ALIAS: These are dynamically set from the workflow inputs, ensuring the specified org aliases are available throughout all job steps.METADATA_DIR: Defines “./metadata-projects” as the base directory for metadata operations, providing a consistent location for file operations.
3. Job Architecture
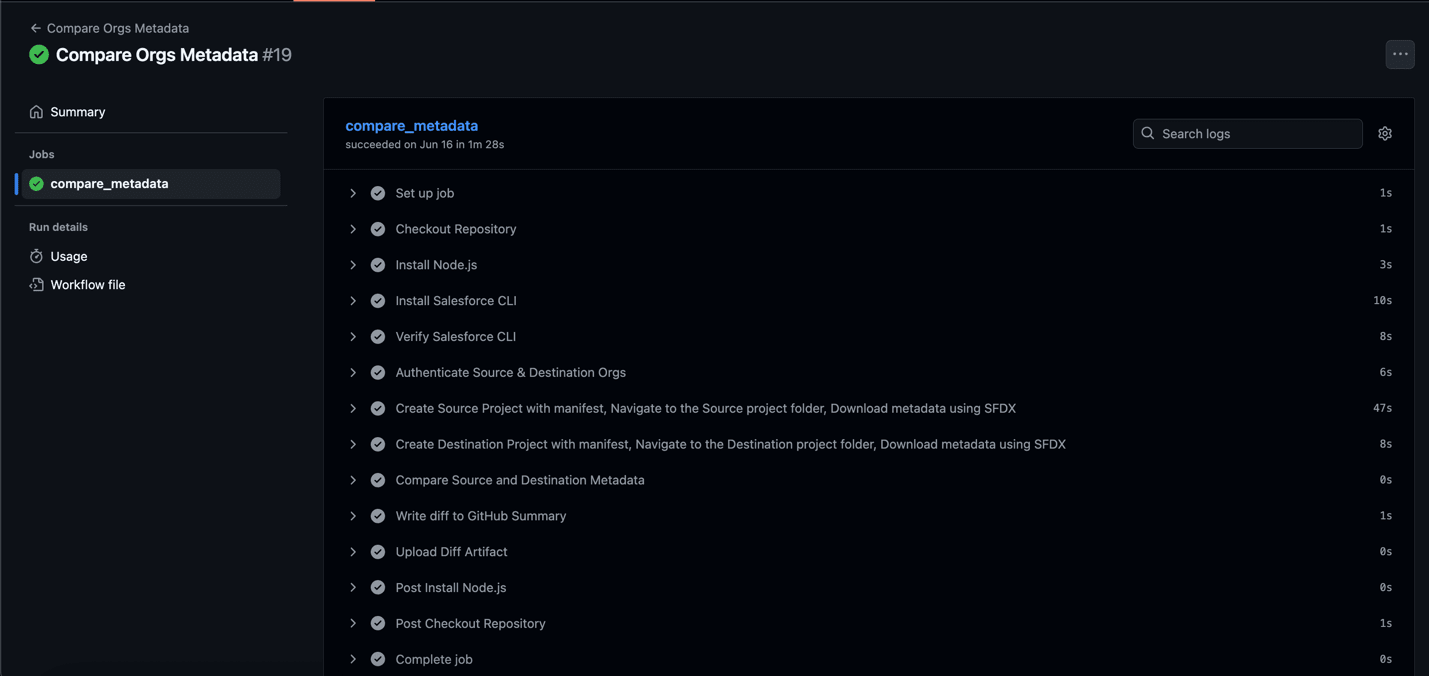
A single job named compare_metadata forms the core of this workflow, executing on GitHub’s latest Ubuntu runner image. This job contains a sequence of orchestrated steps that progress from environment setup through to final comparison reporting.
4. Execution Sequence
- Repository Initialization: The workflow begins by checking out the repository code using the official GitHub checkout action. This ensures all subsequent operations have access to the necessary code and configuration files.
- Node.js Environment Setup: A dedicated step installs Node.js version 20 using GitHub’s setup-node action. This provides the JavaScript runtime required for Salesforce CLI installation and operation.
- Salesforce CLI Installation: The workflow then globally installs the Salesforce CLI via
npm, making thesfcommand available for all subsequent steps. This is followed by a verification process that updates CLI plugins and confirms the installed version. - Org Authentication Process: Using secure credential handling, the workflow authenticates with both Salesforce orgs:
- SFDX URLs are retrieved from GitHub secrets.
- Credentials are piped via stdin to the
sf org logincommand for enhanced security. - A final
sf org listcommand verifies successful authentication.
- Metadata Retrieval Process: The workflow implements a dual retrieval approach for both source and destination orgs:
- Generates new Salesforce projects with manifest files.
- Conditionally incorporates a custom package.xml if present within the ./config directory.
- Executes metadata retrieval using the specified package.xml manifest.
- Metadata Comparison Logic: The core comparison functionality:
- Uses the Linux diff command to recursively compare “force-app” directories.
- Filters output to show only differing or unique files.
- Handles the no-differences case with a clear message.
- Outputs results to metadata-diff.txt.
- Results Reporting: The workflow provides multiple output channels:
- Direct console output of the diff results.
- Appends formatted results to the GitHub Step Summary.
- Creates a downloadable artifact containing the complete diff.
Execute and Track Your Workflow
- Navigate to GitHub Actions:
- Go to your repository and click the “Actions” tab in the top navigation bar.
- Trigger the Workflow:
- From the left sidebar, locate your workflow “Compare Orgs Metadata”.
- Click the “Run workflow” dropdown, confirm any required inputs, and initiate execution.
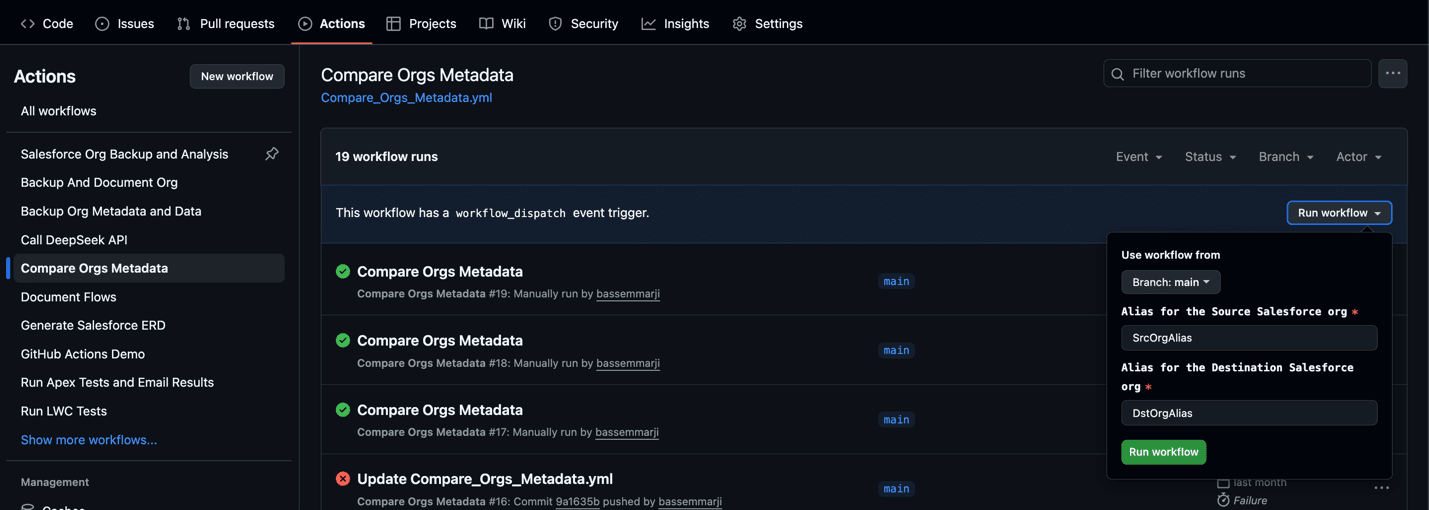
- Monitor Real-Time Progress:
- After triggering, GitHub automatically redirects you to the live run page.
- Observe each step’s status (Success / Failure) as the workflow progresses.
- Review Results:
- After execution completes, review the results by selecting the corresponding workflow run from your Actions history.

Best Practices for Maximizing Workflow Effectiveness
To get the most out of this workflow, it’s important to follow these best practices that enhance security, accuracy, and maintainability:
1. Leverage Package.xml for Efficient Metadata Comparison
Your package.xml file serves as the blueprint for what metadata gets retrieved and compared. Follow these best practices to optimize its effectiveness:
- Comprehensive Coverage: Ensure your package.xml includes all metadata types relevant to your organization’s configuration.
- Selective Precision: Exclude metadata types that are environment-specific (e.g., Users or Organization settings) to reduce noise.
- Version Control: Treat your package.xml as a critical configuration artifact by storing it in version control.
- Regular Updates: As your Salesforce org evolves, regularly review and update your package.xml to include new metadata types.
2. Securely Manage Sensitive Credentials With GitHub Secrets
- Store Sensitive Data Safely: Keep sensitive credentials, such as
Sfdx Auth Urlvalues, securely stored in GitHub Secrets. - Implement Rotation Policies: Schedule regular rotations for authentication URLs to enhance security.
- Monitor Authentication Events: Continuously monitor and log all authentication activities for auditing purposes.
3. Strategically Schedule and Trigger the Workflow
- Pre-Deployment Checks: Always run the workflow before major deployments to catch any discrepancies early.
- Scheduled Runs: Set up weekly automated runs to proactively identify metadata drifts.
- Trigger on Changes: Automatically trigger the workflow after significant configuration changes to ensure consistency.
- Integrate into Release Processes: Use this workflow as a quality gate in your release pipeline to maintain governance.
4. Enhance and Customize the Workflow
This foundational workflow provides a robust starting point, but you can further enhance it with the following features:
- Notification Integration: Integrate Slack or email notifications to alert stakeholders about significant differences.
- Automated Remediation: Implement logic to automatically resolve certain types of metadata discrepancies.
- Historical Tracking: Maintain a record of comparison results over time to identify trends and patterns.
Final Thoughts
Stop guessing about org alignment. This workflow hands you a crystal-clear lens to view metadata consistency across environments.
Whether you’re preparing for a major release or auditing sandboxes, you’ve got an enterprise-grade comparison engine at your fingertips.
