

Before we start, I’ll be the first to admit that I’m guilty of leaving description fields blank. I know I am not the only one who does this, and I believe that many of our readers also leave descriptions blank. It may be that you’re simply unaware of how important it is to populate these fields, or that you’re not sure of the best way to populate them.
Fear not – that’s exactly what I’m here to talk about today! Once you’ve read this article end-to-end, you’ll know exactly what to put in your description fields, where this information is going to add value to your business and beyond, and why it is so vital to do it properly.
Simplest Form of Documentation
One of the top 10 most important best practices to follow when working with Salesforce Flow is to document your Flows both before and as you build them. One of the simplest ways to begin this process is to clearly document the purpose of each part of your Flow in the Description field.
Simply recording the purpose of each piece of your Flow, where it will be used, how it will be used, and where the data is coming from and going to is the first step in documentation.
There are many different forms of documentation, from simply capturing it in a Word document to leveraging connected tools to assist in the process. The most important thing is that you are documenting your Flows in some way, regardless of the medium. The reality is that your Flows belong to the business and should be built knowing that someone else will look at that Flow down the track, whether it’s in 10 years’ time or later that afternoon. That being said, your very first step should be to ensure that you’re filling in the Description fields with relevant information.
If you’ve been careful to ensure that every decision and build is documented in an external tool, but you’ve not populated your Description fields, then it’s as if you’ve stepped out the front door wearing a tuxedo but forgotten your shoes (and revealed your odd socks!). Your description fields throughout your Flow give you the opportunity to embed your basic documentation inside the Flow rather than alongside it in some other tool or repository.
The 60-Second Rule
Keep this in mind when you’re writing your descriptions – make it your goal to share the key information about the Flow with people who are seeing it for the first time within the first 60 seconds. That means using a combination of description fields across the Flow itself, and any elements that you’ve used to get a fresh pair of eyes across what you’ve built in under a minute. This is your chance to get super clear about what your Flow does, what each element in the Flow does, and what the inputs and outputs are.
In addition, this is a great time to get clear to yourself about what your Flow does, and whether it could be modularized further. The better you design your Flows, the easier it will be to document them and the easier it will be for a fresh set of eyes to understand exactly what the Flow does.
Educate the Machines!
A more recent use of the Description fields is to provide valuable context to artificial intelligence tools such as Agentforce 360. AI tools require context (i.e. the who, what, when, where, and why) to be able to serve you best. If you showed an AI tool just a Flow with NO description fields, it would only be able to see the inputs, outputs, decisions, and actions. It would not have any clue why the Flow was built, what each of the elements means beyond the scope of the Flow, or what kind of data may pass through the automation.
This is where your descriptions can provide some much-needed context to an AI tool. Think about the most obvious description field in a Flow – the description of the Flow itself. This is where you can provide a summary of not just what happens inside the Flow, but what business process it lends value to, what the inputs and outputs are, where they are used, and why this Flow needs to operate the way that it does.
The biggest weakness that many feel AI tools have is that they lack context, but realistically, this issue may simply be due to the data or metadata that you’re feeding them. “Go and build me a Flow” is a dreadful prompt because it gives absolutely nothing except a command to build something, and that the something is a Flow. “Go and build me a Record-Triggered Flow” adds another piece of information, but still doesn’t give enough detail for the tool to take the correct level of action. The more information (context) that you can give the tool, the more likely it is to be able to take valuable action.
Context within the description fields ensures that your AI tools are given the full story, not just the surface-level instructions. Think of a Flow as a recipe, and a Flow with detailed descriptions as a food blog article – both explain what to do, but only the food blog tells the rest of the story as well.
The Many Faces of Descriptions in Salesforce Flow
There are many description fields within a Flow, and each of them should be used carefully. Each time you create a variable, be sure to provide a detailed description of exactly what that variable is, what is populating it, and where it will be used. The same goes for your logic elements (Decisions, Assignments, etc.) – explain what the purpose of the element is, what you’re assessing or assigning, where the data comes from, and why it’s being set or split the way it is.
Your Flow has an overarching description field as well. When you first save your Flow, you’re prompted to name it and provide a description of what it does. Do not waste this opportunity for some quick, relevant, and accessible documentation about your Flow that lives within your Flow.
Best Practices for Descriptions in Flow
When documenting anything in Salesforce, it’s good to get into a habit of capturing the How, What, Why, and When.
Starting with the When, you need to carefully capture when the Flow will run. This is easier for Triggered Flows (i.e. Record-Triggered, Schedule-Triggered) as they are clearly defined with their entry criteria, but what is missing from even these is the business context. Make sure you specify what will cause your Flow to run, whether it is expected that this Flow will be high-volume or lower volume, and the business processes that it is involved in.
If it is an Autolaunched Flow, explain where you are planning to use it both now and into the future, if possible, to save you from having to save a new Flow version each time you use it somewhere else (it’s up to you whether you want to go this granular for Autolaunched Flows).
Next up, we have the Why – explain the purpose of the Flow and why it needs to exist in the first place. This is where you can be specific about the business processes that call for it to be built and the goals that you’re setting out to achieve by building the Flow. This is also an opportunity to flag who is responsible for maintaining the Flow if you are involved in a larger organization.
Finally, the How and What. This is where you keep a high-level overview of what actually happens in the Flow. Explain key operations such as your use of Create, Update, Get, and Delete Records elements. Mention any dependencies that this Flow has on Subflows or invocable Apex that the Flow users also have.
You should use the description to keep track of changes to the Flow as they occur, and why they occurred as well. This is also where you should record where any decisions surrounding the Flow have been made (related Jira tickets, for example). Your goal is to make it as easy as possible for someone to look at the Flow and either have the full story or be able to find it easily.
Example Flow: Get Cases from Case Queue
Let’s go through an example together. Below is a Flow called Get Cases from Queue (Group) that is designed to be a Subflow. You would call this Flow from another, pass in the Id of the Queue that you want to retrieve Case records for (where the Queue is the Owner of the Case), and the Flow would return a collection of Case records.
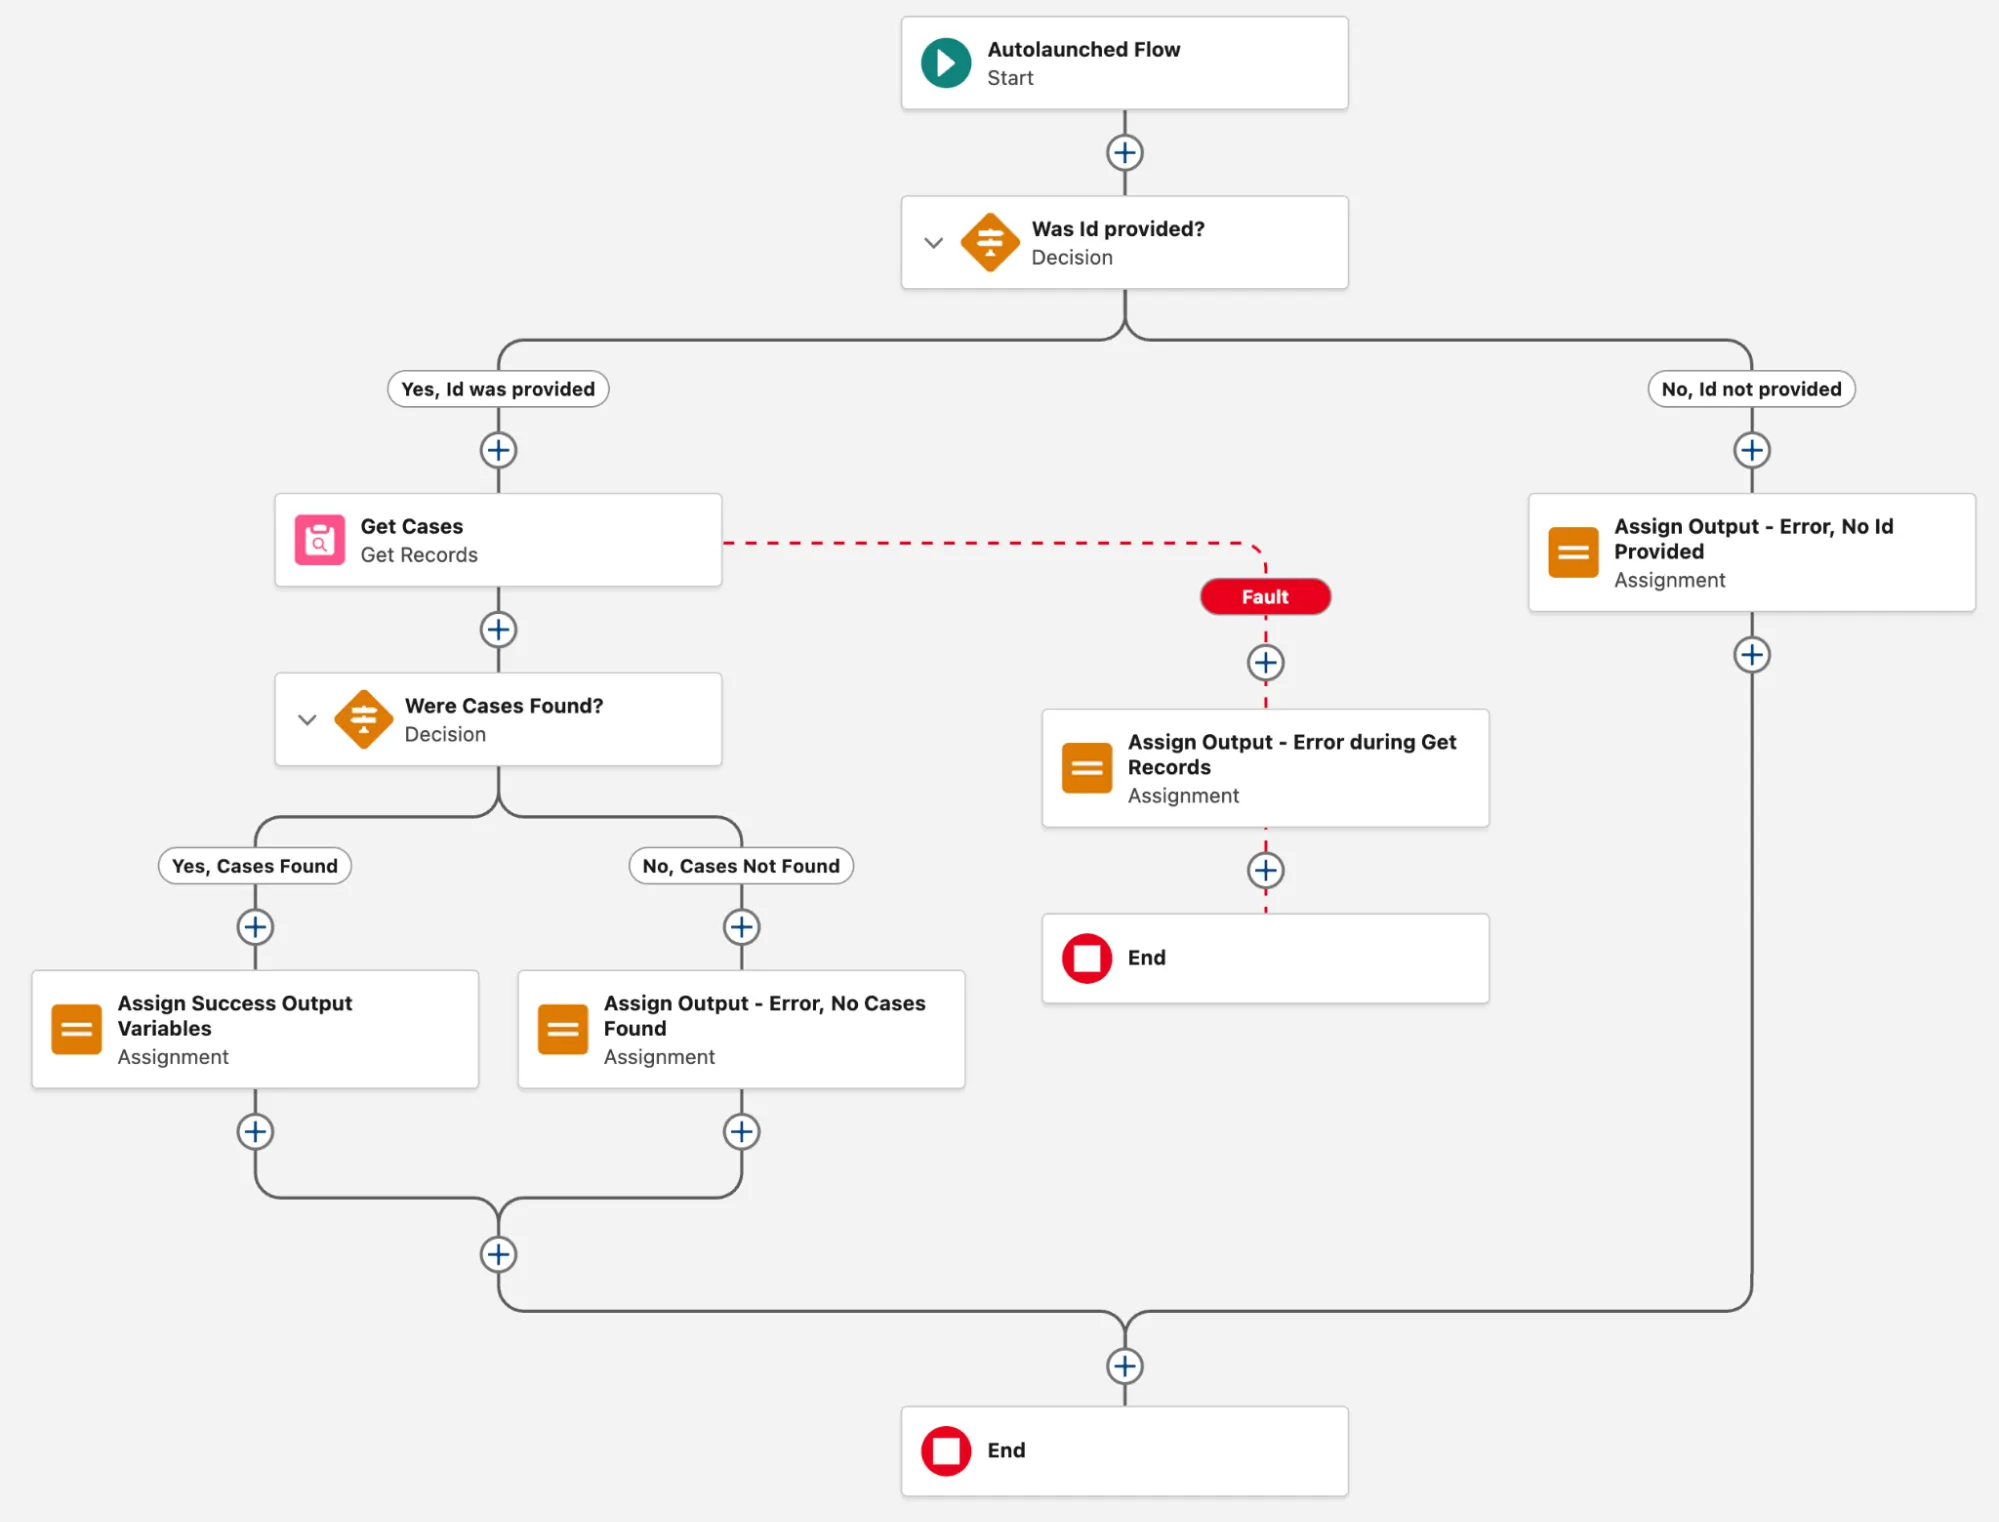
A relatively simple Flow that has error handling built into it as well, but also leverages a simple custom communications standard to pass additional information back to the parent Flow in the form of outputStatus, outputMessage, and outputCollection.
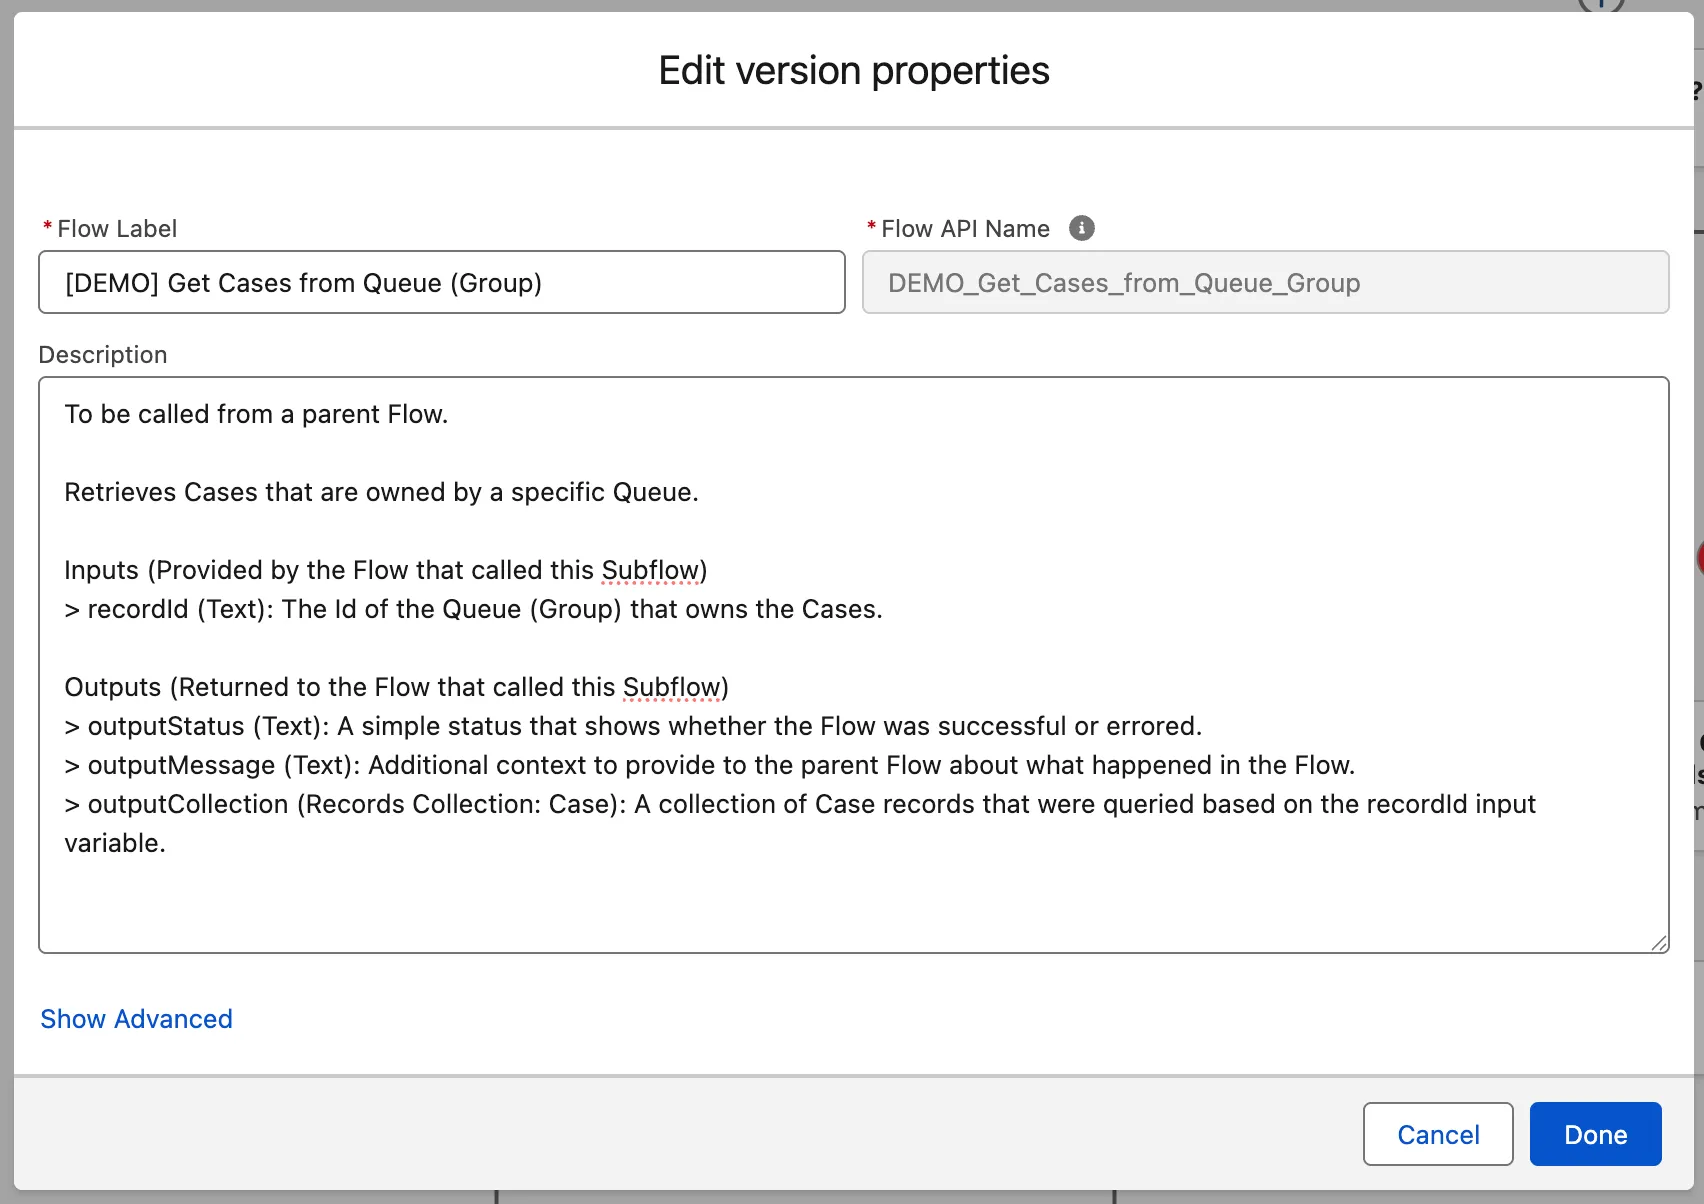
You can learn everything I’ve just said about the Flow by looking at a single description field – the description of the Flow itself. In the screenshot below, you can see that I’ve mentioned where this Flow will be used, what it does, what the inputs are, and what the outputs are. This is an example of the 60-second rule at work, where a fresh set of eyes could look at this Flow and its description and understand what the purpose of the Flow is in less than one minute.
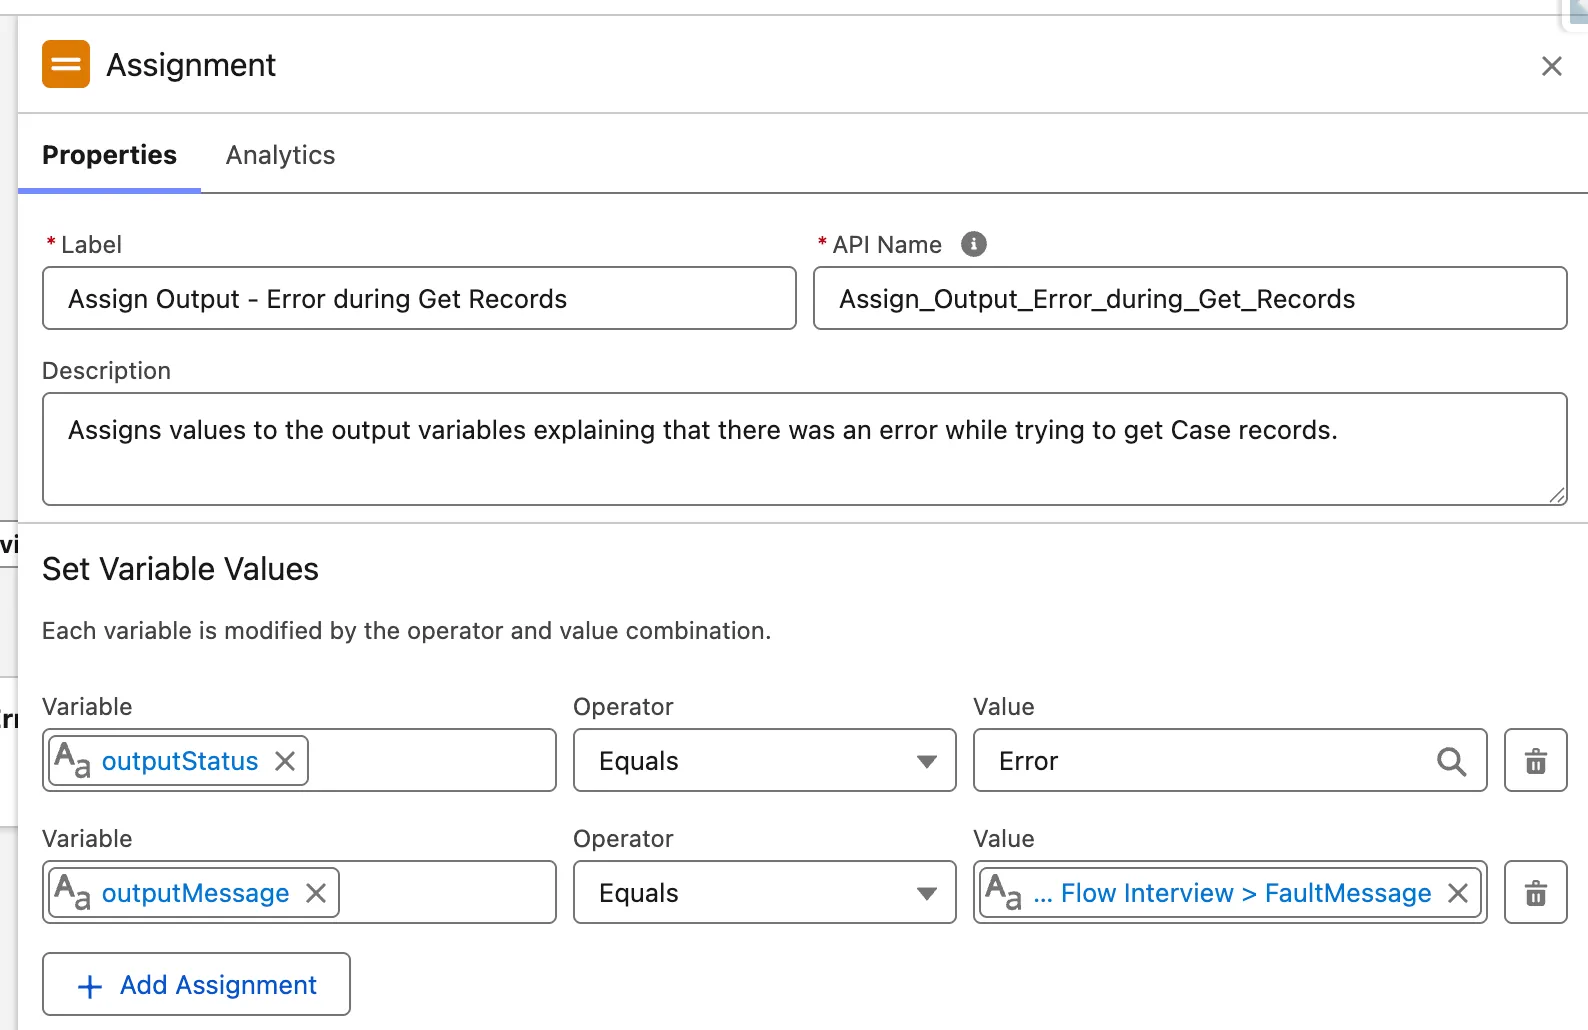
Additionally, you can see that each of the description fields for the elements within the Flow also have detailed explanations of what is being done. For example, below shows the Assignment element that sits along the Flow path. It sets the outputStatus value to Error, and provides the FaultMessage value in the outputMessage variable.
These simple, yet deliberate descriptions are an example of what your descriptions should look like at a minimum. For more complex Flows, you may even want to provide some examples as to what could happen (i.e. for a variable, give some examples as to what the value could be). Keeping them all populated and keeping them consistent across all your Flows is the very first step and certainly one in the right direction.
Summary
Descriptions are one of the most neglected features of Salesforce Flow, and yet can be among the most valuable if used correctly. Think of them as easy-to-access documentation that is embedded directly into your Flows.
Be honest – are you someone who has neglected to populate descriptions in your Flows? What is one thing you’re going to take from this article and apply to your organization?
