

An Email Preference Center (EPC) is a page prospects use to select which topics they want to be emailed about – a preferences pick n’ mix. Prospects land on when they click “update email preferences” from a Pardot email – you may have seen it in action already.
Being intuitive by nature, Pardot comes with easy-to-use email preference functionality. You can choose to use the default page that comes out-of-the-box, or create a custom one if your requirements extend beyond that. Although you can get up and running rapidly, there’s a lot more behind the scenes beyond sticking lists on a page, and is often something organisations seek consultation from a Pardot specialist for.
Not only do people have many questions regarding email preferences and compliance, but some of these elements are not found in one place. Here is a comprehensive guide on Pardot email preference centers – a compilation of my scattered notes from over the years as a consultant with some fairly thorny requirements on this topic. Buckle up, there’s a lot included!
Why You Need an Email Preference Center
Just some compelling reasons I quickly pulled off from the top of my mind:
- Deflecting unsubscribes: giving prospects a choice to opt-out of a topic, rather than ‘all-or-nothing’ global unsubscribe.
- Transparency: prospects can see what lists they are a part of, helping you adhere to matters such as GDPR.
- Improving your email metrics: prospects receiving what they want to hear about should equate to more engagement. Higher engagement on smaller send lists both positively swing email metrics such as click-through-rate.
- Gathering Intel: if a prospect opts-in for a specific topic, it can help drive conversations that the sales team have, and make your email content more ‘sticky’.
How to Create a Pardot Email Preference Center
Here is an overview of the steps involved:
- Decide on your preferences
- Create Public Lists
- Add and order your lists
- Customise your Pardot EPC look and feel
- Access to the EPC – ensure prospects can access the page from emails
- Testing
- Roll-out and documentation
Step 1: Decide on your Preferences – Preference List Examples
There is no straight answer to which lists you should include, but my rule of thumb is to keep it under 8 lists.
Here are common ways I see my clients organise their preferences either into product lines or broad categories (depending on their business structure/product offering). Laying out preferences as broad topics could look like this:
- Newsletters/Product or Feature Updates
- Webinars/Event Invitations
- Training Courses
- Promotions/Special offers
- Service Notifications
How Prospects Access the Email Preference Center
Before we start any building, first ask: what’s the purpose of this page? Who is the audience?
Is the purpose to:
- Capture new subscribers?
- Allow existing prospects to make updates?
In times gone by, prospects were able to use the Pardot Email Preference Center more loosely*; nowadays, however, it’s a different story.
In light of GDPR, and overall tightened security and data integrity, Pardot locked down EPCs to:
- Only be accessed by a prospect using a link in a Pardot email
- Mask the email address field eg. l***@s*****.com
- Make the email address field uneditable
(*as you’ve now seen, what prospects were able to do before the above security measures were bought in were: access the EPC through a URL, being able to amend their fully-visible email address).
Think of it as if a prospect is being funnelled through, from email, clicking a unique link, landing on a preference page for them (and only ever for them).
I’m going to emphasise that you cannot use this page for new subscriptions! If you want to encourage new subscriptions you will need to utilise a Pardot form, or build a custom web page on your website and find a way to integrate it with Pardot.
We’ll come back to accessing the EPC later in Step 5, where we will ensure Prospects can reach the EPC from emails sent from Pardot.
Step 2: What are Public Lists? How do they work?
Public lists (as the name suggests) are Pardot lists that can be made visible to prospects.
Creating Public Lists in Pardot is simple. Just like creating any list, go to Automations → Segmentation Lists → + Add List.
Check the ‘Public List’ checkbox, and additional options will appear. Warning – the Label and Description are both public-facing (so keep this appropriate) and should be appealing enough to convince prospects to stay on that list (while remaining truthful, not over-promising!). The list ‘Name’ is internal-facing.
- Label = public
- Description = public
- Name = internal

Did you know that a Public List can be dynamic too? This means that prospects are added or removed automatically if they match/unmatch the criteria specified on the list.
Why would you make Public Lists dynamic?
- Make preference management more streamlined, eg. if they indicate product interest on a lead capture form, would sync them automatically to the product-specific list.
- Restrict list visibility only those eligible prospects – Dynamic Public lists will be hidden from any prospects not on the lists (only prospects on the Lists can see the Lists).
| Static | Dynamic | |
|---|---|---|
| Opt-in The prospect has actively opted-in. | Added to the list through: - Prospect selection from EPC - Automation Rules - Manual user action | Added to the list automatically (if the prospect meets the list criteria) |
| → will receive emails to list | → will receive emails to list | |
| Neutral The prospect has neither opted-in nor opted-out. | None | Added to the list automatically (if the prospect meets the list criteria) NB: only prospects on the lists can see the lists. |
| → will not receive emails to list | → will receive emails to list | |
| Opt-out | Removed from the list through: - Prospect de-selection from EPC - Automation Rules - Manual user action | Will remain a member of the list. |
| → will not receive emails to list | → will not receive emails to list |
In your list view, you can sort by which lists are public, to find them faster:

Step 3: How Lists Display on a Pardot Preference Page – plus Clever Tricks
Take a look at your default Email Preference Page! Go to Pardot Email → Preference Page. Everyone will have a default page out-of-the-box.

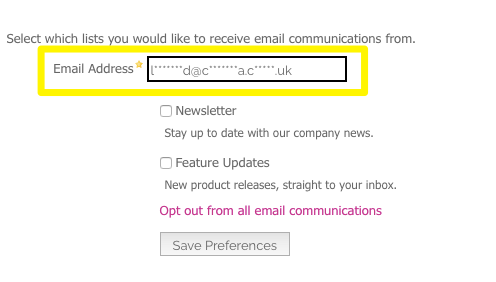
Click on the hyperlink to preview. You will notice that an option to ‘Opt out from all email communications’ is automatically included.

The link to your Pardot EPC will be a randomly generated alphanumeric string – not user-friendly, and looks like a malfunction. You can change this when you edit the preference page.

Have you set up a tracker domain? Do this to use a vanity URL, so the EPC is using a company-branded link. If you have multiple tracker domains, you can select which one to use per EPC.
You have the option here to also add any additional content to the page, and a thank you message.
Here’s the hack. Lists added are ordered alphabetically, according to the List Name (internal-facing). It’s easy enough to change the order, by renaming your Lists as follows:
- Newsletter List
- Feature Updates

Managing Multiple Pardot Email Preference Centers
If you only have the default, out-of-the-box preference page, all Public Lists you created will automatically be added to this page.
If you only want some lists to appear on one page, and others on another, you need to create a second preference page. Click the ‘+ Add Email Preference Page’ button.

A new section ‘Associated Lists’ will enable you to pick exactly which lists to display, in my example here, I only want the customer mailing lists to be included:

Step 4: Customise your Pardot Email Preference Center Look & Feel
Styling your EPC is essential to seem legitimate to prospects. This is not my area of expertise, so I turn to the (far more skilled) Jenna Molby, who has an excellent article about how to customize your EPC here.
Step 5: Access to the Email Preference Center – Merge Tags
The Email Preference Merge Tag is included in all out of the box email templates that come with Pardot, like the one I pulled up below:

You need to ensure prospects can access the page from all emails. This is the {{EmailPreferenceCenter}} merge tag** which you can add using the merge picker:

**if your Pardot org has HML enabled, if not you will use the %%email_preference_center%% variable tag.
As it’s a merge field, when the email is sent to a prosect, the link is rewritten; that way, Pardot knows which prospect clicked on that link unique to them.
All emails must include either the {{Unsubscribe}} merge tag and/or {{EmailPreferenceCenter}} merge tag. Don’t worry about forgetting though – Pardot will warn you with red notification banners in the email builder, plus you won’t be able to save the draft without fixing.
Step 6: Testing
A couple of ‘gotchas’ for testing your Pardot EPC:
- The {{EmailPreferenceCenter}} link won’t appear properly on test email sends (which use the email address manual input box on the Email Builder testing tab). You need to add yourself as a Prospect record and send the email to a Test List.
- If you are using Dynamic Public lists, there’s an option to “Preview page with dynamic lists” – use this or the page will appear blank!
Step 7: Applying Your Email Preferences – Planning
Planning and setting up the EPC is only useful if preferences are respected. What this means is planning email campaigns to fall into one/a few preference categories, and using the Public Lists as the foundation for your send lists.
Look at the types of campaigns you are sending. Which preference category would they fall into? You may end up with lists crisscrossing preferences, but that’s ok as long as the Public List/s are the starting point for send lists. Let’s take an example: there’s an event invitation to a Manufacturing event happening in London. You have Public Lists set up for a) Events b) ‘Updates in my industry – Manufacturing’. Would you email prospects on both lists, or prospects on either list?
You can start thinking in a Venn diagram mindset, the two variations laid out here:

Send to Prospects on either list.

Send to Prospects on both lists (the darker section in the middle).
Factors that would sway your choice include: how strict your organisation follows these preferences, the target no. attendees, the size of your send list, and any observations you made running this event in the past (whether it was oversubscribed, or not).
Honing in on relevant prospects may be an option too. By segmenting only prospects that are located in London, the most targeted (strict) Venn diagram would look like this:

As I mentioned, the crisscrossing of campaign topics and Public lists is enough to send any marketer into a deep pit of documentation (and paranoia?). My suggestion is that you pair both, alongside your team, and put some ‘rules of thumb’ in place for common scenarios (take the different Venn diagrams I outlined above as a use case).
In my experience, it can be tough to consolidate this across local teams in a global organisation. It takes training and enabling your teammates with the template lists for them to apply to email sends. There’s a greater risk of ‘rogue’ sends the bigger our team; so having easy to follow rules in place is key.
Applying Your Email Preferences – Sending Emails
Once you have all the ‘who what where’ sorted out with your preferences, it’s now time for me to show you how to send Pardot emails when you have an active EPC.
On the email builder, you can add Public Lists to the ‘Send to’ box:

Add any prospects you do not want to send to, by creating a secondary list and adding it in the ‘Do not send to’ box opposite.
I understand that this is vague, but I will be writing more about this topic in the coming months – so keep your eyes peeled!
I do want to answer a frequently asked question that I have been asked, and have seen online:
Do I need to create a suppression list based on Public List unsubscribes?
If Prospects are opting out of a Public List, they will appear as OPTED OUT OF LIST: ‘Yes’.

They will still appear on the list in Pardot, but they will not receive the email when that Public List is applied to the ‘Send to’ box. This is why Public Lists should form the foundation of all sending lists.
If you are using Dynamic Lists for a specific campaign, you can use the ‘Prospect public list opt-in status’ criteria to respect any Public List opt-ins/opt-outs:

Syncing Preferences with Salesforce
Every client I have set up a Pardot Email Preference Center for has asked for information to be synced with Salesforce in some way. It’s a common request, mainly for these reasons:
- Sales/Account Management are nosy, or they would like to know if their top targets are being invited to every possible hosted event/networking opportunity.
- Leveraging Salesforce report filters to add send lists of Lead/Contacts to Salesforce Campaigns (as Campaign Members)
- Better auditing/consent management, to report on this alongside other channel preferences, eg. SMS, call.
…all in all, a wise idea.
Getting the preferences to appear in Salesforce can either be an Admin’s dream, or nightmare, depending on how strict their organisation’s GDPR/compliance policy is.
There are two ways you can show a Pardot Prospect’s email preferences on their Lead/Contact record:
| Option: | Good for… |
|---|---|
| 1: Custom fields for each Public List | Advanced preference management, Salesforce Admin’s sanity. |
| 2: Multi-select picklist | Quick glance for end-users (eg. sales reps/account managers). Note: this should not be made editable. |
| 3: Both | Someone that wants to fulfil both 1) and 2). |
The solution for best Admin experience, while giving user visibility, is to create a custom field for each Pardot Public Lists. This field would specify whether a prospect is part of a Public List, or not; my recommendation is that you use picklists instead of checkboxes, due to field sync behaviour gotchas. Still, aside from the effort having to create custom fields for each list (x3 for Prospect, Lead, Contact), you can keep your page layouts neat by grouping these fields in a separate section on the page layout.
Re-opting Prospects to Public Lists
You can’t change a Prospect’s opt-out status once opted-out from a Public List, unless the prospect themselves does this using the EPC. This means you are stumped in a couple of incidences, if a prospect needs to be re-opted in to a Public List it’s not possible to do it by:
- Changing a field in Salesforce combined with an automation rule: essentially, this means a Salesforce user can’t re-opt in a prospect to a public list
- Submitting a form (+ a field change) combined with an automation rule: if using forms to allow prospects to self-service preference management.
Sure, in both cases the internal user/prospect form submission can resubscribe a prospect in general from a global opt-out to not opted-out (reverse a global opt-out), but preferences is another matter.
AMPSEA – what happens with multiple prospects using the same email address?
AMPSEA stands for ‘allow multiple prospects with the same email address’. Love it or hate it, AMPSEA is something you can’t ignore with Pardot data management.
AMPSEA creates each Lead or Contact record as a Prospect record in Pardot – one Salesforce record = one Pardot record. It may be counter-intuitive/illogical/frustrating that when a prospect updates the email preference center, Pardot updates the preferences for all the prospects that have that email address. This is default behaviour that cannot be modified, so we must learn to manage it.
Unsubscribe Pages
While setting up your Pardot Email Preference Center, set up your Unsubscribe Page at the same time. This can be found in the same section as the EPC in the Pardot Lightning App. It’s your choice whether you add both Email Preference Center and Unsubscribe links to email templates, but it is worthwhile in case another user uses an out-of-the-box email template.
Summary
This guide has covered why you need an Email Preference Center, the 7 steps to creating one, plus many other considerations and tips sprinkled within. I hope that this has answered some of the niggling questions you may have had, and I look forward to expanding this guide over time!

Comments: