


When it comes to managing data visibility in Salesforce, sharing rules are one of the key tools in an admin’s toolbox. They allow you to open up record access to certain users without having to restructure your role hierarchy or hand out broad permissions.
In this article, we’ll explore what Salesforce sharing rules are, when and how to use them, and how to create and manage them effectively. Whether you’re new to Salesforce security or refining your sharing model, this step-by-step guide will help you understand and implement sharing rules with confidence.
What Are Salesforce Sharing Rules?
Salesforce follows a layered approach to security:
- Profiles and permission sets control what users can do (create, edit, delete, etc.).
- Organization-wide defaults (OWD) control what users can see by setting the baseline level of access to records.
- The role hierarchy in Salesforce works like an organizational chart. It lets users higher up the hierarchy see, edit, and report on records owned by the people below them. In other words, it helps extend record access beyond what’s defined by your organization-wide defaults.
- Sharing rules come next; they extend access beyond what users automatically inherit from OWDs and the role hierarchy.
- Using restriction rules, you can apply filters to determine which child records a user should be able to see, using User/Permission Criteria combined with Record Criteria.
- Last but not least, manual sharing enables a user to grant access to another user on a single record.
Simply put, sharing rules open up access, but they can never be used to restrict it. They let you automatically share records with users based on who owns them or specific record criteria.
You can use sharing rules for any object whose OWD is set to Private or Public Read Only.
Types of Sharing Rules in Salesforce
Salesforce supports two main types of sharing rules.
1. Owner-Based Sharing Rules
These rules share records based on who owns them.
For example:
- Share all accounts owned by users in the Sales role with the Customer Success team.
- Share all opportunities owned by Inside Sales with Field Sales.
This type is great for team-based collaboration when ownership itself is the key differentiator.
2. Criteria-Based Sharing Rules
Criteria-based sharing rules in Salesforce share records based on record values instead of ownership.
For example:
- Share all cases where the Type = Complaint with the Escalations team.
- Share all opportunities where Stage = Closed Won with the Finance department.
Criteria-based sharing rules are more flexible and dynamic because they automatically update as records meet or stop meeting the criteria.
When to Use a Sharing Rule
Sharing rules are perfect when you need to grant access laterally across roles or teams, when you want to automate record visibility for groups that collaborate frequently, or when you want to open up access without changing the role structure.
Example Use Case
Scenario: Your organization is divided into East and West sales regions. Each region’s manager needs to see both their own team’s accounts and those of the other region for coverage.
Solution: Create an owner-based sharing rule that shares accounts owned by the East Region role with the West Region role, and vice versa.
Benefit: Managers get visibility into each other’s regional data without exposing all records company-wide.
How to Create Sharing Rules in Salesforce
Let’s walk through how to create sharing rules in Salesforce.
Step 1: Review Your OWD Settings
Navigate to: Setup → Security → Sharing Settings.
Before creating a rule, confirm that the object’s OWD is set to Private or Public Read Only. Otherwise, sharing rules won’t make any difference!

Step 2: Choose the Object
On the Sharing Settings page, scroll down until you reach the Sharing Rules section; these are displayed per object. Find the object you want to add a sharing rule to (for example, Account, Opportunity, Case) and click “New”.

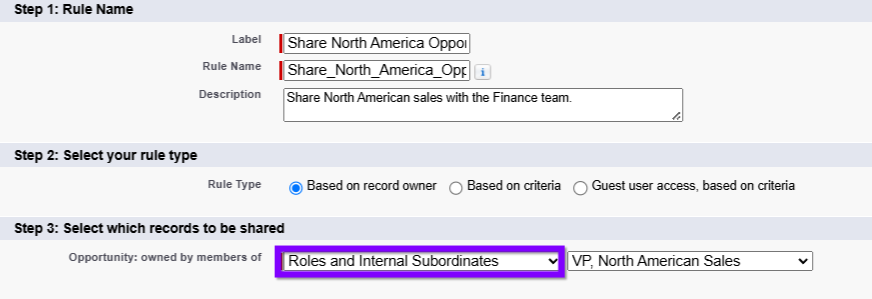
Step 3: Add a Label and Description
Add a label and description. A good sharing rule label should be clear, specific, and concise, describing what is being shared and with whom. Best practice would be to use Title Case and avoid special characters.
Step 4: Select the Rule Type
You’ll see two options:
- Based on record owner (Owner-Based)
- Based on criteria (Criteria-Based)
Choose the one that matches your scenario.
In this example, I want to share all opportunities owned by the North American Sales team with the CFO and their team. To do this, I selected Based on record owner as the rule type and chose Role and Internal Subordinates of the VP, North American Sales. This setting ensures that any opportunities owned by the VP, North American Sales, or anyone reporting to them are shared with the CFO’s team.
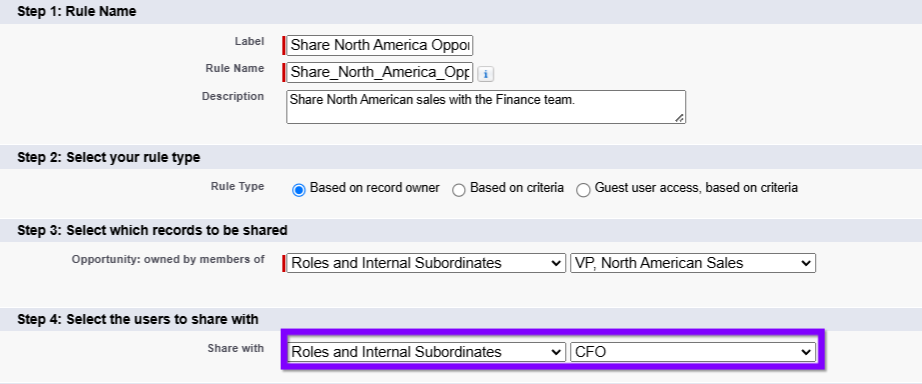
Step 5: Define Who to Share With
You can share records with:
- Public Groups
- Roles
- Roles and Subordinates
- Territories or Territories and Subordinates
Tip: If you plan to share with a Public Group, set it up before creating your sharing rule (Setup → Users → Public Groups)!
To share with the Finance team, I selected Role and Internal Subordinates of the CFO. This ensures that all opportunities are shared with the CFO and everyone in their reporting hierarchy.
Side Note on Portal Users
You can create sharing rules in Salesforce that let users from your website, portal, or Salesforce itself share data with one another. If portal users have licenses that include roles, you can even share records between users from different companies (accounts).
However, high-volume users, such as many community or site users, don’t have roles and can’t be added to public groups. Because of this, they can’t be part of owner-based sharing rules (rules that depend on who owns a record). Still, you can share records they own by using criteria-based or guest user sharing rules instead.
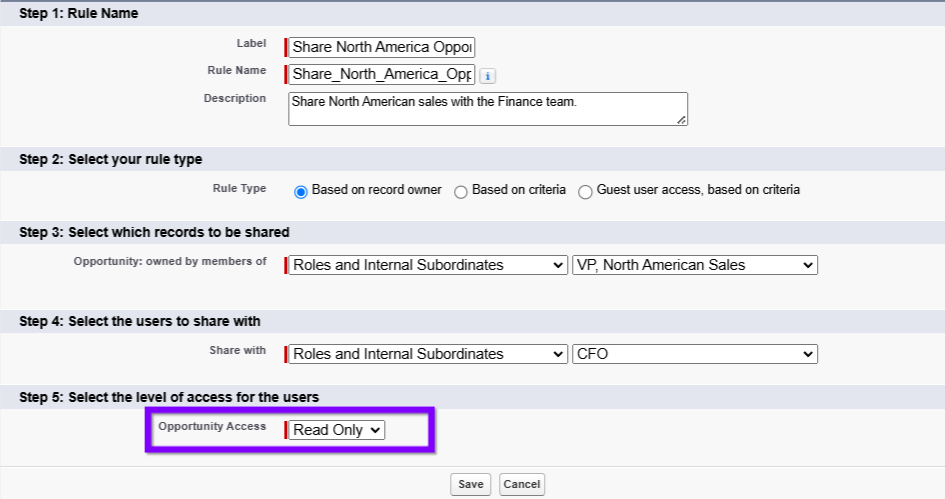
Step 6: Choose the Level of Access
Decide whether the user/s should have:
- Read Only access (can view records)
- Read/Write access (can view and edit records)
Tip: Even if you grant Read/Write access via a sharing rule, the user must still have Edit permission on the object via their profile or permission set!
Since the Finance team only needs to view the opportunities owned by the North American Sales team, I select Read Only access.
Step 7: Save and Let It Process
Once saved, Salesforce will recalculate record access. This might take a few minutes, especially in larger orgs. You’ll receive an email once the recalculation completes.
Best Practices for Using Salesforce Sharing Rules
Here are some key tips for designing an effective sharing model.
- Keep it simple: Complex layers of sharing can be hard to troubleshoot. Start with clear OWDs, utilise the role hierarchy, then add sharing rules only where necessary.
- Use public groups: Instead of creating multiple rules for individual roles, share with a public group that contains all relevant users.
- Watch out for “View All” and “Modify All”: These profile permissions override sharing rules and give full access to records. Use them carefully.
- Monitor rule counts: You can define up to 300 total sharing rules per object and 50 criteria-based sharing rules per object. Salesforce recommends keeping it below 100 ownership-based and 50 criteria-based per object for performance.
- Document your sharing model: Include role hierarchy diagrams, OWD settings, and sharing rules in your documentation to keep your data model maintainable.
Limitations and Considerations
When working with sharing rules in Salesforce, keep these considerations and limits in mind.
- You can’t use sharing rules to restrict access, only to open it.
- You can define up to 300 sharing rules for each object, including up to 50 criteria-based sharing rules (if they are available for that object).
- In criteria-based sharing rules, you can’t use lookup fields, encrypted fields, formula fields, or fields whose values are derived from other fields on the record.
- If multiple sharing rules give a user different levels of access to a record, the user gets the most permissive access level. Salesforce sharing is about opening up access; once it’s opened up, you cannot place restrictions on top of the opened access.
- For a sharing rule based on owner or group membership, you can edit only the sharing access settings (for rules based on any other criteria, you can edit both the sharing access settings and criteria).
- Once you create a rule, you can’t change the “Share With” settings; you’ll need to delete and recreate it.
- When a rule is deleted, any access it provided is automatically removed.
- Related records may also become visible. For example, sharing an opportunity can also share its account, and sharing a case or contact can open up the related account.
Troubleshooting Common Issues
Having some issues with your sharing rules? Not to worry, here are a few common issues and how to troubleshoot them!
- Issue: A user can’t edit a record, even though the sharing rule grants Read/Write.
- Check: Ensure the user’s profile has Edit permission on the object. Sharing rules don’t grant object permissions.
- Issue: Sharing rule changes aren’t showing up immediately.
- Check: Wait for the recalculation to complete. For large datasets, Salesforce may queue the process and notify you via email.
- Issue: Too many sharing rules are slowing performance.
- Check: Consolidate where possible by using Public Groups or rethinking the OWD level.
Summary
Salesforce sharing rules are a powerful way to open up record access automatically based on user or field value. They help teams collaborate without overcomplicating your role hierarchy or compromising data security.
When used thoughtfully, alongside OWDs, roles, profiles, and permission sets, they form a flexible and scalable foundation for secure data visibility in your org. Remember, sharing rules are your best friend for automating visibility. Start simple, test thoroughly, and document everything.
Resources
- Salesforce Help: Sharing Rules
- Trailhead: Create Sharing Rules
- Salesforce Developers: Sharing Rules
- 25+ Ways to Share a Record in Salesforce


Comments: