


A Salesforce Health Check (or “org health check”) can mean different things, depending on who you ask. An Admin might hone the routine maintenance of the org; tasks may include cleaning out unused fields on a heavily used custom object. A governance or compliance team will probably focus more on security aspects, for example, if IP ranges are locked down for all users. An executive may be most interested in the org’s overall spend and license usage.
For the purposes of this article, I will take a blended approach to the above considerations. The goal is to arrive at a snapshot in time of where the org stands; how is it being used and how generally secure is it? Answering these questions will help identify areas of focus to improve overall health.
What this article is not, is a complete guide to “improving and cleaning up a Salesforce org”, which is a very complicated topic and impossible to cover in full detail in one post.
Let’s get started.
Why Is a Health Check Important?
As a Salesforce Admin, developer, and consultant (for over a decade now), I know how difficult it can be to maintain a healthy, mission critical org. Every day, critical processes are flowing through the system, users are asking for changes (if you are directly involved in managing the system), and new projects are in the works (especially if you are a PM). All the while, you may be managing a team, attending high-level meetings, and updating your boss about what’s happening.
When was the last time (if ever) you stopped to ask “how is the org doing overall?”
It’s a simple question, but through all of the noise, it often goes unasked. I know, from experience, that simply stopping to ask some basic questions can uncover many possible vulnerabilities to your system and its scalability. It could be something as simple as an unused Custom Object, or something as fundamental as multi-factor authentication (MFA) not being turned on (more on that later).
So, let’s take a moment to stop and ask that simple question: “how is the org doing overall?”
Regardless of your role, stopping to do this Salesforce Health Check is an important exercise that should be done at least annually. You may be:
- An Admin who has been managing the same org for many years.
- A project manager trying to wrap your head around your company’s Salesforce system.
- A consultant coming into a new org for the first time.

Documenting Your Health Check
Before we dive into our Health Check, just a brief note on documentation – one could argue that the state of your org Documentation could (and should) be part of this exercise. Documentation is simply a way of helping to explain, in words, why a part of the org was built a certain way and how it’s being used, as well as information about who requested it. It’s not nearly as complicated as it sounds and should not feel intimidating. However, documentation is incredibly powerful in keeping your org clean and healthy. Sadly, it’s usually sorely lacking in most Salesforce orgs.
If you do not have some form of org documentation already in place, I would suggest starting a Google Doc or MS Word document now – it’s a good idea to store the findings of this Health Check somewhere that can be easily accessed and shared. As we go through our Health Check, be sure to keep notes on what you find.
Conducting the Health Check
It is important to follow a clear process when conducting your Salesforce Health Check, which I have divided into four steps.
Step 1: Check the Salesforce Contract and Product Usage
Salesforce Contract
You may be a consultant coming into an org for the first time, or a seasoned veteran of an established org. Believe it or not, I would advise that the first stop on our health check journey should be the basic detail of the org’s contract with Salesforce.
When does the contract renew, and what exactly has been purchased from Salesforce? If you’ve been managing an org for a while, you may think you already know these details, but I’ve been surprised on more than one occasion with what I found here. Here is what we are really trying to arrive at with this first check:
- Find out where we are in the buying cycle.
- Ask what products we have.
- Analyze whether those products are actually being used.
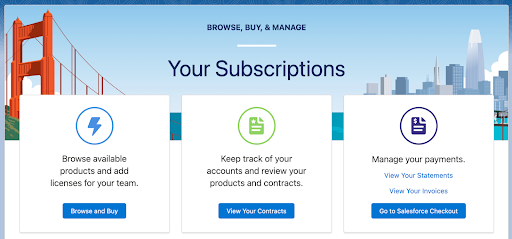
Assuming you are in Lightning Experience, navigate to the top right and click on the gear icon. You should see a link called “Your Account” – click on it and then click on “View Your Contracts” to see a list of products this org has purchased from Salesforce. If you are in Classic (Aloha interface), navigate to the top right and click on the “App Name” dropdown (very last button on the top right). Click “Checkout” and then “Purchased Products.”
Here, add two notes here to your documentation:
- The renewal date.
- A list of the products purchased (and their quantities and costs).
Is the renewal date coming up in the next few months? Will there be discussions with internal management and Salesforce about renewals, license quantities, the effectiveness of purchased products, etc.? If so, you may want to add to your list: discovery/usage sessions with sets of users to determine their usage of Salesforce. This will help avoid the dreaded “do we still need all of these licenses?” question that inevitably arises around contract renewals, often with only a few weeks before the company must make a decision. This leads me to my next point…
For the products that were purchased from Salesforce, what does this overall picture look like? Are there products that are a surprise to you? I’ve seen data storage add-ons for data that was no longer really needed in the org; knowledge license add-ons that were added on after a request by a separate business unit; additional API calls that were a result of poor development practices in the org; hundreds of platforms licenses that were left over from a previous project; and many other things.
Take a minute to make some notes about each product on the list, including any information you have and any information you feel you still need in order to answer any remaining questions. Things like Sales Cloud or Service Cloud licenses might be easy, as you know they are being used and by whom (we’ll dive in deeper next). For others, you might need to ask around in the company (like special licenses or API calls) as to how these products are being used, by whom, and how often.
Check Usage
Now that we have a solid understanding of what products are in the org, let’s take a look at raw usage numbers. I say “raw” because this will tell us which licenses and features are assigned, not necessarily whether they are being used or not. Head over to Setup > Company information.
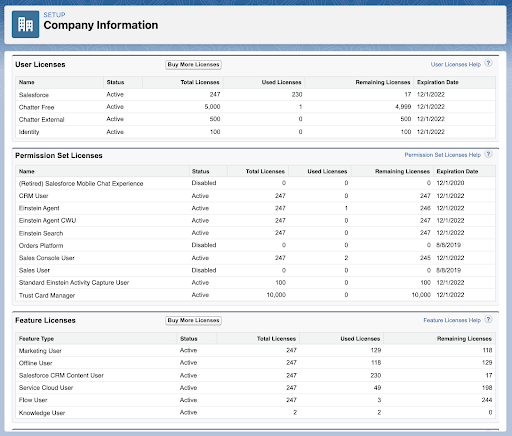
The “User Licenses” section breaks out the different license types in the org, as well as the number of available vs. assigned licenses. From this section, you should be able to get a good idea of how many of each type of main licenses (Full Salesforce License, Platform Licenses etc.) from the Salesforce contract are assigned. Make notes of anything interesting you find, including how many “remaining licenses” there are for any license type.
Next, the “Feature Licenses” section breaks down the “User Licenses” section into finer detail. These are additional products (if your org has these) that are purchased to supplement regular Salesforce licenses, for example, use of Knowledge, Live Agent, and others. Make notes of this as well; ask how many of these licenses are assigned vs. what has been purchased. Is there anything that stands out?
Dive Deeper Into License Usage (Optional)
If you are coming up against any limits on license usage, you may want to dive deeper than the “raw” usage and actually take a look at who is using their license. This can be achieved via a report, as well as some human conversations.
To create the report, navigate to the Reports tab and choose “Users” as your Report Type. It should show automatically the fields we are looking for, but if not, we want to filter based on “active” users so that we can see their last login date. Right off the bat, you may be able to identify some users who are assigned a license and have never logged in (or have not logged in recently).
Using the report as your guide, conduct some reconnaissance via conversations with those users or their managers/business units. Ask the following questions and keep notes of your findings.
- What was the reason behind them getting a license in the first place?
- Was it for a particular project that is still being worked on?
- Or was it for a use case that is no longer valid? In which case, can they be removed from the system?
Tying back to our Salesforce Contract and renewal date, this is information we want to have figured out before that renewal date. Your manager (or whoever is sending the check to Salesforce) will be happy to see that, when the renewal comes up, all products/licenses are accounted for and it’s understood exactly how they are being used.
Other Usage Information
While we are on the “Company Information” page in Setup, let’s also take a look at some other important usage metrics.
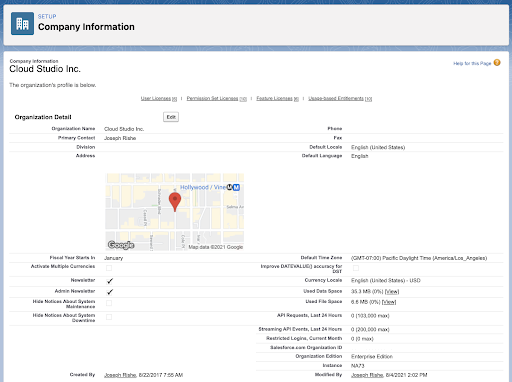
Over on the right, about halfway down the page, you should see “API Requests, last 24 hours”. Based on your org type and the number of licenses the org contains, you should see the number of API requests against the maximum number allowed within any 24-hour period.
An API request comes up from outside the Salesforce org to interact with the org in some way (a query or a record insert, for example). This can be very problematic if you are up against this limit, as integrations can stop working and generally wreak havoc on your org. Make note of the “health” here.
Lastly, let’s take a look at our Data and File usage. These can also be found on the right-hand side, just above the API usage information. Data storage is the number of actual Salesforce records being stored (Accounts, Contacts, etc.), while File storage refers to everything else attached to Salesforce records (attachments from emails, pictures attached to Cases, PDFs attached to Opportunities, etc.).
Each has their own limit, based on your org type and the number of licenses you have purchased. You can click the “View” link next to either of these, which will help you drill down further and start to give you an idea of what is taking up the most space in the org. Overall, you want to keep a bit of padding on each of these, as getting close to the limit can prevent records from being created in the org. If you are close to the limit, all it takes is for one new app or business process to add a few hundred thousand records to cause issues.
Step 2: Security Check
“Health Check”
The next area we’ll take a look at is Security. Mainly, we are looking at the overall security of the org and how well protected it is against outsiders. As a Salesforce Admin, consultant, or project manager, you may think that security is not something you need to worry about. You’d be mostly right in thinking that, as Salesforce handles the vast majority of anything security-related for us. However, it’s still our job to turn on these security protections.
The irony is, Salesforce actually has an incredibly useful tool to help with this… They call it “Health Check”!
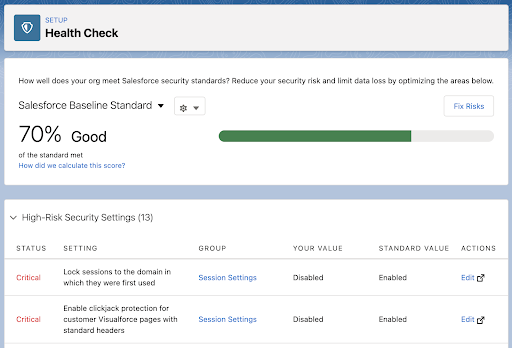
Navigate to Setup > Health Check and you should see a Baseline score for your org. Below this, Security Settings are broken down into High, Medium, and Low risk. You’ll see which Security Settings the org is compliant with, as well as areas where your org is out of compliance. You’ll also see the value the org currently has, as well as the value that Salesforce recommends.
Security is a very complicated topic. Fortunately, we don’t really need to know exactly what every aspect of security means. For the most part, I would recommend updating any policy to be in line with what Salesforce recommends as the “Standard Value.”
The only caveats I’ll add to “accept the recommended values” are as follows:
- If your org has many Visualforce pages or other custom interfaces, just check with your development team if making changes to how these pages are loaded will affect their work. It shouldn’t, but if it does, it doesn’t necessarily mean that the changes shouldn’t be made; instead, it may mean that pages need to be updated to be more secure.
- Salesforce recommends just three invalid login attempts before locking the user out. From practical experience, I usually go with five attempts, as users try different passwords and possibly need a few more chances before their account is locked.
- Salesforce recommends against the following action: “Administrators can log in as any user.” I’m sure they have good reason for this, but in my experience of managing an org, doing so effectively without the ability to login as a user is just not practical.
An important note here: I would recommend updating these Security Settings one by one. In my experience, updating them has gone smoothly (for the most part). However, I have had some users complain that their browsers timed out, and some apps (from the AppExchange that still used Visualforce) stopped working. So, if you need to update Security Settings, update one policy and wait for a few days to see if any users complain about issues. Repeat this until all settings are enabled.
There are two other things that should be enabled in the org from a security standpoint. Both are partially covered in the “Health Check”, but let’s take it one step further.
Multi-Factor Authentication (MFA)
MFA is hands down the best way to protect your org from unauthorized users gaining access. It pairs something you know (the password) with another factor (like your email or a text). You can find this here: Setup > Session Settings > Session Security Levels > Multi-Factor Authentication.
Turning this on in session settings will require all users (when using a new device or new browser session) to sign into their Salesforce accounts – they will need a code from an email or a text (if they have registered a mobile device). Most orgs should already have this one, but if yours does not, I would highly recommend it.

Taking it one step further, by February 1st, 2022, Salesforce will require an even more secure version of MFA to be turned on. This authentication requirement will eliminate the ability to use text/email as the 2nd authentication method. Instead, it will require the use of an authentication app or security key. This authentication app (downloaded to a Salesforce user’s phone) produces six-digit codes that are only valid for about 30 seconds. Navigate to Setup > Multi-Factor Authentication Assistant for more information.
My Domain
My Domain makes your Salesforce URL specific to your org/company. So, instead of login.salesforce.com, it becomes mycompany.lightning.force.com. Not only is this required to use many of the newer features, it also helps secure your org – unauthorized users would first need to know your “my domain” before even attempting to gain access to your org. I won’t get into the details here, but you will find this in Setup > My Domain, and if you don’t already have it turned on, I would recommend doing so.
The only thing to be aware of here, is the “prevent login from login.salesforce.com” option, which you can turn on after enabling My Domain – this essentially blocks logins at the generic login page. Just make sure that all integrations in your org are set up to handle this (and are not pointed at the generic login).
That’s it! Salesforce makes solid security practices very easy.
Step 3: Check Access Controls
The next stop on our Health Check is access controls, which relates to the security aspects from Step 2, but focuses on internal, licensed Salesforce users. We want to ensure that all users in the org have an appropriate amount of access (and nothing more). This principle is called “Least Privilege Access,” and is a best practice for managing a Salesforce org. I won’t be recommending a complete “access audit” here (although an annual audit is a good idea), but I will focus on the two key areas below, which are high priority.
Admins
Obviously, the users with the most amount of access in Salesforce are System Administrators. For anyone who does not already know this, these users are not only able to change the backend setup/functionality of the Salesforce org, they can also read and edit any piece of data in the system (short of some encrypted fields).
Needless to say, this amount of access should be doled out very carefully. I’ve come across so many orgs where there are 50 users, 20 of which are Admins! I’ve even seen full orgs where each and every user was setup as an Admin. This is an access control nightmare and should be corrected as soon as possible.
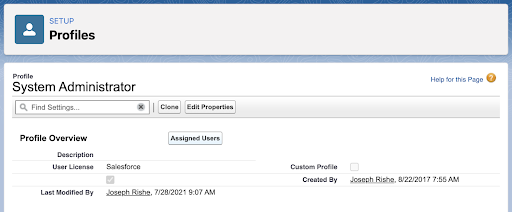
Navigate to Setup > Profiles > “System Administrator” profile > Assigned Users to see which users are currently assigned the Admin profile. How does this list of users look? The only users who should be assigned this profile are users who are actually involved in managing the app itself. There is no reason for “sales managers’, or others who need lots of data access, to be assigned this profile. Without diving into a ton of detail, those users should be granted additional access via permission sets.
So, if you find users in here that should not be Admins, make note of it. The next thing I would do is talk to the person who set up their profile, or talk with that user directly to try to understand how they are using Salesforce and what additional access they may need to do their job. Once you have this figured out, you should set up a Permission Set with those additional permissions, assign it to that user, and then promptly remove them from the System Administrator profile.
Ultimately, what we want to end up with is a very tight list of Admins who are involved in managing the system. Having additional users with this level of permission increases the risk of harmful system changes, or sensitive data being viewed/altered.
A quick note on this: While viewing the “System Administrator” profile, Assigned Users in Setup will show you all of the true Admins. It is still possible to grant broad “admin-like” permissions via another Profile or with a Permission Set. Basically, any Profile or Permission Set with “Customize Application” or “Read/View all Data” options, should be treated as having Admin access. You could build a “List View” to tease out these additional Profiles / Permission Sets.

Sensitive Permissions
Beyond Administrators, other users may have permissions within the org that are deemed “sensitive”, but they might not actually need them. Again, without going into a full “access audit,” this is a difficult risk to assess, based purely on your company and the type of data you deem most sensitive. There is no single answer for every company/org.
I would start by making a list of the top five most sensitive types of data in your org. From a general standpoint, Contracts may be the most sensitive, followed by any objects that contain PII (personally identifiable information) like Contacts. Or it could be a certain Apex Class that is extra sensitive, but again, you’ll need to determine what those data types are for your specific company.
Once you have this list, you’ll need to determine which Profiles contain these permissions and, in turn, which users are assigned to these profiles to determine which users have been granted access. To do this on Profile, go to Setup > Profiles. You should be able to create a new list (view “Create new View” on the top left) and filter it to the permissions you have deemed to be sensitive. Honestly, I’ve found the Profiles list views to be okay at best, especially for complicated permissions like Record Type or Field access, but it’s the best tool Salesforce offers.
Now that you have your list of users with sensitive permissions, talk with them, their managers, and others on your team about which users actually need this access. Then, simply remove those who do not need access.
Read more:

Step 4: Org Build Analysis
Salesforce Optimizer
At the beginning, I said that this is not a complete guide to “improving and cleaning up a Salesforce org”, and I stand by that. However, I would be remiss if I didn’t at least touch on the analysis of how the org has been set up, and how clean its build is. Build problems are very common and can make orgs difficult to maintain and scale. This is a very difficult topic to cover, so I cannot go into full detail of this.
However, with that said, Salesforce has put together a very solid starting point with its “Optimizer” tool. Optimizer is native to Salesforce, and can help highlight problem areas with your build. Namely, it helps identify Fields, Profiles, Permission Sets, and Roles that are not being used. It also provides suggestions for ways to remedy the problem. The tool does have limitations, and it surely produces some false “issues”, but it’s a great start.
Navigate to Setup > Optimizer to run it, and then analyze the results.

oAtlas – Understand, Document and Report on Your Salesforce Org
I’ve completed the exercise above for more orgs than I can count, either as I came into new orgs as a consultant, or as I tried to improve existing ones as an Admin. This led me to dream up a tool to “quickly understand how an org is built and how it’s being used.” Fast forward five years, and oAtlas was born.

oAtlas alleviates many of the sticking points above and dives deeper than standard tools:
- Dive deeper into User usage to determine who is really using their license – see not only their last login, but also logins over time and which parts of the system they are using.
- Full permissions reporting (right in Salesforce) via the standard Salesforce reporting engine – no more clicking through endless menus to determine sensitive permissions.
- Dive deeper into the org’s build – get a detailed “map” of how the org is built and how it’s being used.
- Documentation right in your org.
With Salesforce native Documentation, you can document your Health Checks, communicate major changes across your Salesforce team via Chatter, and even run Salesforce projects through an approval process, all right in your org.
Visit the oATLAS website to learn more or email support@cloudstudio.build to get in touch (we are currently offering a free org analysis). You can also get a free org documentation template here.
Summary
I hope this guide to conducting a Salesforce Health Check has helped you to make your Salesforce org healthier! A Salesforce system is a big investment, and ensuring its health is one of the best ways to protect it.


Comments: