NPS (net promoter score) is designed to measure loyalty and brand promotion among your customers by asking: ‘how likely are you to recommend us?’ on a scale of 0-10 (not at all likely, to extremely likely). Scores result in three categories: Detractors (0-6), Passives (7-8), and Promoters (9-10).
You can run a simple NPS survey in Pardot using custom redirects (with some limitations) or use form handlers as the more reliable alternative. I’ve included both ways, in case you don’t have the ability to create form handlers. Most importantly, you can run these quick snapshot surveys without extra survey tools (budget-saving!)


1. NPS Surveys Using Custom Redirects
You can run a simple NPS survey in Pardot using custom redirects. Note: This solution will no longer give you 100% accurate data; sure, you will be able to see the number of clicks across all numbers (indicating general consensus about your brand), however, only cookied prospects using the same browser/device that they were cookied using will have their prospect record updated.
To continue with this easy approach, all you need is:
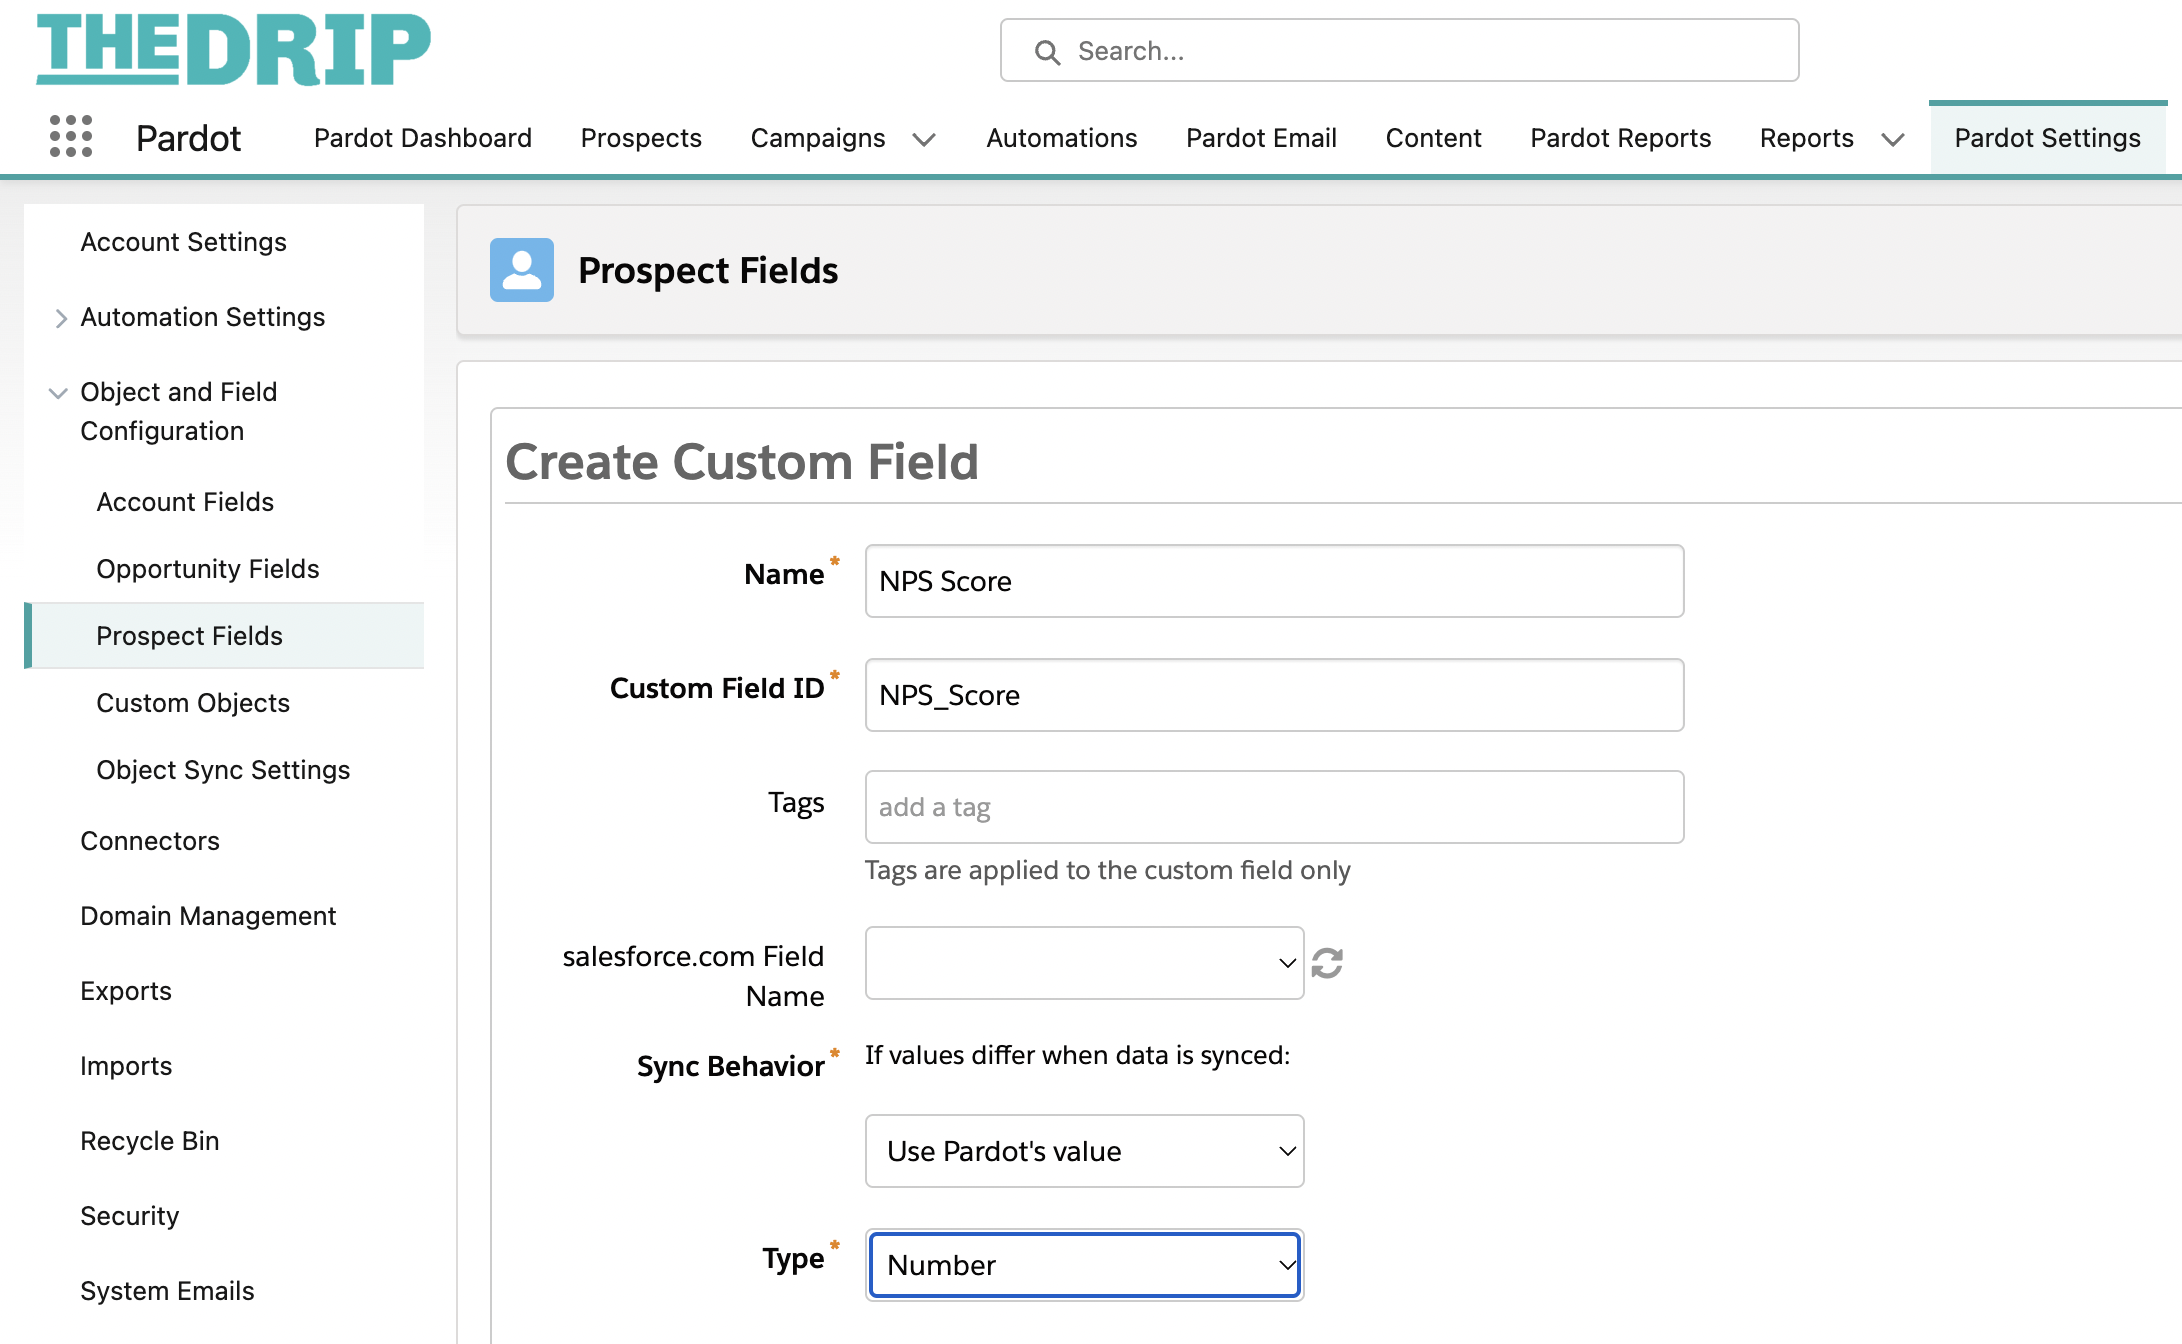
- Create a custom field on the prospect object called ‘NPS Score’ or similar, with the type number. This field doesn’t need to be mapped to Salesforce.
- Optional: You can create a “NPS Date” field for tracking. This will be a date field type.
- 10 custom redirects: Each custom redirect has a completion action to ‘change prospect custom field value’ by a specific number; for example, the custom redirect named ‘NPS_10’ will change the ‘NPS Score’ field to 10.
- Optional: Set another completion action on each: Prospect custom field | NPS Score Date | Submission Date.
- Destination URL: Once a prospect has clicked their chosen score, you need to direct them somewhere. This could be a simple “Thank you” landing page (a good opportunity to show additional content), or a redirection to your website with a pop-up banner. Either way, there should be a confirmation message involved.
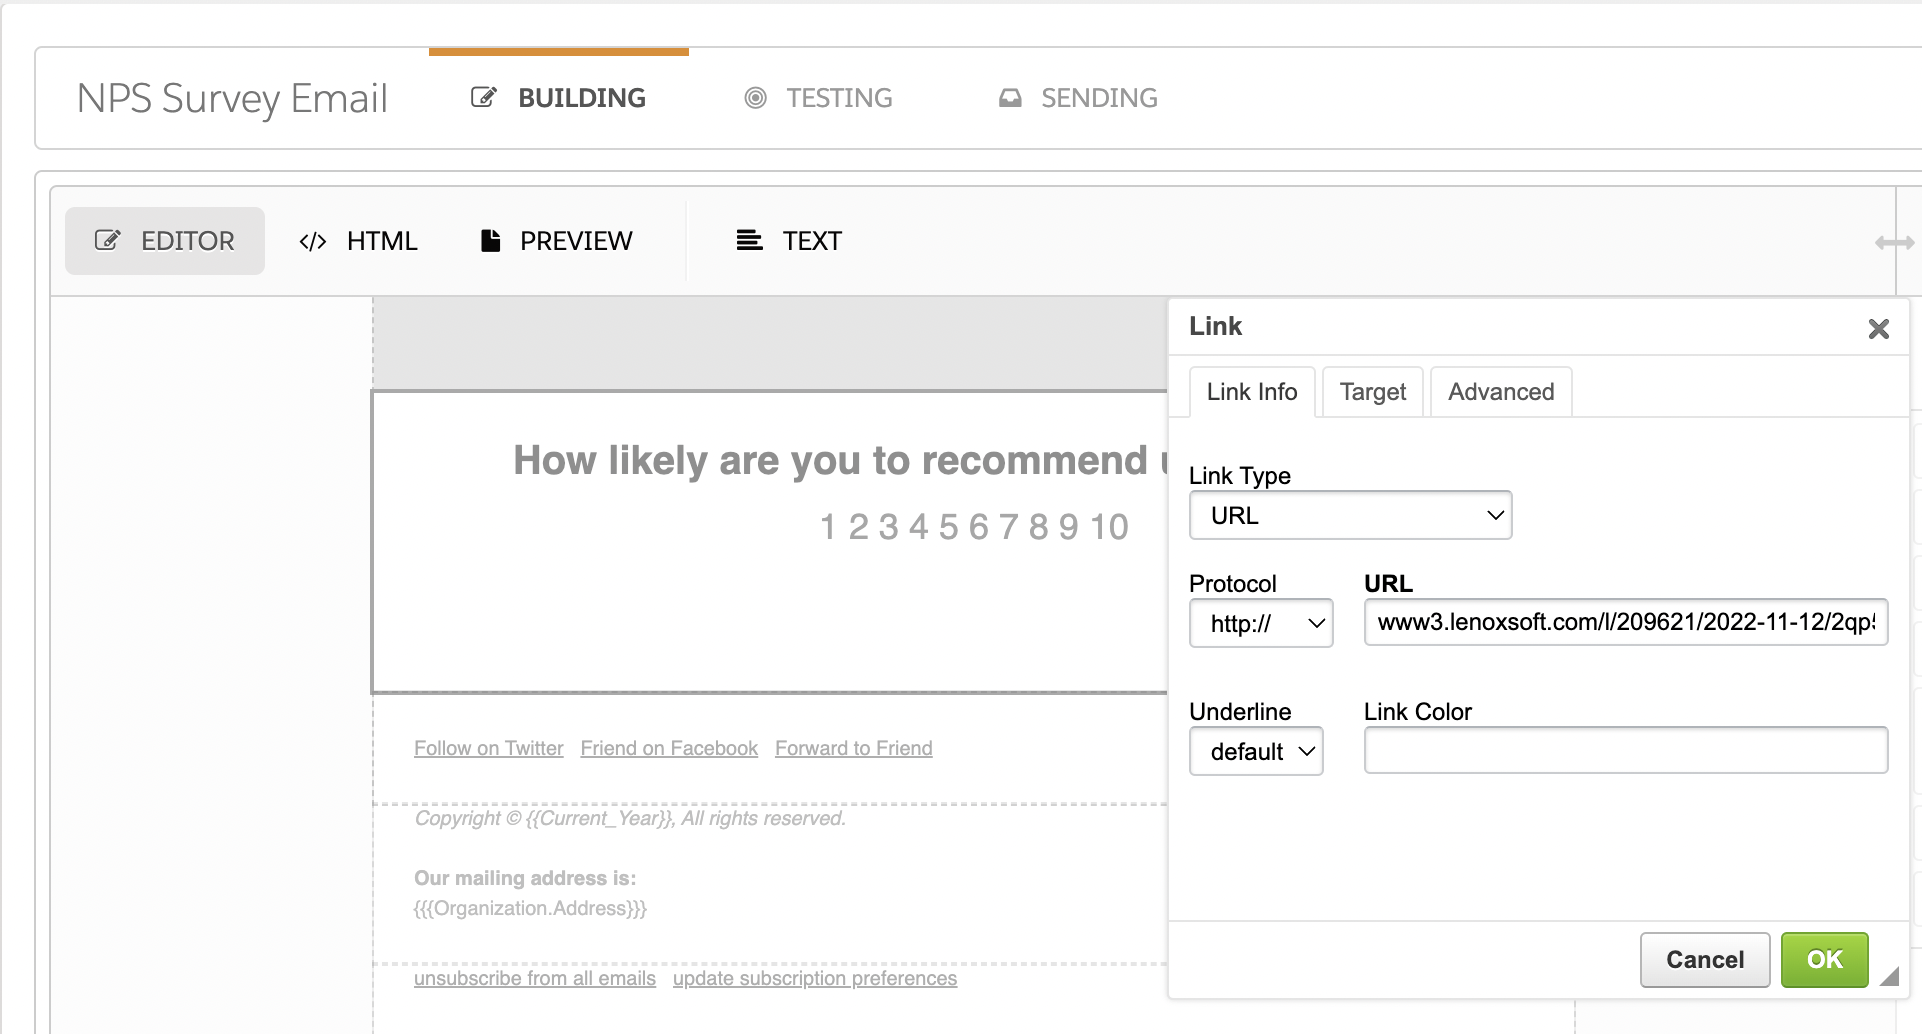
Images in the email are hyperlinked with each of the 10 custom redirects. These act like buttons that a prospect can click.
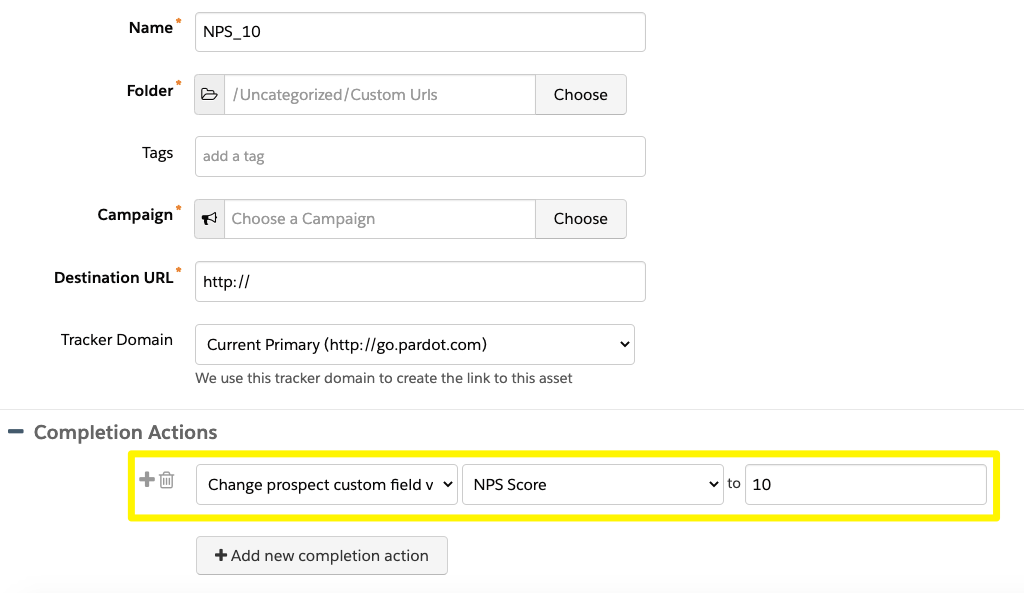

Note: Again, only cookied prospects using the same browser/device that they were cookied using will have their prospect record updated by the completion action.
2. NPS Surveys Using Form Handlers
Due to the changes in how cookies function with Pardot, you should amend your NPS survey flow from a single link click, to a link click + form handler. The form handler will register the click and update the prospect’s NPS score.
Step 1: Create the Confirmation Landing Page
For this build, we’ll start backwards, meaning that you will have all of the pieces ready when you tie them all together.
Once a prospect has clicked their chosen score, you need to direct them somewhere. This could be a simple “Thank you” landing page (a good opportunity to show additional content), or a redirection to your website with a pop-up banner. Either way, there should be a confirmation message involved.
Step 2: Create the “NPS” Fields
Create a custom field on the prospect object called ‘NPS Score’ or similar, with the type number. This field doesn’t need to be mapped to Salesforce.
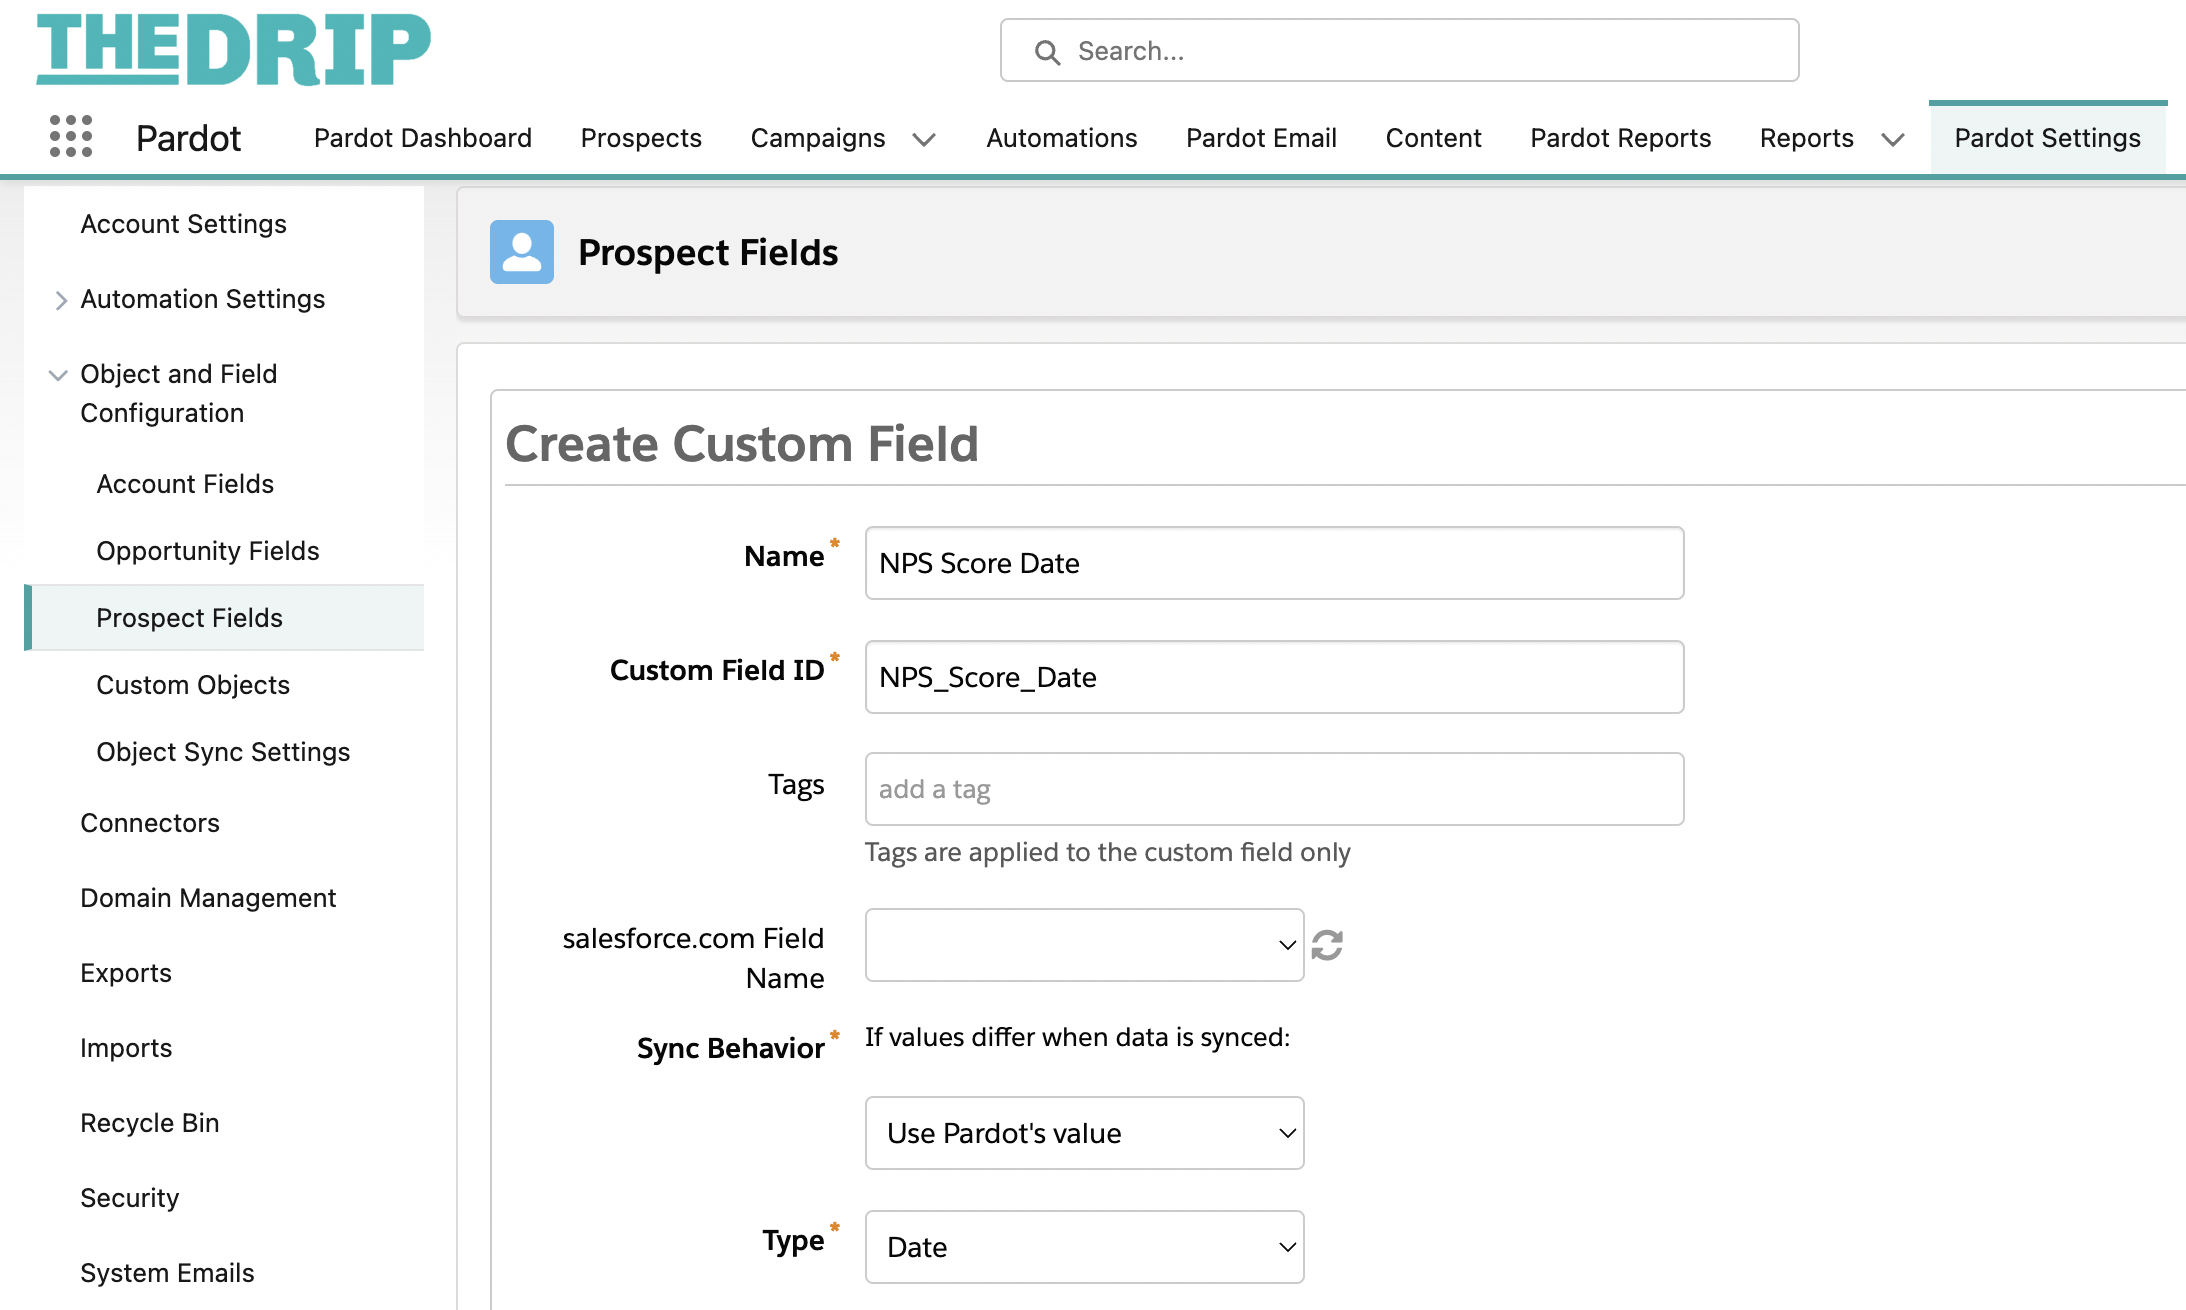
Optional: You can create a “NPS Score Date” field for tracking. This will be a date field type:
Step 3: Create the NPS Score Form Handlers
We need to guarantee that completion actions will fire for every prospect that clicks within the NPS email. We already mentioned that custom redirects are no longer reliable for this process – so we’ll leverage form handlers instead.
We’ll need 10 form handlers in total because each one has a completion action to ‘change prospect custom field value’ by a specific number; for example, the custom redirect named ‘NPS_10’ will change the ‘NPS Score’ field to 10.
- Navigate to Content → Form Handlers → click +Add Form Handler.
- Name: “NPS_10”, or similar.
- Select the folder and campaign you’d like.
- Tracker domain: Ensure that a custom tracker domain is selected. The primary tracker domain in my example is “www3.lenoxsoft.com”.
- Success Location: Paste the link to the thank you landing page you created in step 1.
Error location: This solution won’t error; however, as the error location fields are required, you can paste your website home page here.
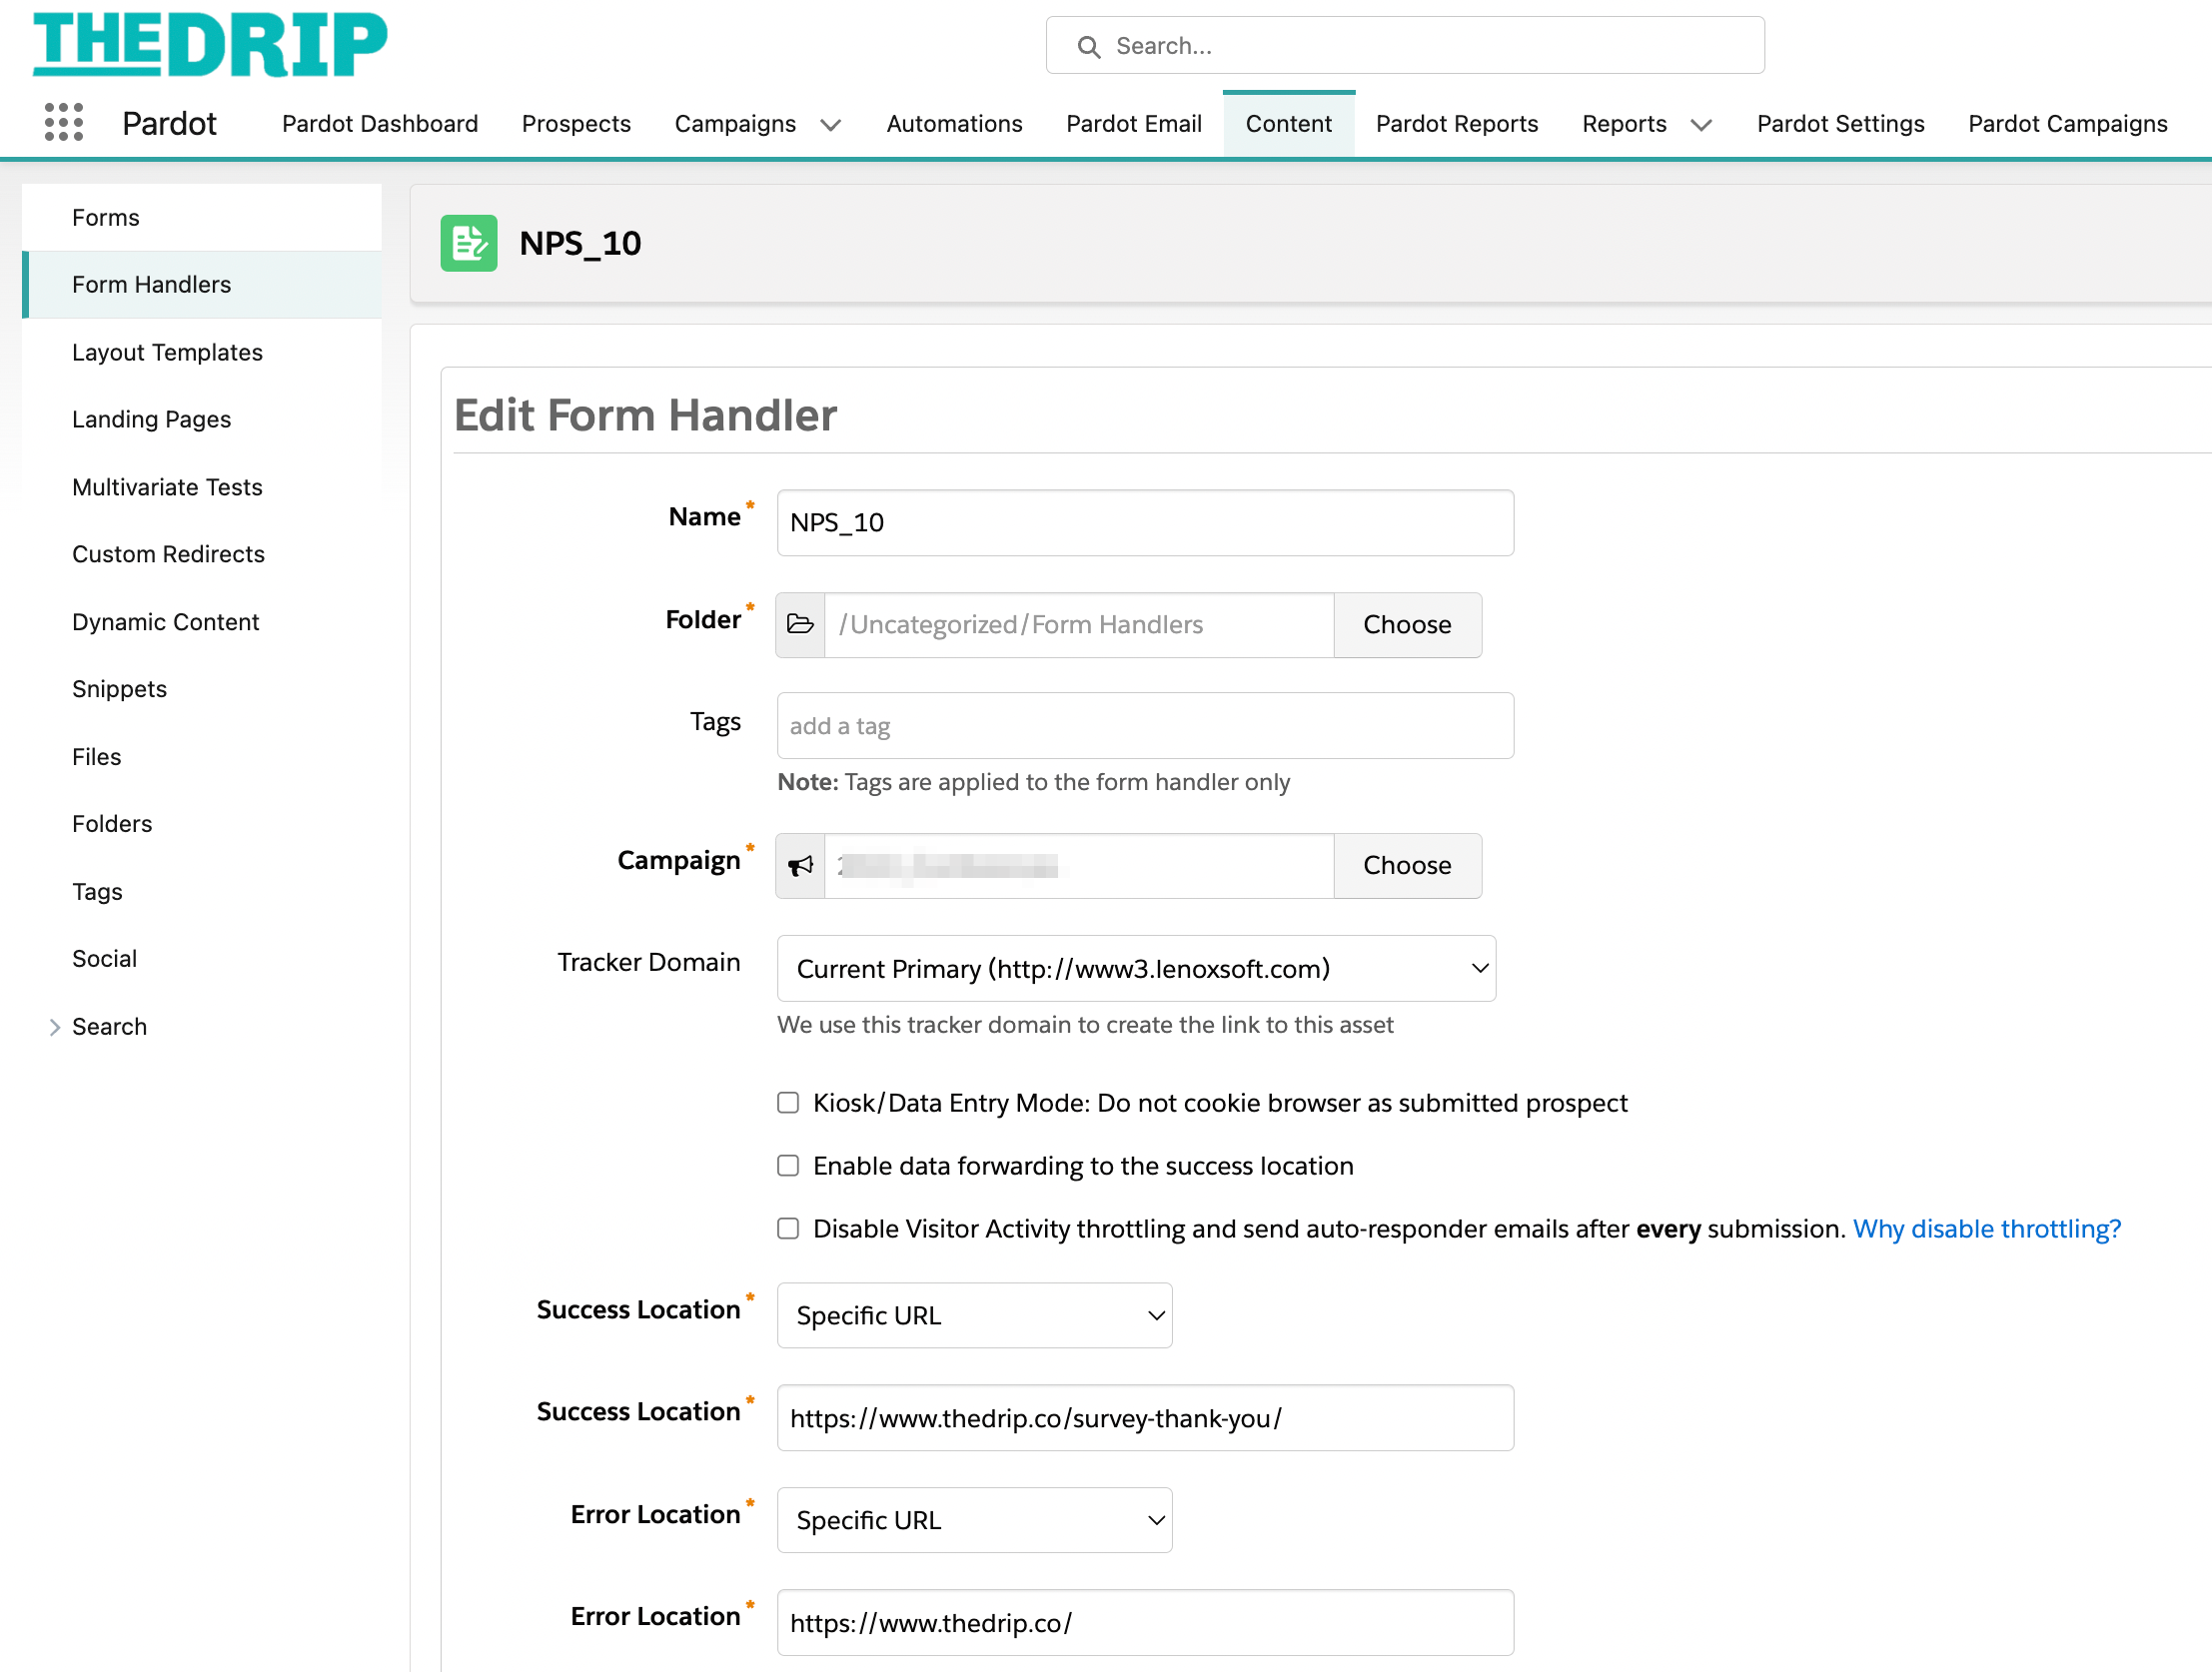

Completion Actions
Use the criteria:
- Set prospect custom field | NPS Score | 10
- (Optional) Set prospect custom field | NPS Score Date | Submission Date


Form Fields
- As you can see in the image above, ‘email’ is mapped by default. This is all you need.
- Click Save and copy the Endpoint URL link – you will need this in the next step.
Repeat for all 10 scores.
Step 4: Create the Email Template
Create the email template, and hyperlink the form handler links in the body of the email. These could be simply hyperlinked text, but hyperlinked images would be more engaging:

Use NPS Data With Pardot (Account Engagement)
Send the email out to a list of prospects using a list email or Engagement Studio. You’ll start collecting NPS scores.
From there you can use the data in multiple ways. You could:
- Use dynamic content to show different content to promoters vs detractors.
- Map the NPS field to Salesforce, and give the sales/support team insight when they are interacting with prospects/customers.
- Suppress prospects with scores from 1-6 from upsell campaigns.
Summary
This guide has shown you how to build an NPS survey with Pardot (Account Engagement) to discover your promoters and detractors. Even if this campaign doesn’t come out of the box, the silver lining is that you have the flexibility to build the flow how you want it.
Don’t forget about putting the data into action once you have collected it. There are multiple ways – such as using dynamic content, revealing insights to sales/service teams, or being smart about who you attempt to upsell to.



Comments: