


If you’ve ever worked in a role that involves frequent messaging, such as replying to emails, handling chats, or managing similar cases over and over, then you’ve most likely felt the frustration of having to rewrite the same responses again and again. I know I have, having previously worked in support roles myself. It’s a common pain point for most support teams, especially when many cases follow the same patterns.
And for those similar cases, wouldn’t it have been great if you had a predefined template or written message you could always use and just modify as needed? Quick Text is one of Salesforce’s long-standing productivity features, and if your org doesn’t use it yet, then there’s no better time to start.
This article focuses on Quick Text – what it is, how to set it up, and how to use it to standardize communication across support teams.
What Is Salesforce Quick Text?
Quick Text is a custom, predefined message that can be inserted into various places across Salesforce, such as emails, chats, tasks, or events. Instead of typing the same response repeatedly, you can save time by simply selecting a Quick Text entry and adjusting it as needed based on the specific case or situation. They’re essentially useful text snippets that you can pull out when needed.

Quick Text goes beyond just plain text or alphanumeric characters because it can even include merge fields, line breaks, or special characters. This allows agents more space for personalizing responses even while maintaining speed and consistency.
Where Can Quick Text Be Used?
Depending on the channel your agents work in, Quick Text can be inserted in several places across the platform. This makes it useful for teams who are handling conversations across multiple touchpoints. The most common channels to use Quick Text on are email, chat, and phone, but Salesforce also supports Quick Text in a variety of other actions or communication fields across your org. The table below shows the supported channels and typical scenarios where Quick Text can help agents save time and stay consistent.
| Channels | Where It Appears | Typical Use Cases |
|---|---|---|
| Email actions (used in the email body) | Standard customer emails such as acknowledging receipt, follow-ups, next steps, etc. | |
| Knowledge | Lightning Knowledge Articles (any rich text area fields) | Reusing standardized article introductions, summaries, or disclaimer text. |
| Chat / Messaging | Chat windows (appear in the transcript) | Greetings, verification questions, quick answers to FAQs. |
| Tasks | Task records (Comments field) | Call summaries, next-step reminders, follow-up templates. |
| Events | Event records (specifically the Description field) | Meeting agendas, post-meeting summaries. |
| Phone | Log a Call actions (Comments field) | Standardized call notes for sales or support calls. |
| Social | Social posts (Message field) | Responses to inquiries with on-brand messaging. |
| Case Comment | Case comments (rich text-enabled) | Status updates, escalation summaries, and public customer updates. |
| Note: Quick Text support for Case Comments was introduced in the Spring ’26 release. As with all newer features included in the release notes, availability and behavior may evolve in future releases. | ||
Plan Your Quick Text Strategy
Quick Text, on its own, is a simple concept and also fairly easy to create. But if you don’t decide on a clear strategy beforehand, things can get messy and difficult for agents to navigate (imagine giving all agents the ability to create their own quick text responses?). An unplanned repository can end up counteracting the very pain point you’re trying to resolve.
Here are three questions you’d want to answer first before setting up Quick Text in your org:
- What are your most common use cases?
This is a good time to identify who in your org needs Quick Text the most. Identify which scenarios agents spend the most time writing similar messages. These could be greeting messages in chat, closing emails upon case resolution, or even troubleshooting responses in simple cases.
- How will you organize your Quick Text content?
Quick Text entries will be stored in folders, so decide how you would like to structure them. You can classify Quick Text according to team, channel, intent, etc. Establish a naming convention that’s easy to follow.
- Who owns Quick Text creation and governance?
A big chunk of your team may need to use Quick Text, but not all of them should have the capability to create or edit Quick Text records, otherwise you risk your library becoming inconsistent, fast. Decide which roles would best manage and review your repository, and identify the few who will be allowed to. Take note that users with a Salesforce Platform user license cannot be given access to Quick Text.
- (Bonus) How will you measure success?
This isn’t required, but it’s worth considering how you will measure whether Quick Text is actually helping. It would be great if this small feature turns out to be a big win, and what better way to prove that than with data? You can start by looking at agent adoption and response times, but you may also want to track case handling time, case resolution time, and even CSAT (if you aren’t yet) to understand the broader impact of Quick Text on your support experience.
Setting Up Quick Text
Time to get started! Begin by enabling Quick Text in Setup.
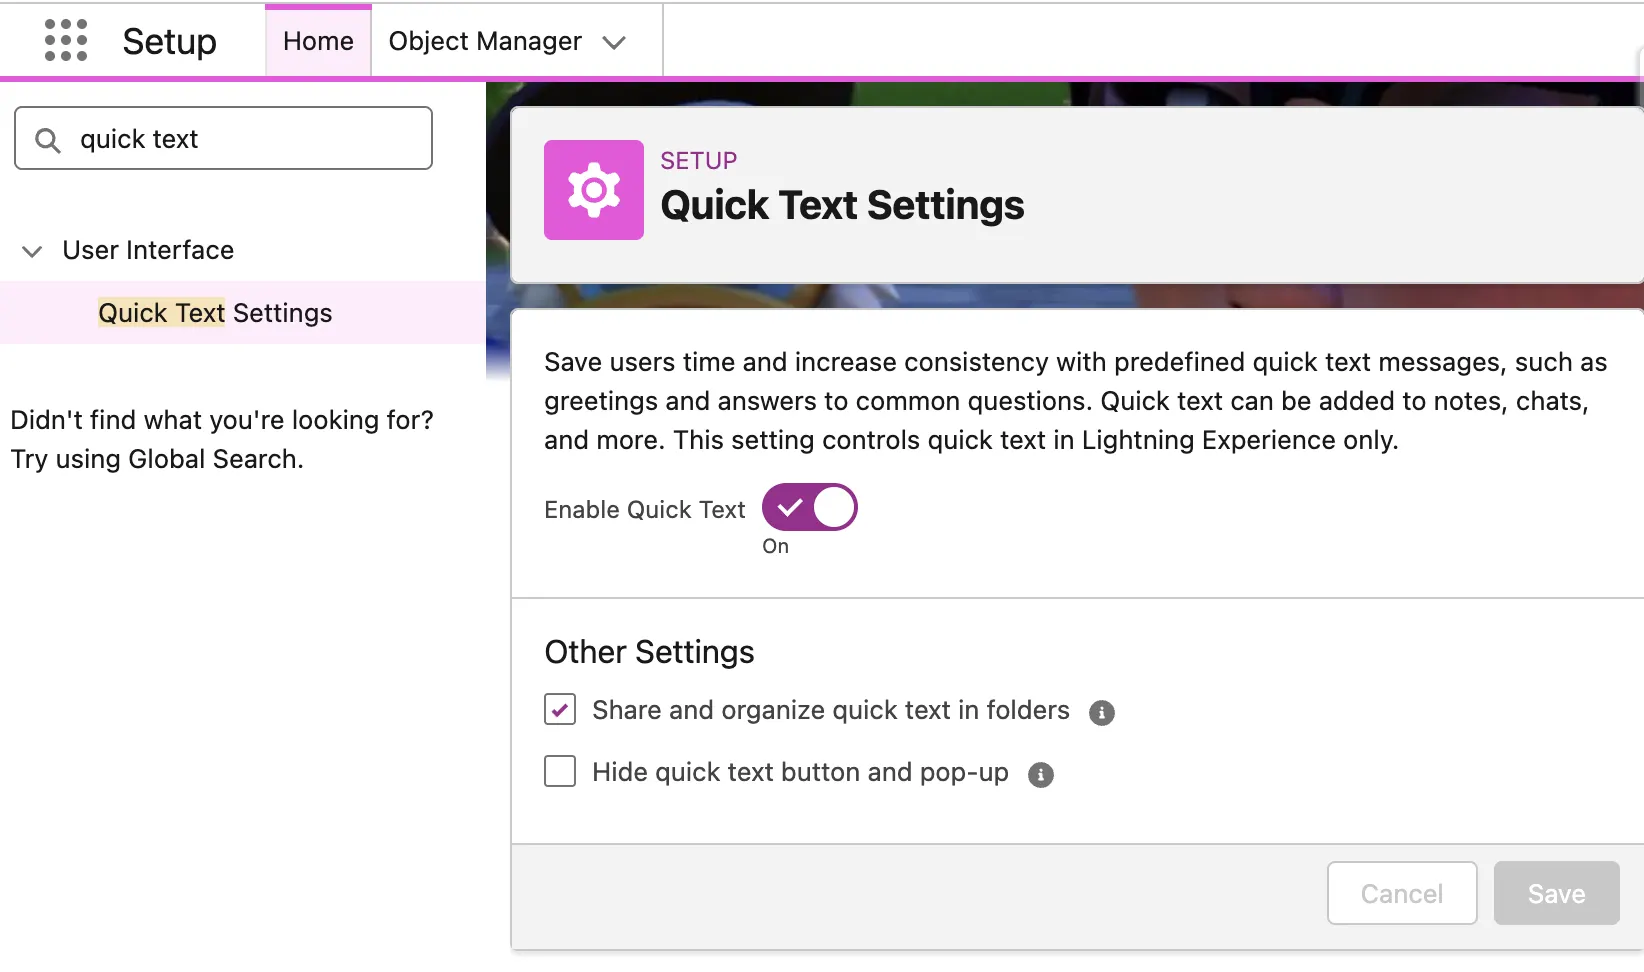
Toggle the switch on to enable. While you’re here, select “Share and organize quick text in folders” to make it easier to manage Quick Text entries at scale.
You’ll also see the option “Hide quick text button and pop-up”. If this is enabled, users won’t be able to see the Quick Text option in supported channels. In most cases, this should be left disabled so agents can start using Quick Text right away. That said, you can also choose to temporarily keep this enabled while you’re still building, organizing, or reviewing your Quick Text library. It’s a useful option to keep in mind if you want to get everything in place before making it available to agents.
Granting Permissions to Use Quick Text
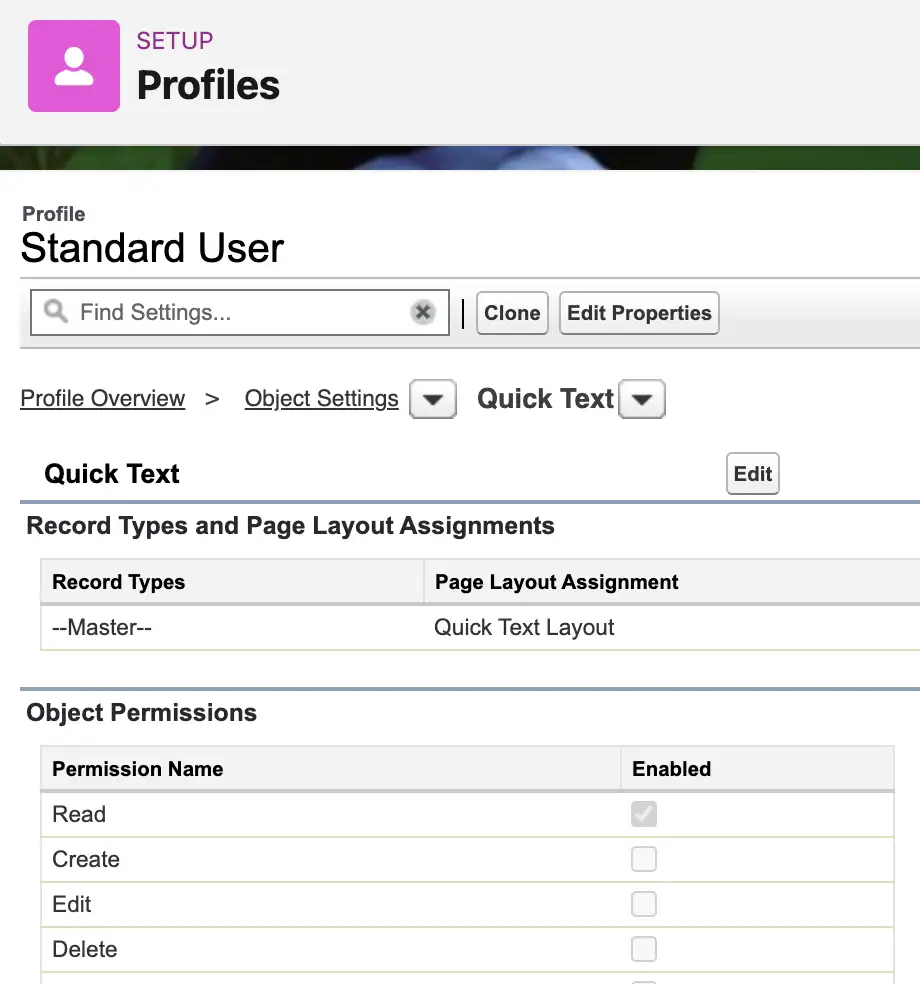
Getting users the capability to view and insert Quick Text messages into convos is pretty straightforward. In most cases, users only need the Read permission for Quick Text to start using it. Since this permission is typically granted to the majority of users, you may find that no additional setup is required, because for orgs created after Spring ’18, the Read permission on Quick Text is included by default on user profiles.
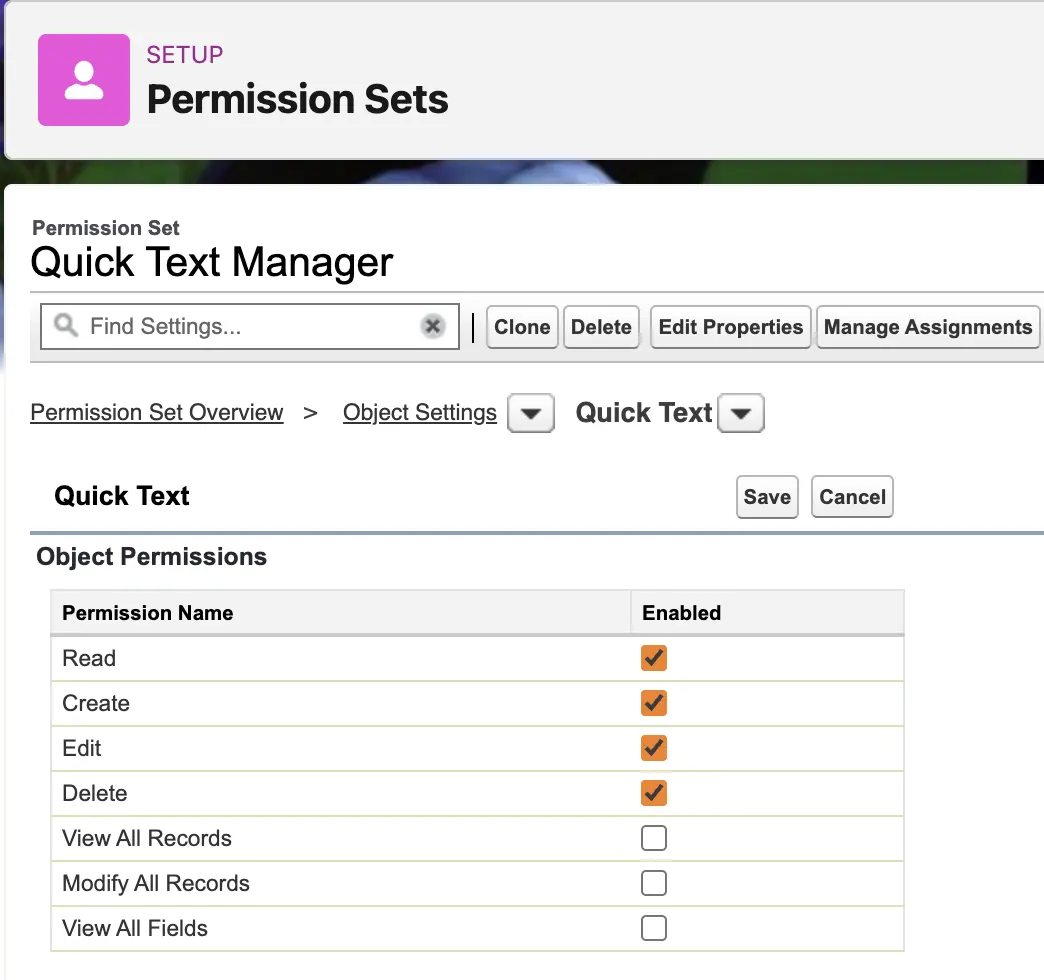
Remember when we answered Question 3 from our planning stage? Here’s where we give your chosen users the ability to manage Quick Text. Update their profile (or better yet, use a permission set) to grant them Create, Edit, and/or Delete permissions. Be mindful when assigning these permissions: the more users who can manage Quick Text, the harder it can be to maintain consistent and standardized company messaging.
Setting Up Quick Text Folders
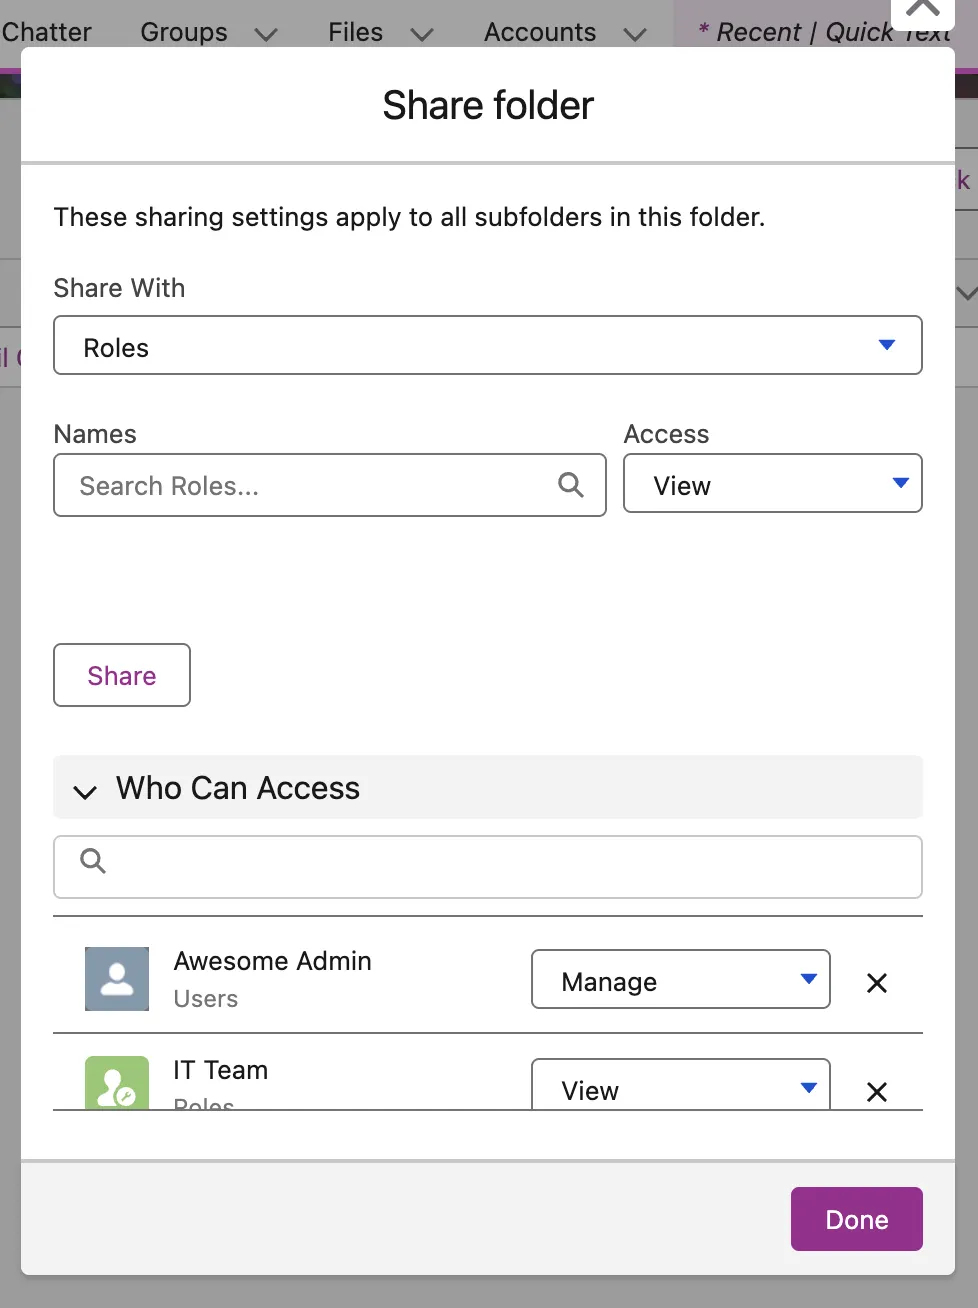
Building on Question 2 from the planning stage, it’s time to set up your Quick Text folders and assign them to the right users. From the App Launcher, navigate to Quick Text, then click New Folder to create your first folder. Create as many folders as you need to reflect how your team uses Quick Text. If your library starts to grow, you can also nest folders to keep messages organized and easy to find.
Share your folders with the appropriate users. This works similarly to folder sharing in reports and dashboards, where you can choose to share with users, roles, public groups, etc.
Creating Quick Text Entries
Creating a new Quick Text is as easy as clicking the New Quick Text button. Give it a name, its message body, and a category (you can add your own custom categories by adding a new picklist value to the Category field in Object Manager > Quick Text > Fields & Relationships).
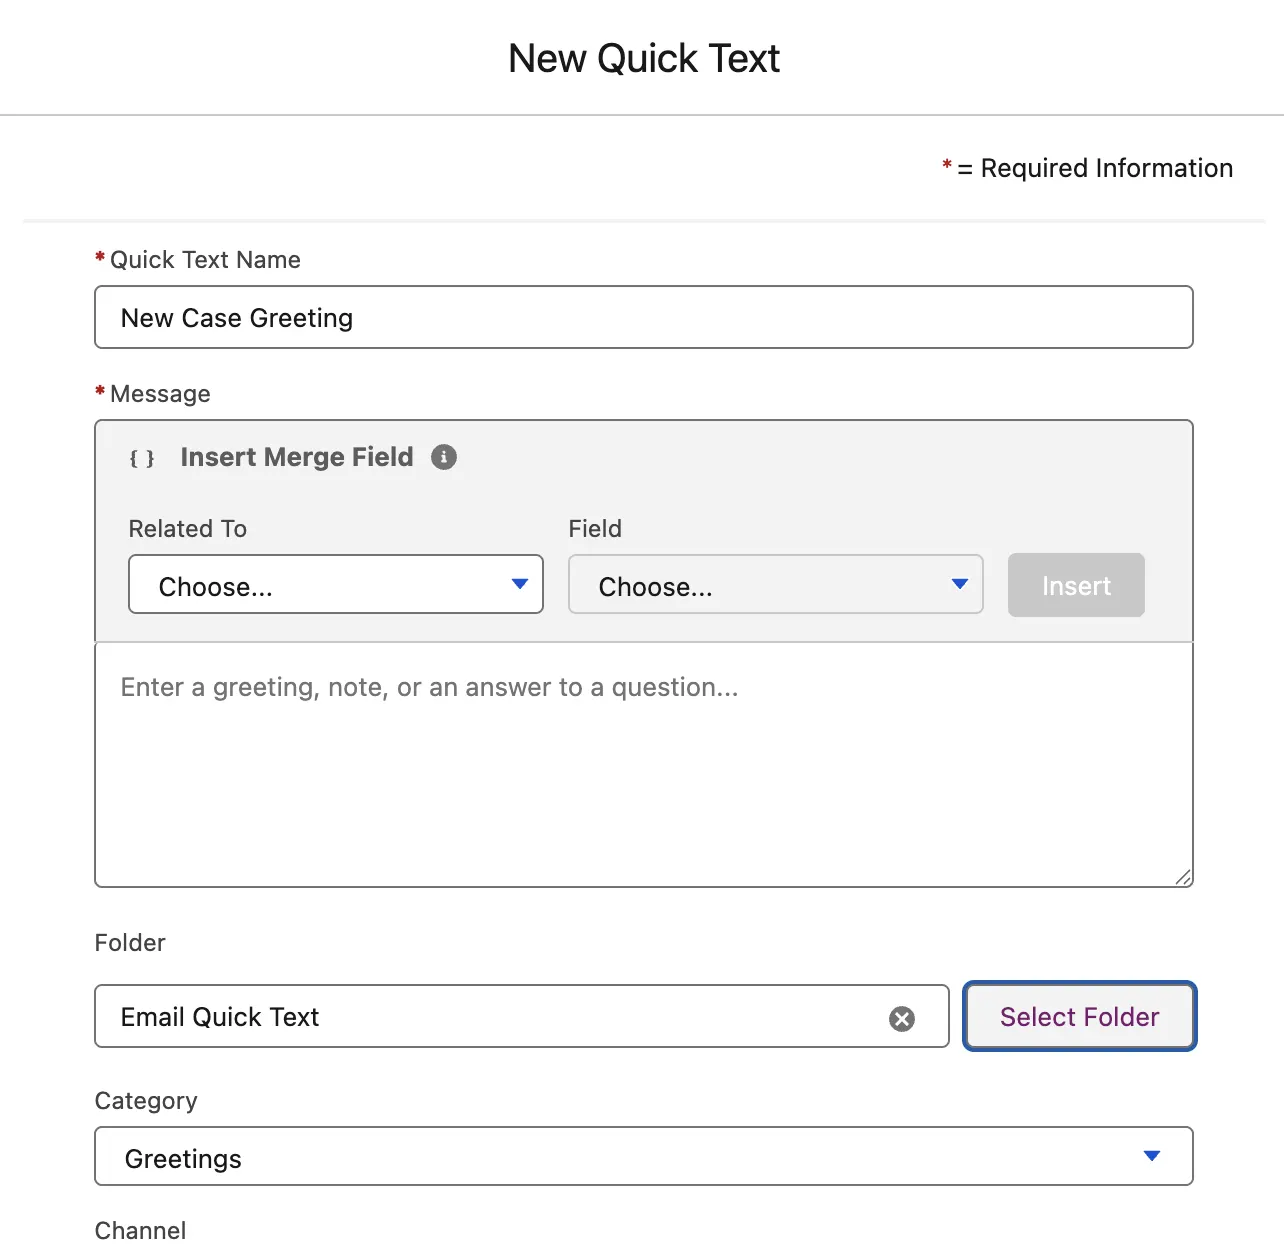
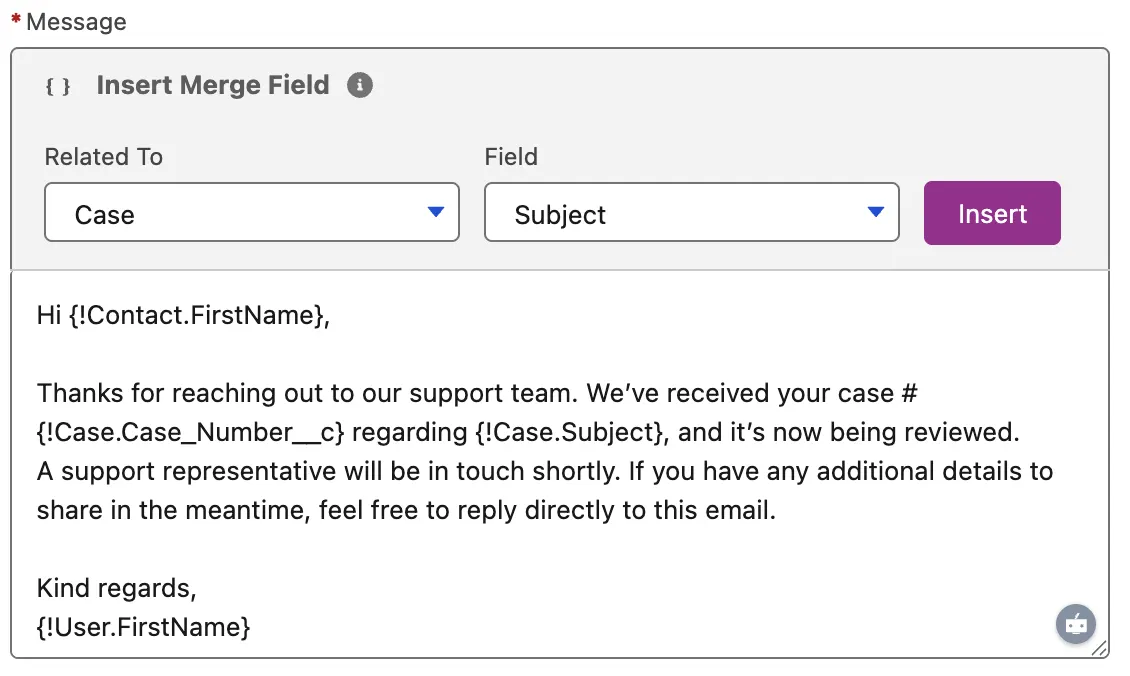
Your message body is not limited to plain text. You can insert merge fields as well. You can use the Preview button to review the message with data from actual records and confirm whether your merge fields are working as expected.
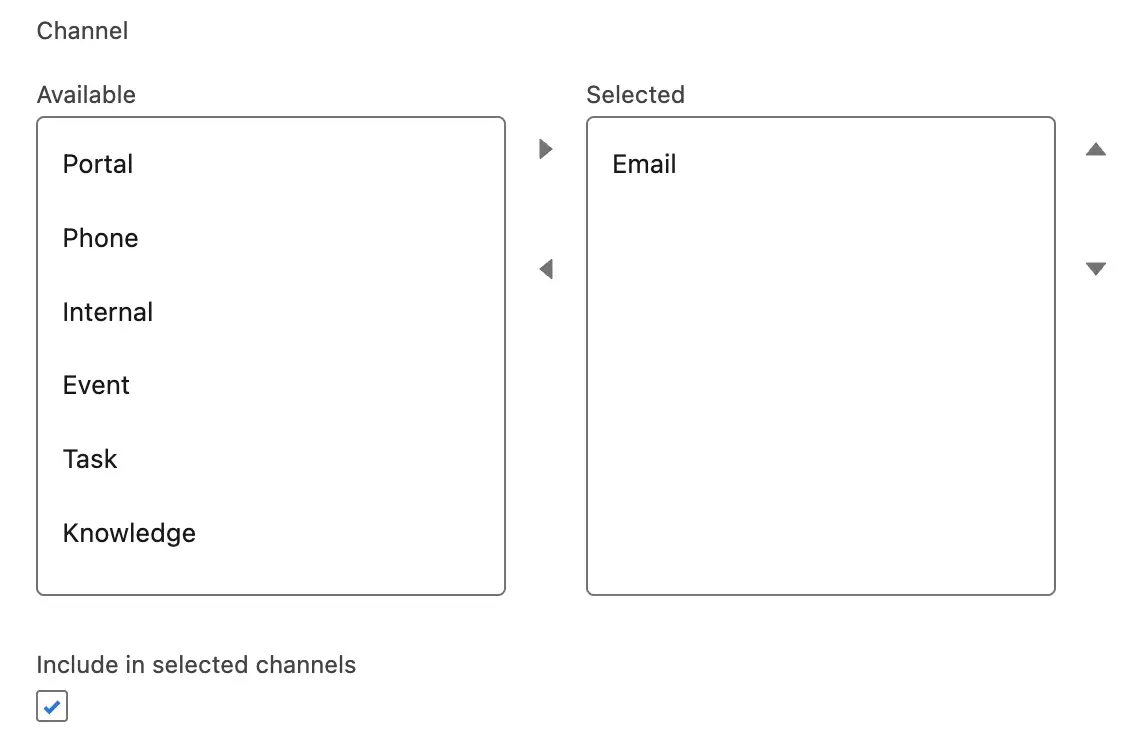
Next, select the channel where this Quick Text will be available, such as Email:
Hit Save, and you should be good to go! This is also the same process that your users with Quick Text governance access should go through when creating new Quick Text entries.
Using Quick Text
When on a supported channel, just click the Quick Text icon to pull up a list of Quick Text entries to use. We’ll be in the email composer from a Case record in this example:

Because the Quick Text icon is almost always the last one in every rich text composer, you may have to expand your toolbar first if you don’t see it the first time. I’ve seen users mention that this additional click can get troublesome, so you can also use keyboard shortcuts to pull up the Quick Text menu if you’re more comfortable with that!
Ctrl + . should do it for Windows, and Cmd + . for Mac.
Search for and click on your preferred Quick Text entry to add it to the email body.
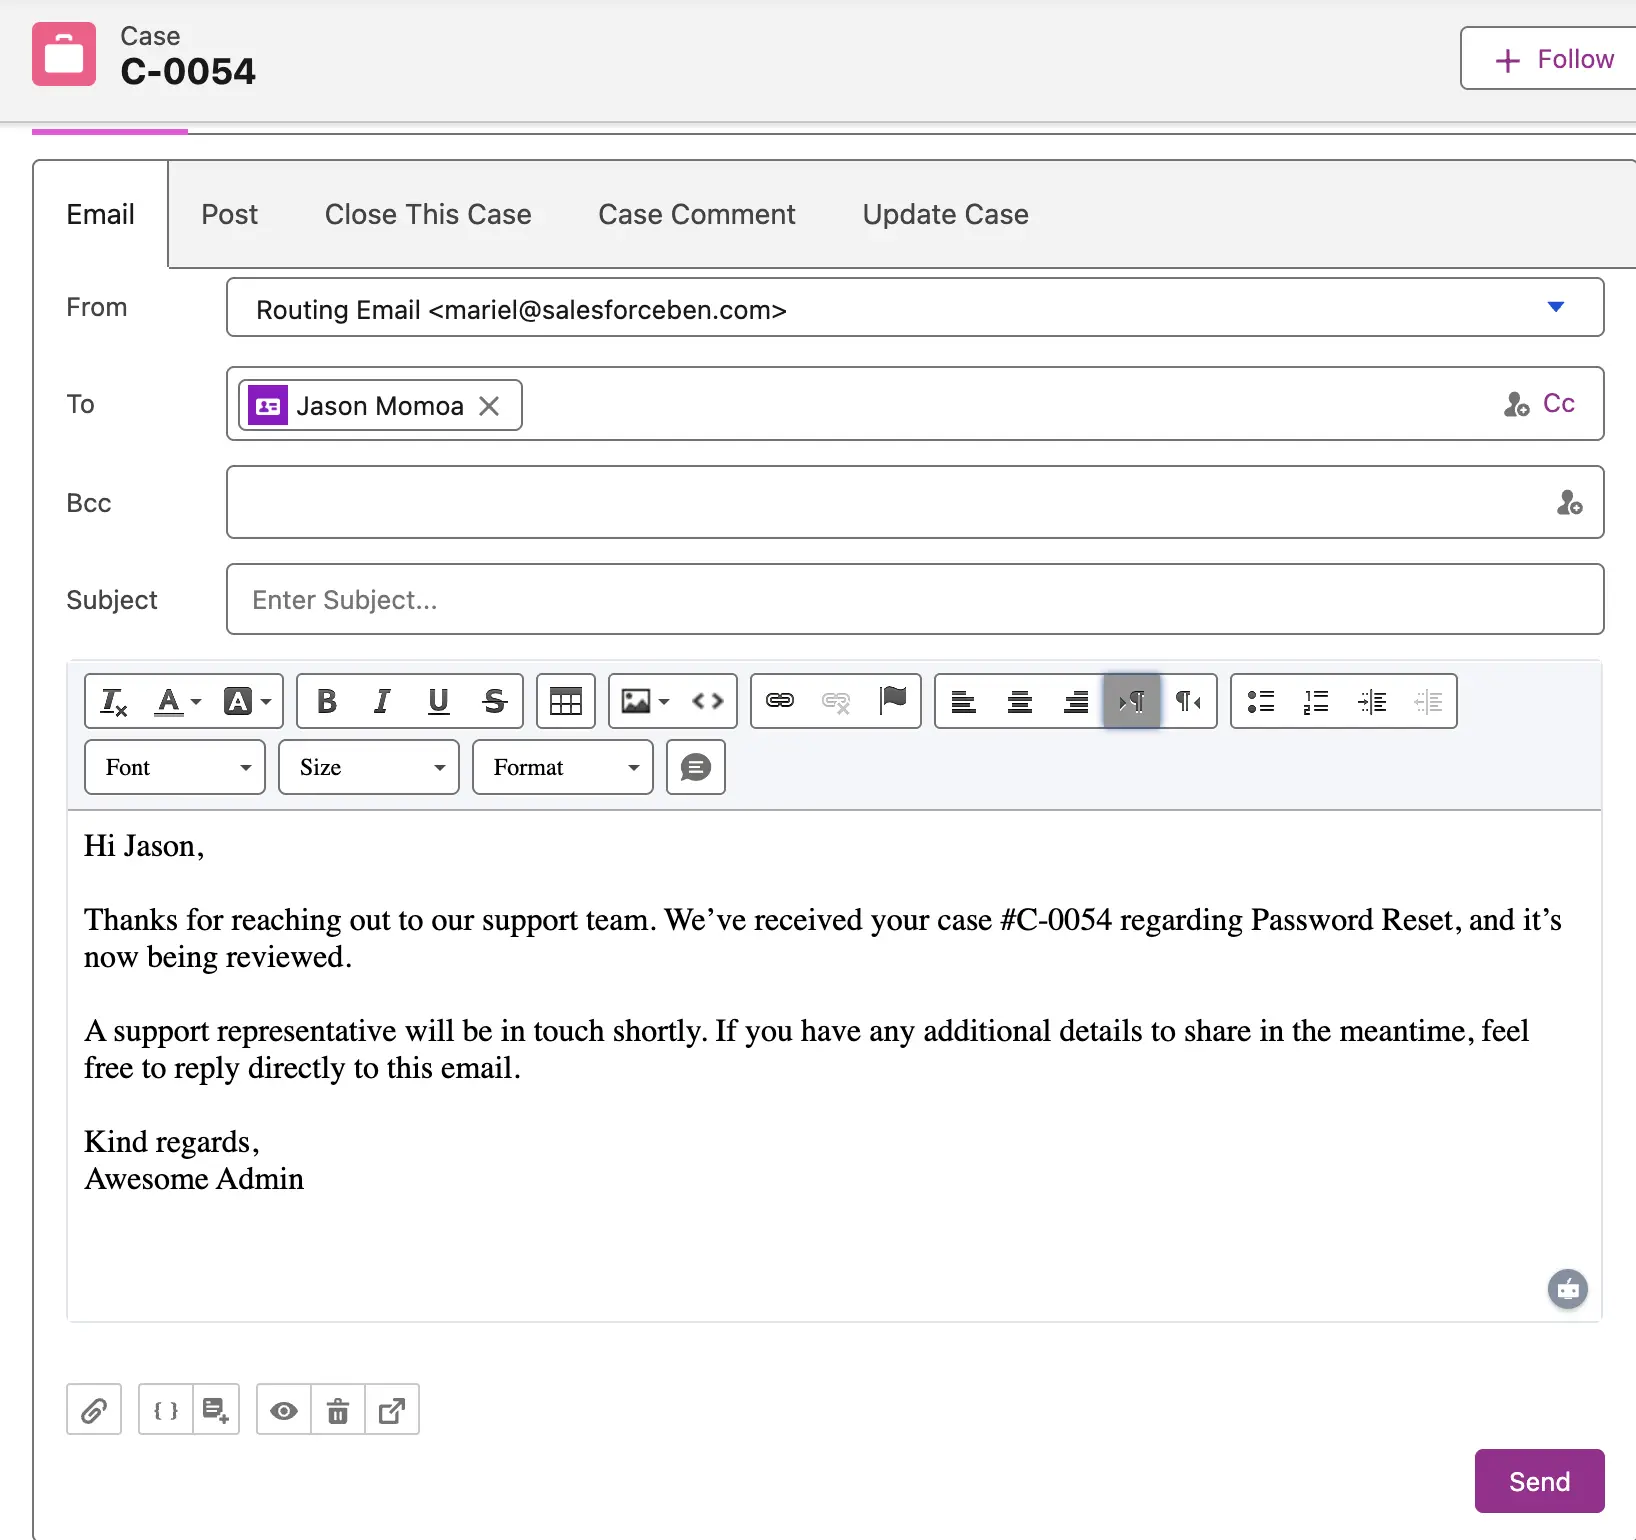
Check to see if all the merge fields have been filled out accurately, because when merge fields don’t apply to the record you’re currently working with, no error is shown. Instead, the merge field shows blank.
And that’s it!
Final Thoughts
Quick Text has been around for a long time in Salesforce, and while it’s easy to overlook and may seem like a small feature, it can make a noticeable difference when used thoughtfully. With a clear strategy, proper governance, and a well-organized library, Quick Text becomes more than just a convenience.
The mere reduction of repetitive typing is something I’m sure your support agents will thank you for. And because of the improved consistency, I’m sure your customers will, too.
If your org hasn’t fully embraced Quick Text yet, now’s a great time to revisit it and see where it can fit into your support workflows.


Comments: