






As a Salesforce Developer, React always caught my attention. Salesforce gives us a well-connected development world. We work with objects, fields, Flows, Apex, and Lightning Web Components, and all these tools come together on one platform.
React comes from the broader web-development world, so I was curious to understand how it works and where it could fit within Salesforce. I have tinkered with React in the past and realised that React was not completely different from what we already knew. It also focuses on building reusable parts of a screen, managing changing information, and creating smoother experiences for users.
The real breakthrough came when Salesforce introduced Multi-Framework (made generally available in July 2026). It gives customers a supported way to build React applications that run as part of Salesforce, instead of always hosting them externally and creating a custom connection back to the platform.
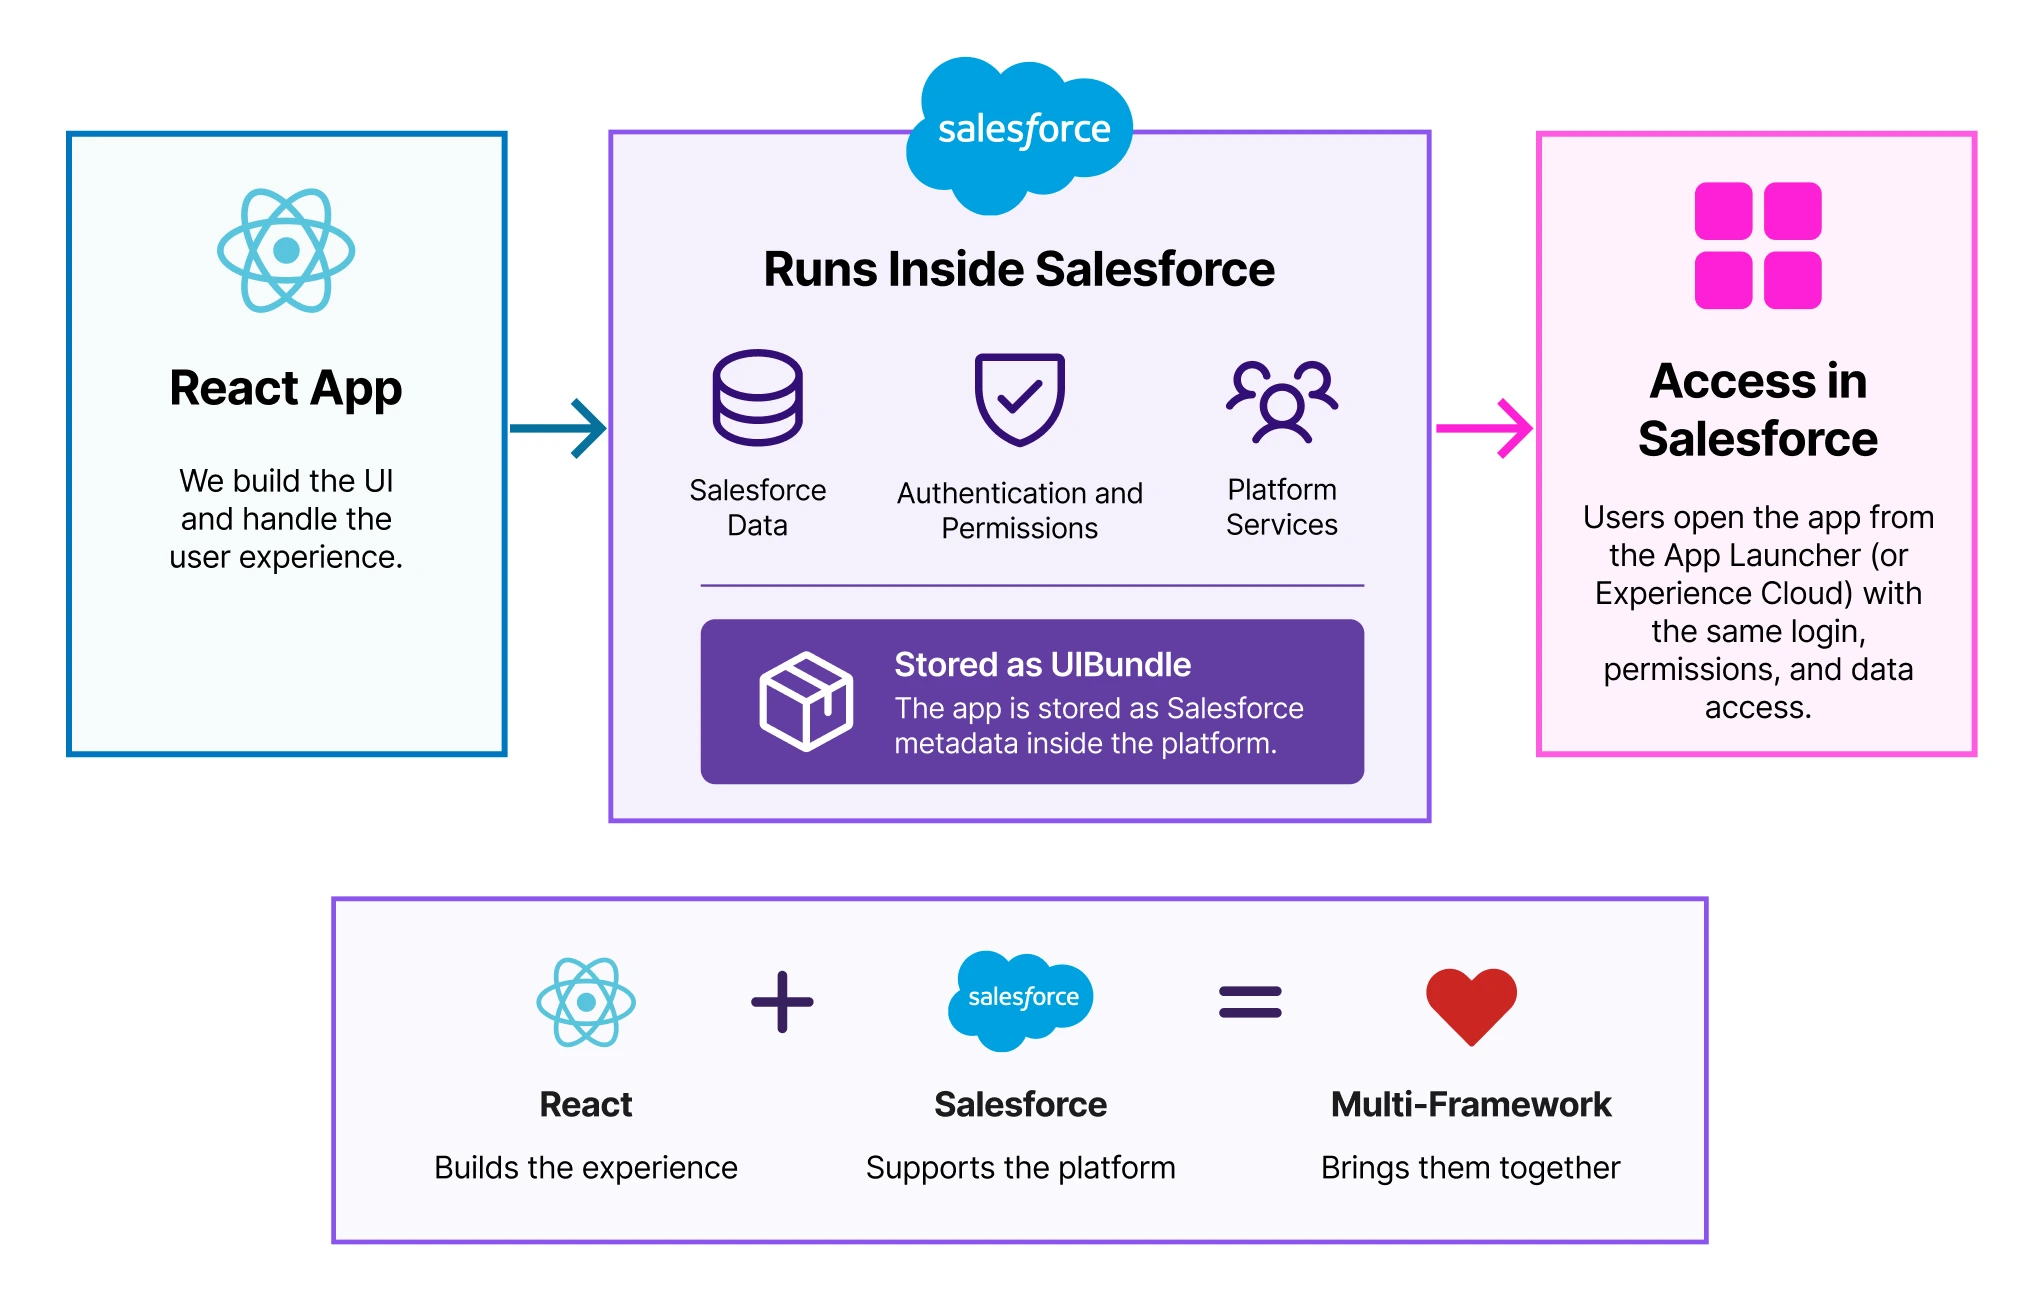
With Multi-Framework, React can focus on the experience users see, while Salesforce continues to manage the data, user access, and business processes behind it.
In simple terms:
- React builds the experience.
- Salesforce supports the application, sort of like a backend.
- Multi-Framework brings them together.
This blog is about that learning journey: what React is, what Salesforce Multi-Framework makes possible, where it may be useful, and what I learned while understanding how everything fits together.
Getting Comfortable With React
Before going deeper into Salesforce Multi-Framework, it helps to understand what React actually does.
React is used to build the parts of a website or application that people can see and interact with. This includes things such as search boxes, forms, menus, dashboards, buttons, cards, and lists that update as the user takes an action. Pretty much what we use Lightning Web Components for.
React allows developers to build each of these pieces separately and then bring them together to create the complete experience. These reusable pieces are called components. This idea should already feel familiar to Salesforce Developers, as it is a best practice to keep your Lightning Web Components-based app modular.
The tools and terminology may be different, but the basic idea is very similar to what we have been doing with Lightning Web Components.
This was one of the first things that made React feel more approachable to me. I did not need to forget the way I already understood Salesforce development. I only needed to see how React uses some of the same ideas in the broader web-development world.
And now, with Salesforce Multi-Framework, those two worlds feel much closer than before.
Multi-Framework Architecture and Project Artifacts
Apart from the old host-React-in-Visualforce trick, React applications have traditionally lived outside of Salesforce. Salesforce stored the customer data and business processes, while React handled the separate website or application. That setup was useful, but it required additional work to connect the two systems.
But that’s no longer going to be the case, all thanks to the Salesforce Multi-Framework. The simplest way to think about Salesforce Multi-Framework is that it gives a React application a proper home inside Salesforce.
Instead of hosting the app outside of Salesforce by creating a separate connection to manage authentication, the React application can now be stored as a UIBundle (metadata that stores the Multi-Framework, in our case, a React app), allowing it to run natively as a part of the platform.
React handles what the user sees and interacts with, while Salesforce continues to manage the data, login, and permissions behind it.
Building My First React Application
For this project, we will create an internal application called Account Explorer, an app that allows users to search an Account by name.
The goal of this exercise is not to explore every React feature, but rather to understand:
- You can create a React application,
- The React app interacts with Salesforce, and
- How it can be deployed.
Enable Multi-Framework
Multi-Framework is enabled by default and is only available if your org is on Hyperforce. If for some weird reason, you have to manually enable it, you can do so by searching for “React Development with Agentforce Vibes and Salesforce Multi-Framework” in Setup. Under the same settings page, you must also ensure that Salesforce App Domain is active.
Note: Salesforce uses the (new) App Domain to run employee-facing Multi-Framework applications.
Create Salesforce React Project in VS Code
This is where you can choose the path that feels most comfortable.
Option 1: Salesforce Extension Pack for VS Code
- Open the VS Code Command Palette and run: SFDX: Create Project
- From the available templates, select: React Internal App.
An internal app means that this app will be used by Salesforce users internally; in other words, for users who will log in to Salesforce to use it not on Experience Cloud. - Enter the project name and location when prompted.
This is what I would recommend if you’re just starting. And that’s because in addition to creating the Salesforce DX project and React application, it also creates the additional metadata (Custom Application and Permission Set). You will need this “additional” metadata if you want to access your React app in Salesforce. More on this later under the “Build and deploy the application” section.
Option 2: Salesforce CLI
For the “black screen” lovers, there is also a possibility to create the React app directly from the root of an existing Salesforce project using the following command.
sf template generate ui-bundle \
  --name AccountExplorer \
  --label "Account Explorer" \
  --template reactbasic
This command creates the AccountExplorer application under force-app/main/default/uiBundles.
Option 3: Agentforce Vibes
- Open Agentforce Vibes in VS Code and choose the option to create a new React application and select React Internal App.
- Give the application a name such as: Account Explorer
Agentforce Vibes creates the starting Salesforce and React structure for the application. It can also help with planning, scaffolding, Salesforce data access, and implementation through natural-language prompts.
This option certainly tops my least favorite options list for a bunch of different reasons, which I’ve listed towards the end of this article.
Note: The API version of the Salesforce project must be 67.0 (or higher) for Multi-Framework to work.
Glancing Through the SF Project and App Structure
my-react-project
└── force-app/
    └── main/
        └── default/
              └── uiBundles/
                    └── myapp/
                        ├── myapp.uibundle-meta.xml      # Salesforce metadata file
                        ├── ui-bundle.json               # React app configuration
                        ├── package.json                 # React app dependencies
                        ├── ... some other files         # TypeScript configuration
                        ├── src/                         # source folder for app’s code
                        │      ├── ...
                        └── dist/                        # Build output (generated)
├── sfdx-project.json                                    # SFDX project configuration
└── package.json                                         # Root workspace configuration
- <ReactAppName>.uibundle-meta.xml is the Salesforce metadata file. This file contains all the Salesforce-relevant configuration for the React app. The UIBundle metadata type represents a Salesforce Multi-Framework app, such as a React app.
- The UIBundle metadata type contains an attribute called target, which is used to specify where the app is supported. In other words, where/how can the app be exposed? To expose the app to internal users, the target value should be set to CustomApplication.
- dist folder in the React app contains the bundled and transpiled version of your React application that runs on the client (browser) side.
- There are now two package.json files, one in the root folder of the SF project and the other in the React app folder. Both are required, and both are different, so do not mix or confuse one with the other.
Building the React App
Let’s start with the easier option – to just vibe code your first React application using Agentforce Vibes.
Start with Plan Mode in Agentforce Vibes and describe what the application should do. For example, I used the following prompt.
Create an internal React application called Account Explorer using the Salesforce Multi-Framework.

The application should -

- Allow users to search for an Account (standard Salesforce object) by name.
- Show Account Name, Industry, Type, and Billing City of the searched account.
- Include loading, error, and empty states
- Use the current Salesforce Data SDK and GraphQL

You must ask before implementing anything that is not part of the specifications.
Review the plan and proceed with implementation if everything checks out – and that should give you your React app.
Then, of course, there is always the manual way to build your app rather than vibe coding it if you’re familiar with React.
Once your application is ready, it’s time to test it out. And this is where you might start to like React.
Preview the Application
Previewing or testing your application doesn’t require you to deploy your application to Salesforce. Rather, you can easily test it locally (yes, locally, unlike LWCs) with actual Salesforce data, meaning your application runs locally on your system (not on Salesforce) and can still fetch real data from Salesforce. Super cool, right? I know!
- Before doing anything else, you must install all the “dependencies” you have in your React app. To do so, go to the root folder of your React app in your terminal. So the current folder path in your terminal should look something like:
<sf-project-name>/force-app/main/default/uiBundles/<react-app-name>/ - Next, run the
npm installcommand. This will install the dependencies. - On to the testing part then! The easiest way to get started is to run this command in your VS Code terminal. The command must run from the Salesforce project root.
sf ui-bundle dev --name AccountExplorer --open
This starts the local React development environment and connects it to the authorized Salesforce org.
You can also preview your app using Agentforce Vibes using the Live Preview from the Agentforce Vibes extension. I tried, but it didn’t work. A good few minutes wasted thanks to Agentforce Vibes.
There is yet another way to run the app locally. This one would sound familiar to those with some experience in Web development. And that’s running the npm run dev command in the root of the React app folder. So you can think of the sf ui-bundle dev command as a wrapper around npm run dev.
Note: If you run this command in the SF project’s root, (most likely) nothing will happen.
Behind the “Preview” Scenes
What actually happens when you run your React app is rather simple. Running the npm run dev command starts the local development server, allowing you to open your app in the browser. Once the user opens the app and searches for an Account record:
- A GraphQL query request is sent to Salesforce using Salesforce’s platform-sdk npm package.
- The platform-sdk package handles authentication, security, making a request to Salesforce, and fetching the results.
- The result of the API requests is returned to the React app, and consequently displayed to the user.
Once you’re through with the testing, it’s time to deploy the app.
Build and Deploy the Application
Deploying your React app directly to Salesforce will not work – your deployment will be successful, but the app will not work in Salesforce.
As a prerequisite for deploying a React app to Salesforce, you must build the app first.
To do so, from the root of the React app folder, run the following command in your terminal.
npm run build
This command creates the final browser-ready files, which you can access in the dist folder.
Your React app (UIBundle) is now ready to be deployed. BUT! Yes, but…
To access your app, in our case, for an internal application, along with the app’s UIBundle, Salesforce needs additional metadata to expose the app to the users:
- Custom Application: To make the bundle accessible, you also need a Custom Application that references it. The Custom Application metadata ties your UI Bundle to the App Launcher. The Custom Application metadata type contains an attribute uiBundle. This attribute should reference the name of the React app along with the correct namespace. So in our case, the metadata file of the custom application will have
<uiBundle>c__AccountExplorer<uiBundle/>. - Note: You cannot create a CustomApplication referencing a React app from the App Manager UI, rather only via Metadata API.
- Permission Set to grant access to the Custom Application.
Once you have all the pieces ready, you can deploy everything straight away. Post-deployment, make sure to grant the user access to the Custom Application. You should be able to access your Custom Application from the App launcher.
How Does React Code Feel Compared to LWC?
React may look unfamiliar at first, but many of the ideas are already familiar to Salesforce Developers. Rather than comparing everything at once, here are a few places where I noticed the difference most clearly.
Managing State
In React, changing values are commonly managed using useState. For example:
const [searchText, setSearchText] = useState('');

function handleSearchChange(event) {
  setSearchText(event.target.value);
}
Here, searchText stores the current value, while setSearchText updates it.
In LWC, the same idea is usually simpler because the value can be stored directly on the component:
searchText = '';

handleSearchChange(event) {
    this.searchText = event.target.value;
}
So the purpose is the same. React simply has its own way of managing changing values through hooks.
Building the UI
In React, the UI is commonly written directly inside the component using JSX. This is analogous to the .html file in an LWC. React can use standard HTML elements as well as reusable React component libraries.
Retrieving Salesforce Data
For a Multi-Framework React application, Salesforce data is commonly retrieved using the Salesforce Data SDK with GraphQL. Conceptually, it looks like:
const result = await sdk.graphql.query({
  query: ACCOUNT_QUERY
});
In LWC, we have more Salesforce-native options depending on the requirement, such as:
- Lightning Data Service
@wire- GraphQL
- Apex
With LWC, we are accustomed to choosing from several Salesforce data-access patterns. With Multi-Framework React, the Data SDK and GraphQL become the main path for working with Salesforce data.
Organizing the Files
React components commonly keep their logic and UI together in a .tsx file, with styling stored separately when needed.
LWC usually separates the component into:
- JavaScript
- HTML
- CSS
- Metadata
Neither approach is necessarily better. It is simply a different way of organizing the same application responsibilities.
For me, once these few differences became clear, React started feeling much less foreign. The concepts were already familiar from LWC – the syntax and structure were simply different.
Lessons Learned
I learned a lot actually! Remember me saying using Agentforce Vibes was my least favorite option? So let me start by ranting about Agentforce Vibes. Fun fact: this is my very first time using Agentforce Vibes.
- If you have used Agentforce Vibes, you may know it requires an SF Project, an SF VS Code extensions pack, and an authenticated org to be able to work with. So after completing the previously mentioned prerequisites, I clicked on the + New Project button and selected React App → Create a project (Internal User App). This ends up creating an entirely new Salesforce project. So it’s a bit funky and silly how it’s designed to work.
- If you plan to try Agentforce Vibes, use an Agentforce-enabled org. You can sign up for one here.
- If you’re interested in learning React, then using Agentforce Vibes to vibe code your React app would be the worst possible way to learn.
- I tried to vibe code the app, but the app was not able to successfully make requests to Salesforce. Troubleshooting the problem didn’t get me anywhere close to solving it. Interestingly, creating the app with CLI worked fine.
- Agentforce Vibes is terribly slow. I use Cursor and Claude Code, and I’ve never felt my laptop lag. However, with Agentforce Vibes, my laptop died while vibe coding a simple React app.
My overall impression of Agentforce Vibes is that I do not want to use it ever again.
More Findings and Thoughts
As we just learned, to expose the React app internally, we must use CustomApplication. So, at least at the moment, it seems React apps are supposed to be standalone (and most likely complex) single-page applications.
In my opinion, this really limits the use cases for using React in Salesforce implementations. I’d like to use React apps as we use Lightning Web Components, i.e., not just limiting the exposure of React apps to a CustomApplication.
A React app that works locally doesn’t mean it will deploy successfully or work as expected in Salesforce.
A couple of instances, for example:
- My React app worked fine locally even when my Project’s API version was 66.0.
- CSPs: Every external domain (fonts, CDNs, externally hosted images, etc.) is blocked at runtime unless you create a cspTrustedSite metadata for each. Also, every subdomain needs its own entry, HTTPS only, no wildcards.
On to some more additional findings and thoughts:
- At the moment, there is no UI in Setup to view your React applications.
- As suggested here in the documentation, using
reactinternalappas a template in a CLI command results in an error. The documentation is not accurate. That value is not available even in the CLI documentation. I felt the documentation overall is a bit scattered. - It’s worth mentioning again that in your SF project, there will be two package.json files; one for the SF project that stays in the root of the project and the other for the React app, which is in the root of the React app folder (force-app/main/default/uiBundles/<name>). So running the
npm run devcommand in the SF Project root will not do anything. npm run testcommand fails even with an empty React application, even though the application previews perfectly.- Multi-Framework is now available only on Hyperforce orgs.
Final Thoughts
Going into this, I wanted to understand where React fits in the Salesforce world. After building, previewing, and deploying an actual React app, my biggest takeaway is that React itself isn’t as foreign to a Salesforce Developer as it might initially seem. A lot of the concepts are already familiar from LWC – it’s mostly the tools, syntax, and application structure that change.
Multi-Framework is still young, though. There are some rough edges and limitations in tooling, documentation, and how React apps can currently be exposed in Salesforce.
But the roadmap already looks very promising. I am really looking forward to Microfrontends, something that will allow externally hosted React components to live alongside LWCs. In addition, Angular support, Managed packages support, and App Management via UI are also part of the roadmap.
With Angular support on the roadmap, one can infer that Multi-Framework isn’t only to build React apps. React is only the beginning. Potentially, it gives Salesforce Developers a way to build experiences using any standardized web framework without leaving the Salesforce platform behind.