

Slack is one of the most popular business collaboration platforms globally. When Salesforce acquired Slack, their largest purchase to date, it sparked the interest of many professionals in the industry (if you’re wondering why, this community-sourced Slack to Salesforce wishlist speaks volumes).
You can integrate Pardot with Slack using the Account Engagement for Slack app. Compared to the existing Notify user completion actions, Notify Slack channel allows admins to customize the message that appears in the Slack channel. Plus, being a channel, more than one user can rally around (‘swarm’) the message, and collaborate on a plan of action.
You may be familiar with the previous Slack/Pardot app, which was launched in beta. The beta app has been replaced with a new version that centralizes Slack app configuration (i.e. alongside Sales Cloud, Service Cloud, CRM Analytics).
This guide walks you through the setup steps (with images) and explains how you can take advantage of the connection.
What Does the Pardot (Account Engagement) to Slack Connector Do?
With the Account Engagement Slack app installed, you can set notifications to send from Pardot (Account Engagement) to Slack channels when a prospect interacts with a marketing asset. This type of Account Engagement automation is known as completion actions, and can be set on forms, form handlers, list emails, files, custom redirects, and page actions.
Notify Slack channel appears as a new completion action option from the dropdown:
- Workspaces and channels limits: You can connect one Slack workspace, and up to 10 channels.
- Character limits: Each custom message can have up to 3,000 characters, including the field values automatically populated with Account Engagement data.
- Lightning app only: You must use the Account Engagement Lightning app, plus have a verified Salesforce connector.
View all considerations here.
How to Integrate Pardot (Account Engagement) and Slack
Step 1: Enable Salesforce for Slack Integrations
Regardless of whether you’re new to connecting this B2B marketing app to Slack, or if you dabbled with the beta Pardot-Slack connector, there are steps everyone must complete.
Note: You will need Salesforce Administrator permissions to do this part. It’s not available via Marketing Setup, however, ask your Salesforce Admin because they may have already ticked these items off for you.
1. In Salesforce Setup, search for Slack in the Quick Find box → Initial Slack Setup.

2. Follow the guided setup steps. For the purposes of this tutorial, I didn’t enable any of the other Slack apps (i.e. Sales Cloud, Service Cloud, CRM Analytics) and we will cover permissions shortly.
3. On Step 5, I chose the Record Detail Security, “Show Record Name and Object Type” and the Unfurling Option, “Object Type and Preview Button”.
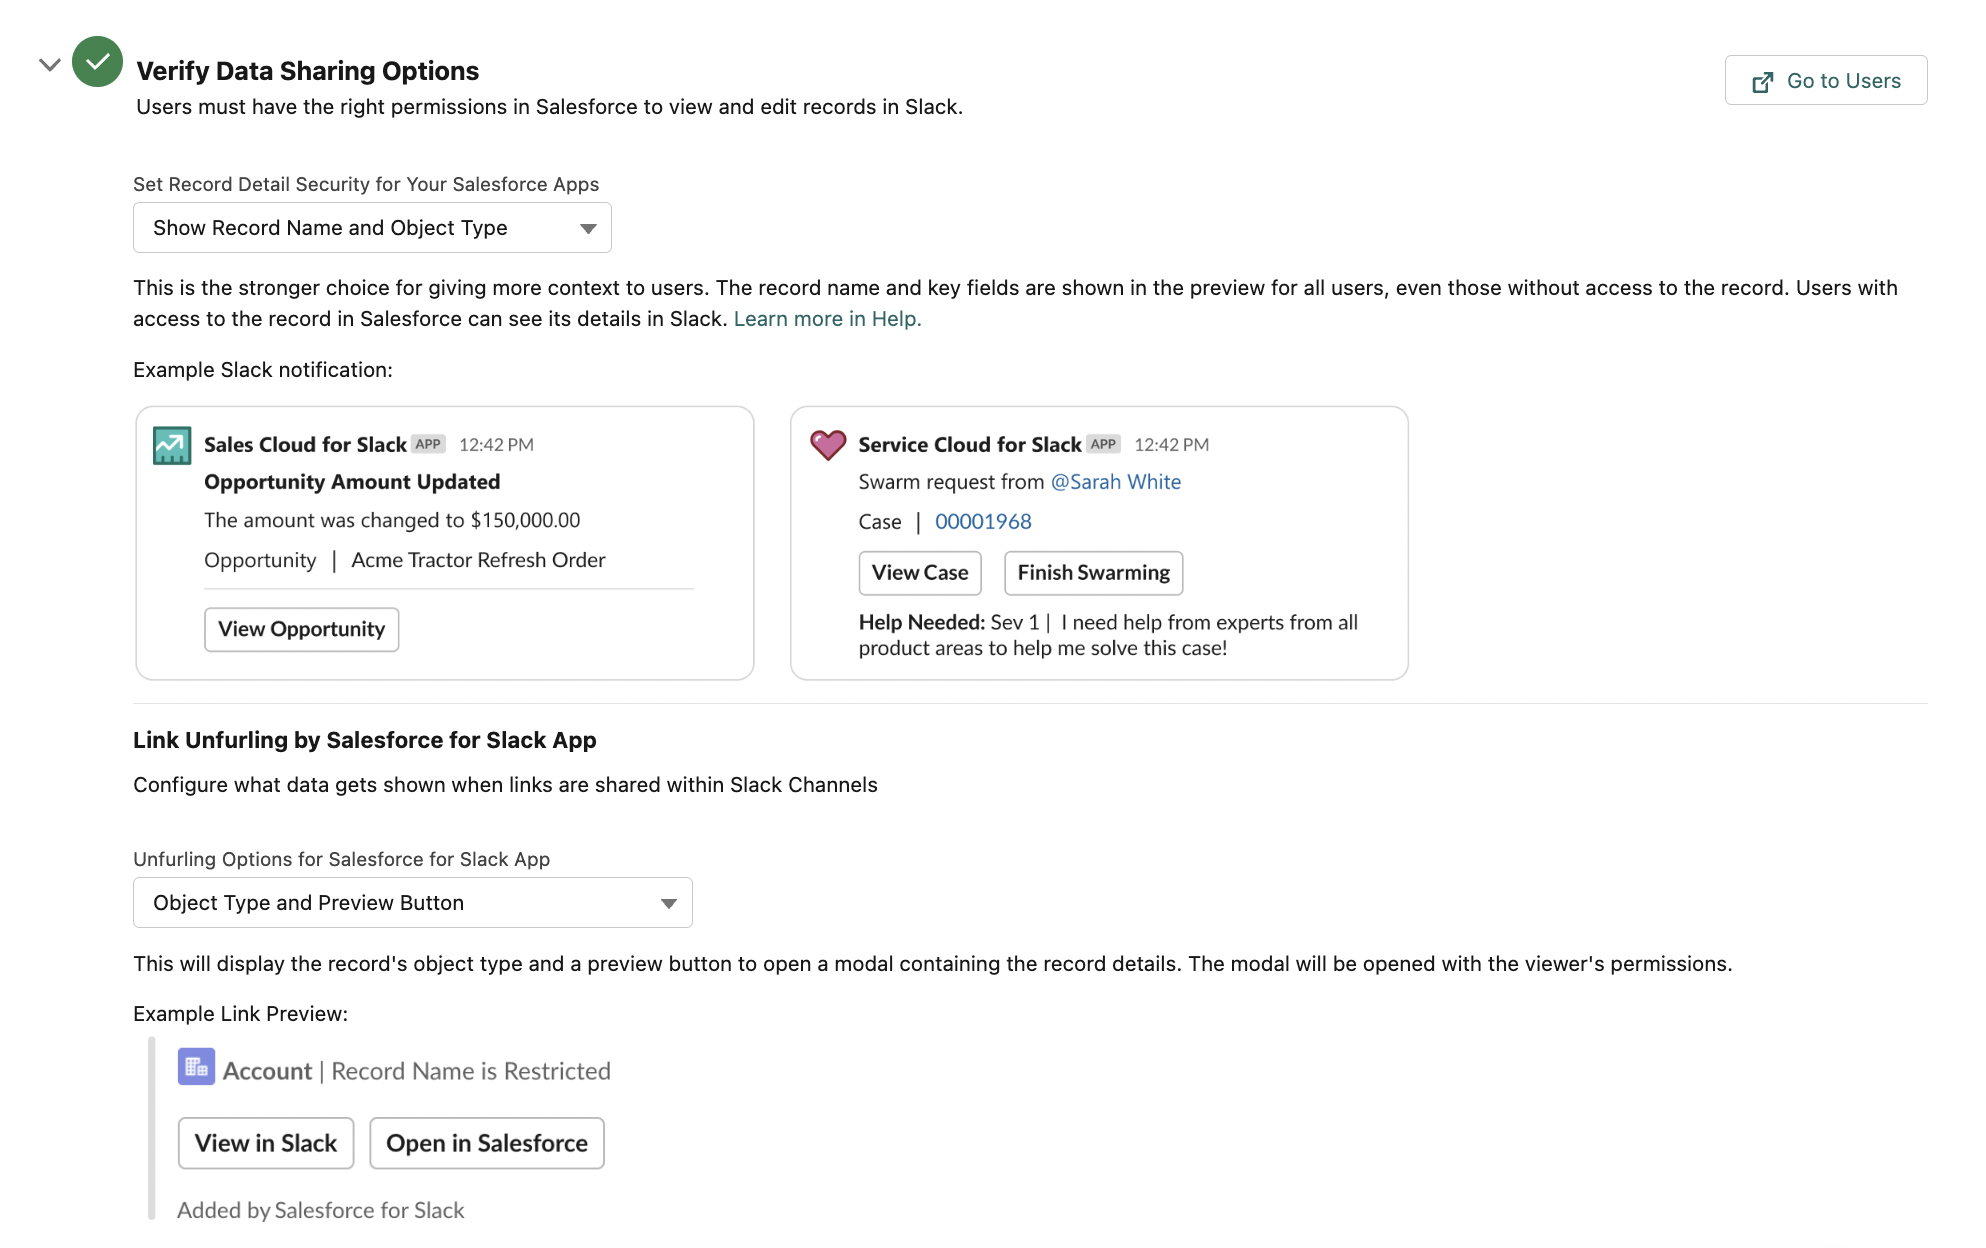
After following the guided setup steps, you will have green ticks under steps 1-8.
Step 2: Slack Connector Permissions
You will have noticed that the permissions information was relating to Sales Cloud, Service Cloud, CRM Analytics. This is where I got confused, as I didn’t want to enable these apps. Therefore, I created a permission set for this specific purpose.
1. In Salesforce Setup, search for permissions in the Quick Find box → Permission Sets.
2. Give the permission set a name, and a description so that anyone can understand its purpose. This is what I used: “Contains the Connect Salesforce with Slack system permission. Each Slack user, including the Slack workspace owner that adds apps in Slack, must be assigned this permission.”

3. On the next screen, scroll down and click System Permissions.

4. Click Edit → select Connect Salesforce with Slack → click Save.
5. Click Manage Assignments → Add Assignment. Select the users you want, including the Slack workspace owner that adds apps in Slack. Click Next → keep “No expiration date” → Assign → Done.

Step 3: Install Account Engagement for Slack
1. Open the Account Engagement for Slack listing in the Slack App Directory. Ensure you have the correct workspace selected before you click Add to Slack.

2. Click Allow, then Connect, and log in with your credentials. Click Allow again. Wait a few seconds to be forwarded to the app in Slack.

Step 4: Add the Connector in Account Engagement Settings
1. In the Account Engagement app, go to: Account Engagement Settings → Connectors. Click the Add Connector button.

2. Select Slack from the connector menu page.

3. If you’re new to the Slack connector (i.e. you didn’t use the beta version), install the app. If you used the beta version, you see the button to upgrade. This preserves any completion actions you already had set up during the beta program.

Step 5: Add Slack Channels
1. On the Channels sub-tab → click Add Channel.

2. Go to Slack and check that the channel you want to add to Account Engagement is public and not read-only. You can do this by viewing the channel setting (click on the dropdown arrow by the channel name) → Settings sub-tab. If you see the option to “Change to a private channel” that means that your channel is currently public.

3. In the Slack app, right-click your channel name where it appears in the sidebar → select Copy Link. Paste the link into the Account Engagement app → Verify.


Now, when you go to an asset where completion actions can be set, e.g. a form, you will see the Notify Slack channel action.
Create Slack Notifications in Account Engagement (Pardot)
Slack notification completion actions are available for:
- Forms & form handlers
- List emails
- Files
- Custom redirects
- Page actions
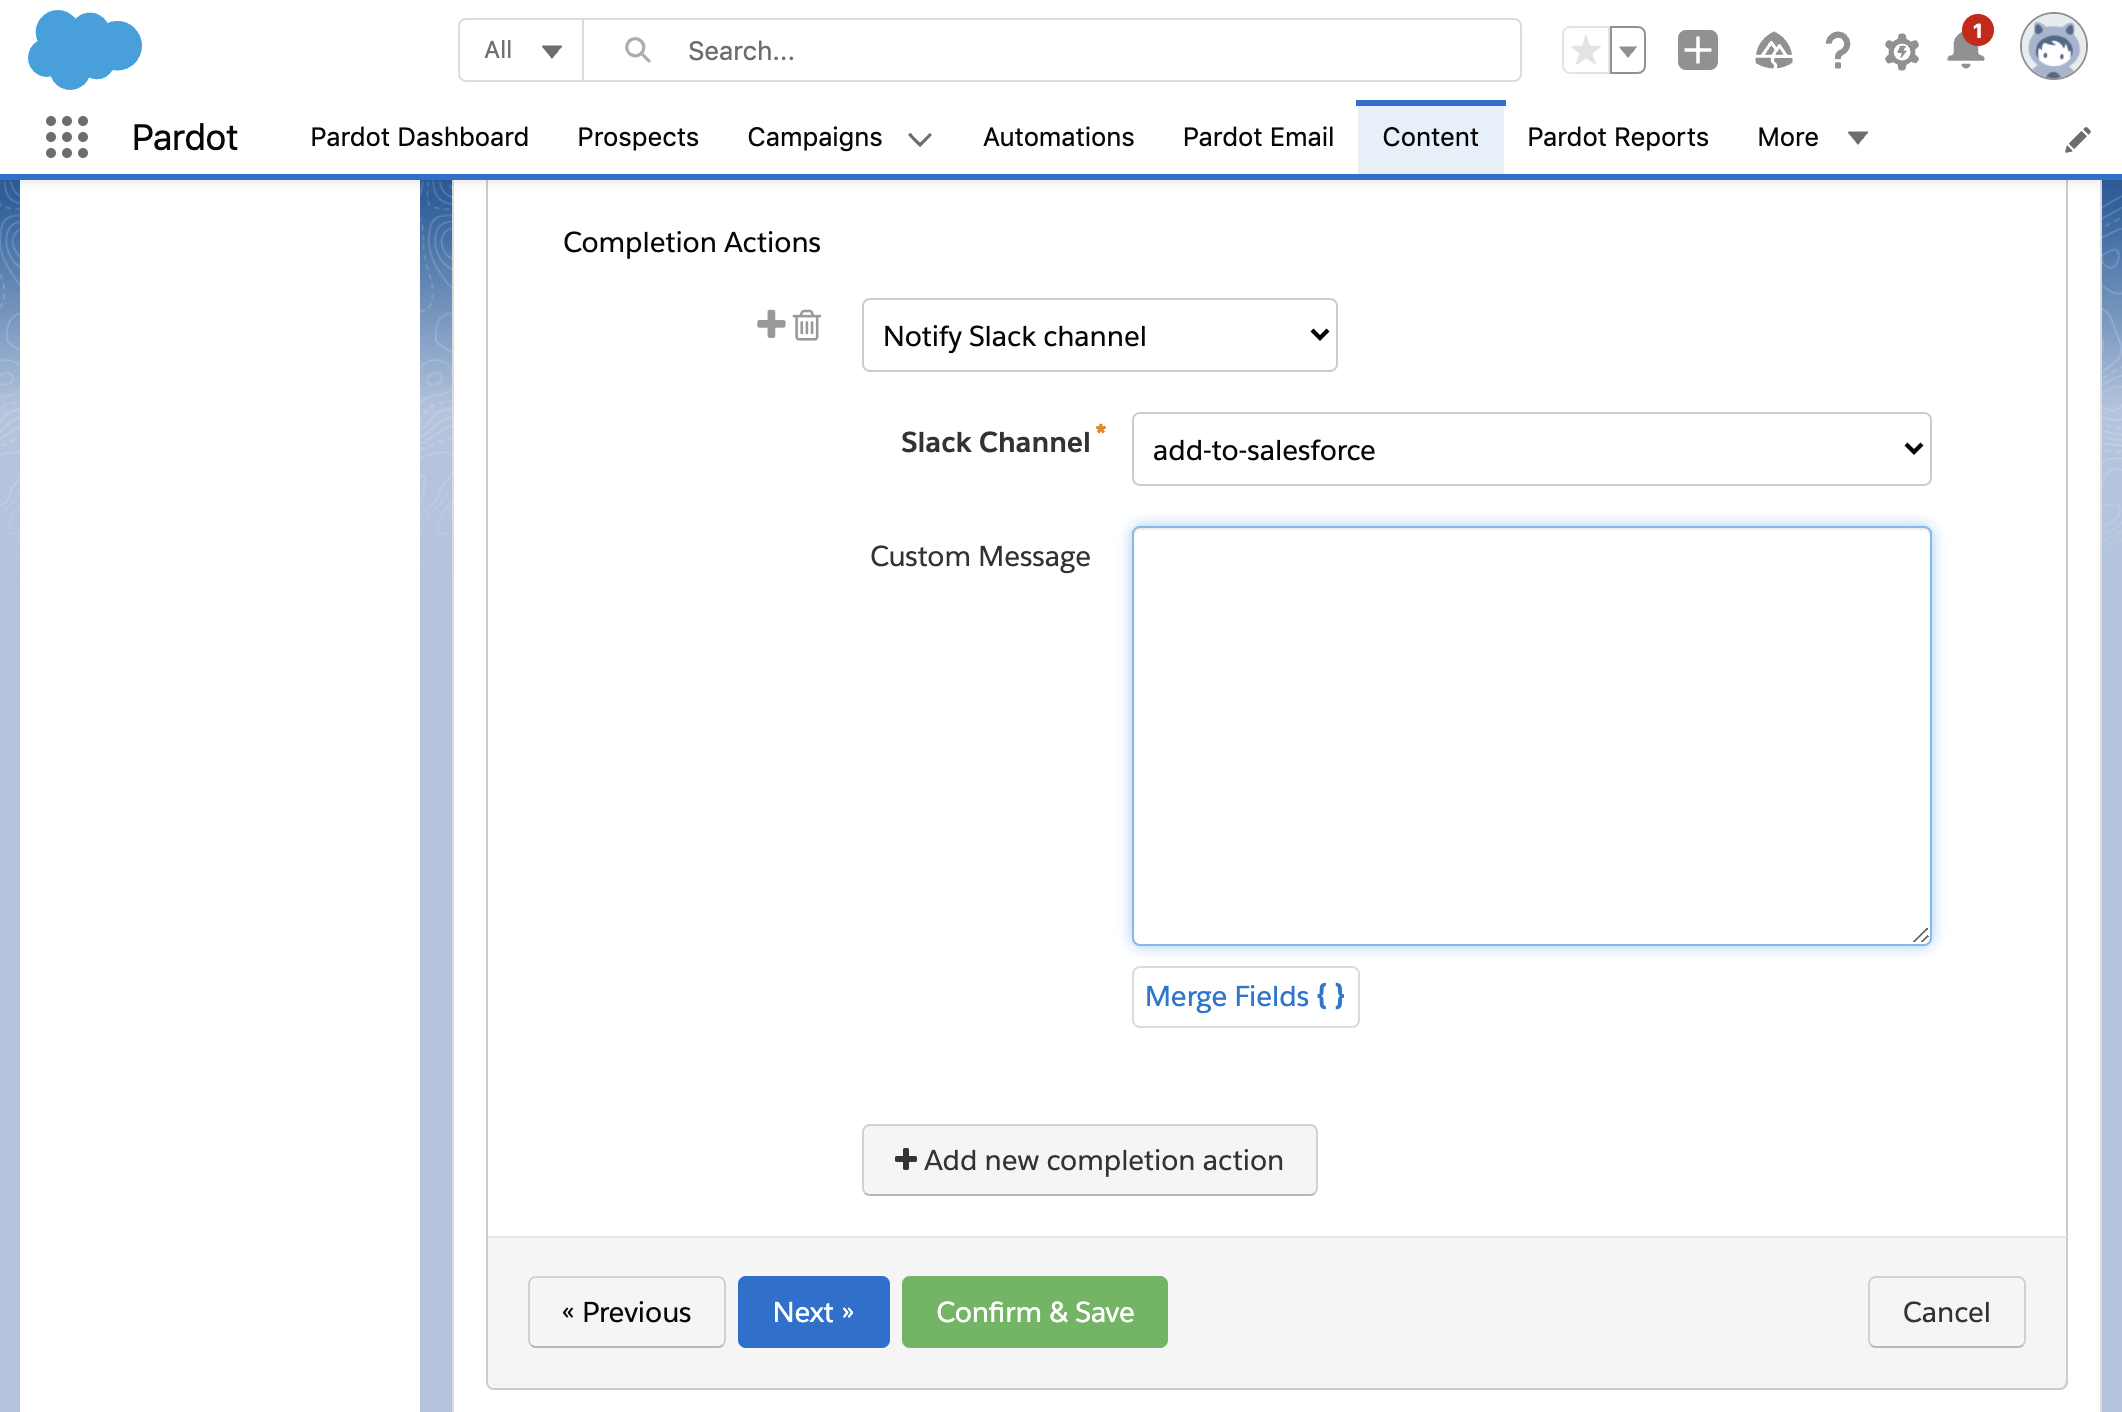
I’ve opened up a Pardot form (Completion Actions step) where I am going to create a notification to fire each time the form is submitted.
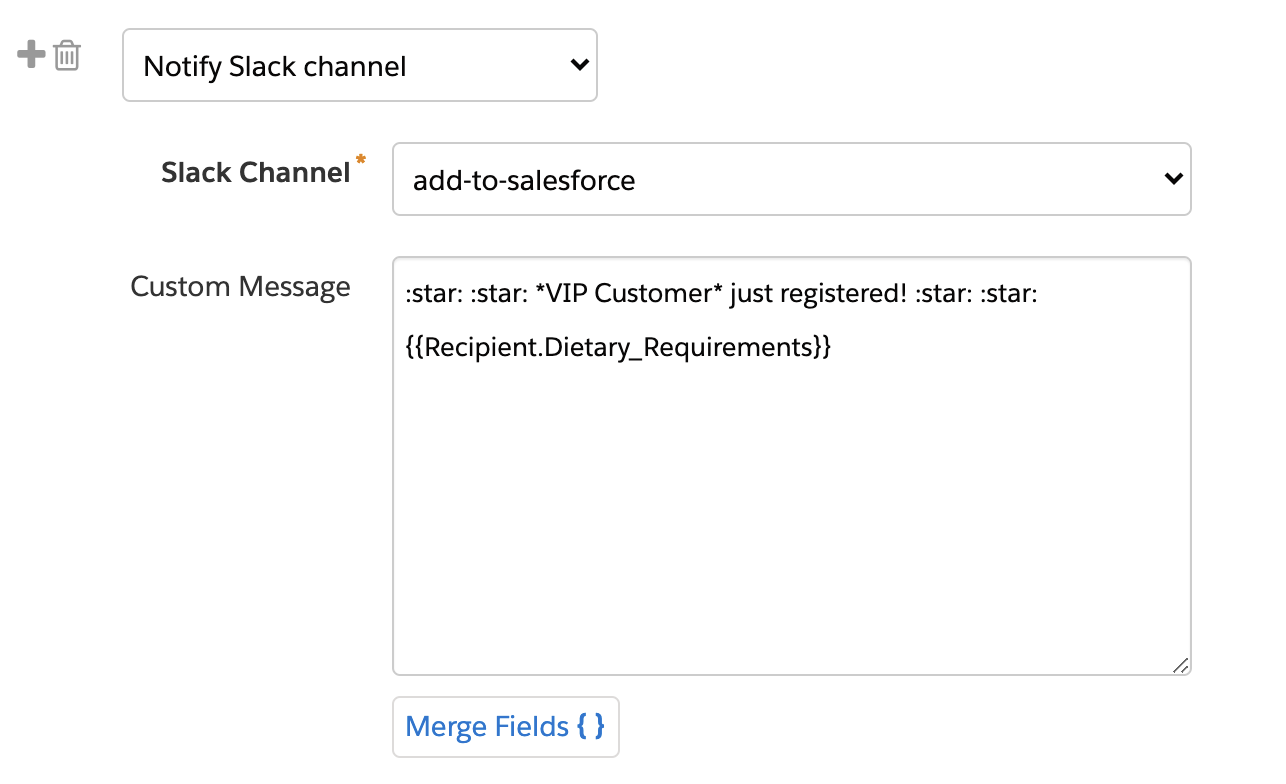
- Select “Notify Slack channel” and a Slack channel you have connected.
You may have to see it to believe it – but yes – you can customize the notification message! (A highly-requested functionality for many years.) The Custom Message box can use a combination of Pardot Merge Fields and Slack markdown:
- Pardot Merge Fields: Use the Merge Fields { } picker to insert field data for the specific prospect that has just submitted the form. It could be a good idea to think about which fields your form contains, as well as the fields the Slack channel users will find useful. Find advanced ways to tap into Pardot personalization.
- Slack markdown: Use will know some basic commands if you’ve used Slack – think : to insert emojis, or _italic_ *bold* ~strike~ Use this reference guide by Slack for the full list.
I’ve used both Merge Fields and Slack markdown in the example:
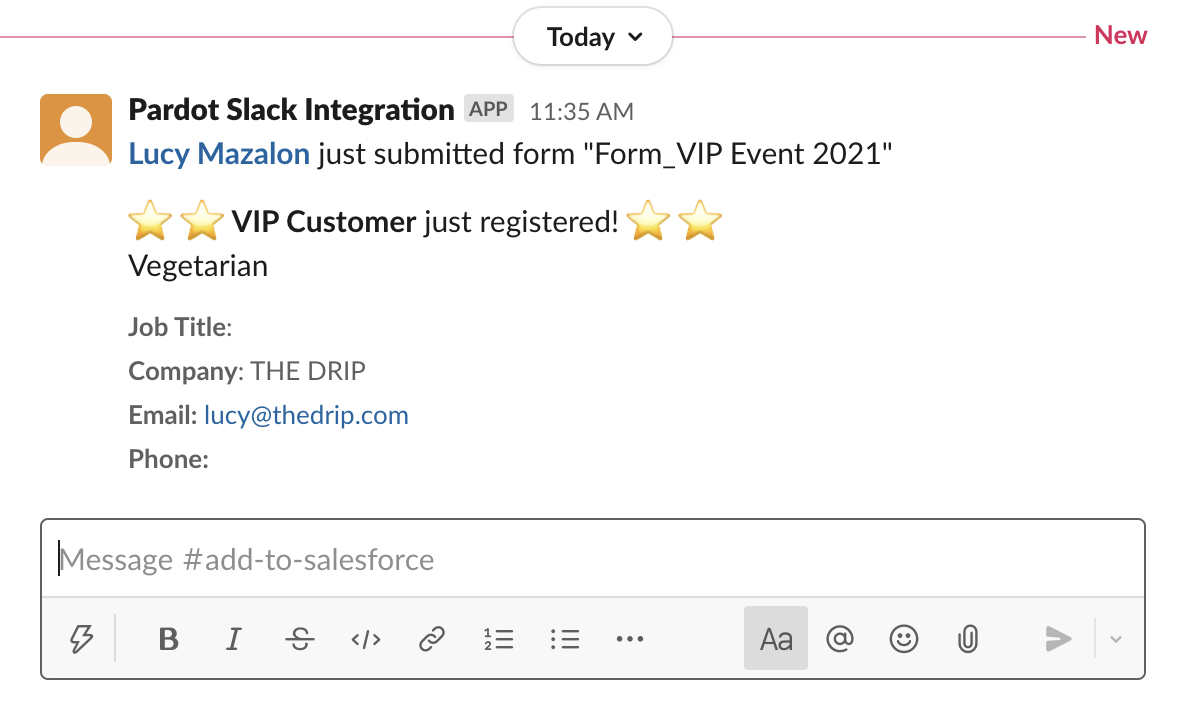
Note that some information is included by default:
- Prospect name, hyperlinked to the prospect record (a Pardot Lightning link!)
- The marketing asset name they just interacted with.
- Job title, Company, Email, Phone.
When the form is submitted, the channel is notified:
Summary
Now, you will have successfully integrated Pardot with Slack using the Account Engagement for Slack app, have set up your first completion action on your desired marketing asset.
Monitor the notifications you’re sending to channels and others for feedback on whether they’re too frequent, and if they are for meaningful interactions. I’m sure you can agree that we could all do with less notifications!
