If you are using Salesforce Lightning Experience, please see this guide for the correct way to URL Hack, this post applies only to Salesforce Classic.
After briefly covering what Salesforce URL Hacking is in my 4 Clever Hacks with Salesforce buttons post I decided that this would require a separate post being the beast of a topic that it is! But please don’t be put off by that statement, URL Hacking does take some learning but it is by no means an advanced topic or require you to be a developer. It will also teach you a lot about how URL’s work and help you do similar techniques in Salesforce and other systems.
As a quick recap – URL hacking is the process of pre-populating data in a new record with data from a record you are currently working off using a custom button to launch this new record. Check out my 4 Clever Hacks post above for an example, as I will be using a similar example through this tutorial. In a nutshell though I will be populating a new custom object called Resource Request from data in the Opportunity.
Step 1 – Create a button and add it to your page layout
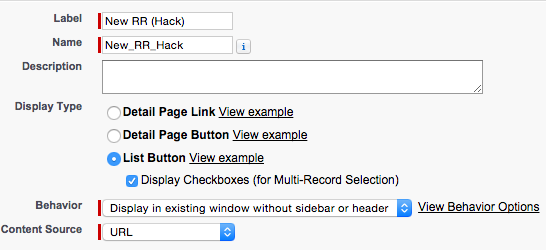
The best place to start with creating a custom button to URL hack is to actually create the framework and add the button to the page layout so we can start testing after each step is completed. So go to your object and Click “New Button or Link” in the section Buttons, Links & Actions. Lets give our new button a name and select List Button. This means it can be placed in a related list and not on top of a record. We also want to make sure we have the behaviour set as the below and the content source as URL.
As we want this button to launch our object and fill it with information, lets deal with the actual launching of the object first. The button we’re creating already presumes that we want to launch information inside of Salesforce, so hidden away out of site of the text box you will with your URL will be “https://na15.salesforce.com/” with whatever instance of Salesforce you are on. This means we only need to fill in data after the /.
The URL to actually launch our object looks a bit like this “/a0U/e”. The three letter code is your object code. You can find out your object code by creating a new record and looking at the first part of the URL, mine looks a bit like this. The “e” refers to edit, which means we are going to the edit page of this object.
https://na15.salesforce.com/a0U/e?
So copy that part after the .com and up to ? and paste it into your new custom button you have created so it looks like this.
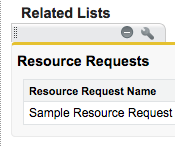
We’re now ready to add this to our page layout and launch it! To do this were going to need to go to the master object where this button is going to be launched from. In my example this is the opportunity. Edit this page layout and scroll down to your related list. You then want to hit the spanner.
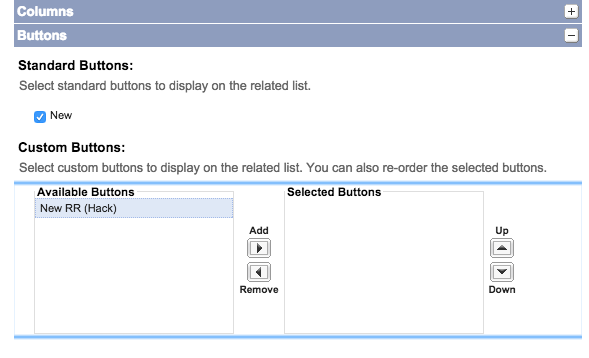
Once here you can click on the Buttons tab and move across your new button to the selected side.
We’re done! Give your button a click. It should launch into the edit page for your new object.
Step 2 – Pre-populating some basic text values
Now we’ve set up our basic custom button that launches our edit page for the new record we want to create, lets start populating some data. The reason this step is to populate some basic text values, is because the way to populate Lookup fields is very slightly different.
So to start off pre-populating text values we need two things. The ID of the field we wish to populate and the value of which we would like to populate this with.
- To get the ID of the field we wish to populate go to the relevant object in setup and click on the field we wish to populate. If you check out the URL when you’re on this page, you can see the unique ID given to this field.
https://na15.salesforce.com/00Ni000000EpsgY?setupid=CustomObjects
- The value of which we would like to populate this with is found in the form of a merge field. These can be explored on the custom button page and looks like the below. As I am working off an Opportunity I can grab fields from the Account and Opportunity page because of the relationship.


Now, to turn this into something that actually works! Lets go to our custom button editing page and enter a “?” after our little URL. This acts as a separator and will allow us to enter the next part. The next part will just require you to enter the ID of the field you grabbed earlier with “=” and then the merge field value.
/a0U/e?00Ni000000EpsgY={!Opportunity.Description}
If you click on your list view button now, you will be hopefully able to see a pre-populated value in your specified field. If this does not work be sure to check out your URL on the page to make sure it looks correct. My button that I have just made will look like this..
https://na15.salesforce.com/a0U/e?00Ni000000EpsgY=This+is+a+test
As you can see we have our field URL and then the value afterwards. If the value is not present for any reason you can presume that either data is not in that field at the moment or the merge field is wrong or not accessible.
Step 3 – Pre-populating lookup values
You may have noticed that if you are following a similar example to mine, your lookup value will not be pre-populating like the default “New” button does. This is because behind that new button, Salesforce is bringing over the value from the previous object, as our button is fresh, we will need to do this ourselves (and with any other lookup values we have). They do differ slightly from basic text values which I will explain below.
To populate a Lookup value we need the field ID as before but this time we need to add CF to the front of the ID so it looks something like this – CF00Ni000000EpsgO. This is required when populating a custom lookup field. The first part to populate a lookup value is to grab the name of the record we are populating. So using the method before but with the added CF you can expect your button URL to look like this
/a0U/e?CF00Ni000000EpsgO={!Opportunity.Name}
The next step is to grab the ID of the record we wish to populate. This time though, we are going to add “_lkid” to the end of our field ID (plus the CF we added on earlier). This lkid parameter is telling Salesforce this is a lookup field. So it looks a bit like this.
/a0U/e?CF00Ni000000EpsgO={!Opportunity.Name}&CF00Ni000000EpsgO_lkid={!Opportunity.Id}
Again nothing too fancy we’ve just added some extra parts to the ID and referenced this field twice, grabbing the ID and the Name of the record. Please note the “&” used to separate the URL when referencing different fields. You can also see this being used below where I have the full URL used for this demonstration.
/a0U/e?CF00Ni000000EpsgO={!Opportunity.Name}&CF00Ni000000EpsgO_lkid={!Opportunity.Id}&00Ni000000EpsgY={!Opportunity.Description}
Bonus Tips
- As mentioned earlier, if something isn’t working, always checkout the URL on your object after you click your custom button. This will show you whether data is getting as far as being populated into the URL.
- You should always add &retURL={!Opportunity.Id} to your button. Where Opportunity.ID is the ID of your master object. This will make sure your return to this object if you press cancel while creating a record.
- URL hacking may not be the best thing to use if you have a very complex process that requires a lot of data to be transferred. Please look to APEX in these circumstances.
- If you have multiple record types, you can easily pass in the ID of the record type using this format – &RecordType=abc. With abc being a fixed value or possibly a merge field with your Record Type ID (This can be found on the record type page)


Comments: