






Salesforce DevOps Center’s managed package has been around for a while as an alternative to Change Sets. Since Spring ’26, there’s been a huge leap forward with the Next Generation of DevOps Center now available natively inside your production instance, with no managed package required.
“Built on the principles” of the original package, the new app feels like a complete reinvention: long-standing issues resolved, capability limits removed, and – even better – new AI-powered actions.
This article walks through what the Next Generation DevOps Center looks like in practice, step by step, including the underlying actions in the source control system. We’ll also cover the key differences between the managed package and the native app, and the details worth knowing before you use it.
If you’re not familiar with DevOps practices, I recommend reading my previous article first, where the underlying DevOps and source control concepts are explained with practical examples.
Getting Started: Enabling the App
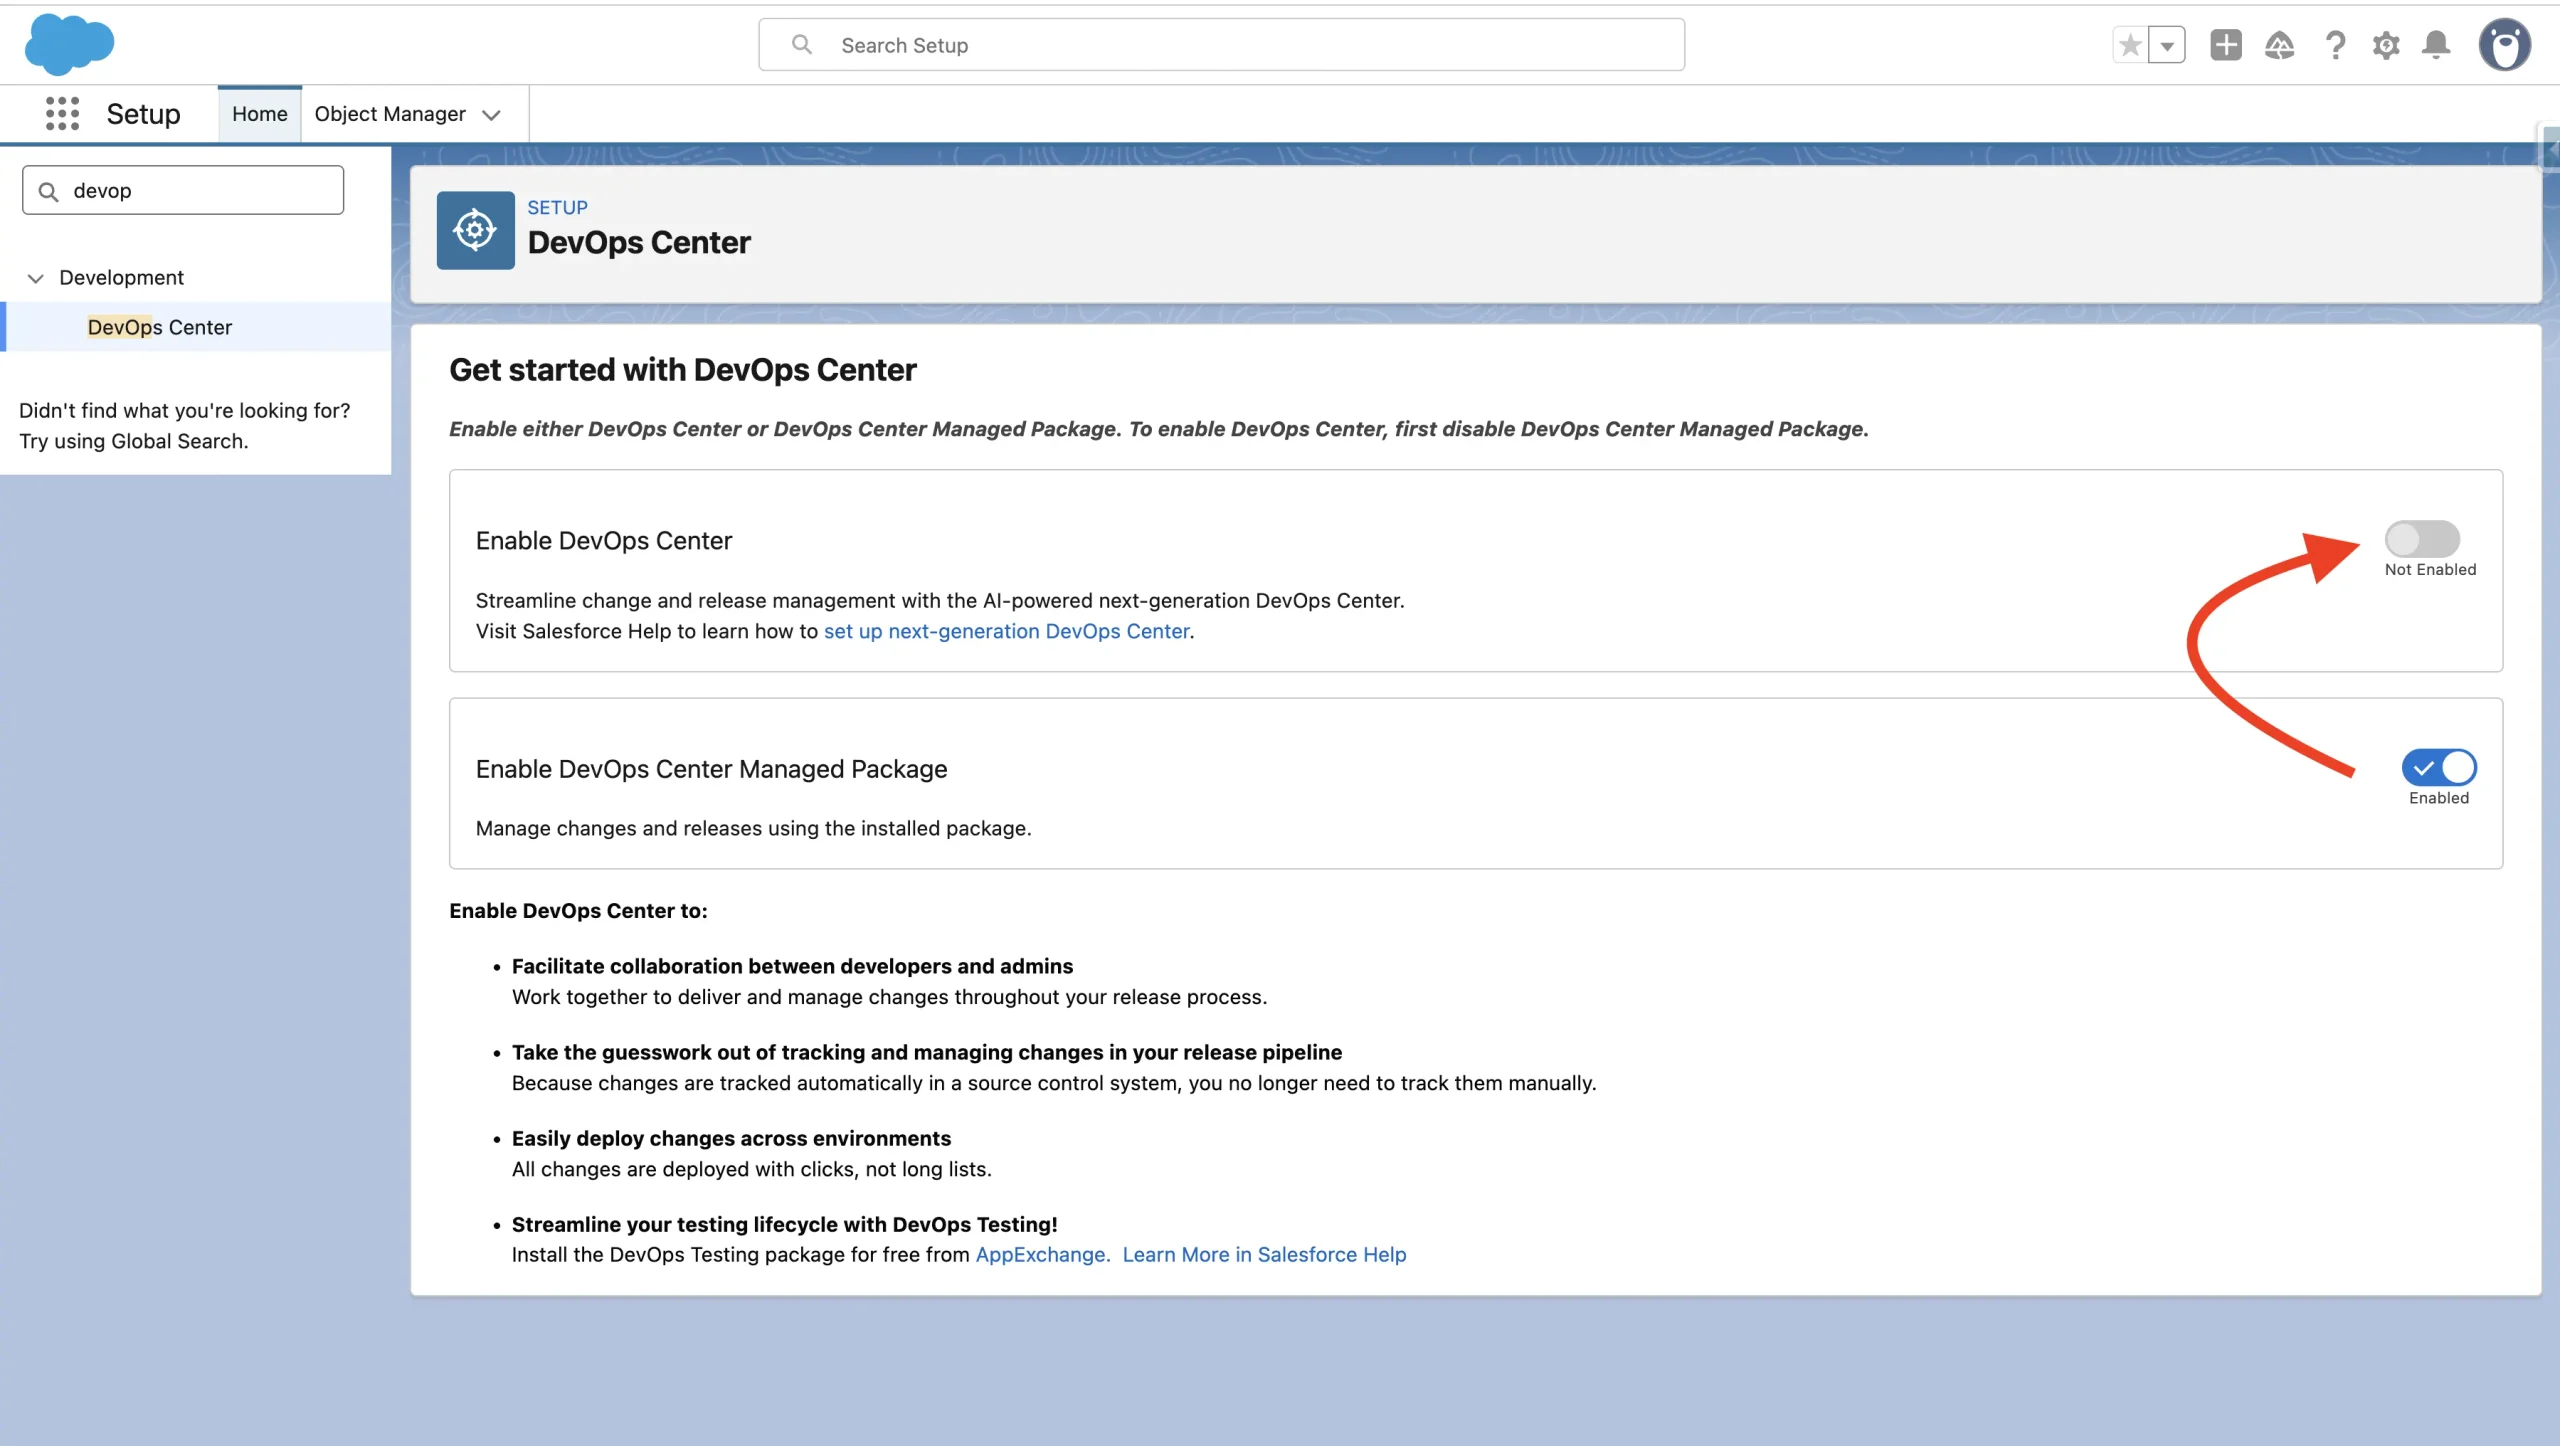
To activate it, go to DevOps Center in Setup and toggle the switch on.
- Top tip: If you’re already using the DevOps Center managed package, you’ll need to disable it first – only one can be active at a time. A new migration tool is rolling out in Dev Preview over the next couple of weeks.
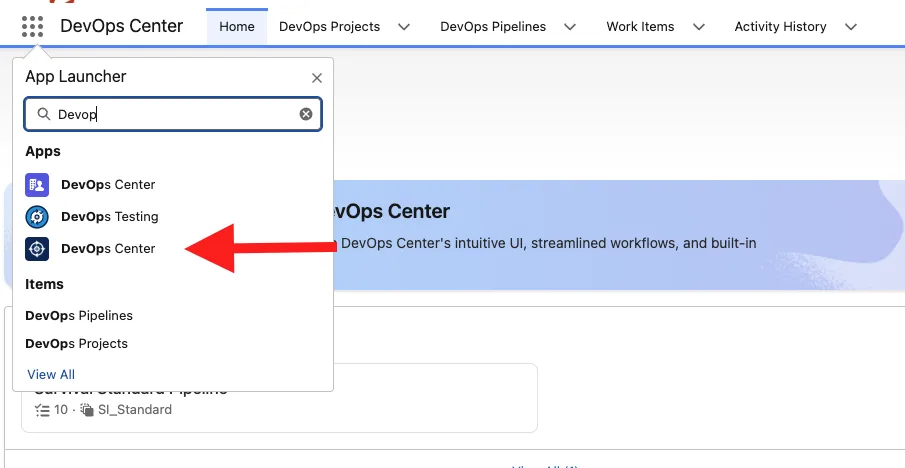
Once activated, you’ll find it in the App Launcher marked with a “crosshair” icon, as opposed to the managed package’s Person Account icon.
The Workflow: Five Steps
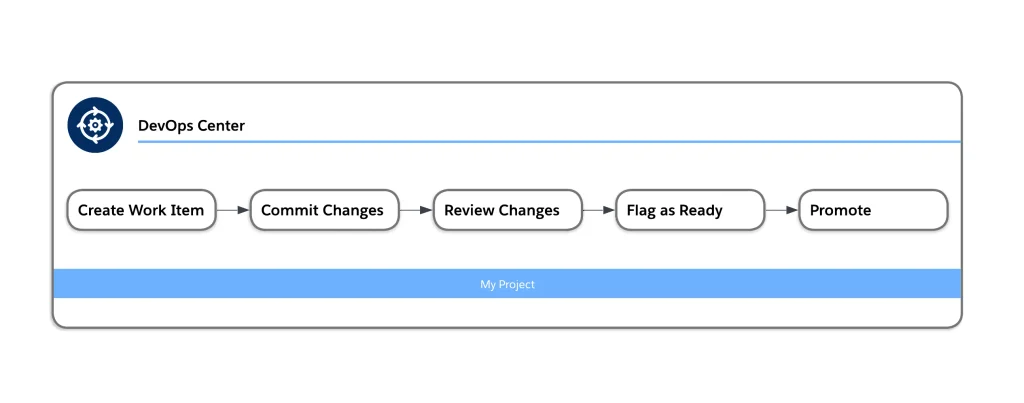
Moving a change through the pipeline takes just five steps. All the heavy lifting happens in the background, in the source control system – DevOps Center just gives it a simple, user-friendly front end.
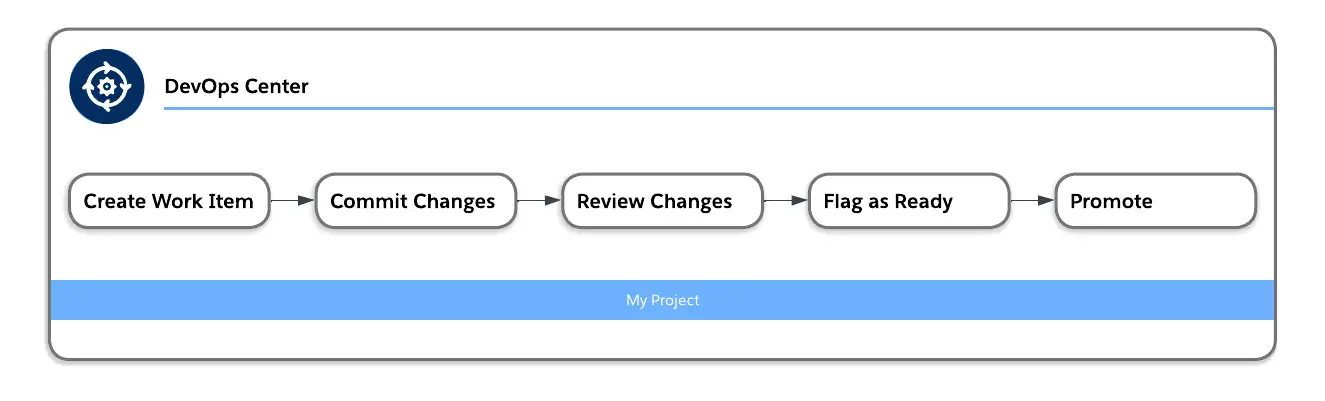
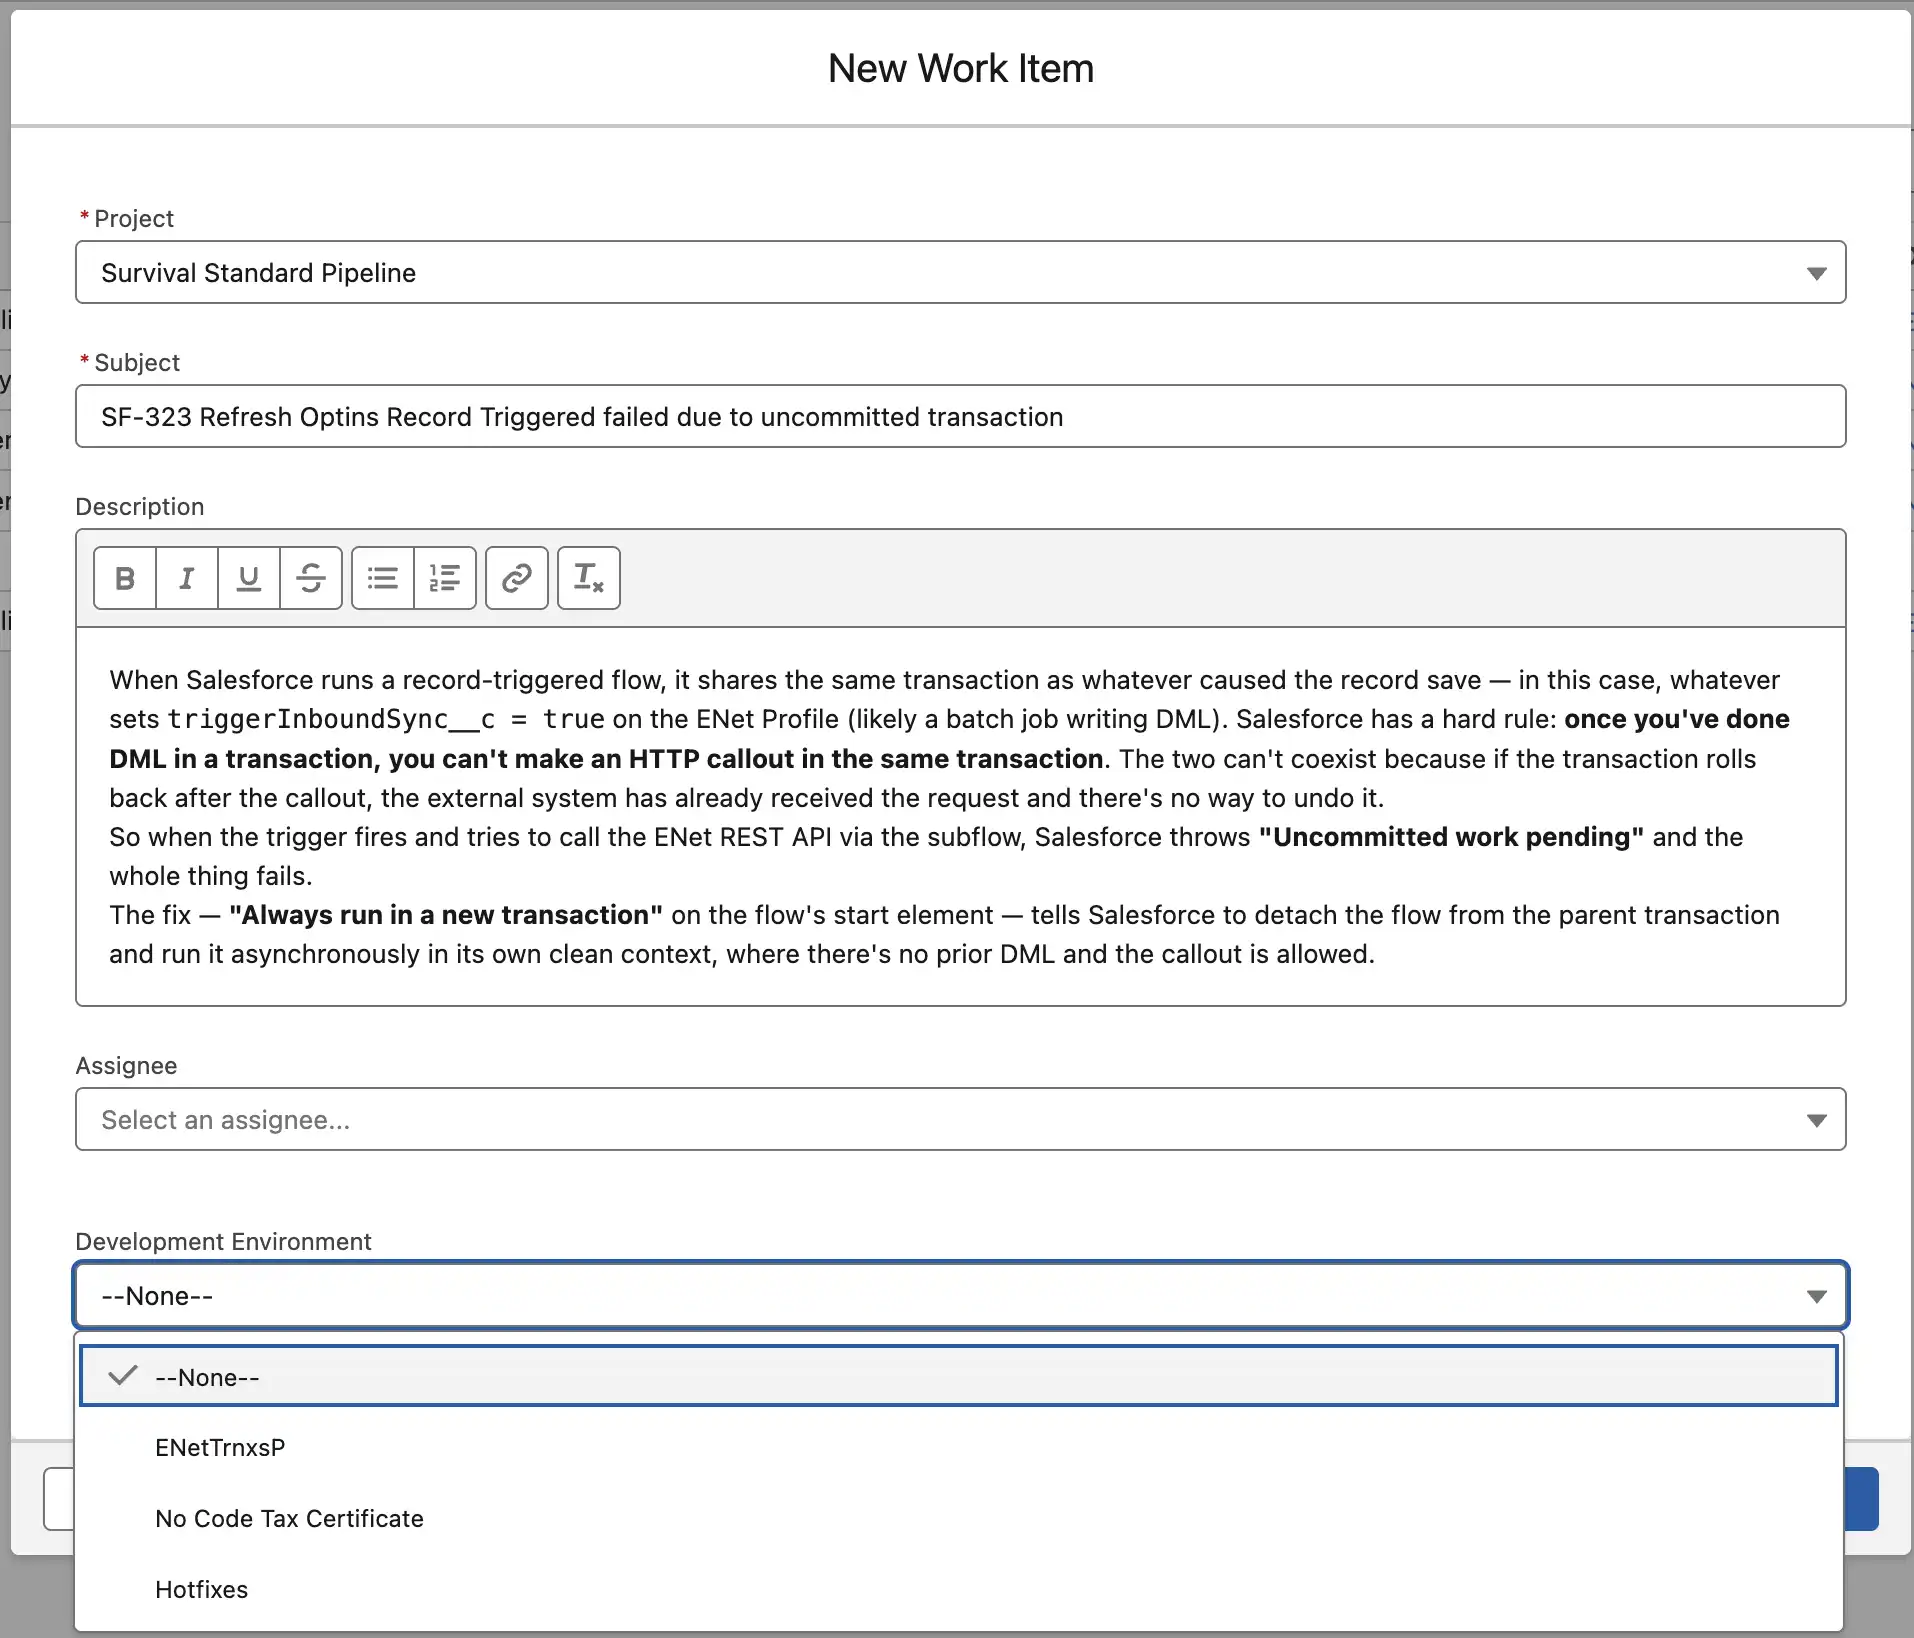
1. Create the Work Item
A Work Item (WI) represents a logical unit of business change: a user story, a new feature, a Jira ticket, a Linear issue, a bug fix, or even an entire app.
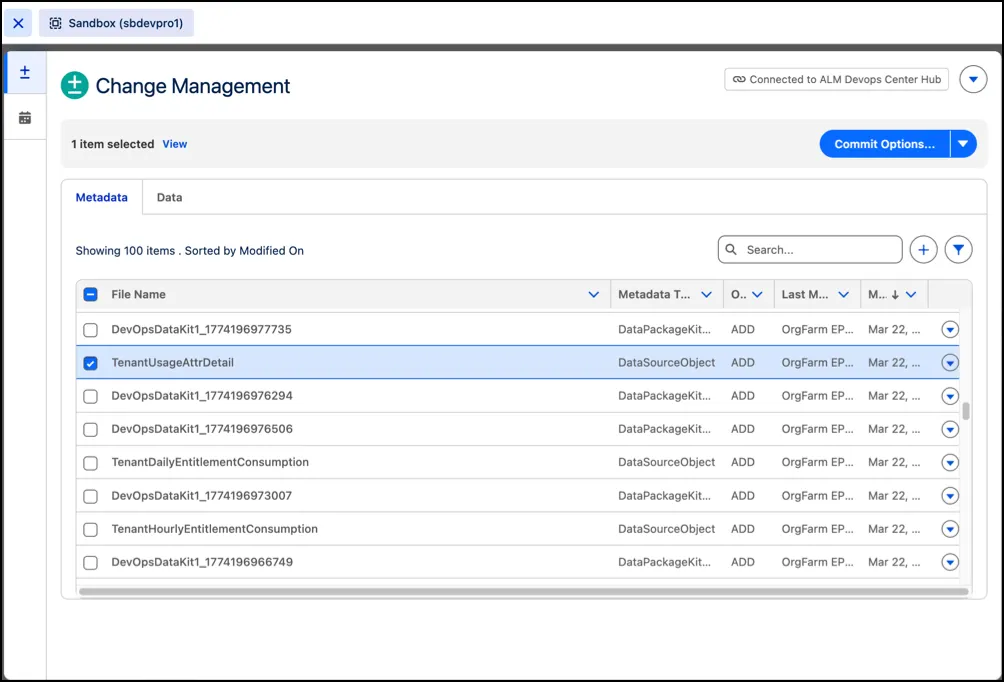
2. Commit the Changes
Save snapshots of your work directly to the version control branch.
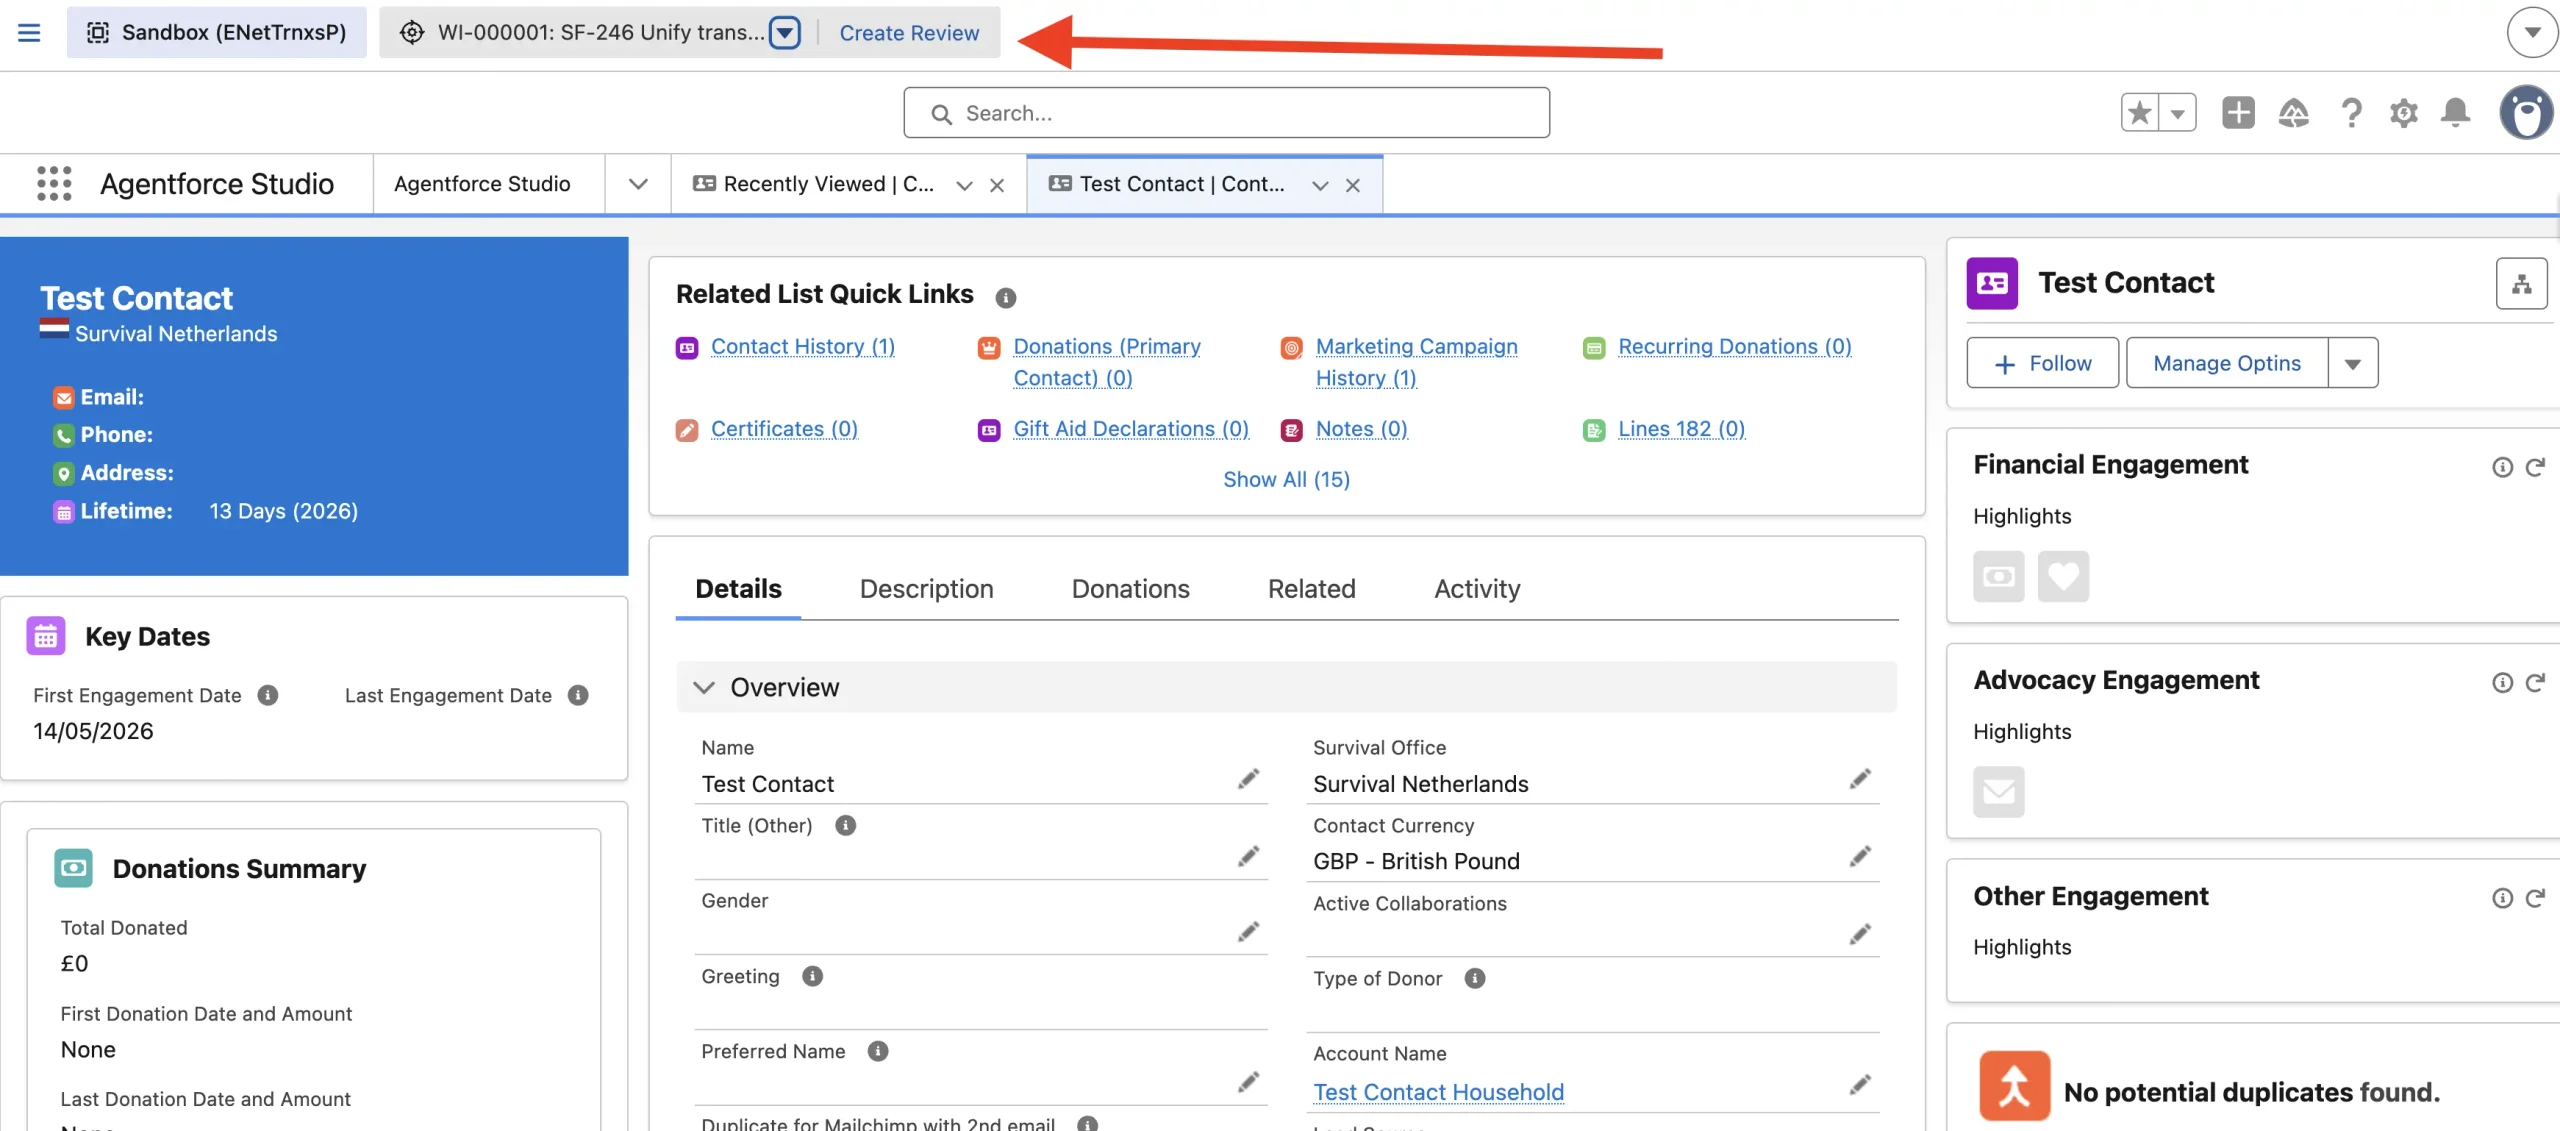
3. Create a Review
Flag the changes for review and feedback before merging.
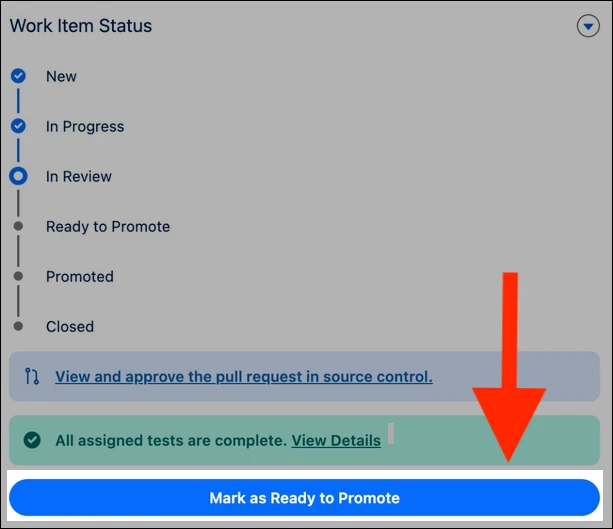
4. Flag as Ready to Promote
Mark the item visible in the pipeline, so release managers can promote it from the UI into the next environment.
5. Promote the Changes
Move the item across each stage of the pipeline, which acts as a quality gate – a shift-left approach that runs a baseline test suite on every promotion to catch issues early.
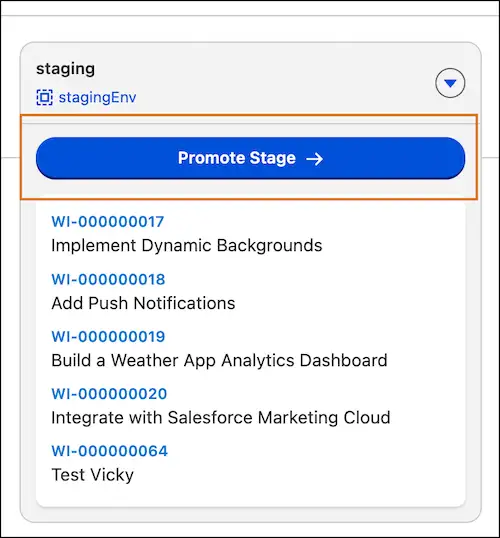
Changes can then be backsynced to other development environments when needed.
Working via AI Agents
DevOps Center’s operations are exposed through the official Salesforce MCP (Model Context Protocol), so you can commit, push, promote, and even resolve conflicts straight from your preferred LLM agent: Claude Code via the CLI, Copilot in VS Code, or any other AI extension.
Taking this further, you can run the entire work cycle from your ticketing system, e.g. Linear, using Coding Sessions.
- Ask the agent to create a Work Item in DevOps Center.
- The conversation continues. Some items may get deployed to the org for testing and committed to the branch.
- Once the work is agreed to be complete, ask the agent to create a review (a pull request).
- Promote the Work Item through the pipeline, resolving conflicts as needed.
It’s worth grounding agent behavior with clear rules and instructions to avoid unexpected outcomes. The agent should always seek approval before performing an action.
How Next Generation DevOps Center Works Under the Hood
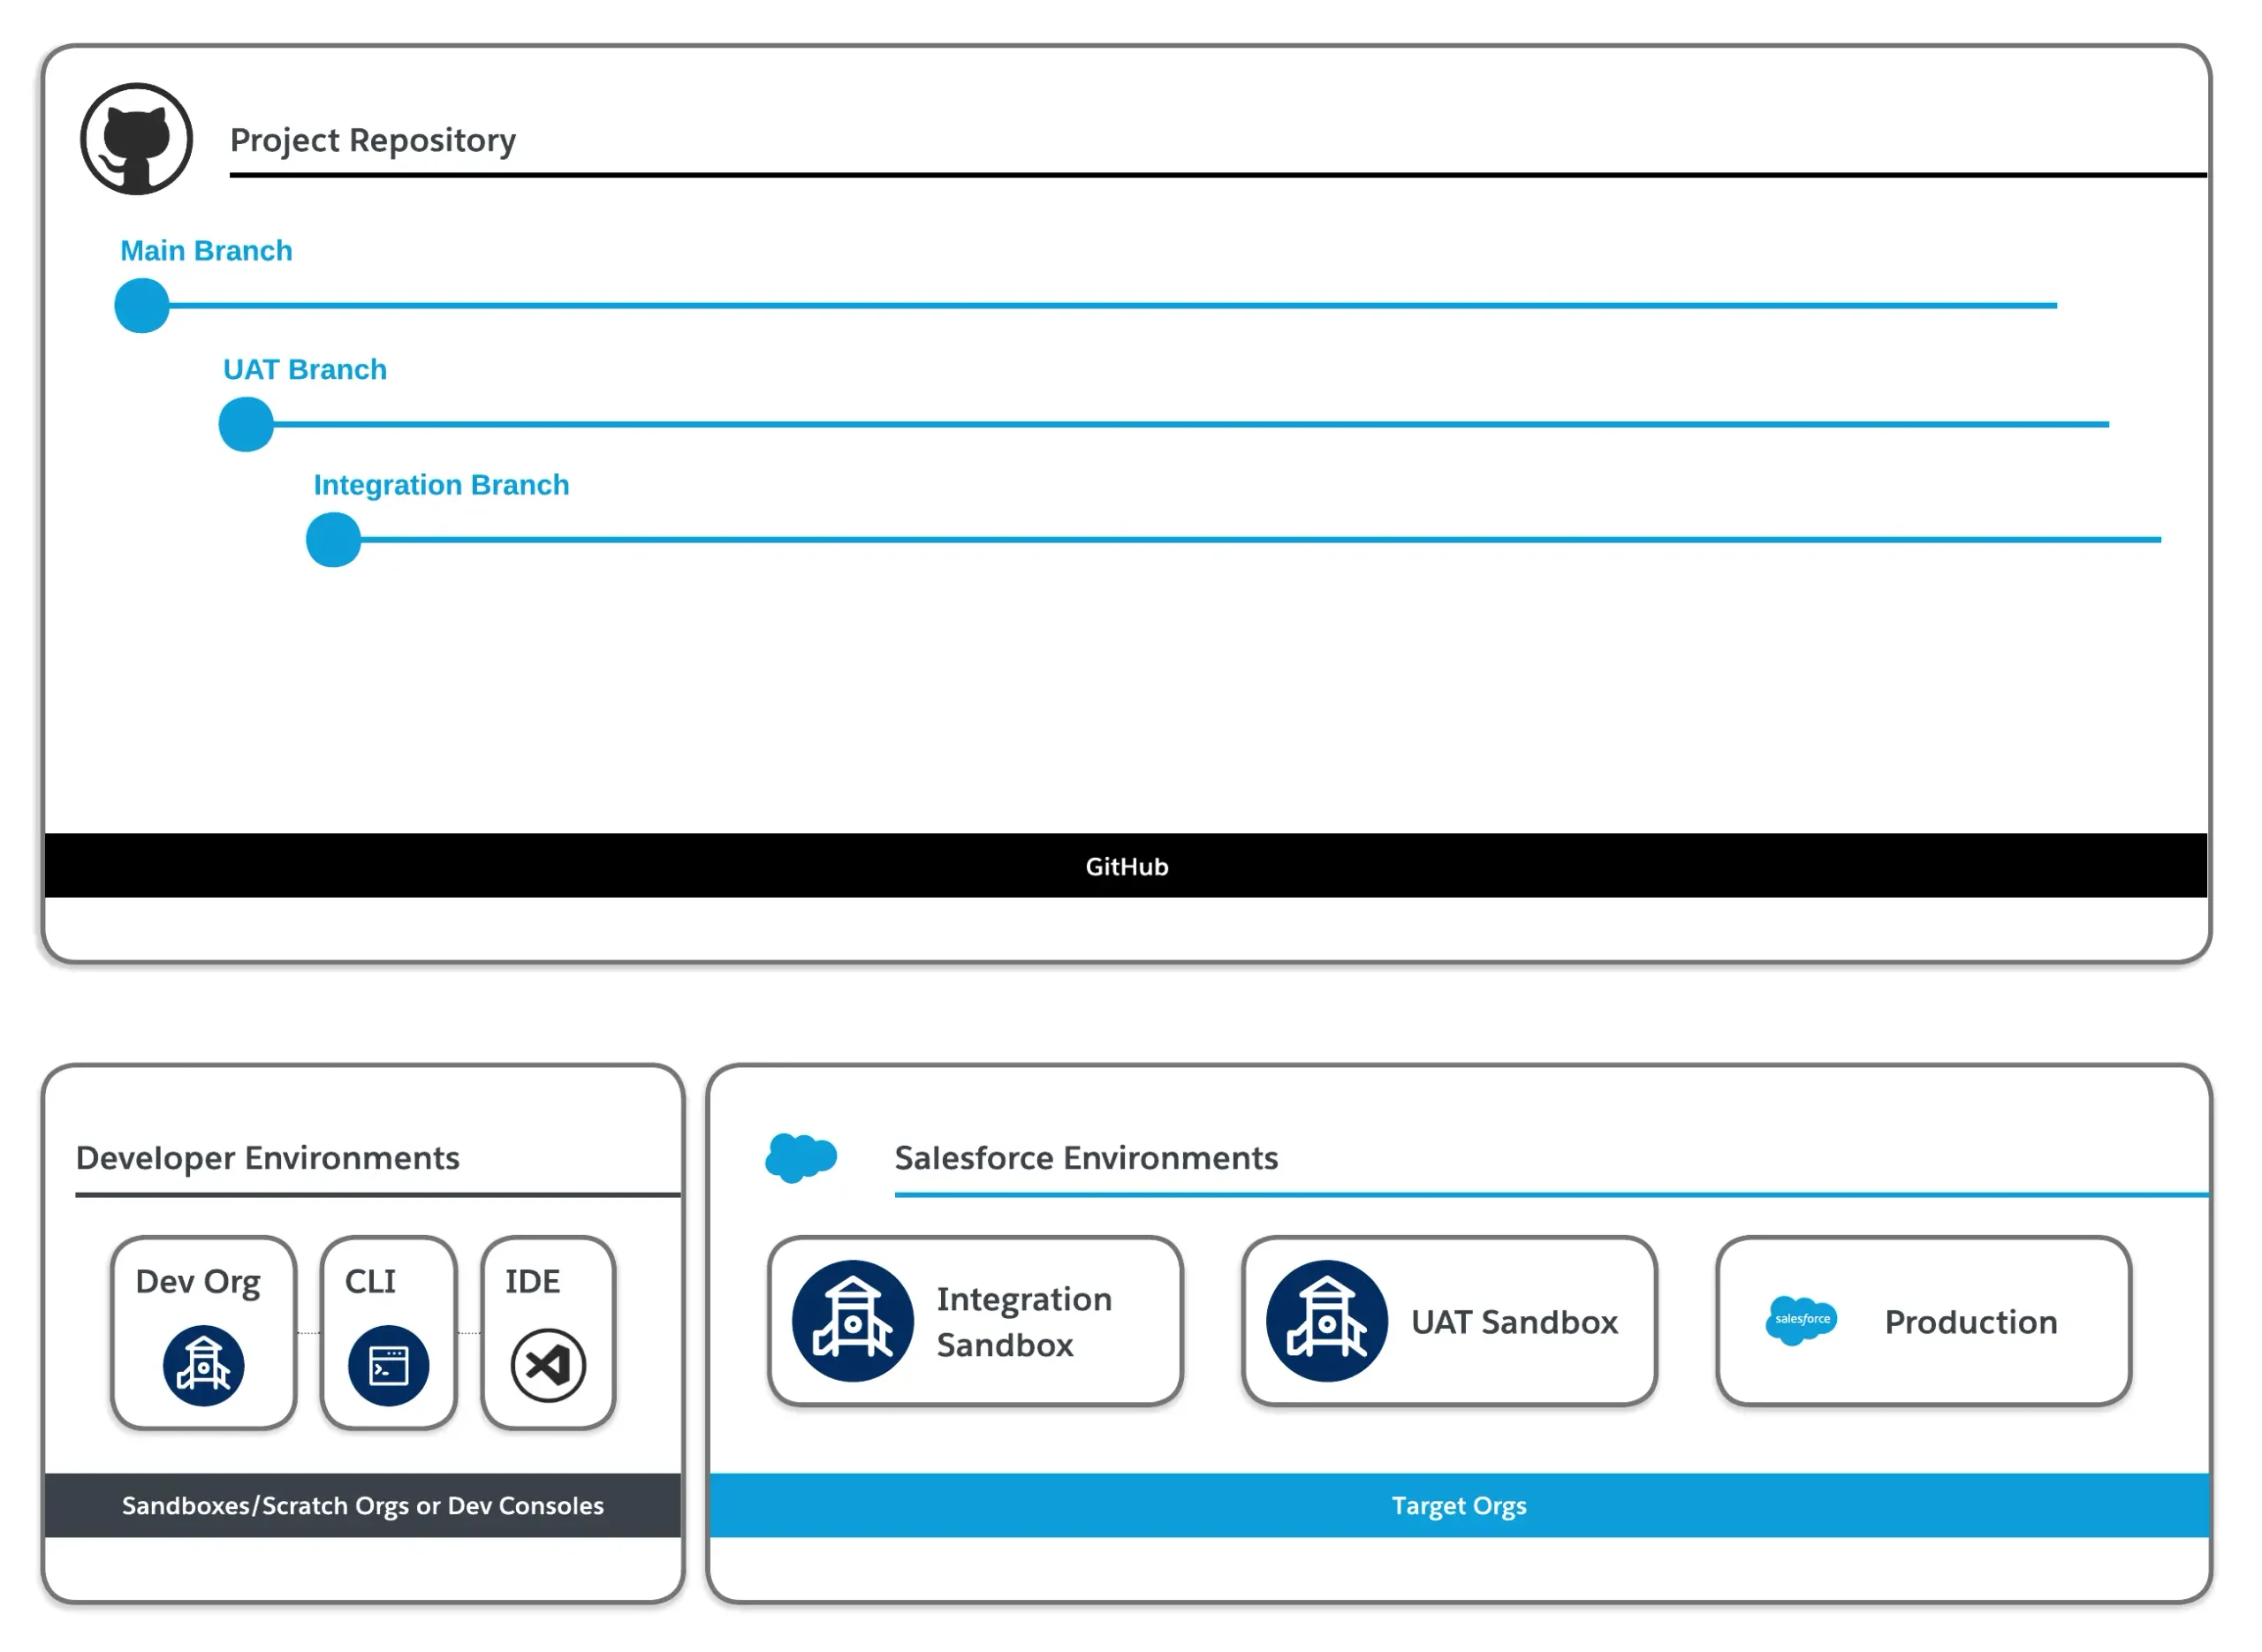
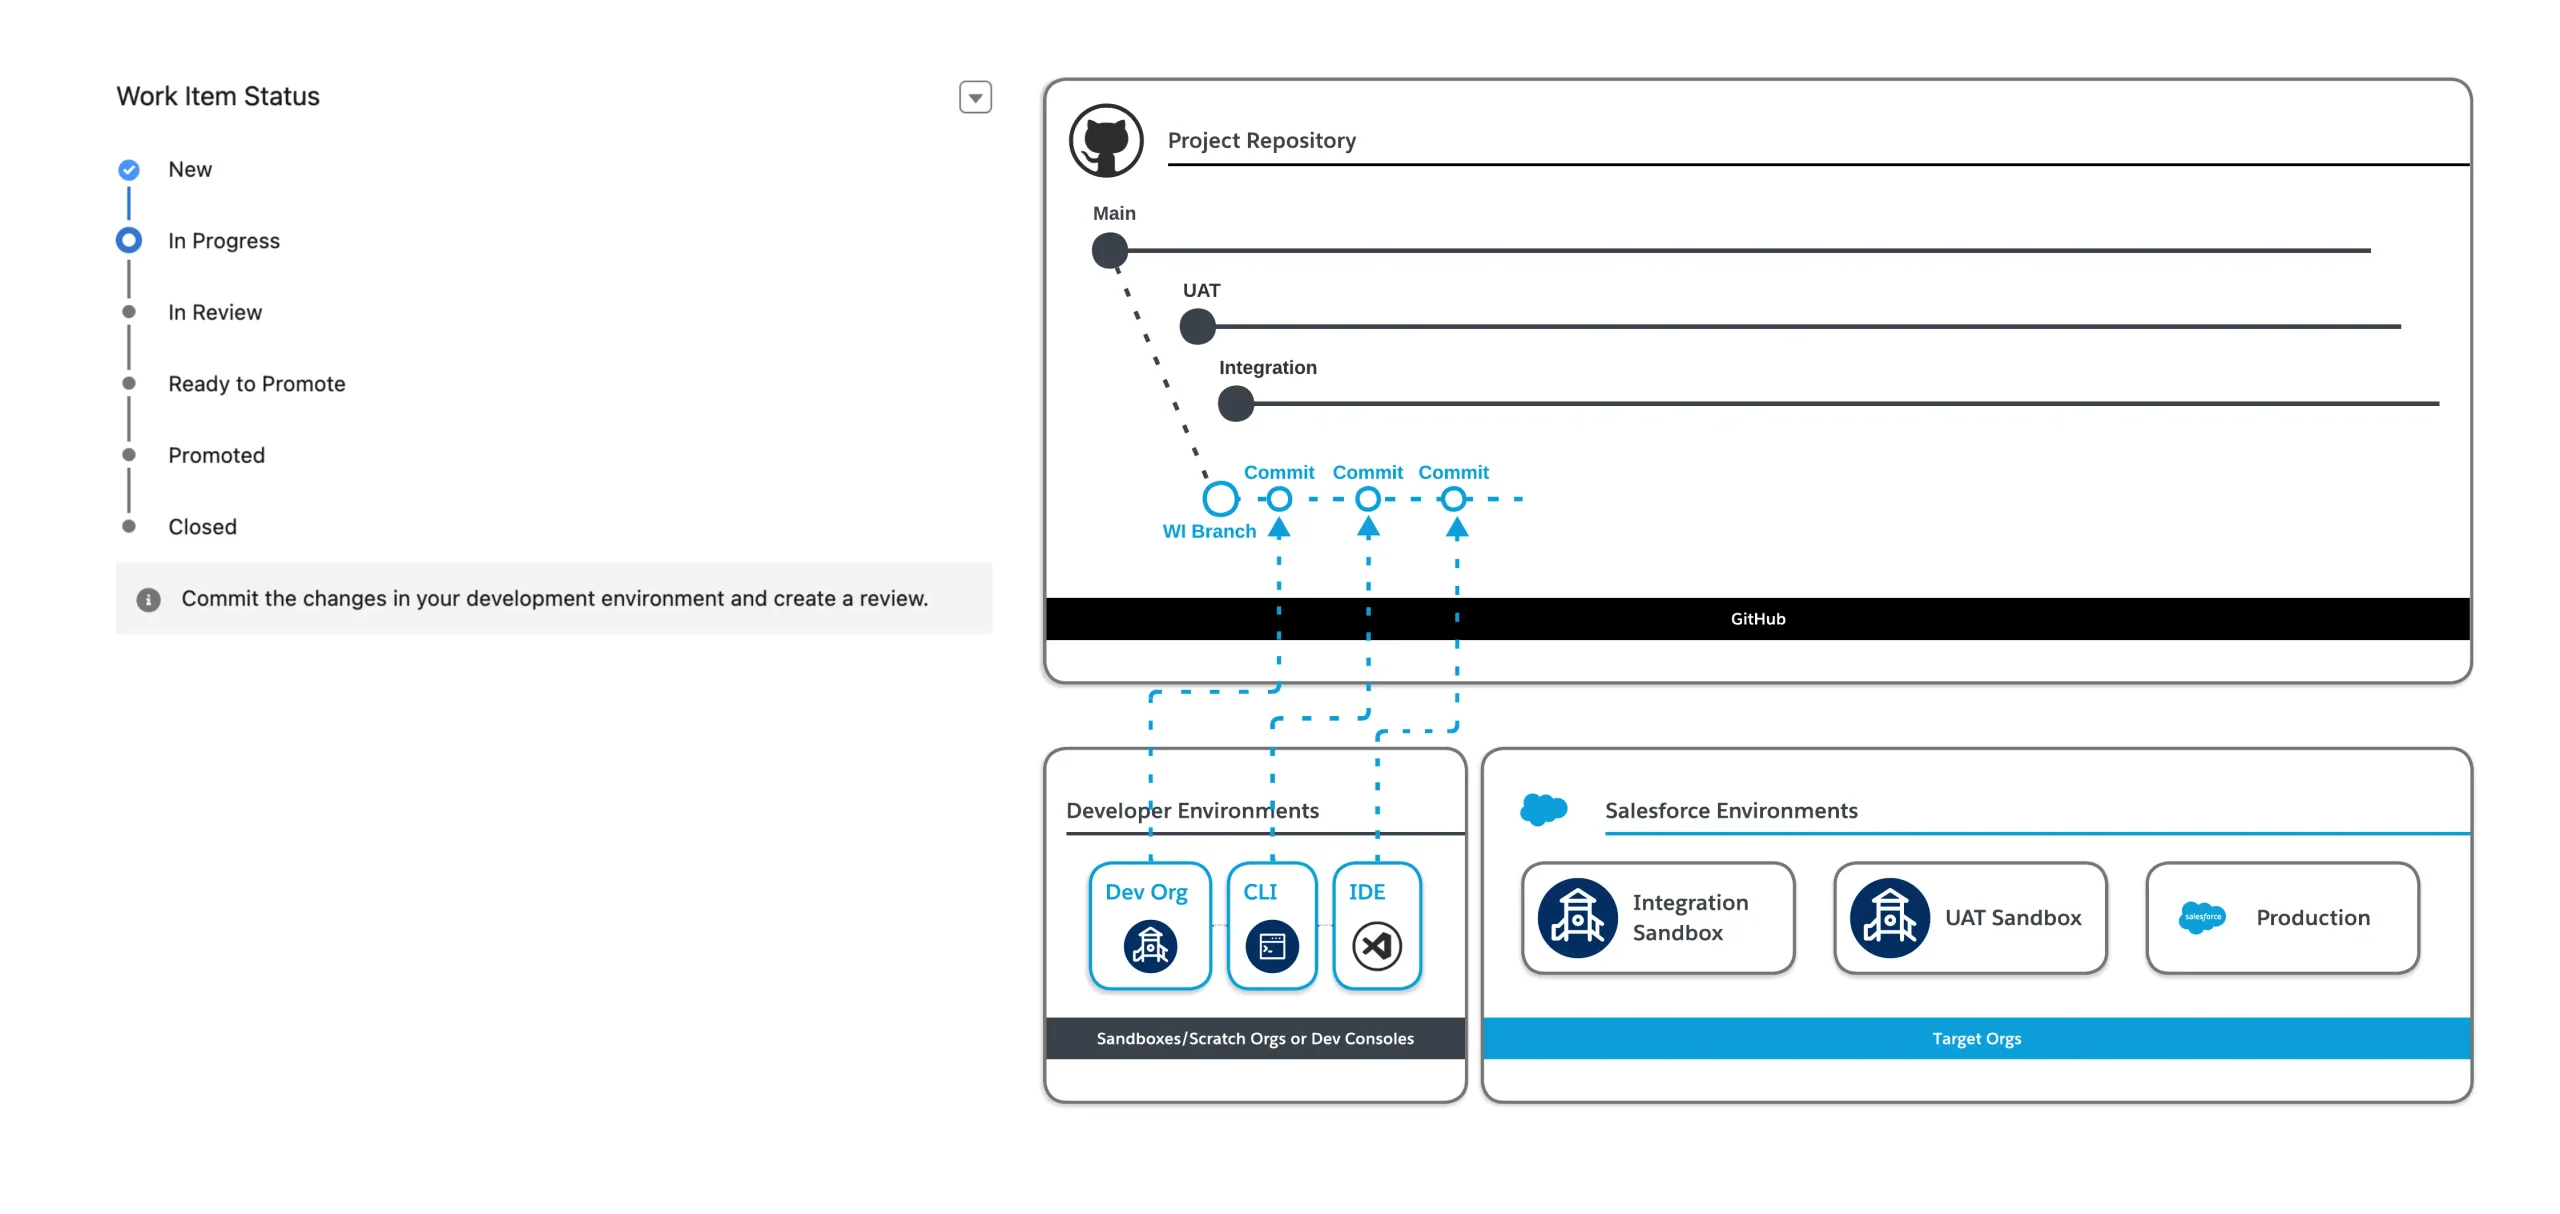
As mentioned, DevOps Center powers a range of actions in the source control system so you don’t have to. Changes can be committed straight from a sandbox’s UI, or pushed from external tools: the CLI (via SFDX), an IDE like VS Code, or an AI agent such as Agentforce, Linear’s coding agents, or Claude Code via the official Salesforce MCP, which lets agents commit, merge, and promote directly.
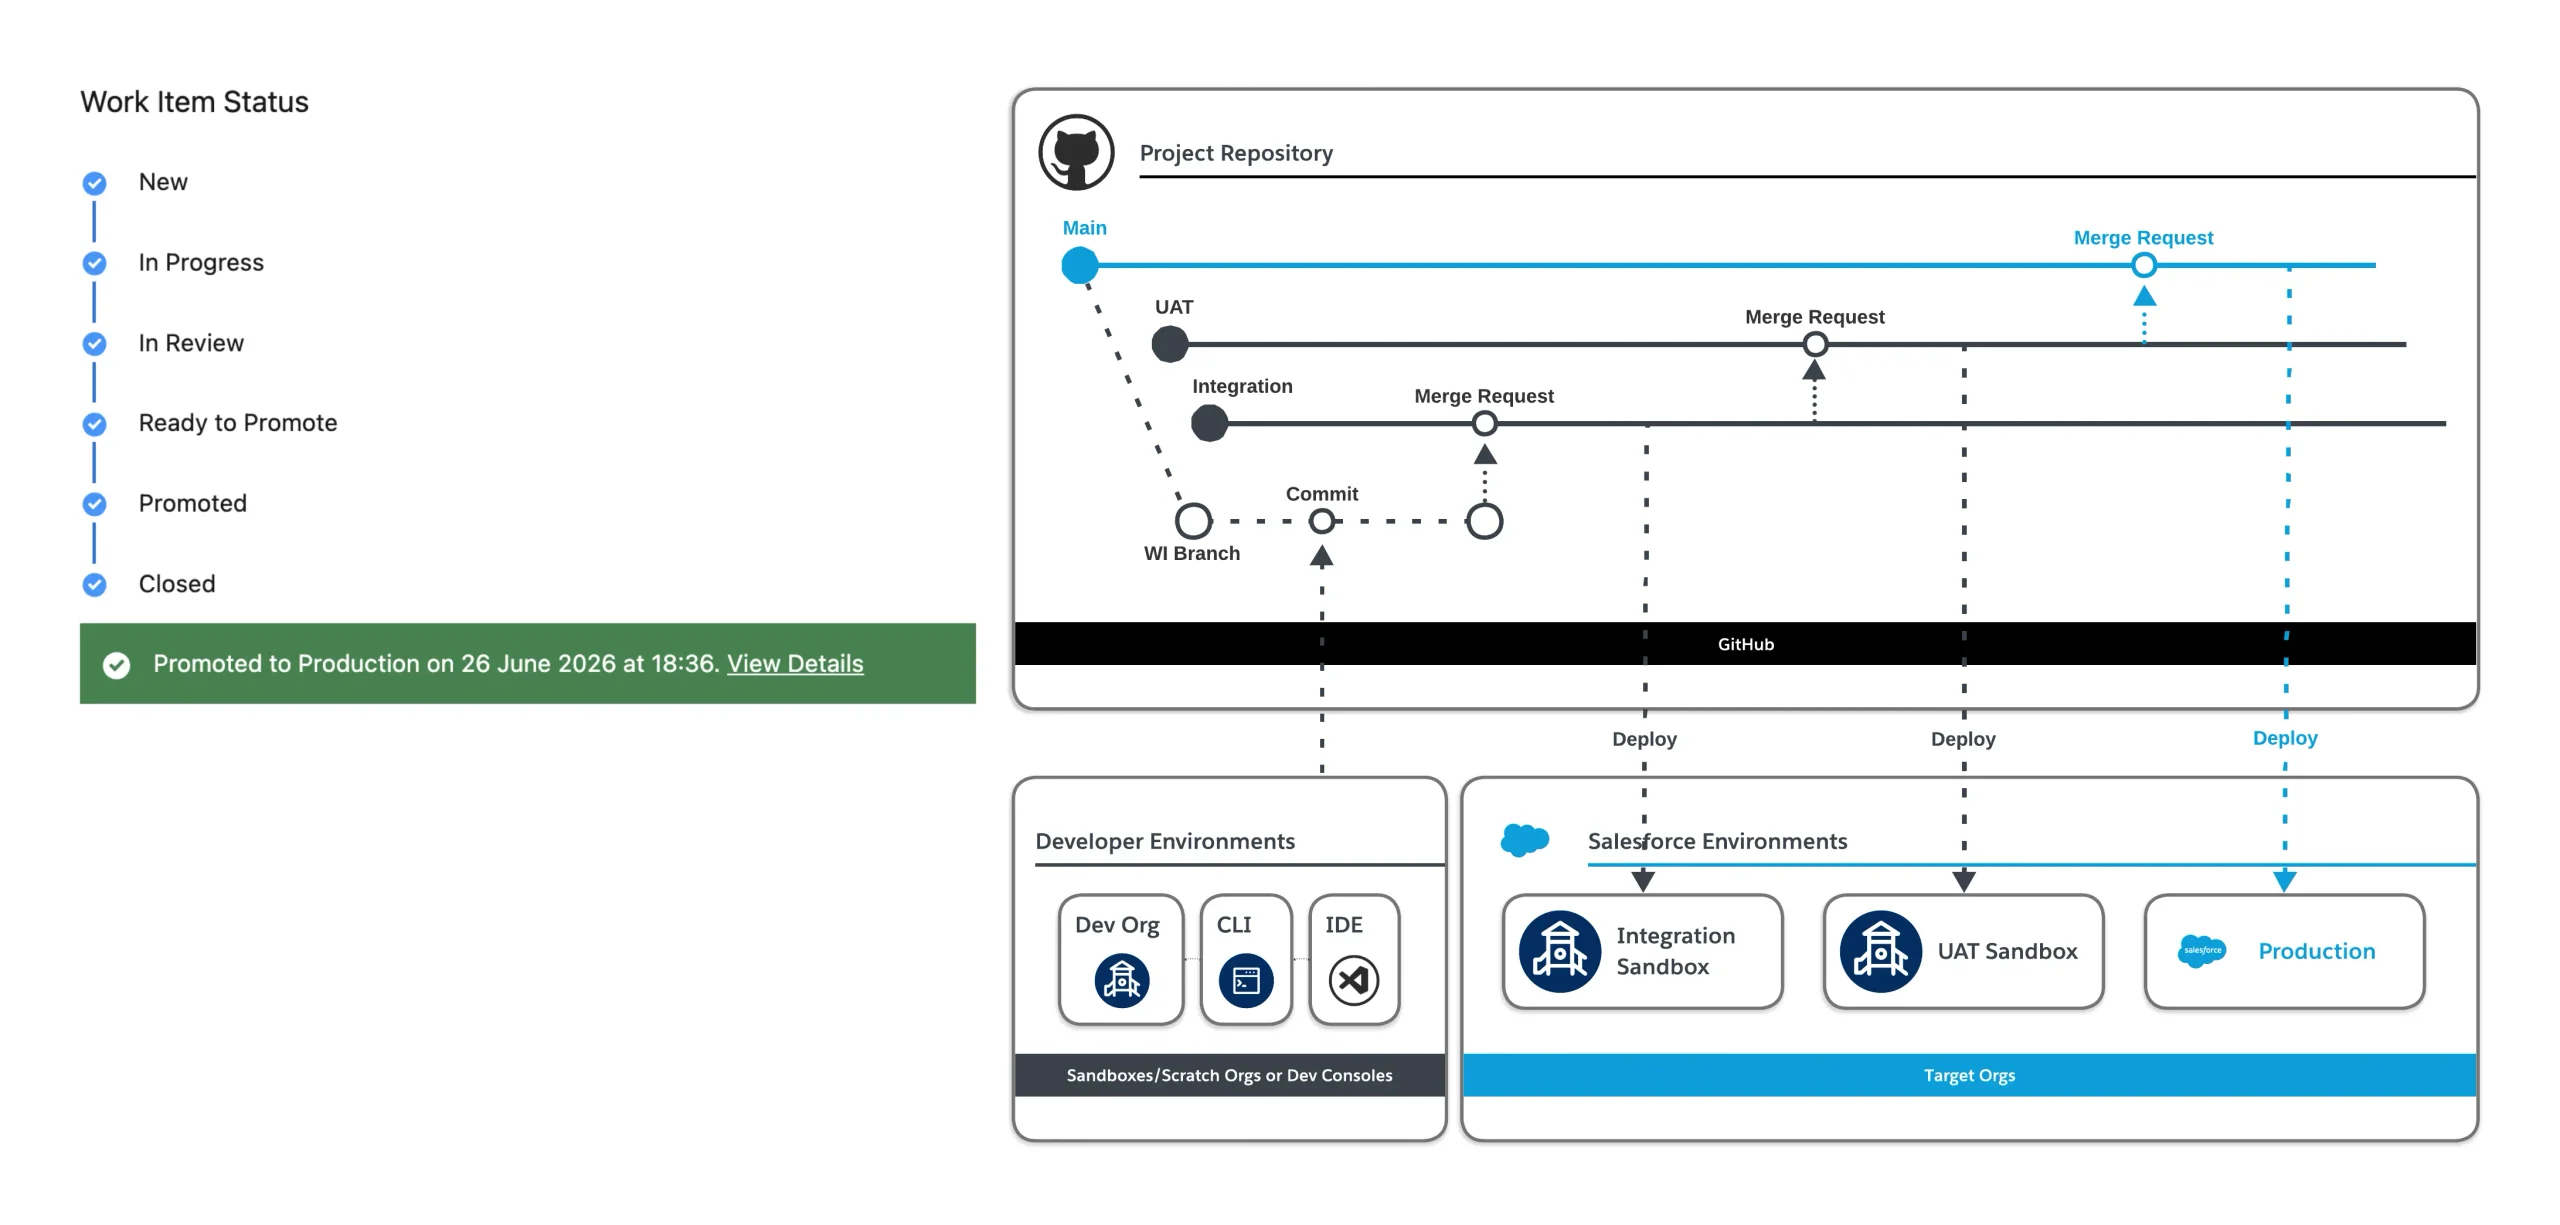
For every simple step you see in the UI, there’s a corresponding technical action happening in the background. As a baseline, the source control system has one branch per stage environment.
Creating a New Work Item
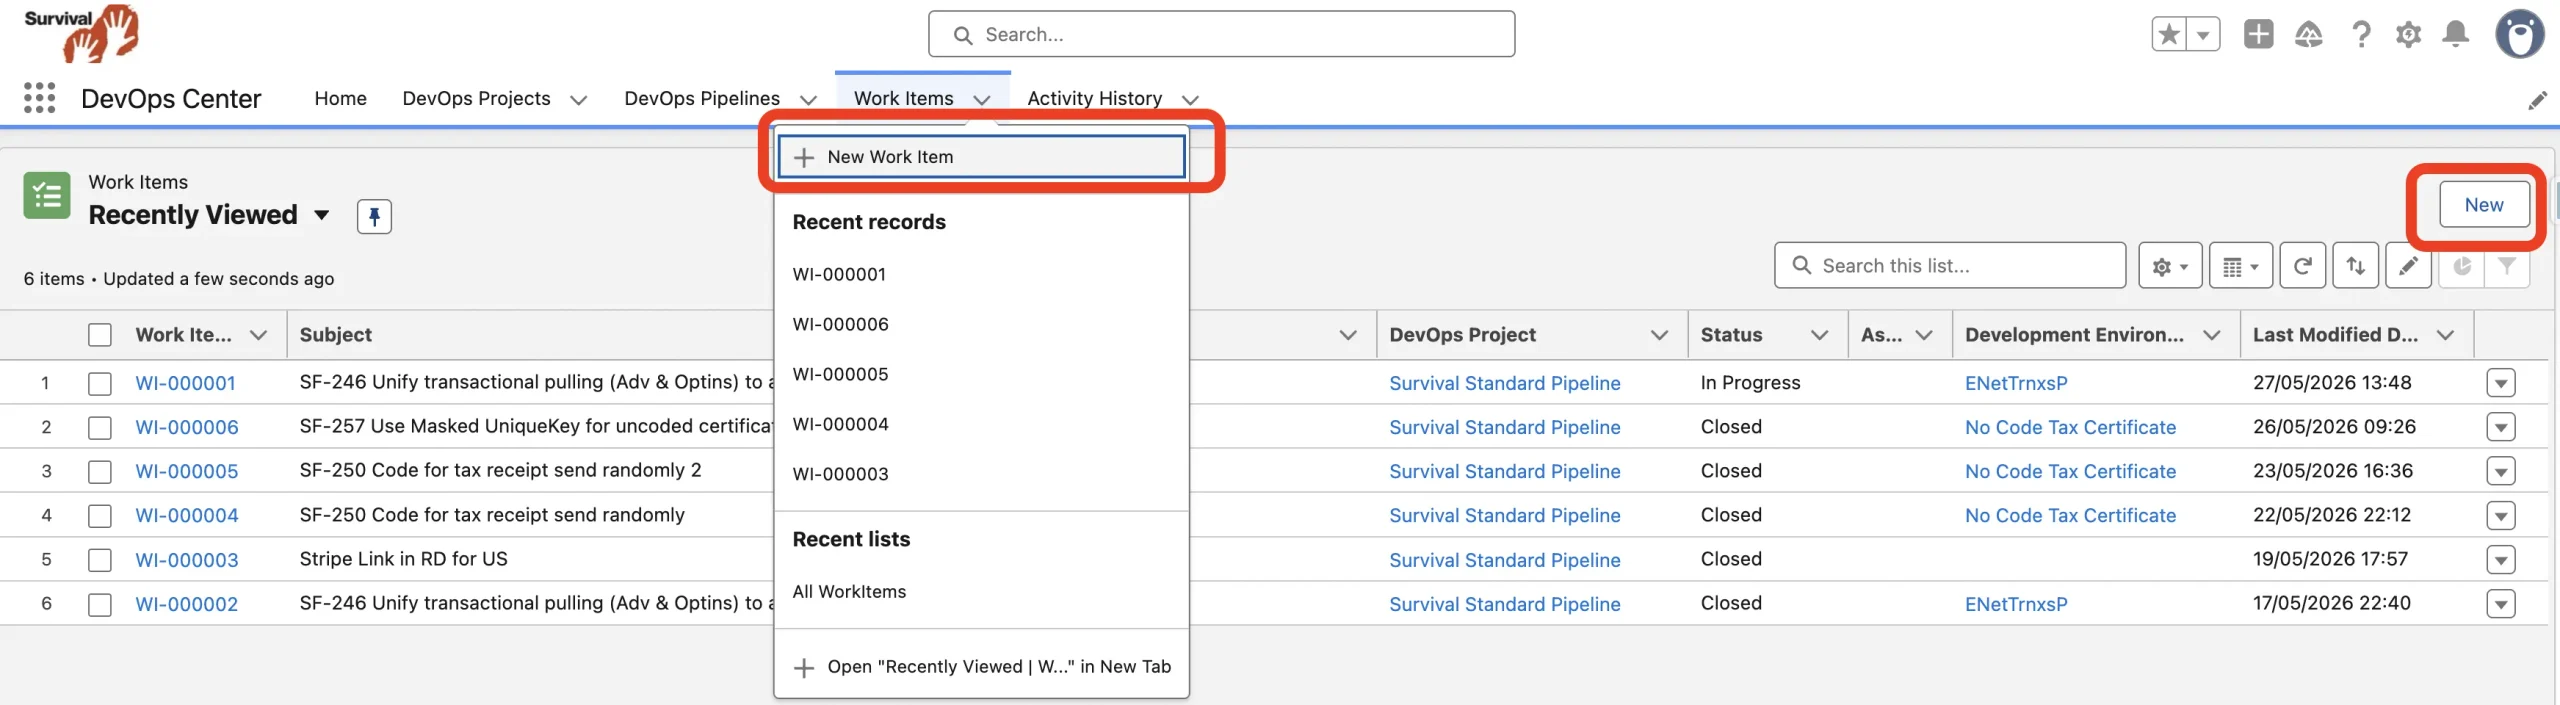
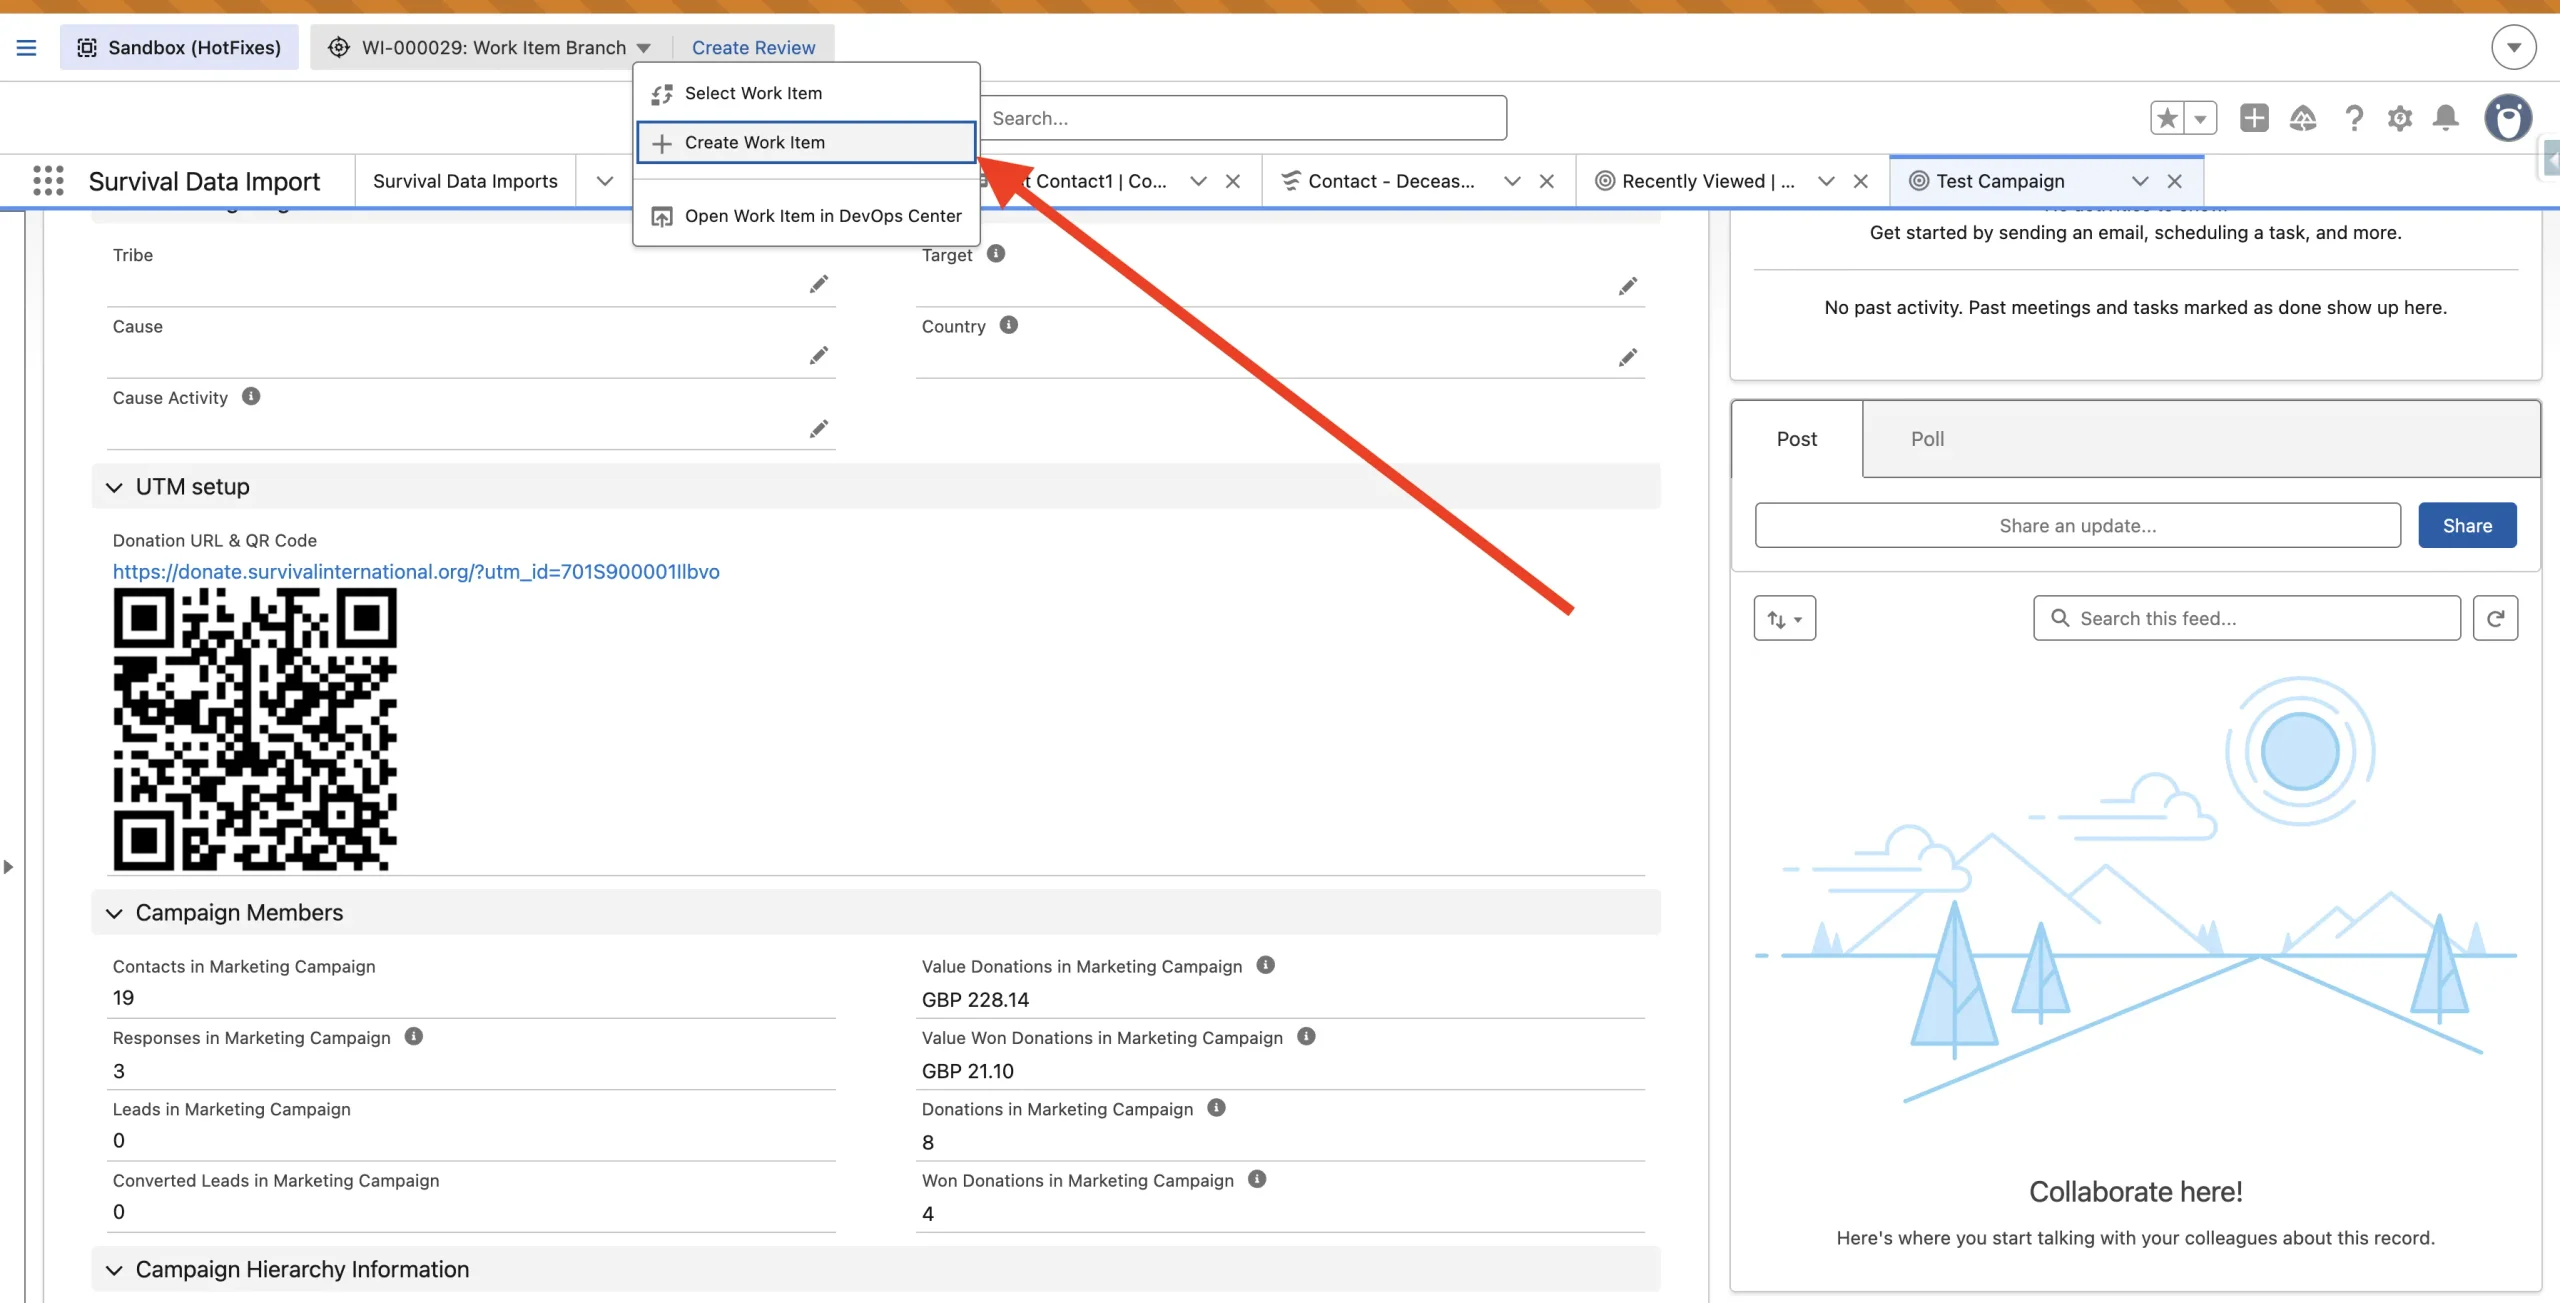
You can create a Work Item in two places: from the DevOps Center app in production (the standard “New” button on the Work Item tab/list view), or straight from the sandbox you’re working in, though the “Create Work Item” button there only appears if the environment already has another Work Item connected.
Items in this status only exist inside DevOps Center – nothing has changed yet in the source control system.
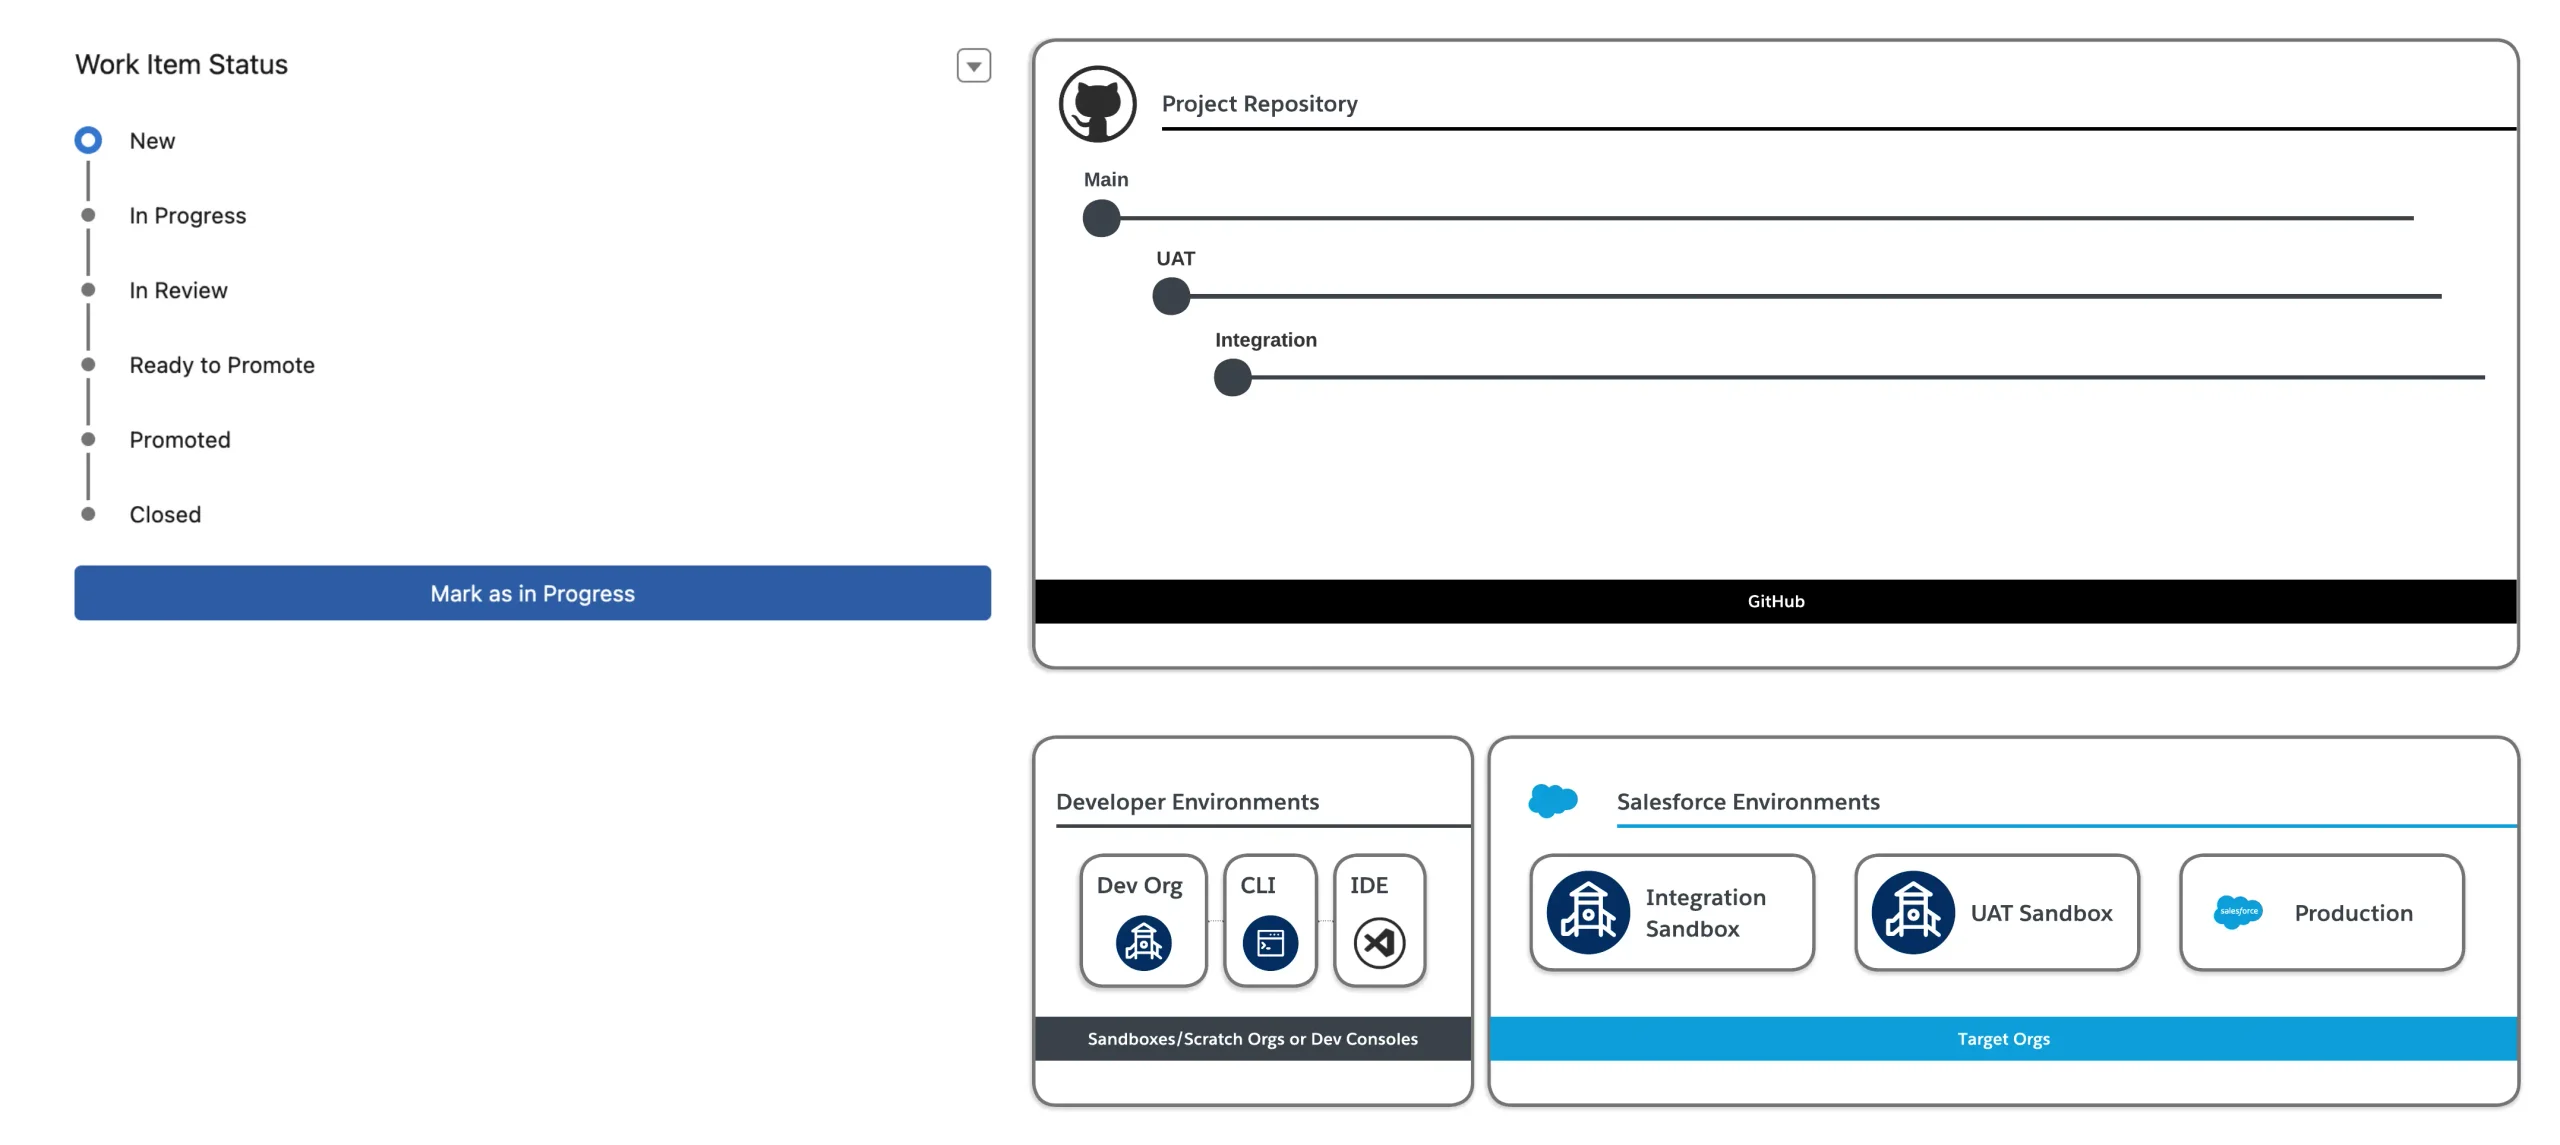
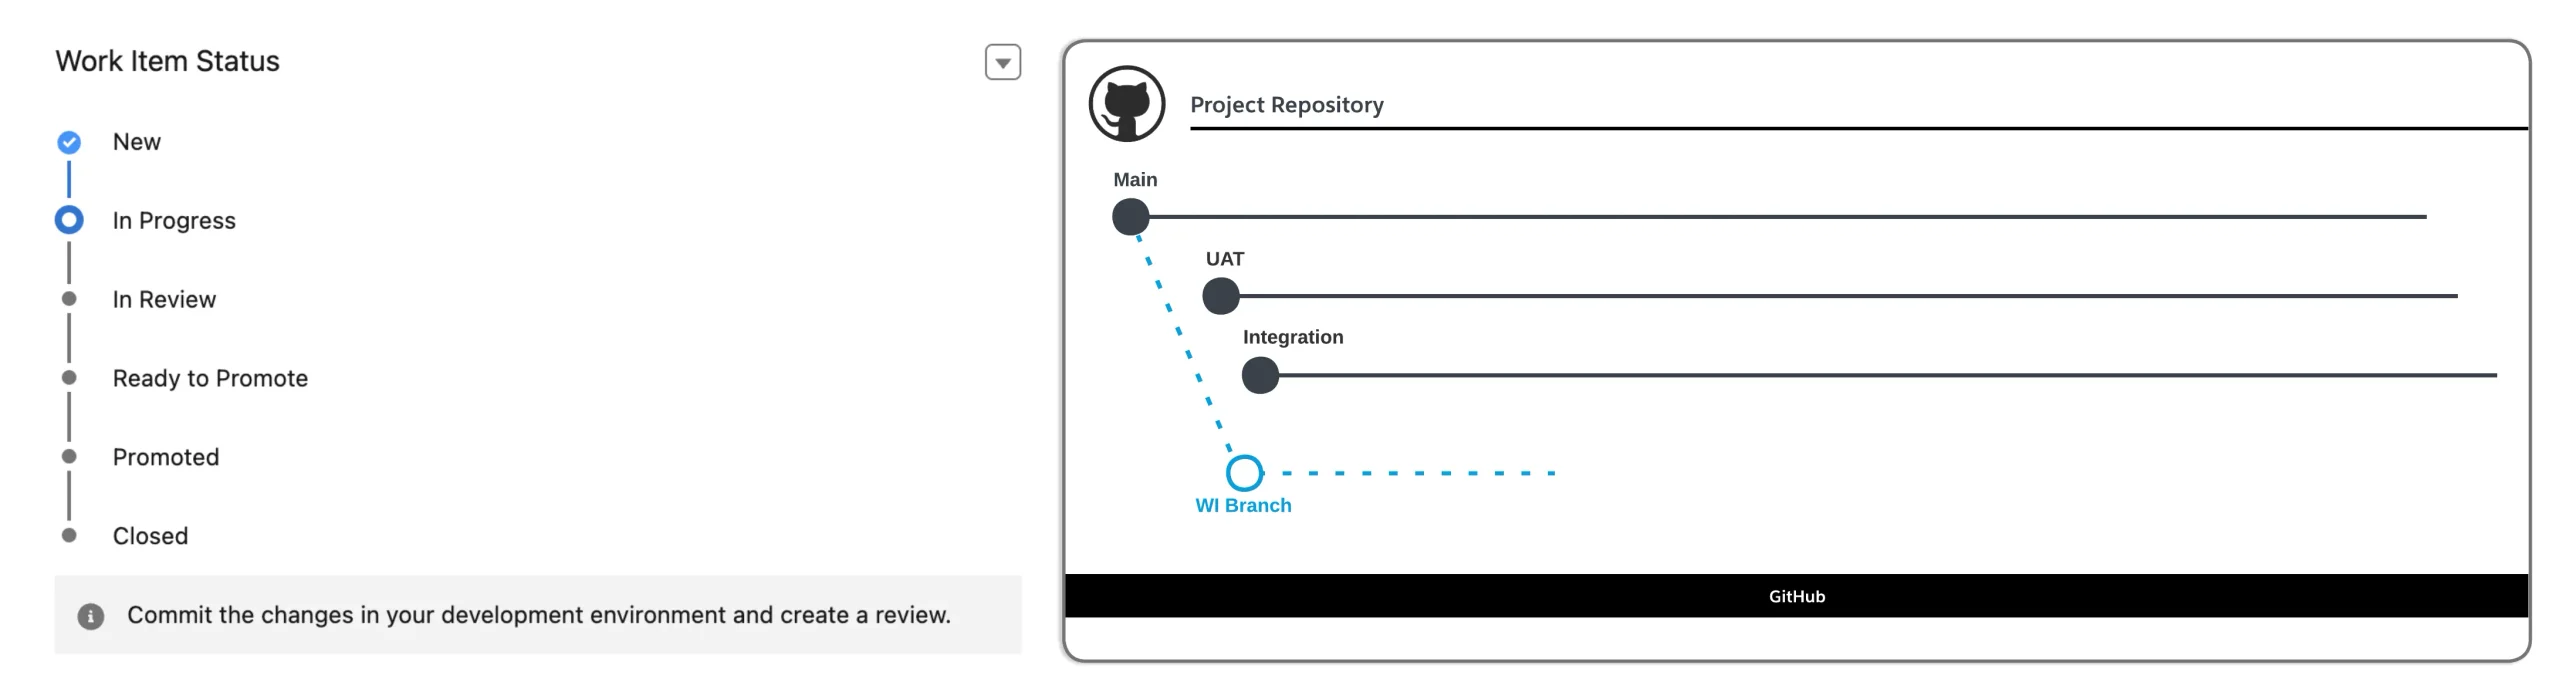
In Progress
A Work Item moves to In Progress from two places: the DevOps Center UI, or straight from the sandbox by committing components via the DX Inspector Bar.
Switching to In Progress automatically copies the main branch into a feature branch named after the Work Item. This lets developers or coding agents work with the latest files from production locally and commit directly to that isolated branch.
- Top tip: If you’re working from the CLI or an IDE, checking out your own branch bypasses DevOps Center entirely, and you won’t be able to control the WI from there. Checking out a branch via an AI agent using the SF MCP, however, does create a DevOps Center-compatible feature branch, and the status updates to In Progress automatically.
Developers, admins, and agents can all commit to the same branch, effectively saving snapshots of their work as they go.
In Review
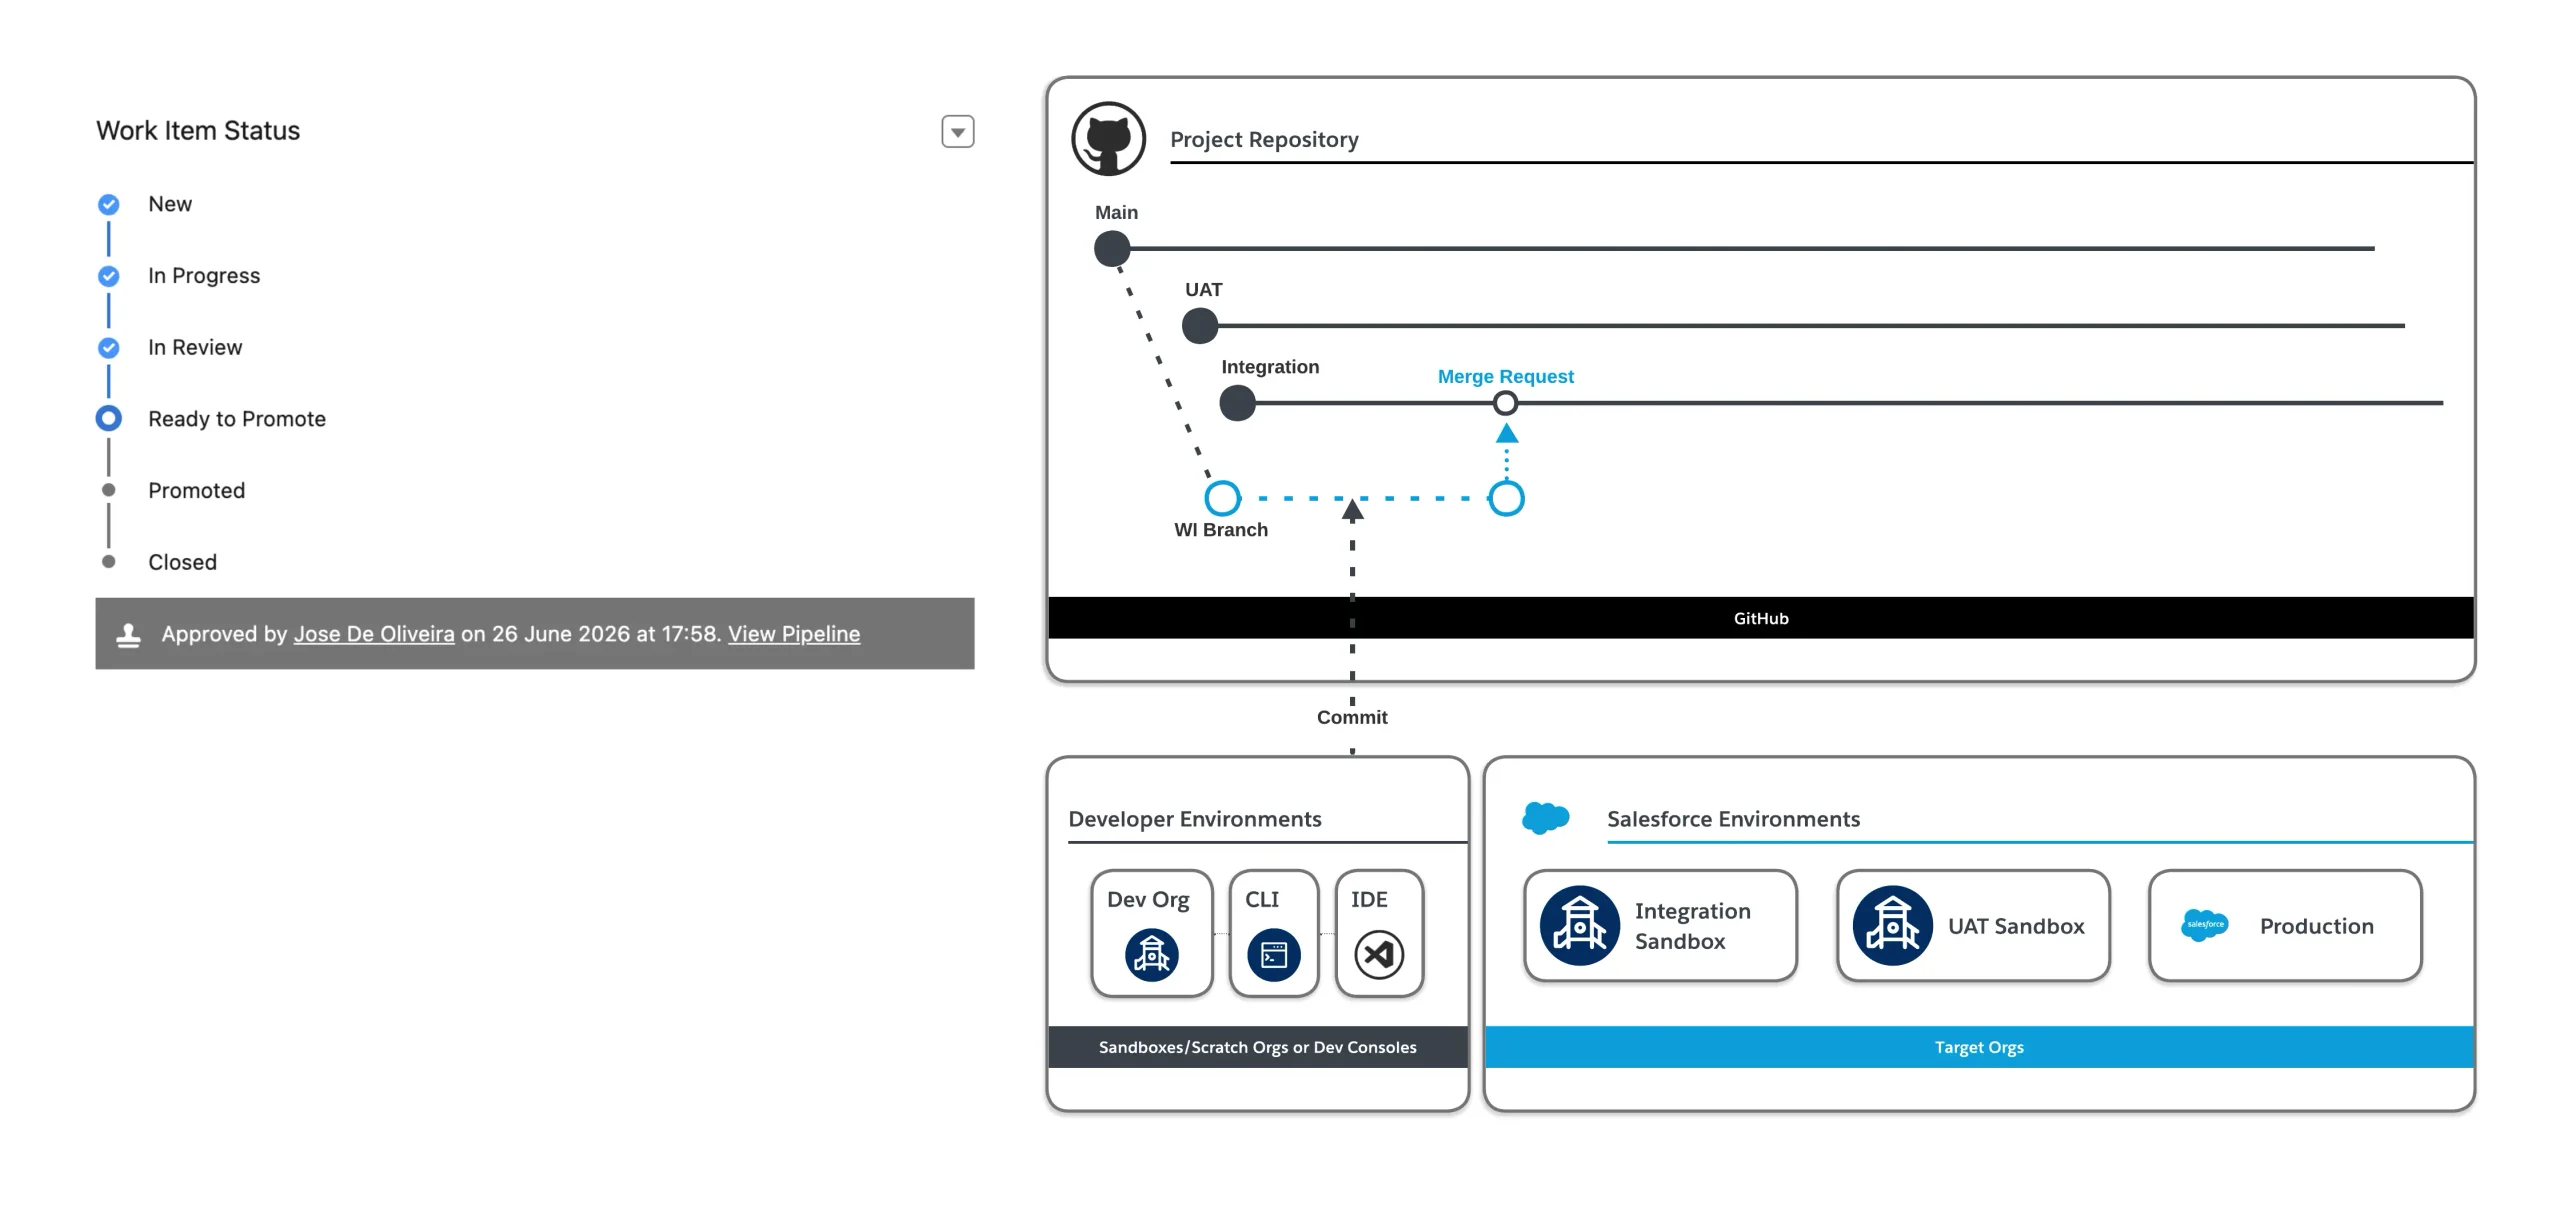
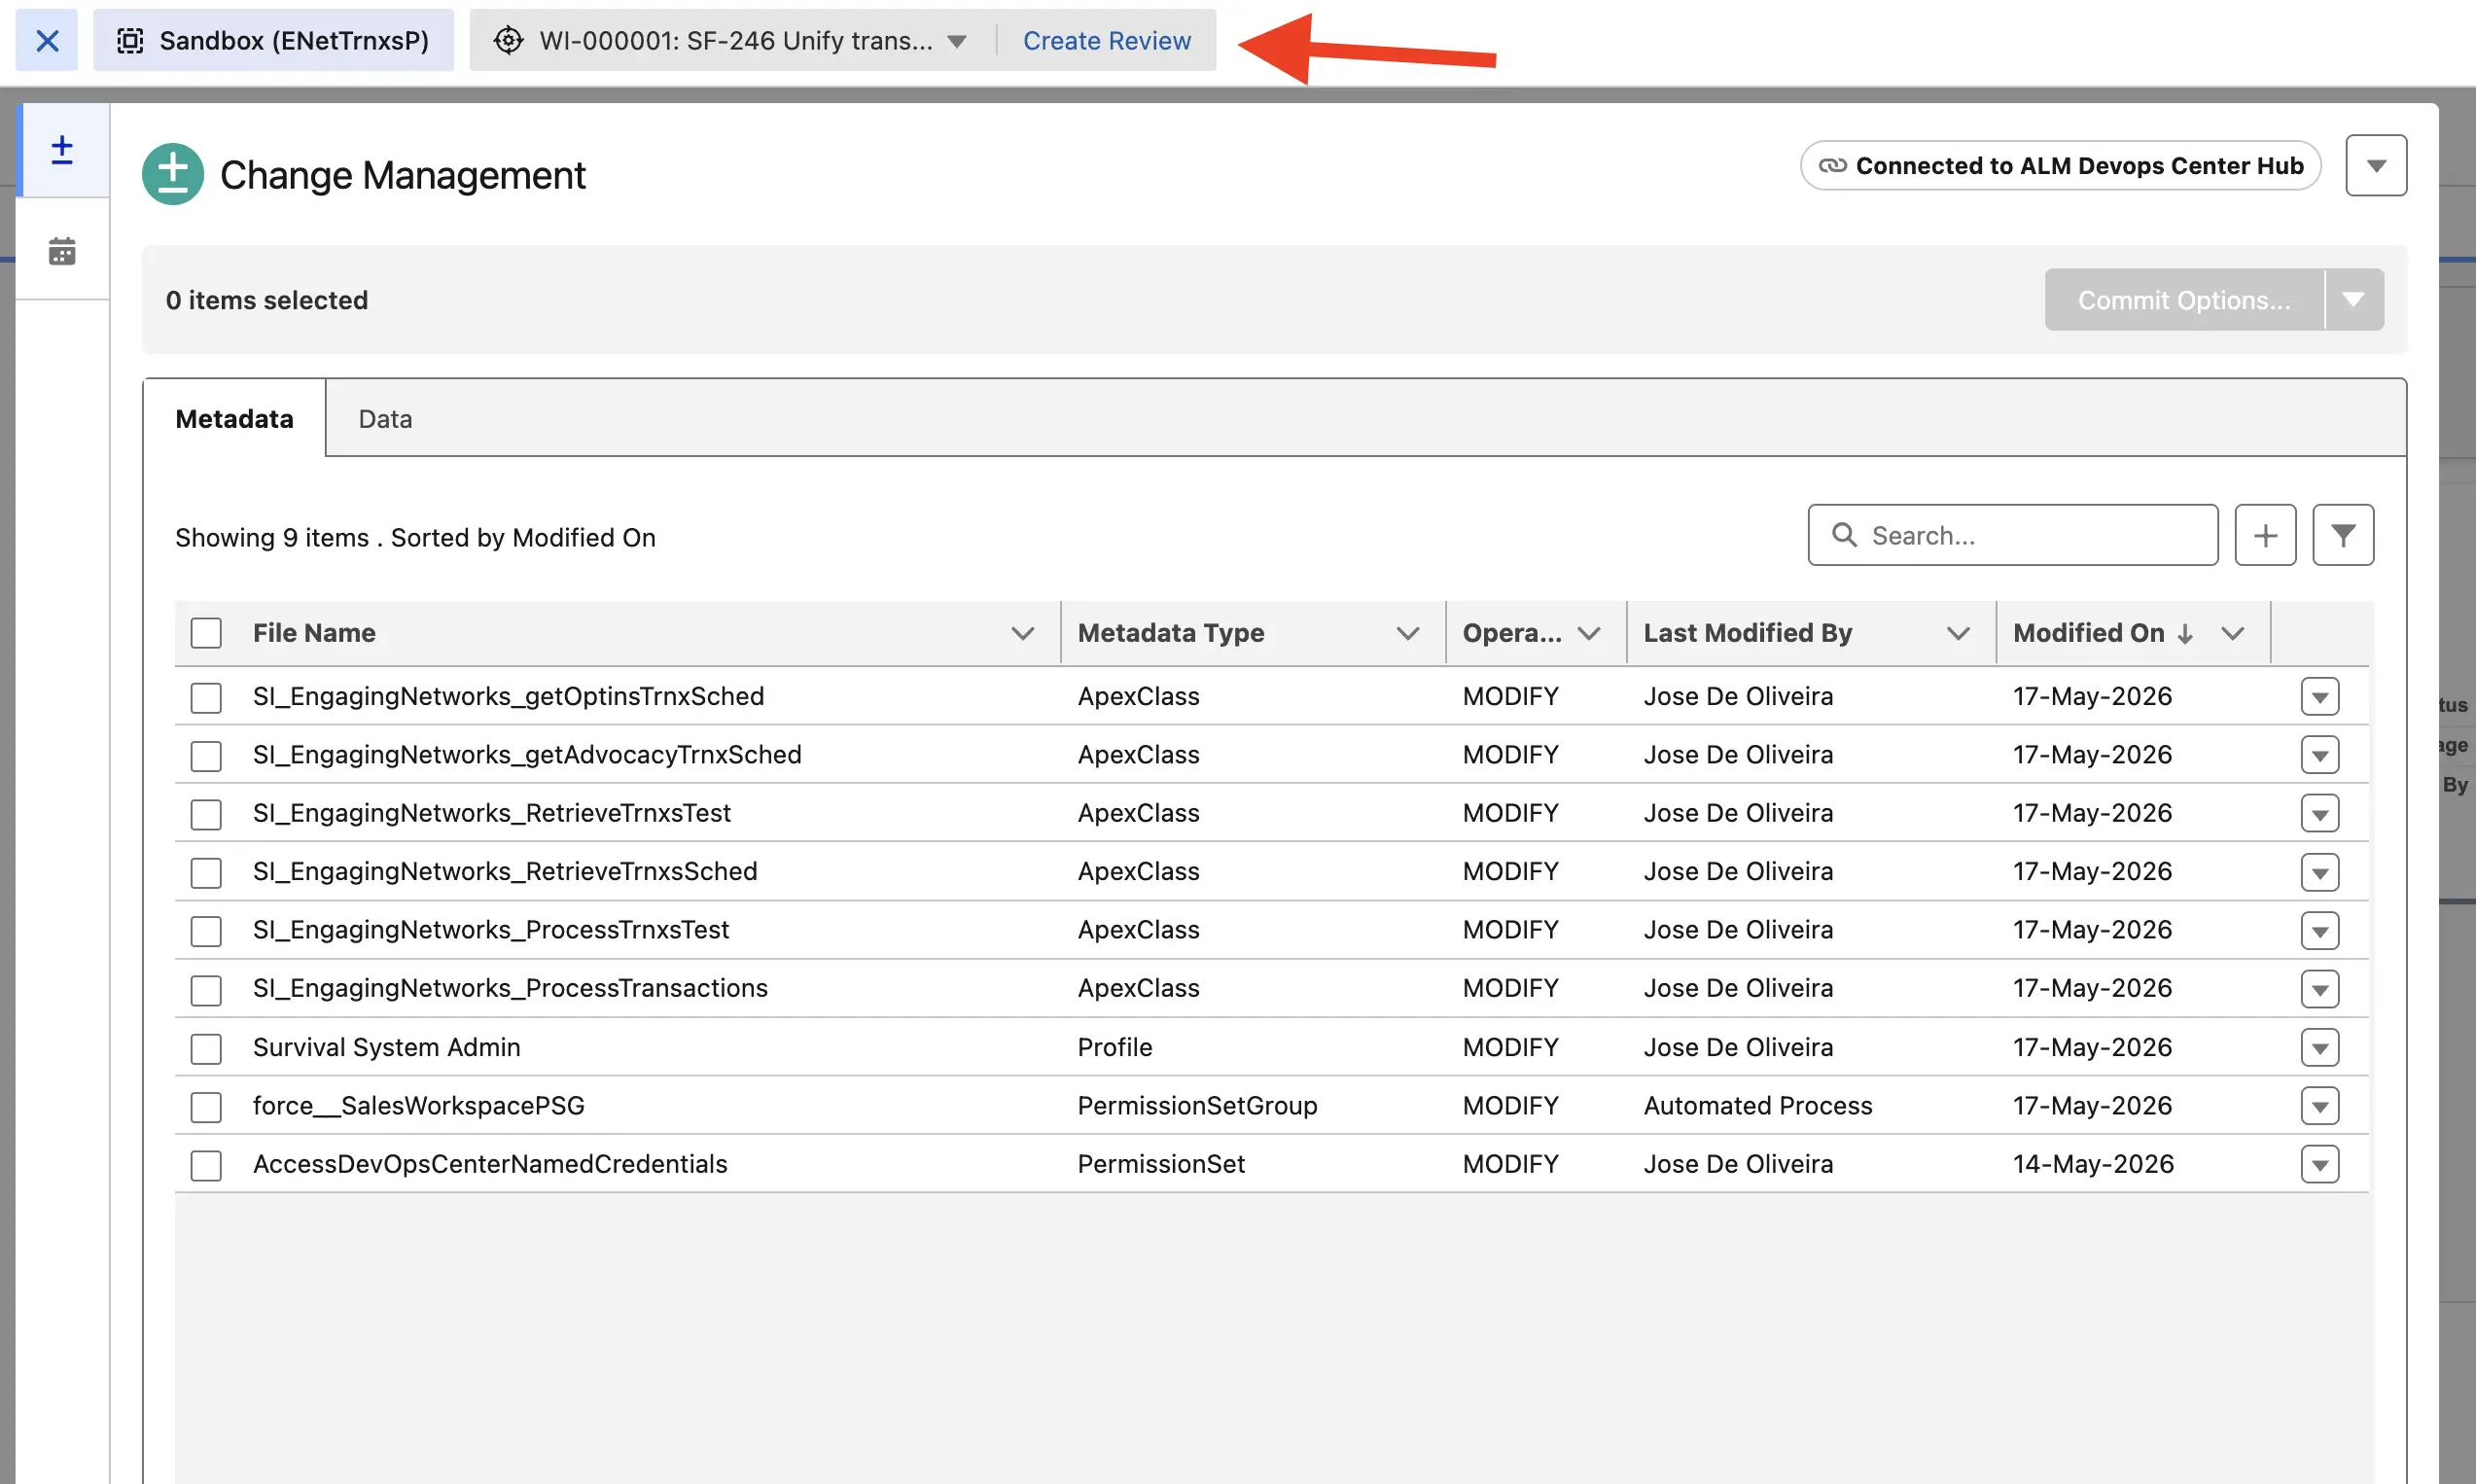
Once work is complete and all changes are committed to the WI branch, the item moves to “In Review” by clicking “Create Review” in the DX Inspector Bar, straight from the sandbox.
Moving to review creates a change request in the source control system – a merge or pull request – to merge the Work Item’s feature branch into the next environment’s branch (the next sandbox in the pipeline). This pull request can also be run directly from the source control system or from a coding agent via the SF MCP.
Once the change request is submitted, you can either merge it directly in the source control system (GitHub/Bitbucket), or mark the item “Ready to Promote.”
Merging directly in source control “half-promotes” the work: it moves the changes into the next environment’s branch, but only locally in the repository – the changes still need to be pushed to the actual org via “Complete Promotion.” This route lets you review and compare files before executing the merge.
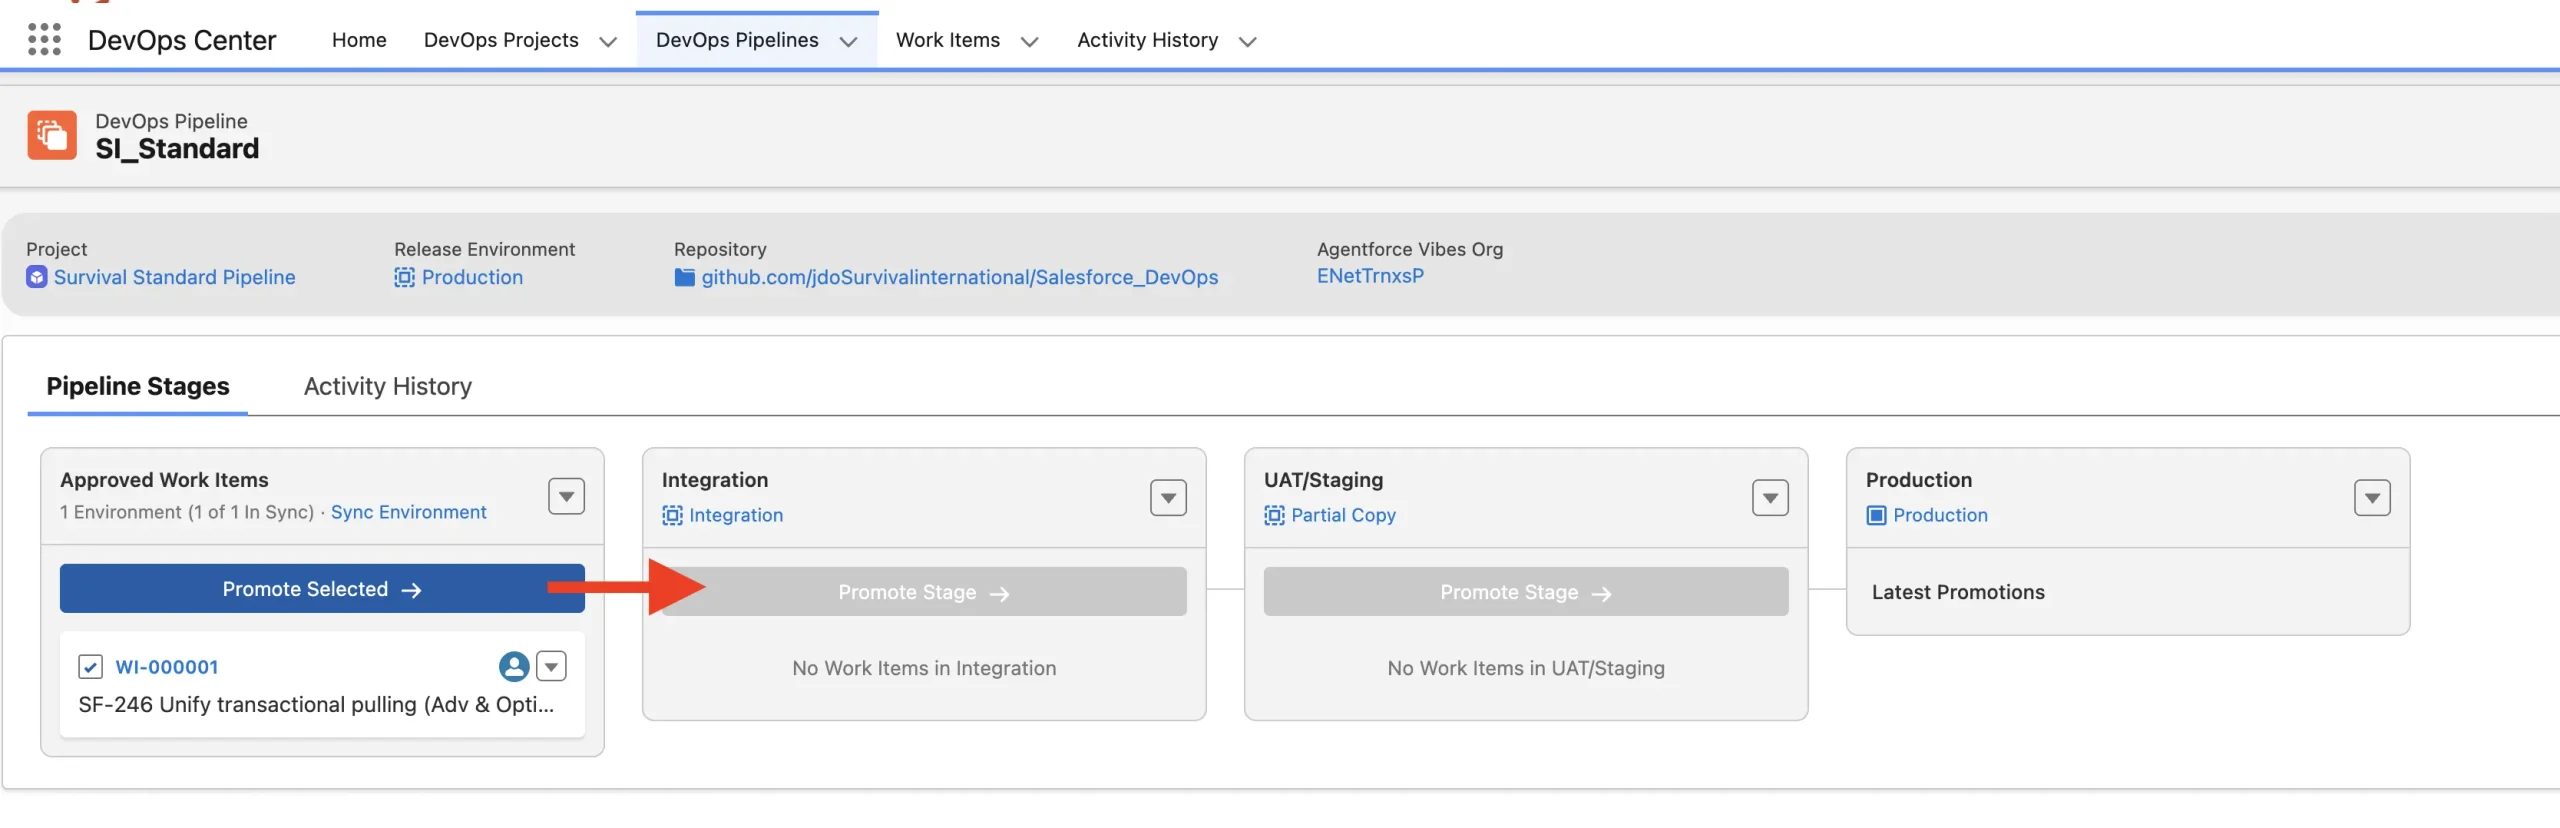
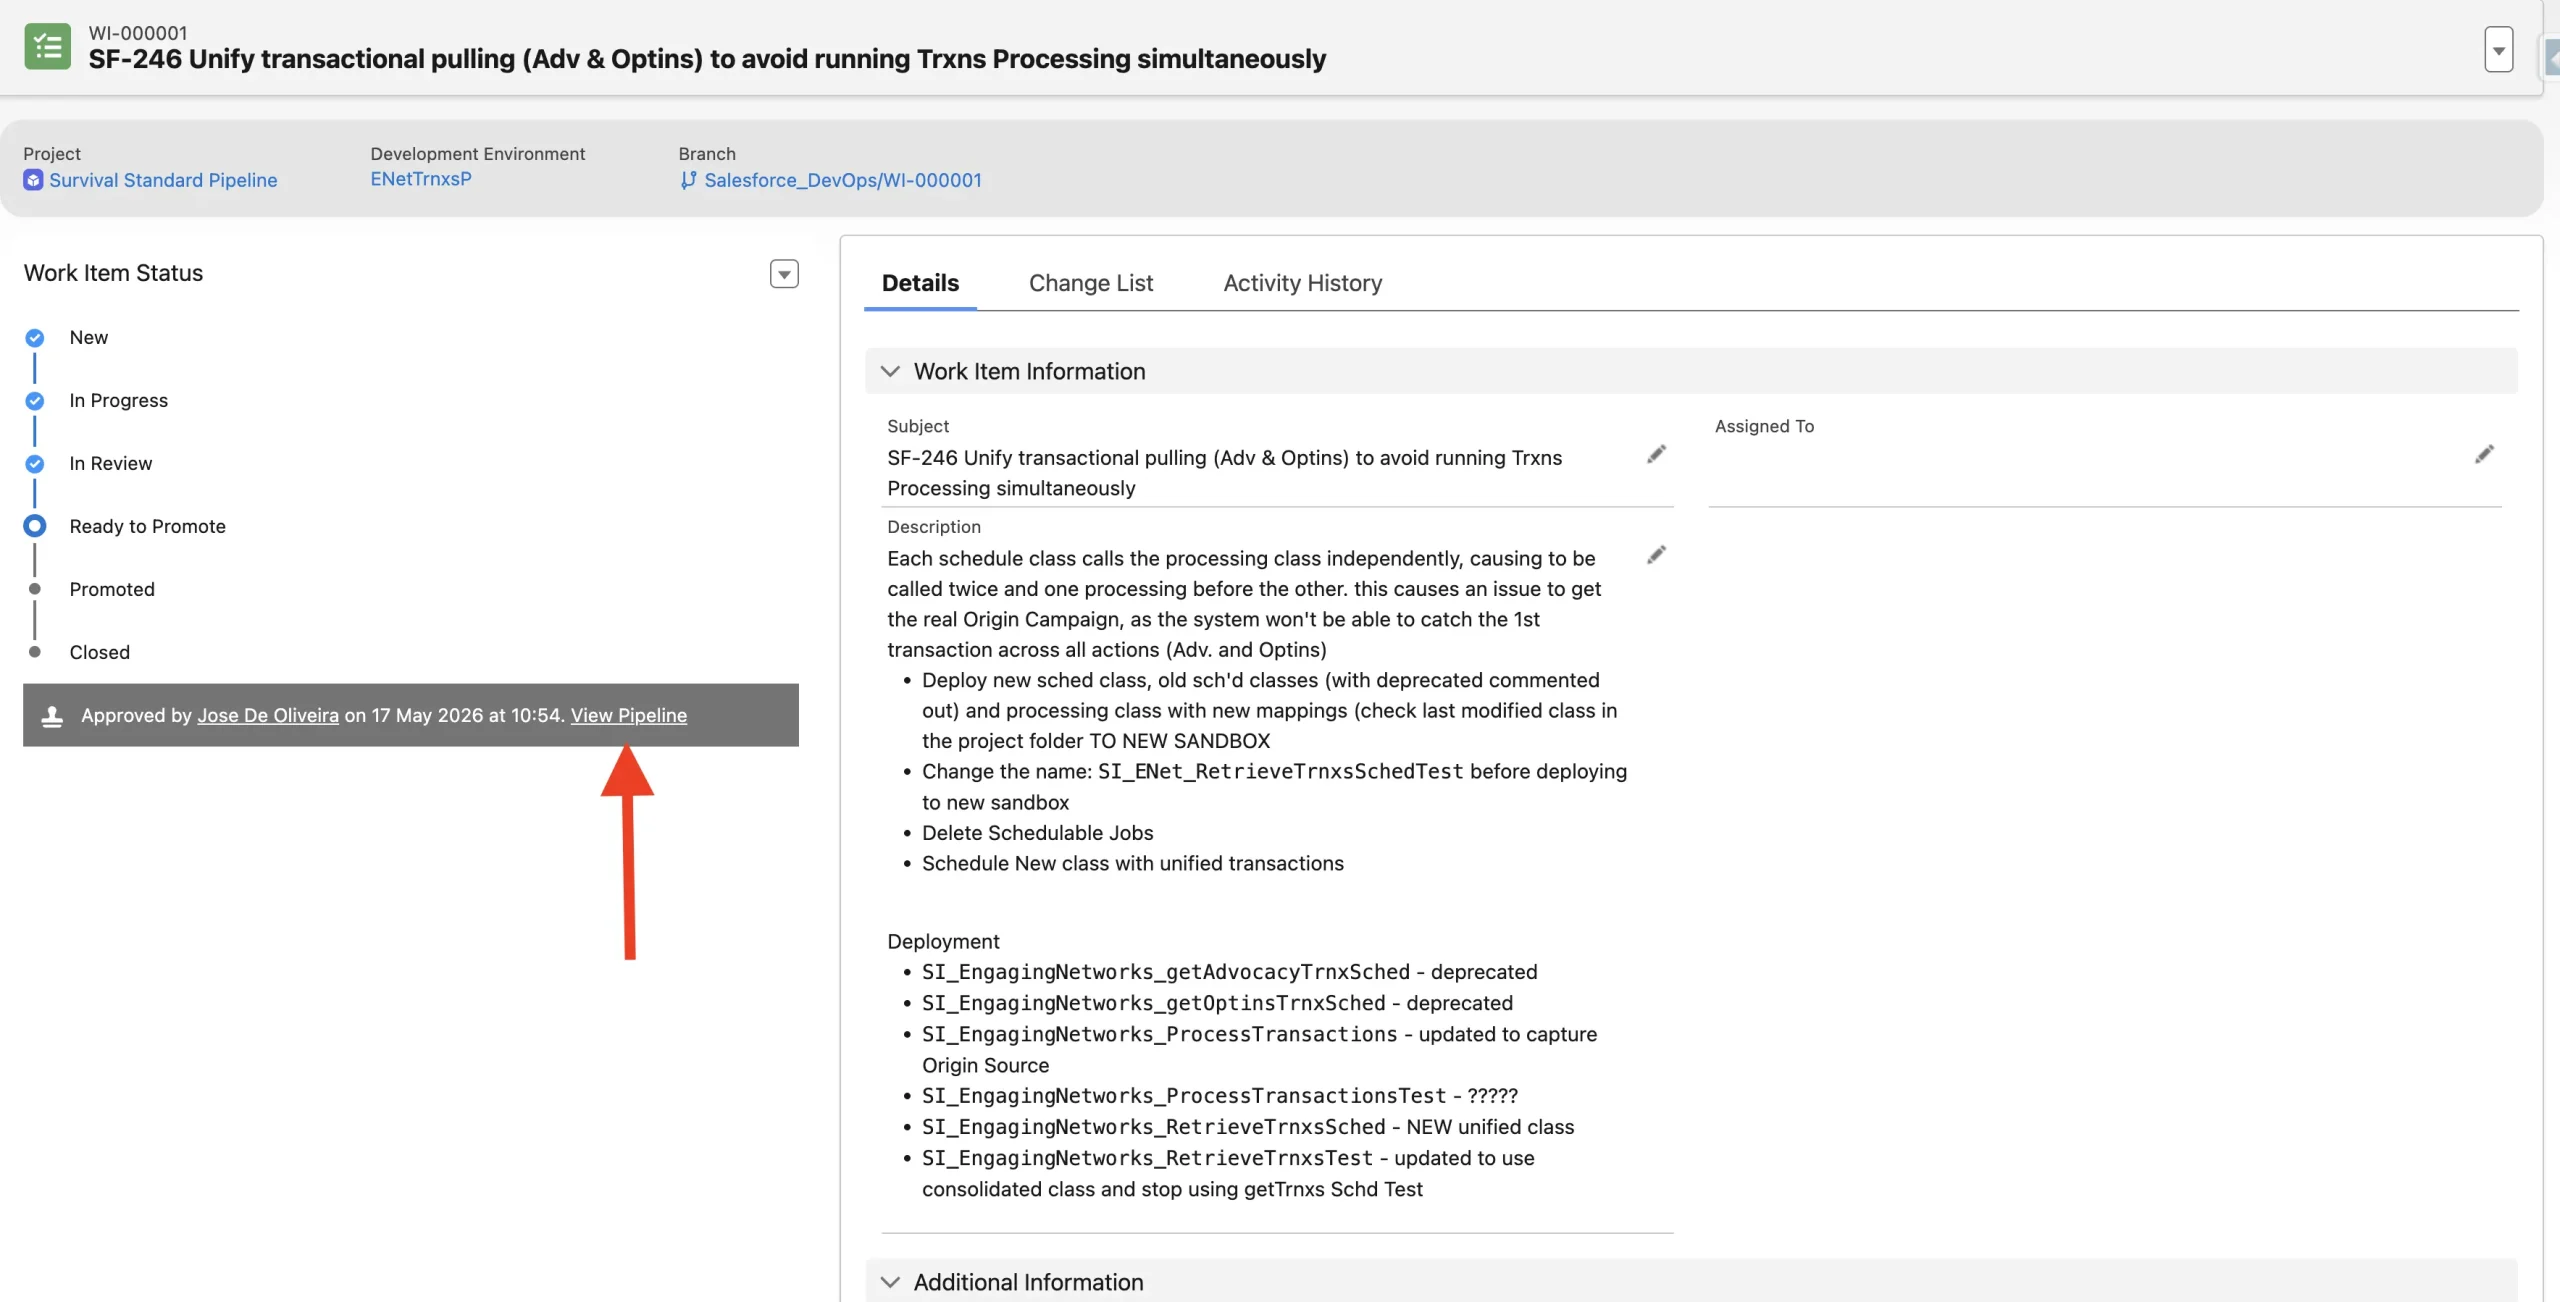
Marking it “Ready to Promote” instead makes the WI visible in the DevOps Center pipeline, waiting for a declarative promotion via the UI. When you promote this way, the merge and the push to the target org both happen automatically.
Ready to Promote
This status only makes the item visible in the pipeline for a UI-driven promotion – nothing changes yet in the source control system. This step isn’t needed if the pull request is merged directly in the repository, or via an AI coding agent.
Promoted
Once the pull request is approved and merged, the WI status becomes “Promoted.” Changes are merged into the next environment’s branch (e.g. Integration) and pushed from the source control system into the sandbox.
This means that when resolving conflicts, manual changes must be made in the environment’s branch – not the Work Item’s branch – and redeployed to the org by promoting again.
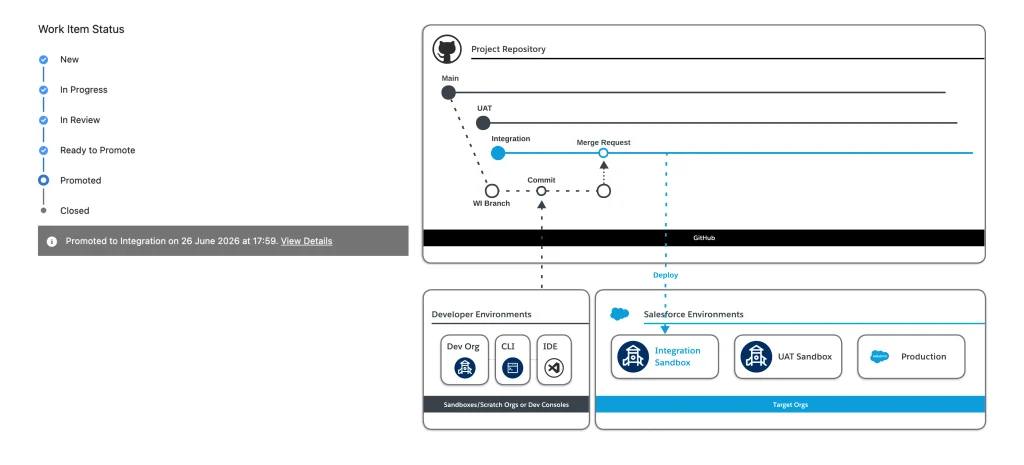
No further changes are allowed on the Work Item once it’s been delivered to the next stage.
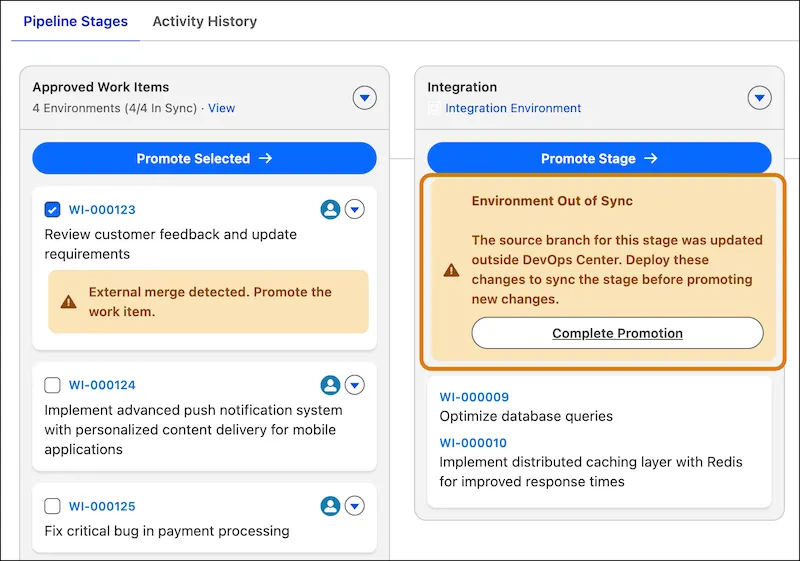
If the change request is merged manually, outside DevOps Center, DevOps Center picks this up and prompts a warning to complete promotion by pushing changes to the target org.
A merge done via an agent through the SF MCP, on the other hand, automatically pushes to the target and completes promotion with no extra steps.
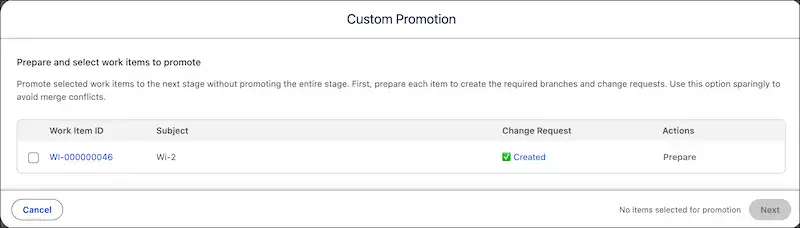
Even when several changes land in the same stage, each Work Item is still tracked separately behind the scenes, enabling “Custom Promotions” that promote one item independently of the rest.
Clicking “Prepare Work Item” creates a separate change request from that item’s rebased branch to the next environment’s branch (e.g., from the original PR “Integration → UAT,” it creates a new PR “WI-00001 → UAT”), letting you push individual change bundles.
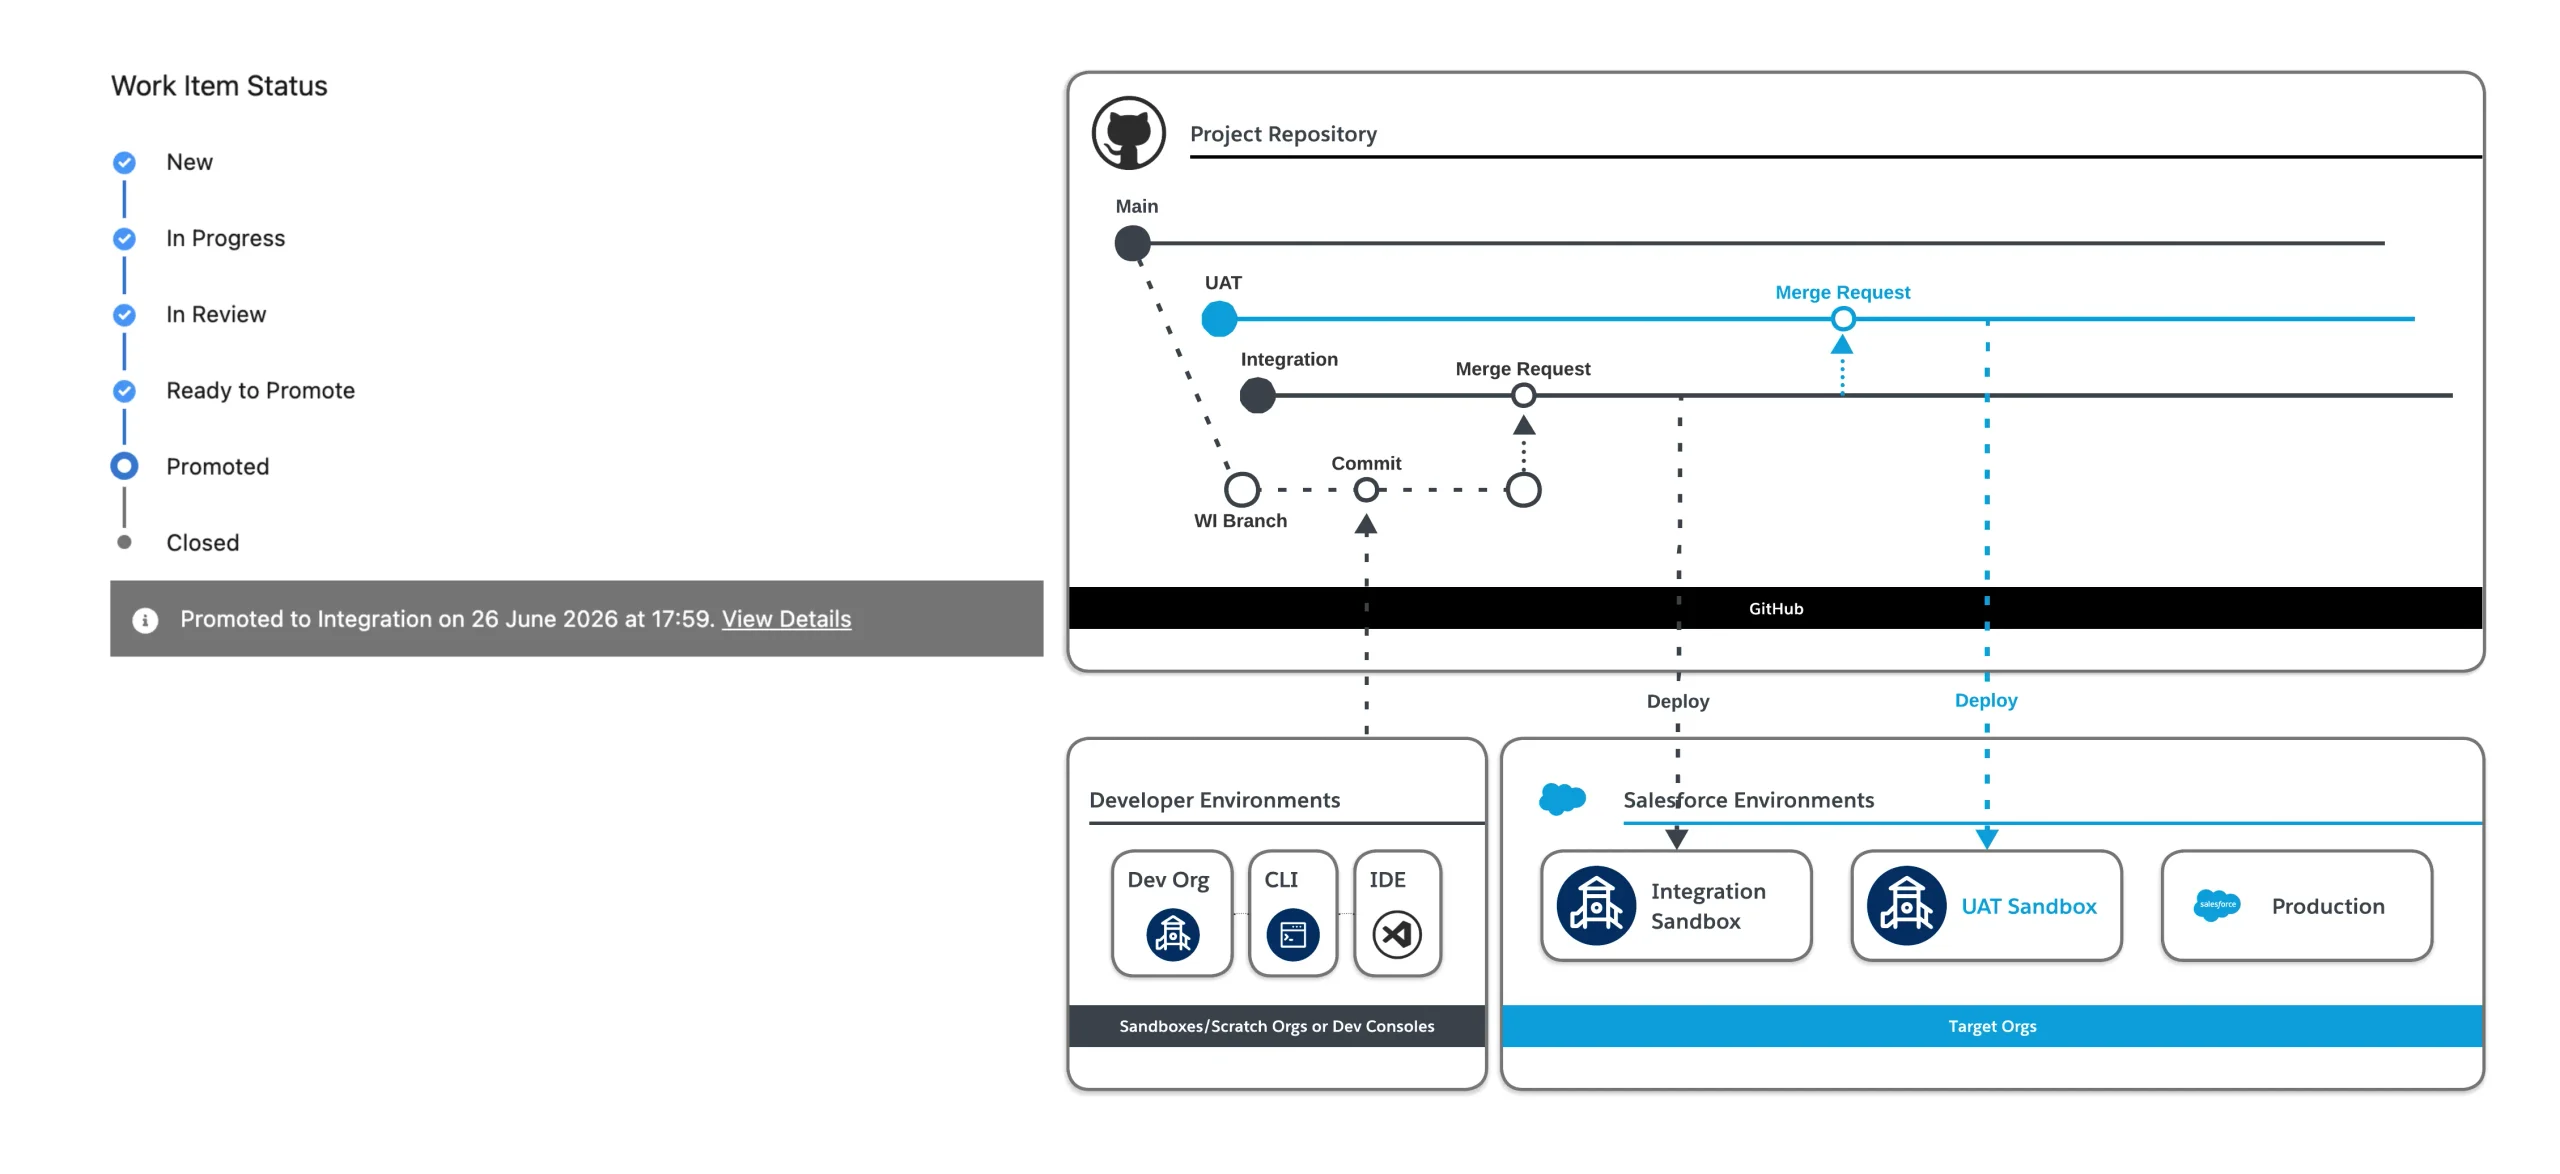
Once promoted, a new pull request is created automatically between the current stage’s branch and the next (e.g., Integration to UAT), and this continues until the item reaches its final destination in the pipeline.
Closed
The final stage: changes are merged into the main branch, and all components have been deployed to production from the source control system.
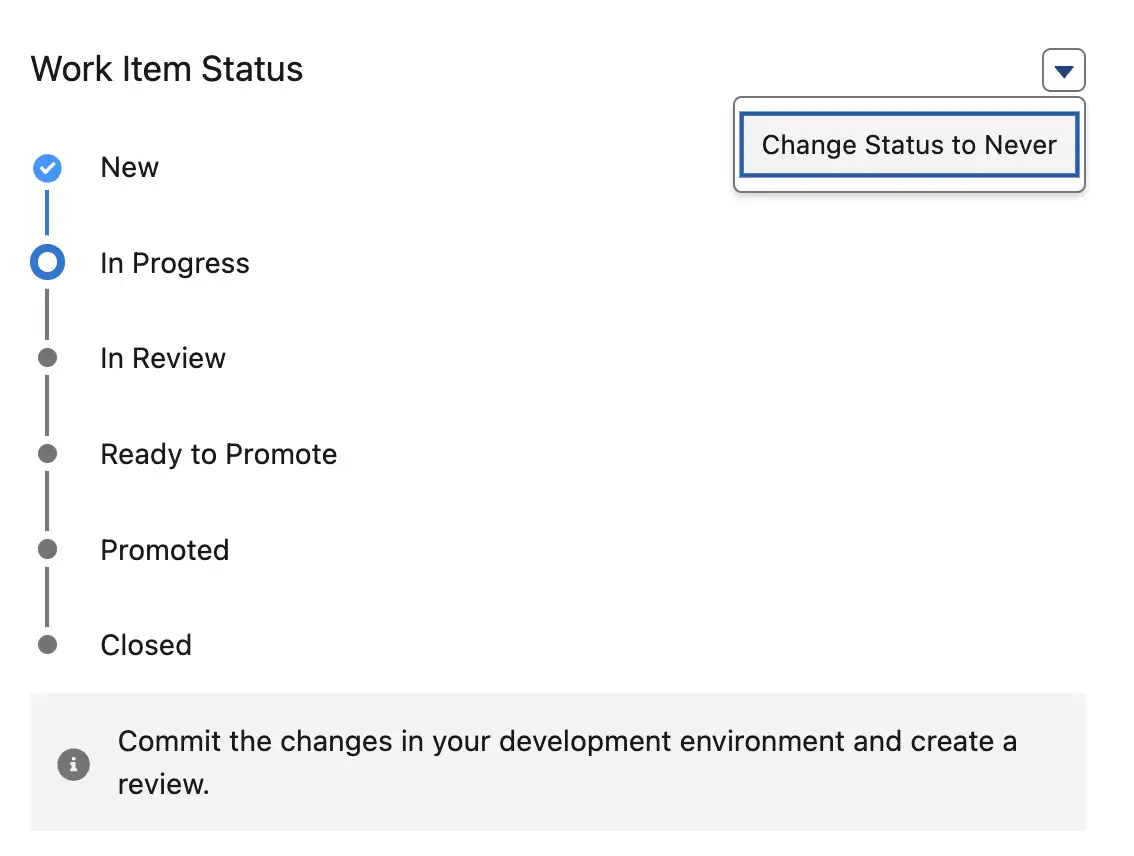
Never (…Promoted)
Any Work Item can be changed to “Never” status if it’s being rescinded, leaving its branch unmerged.
Key Differences: Managed Package vs. Next Generation Core App
The differences are substantial – it feels like a complete reinvention, with a much simpler underlying data model. Here’s a rundown of what stood out most.
Seamless AI Integration
As mentioned earlier, you can manage every operation – pushing, merging, checking out branches, creating Work Items, even resolving conflicts – straight from an LLM like Claude Code, via the official Salesforce MCP.
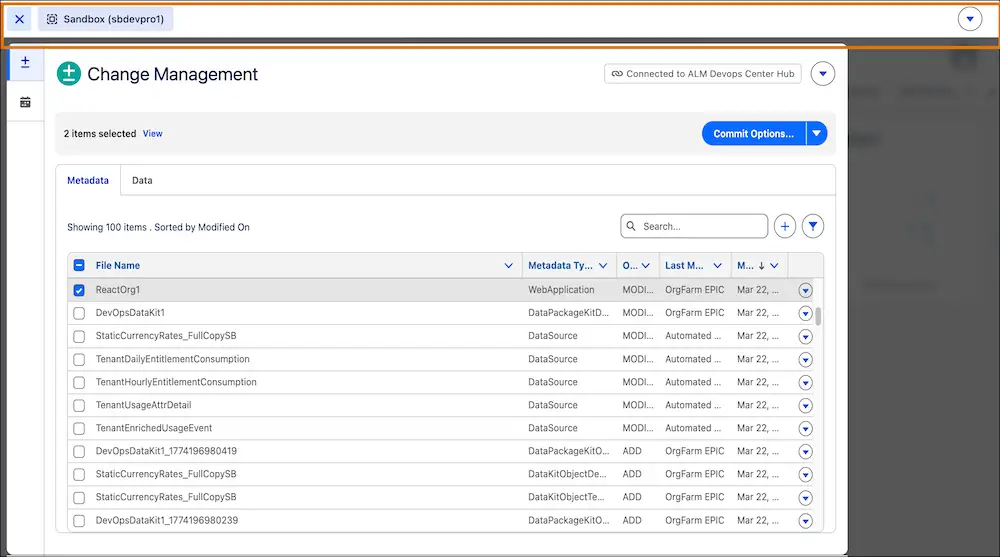
Commit Straight from the Sandbox
With the DX Inspector Bar, changes can be committed to the branch directly from the working sandbox, instead of pulling and committing components inside DevOps Center, removing the friction of switching between environments.
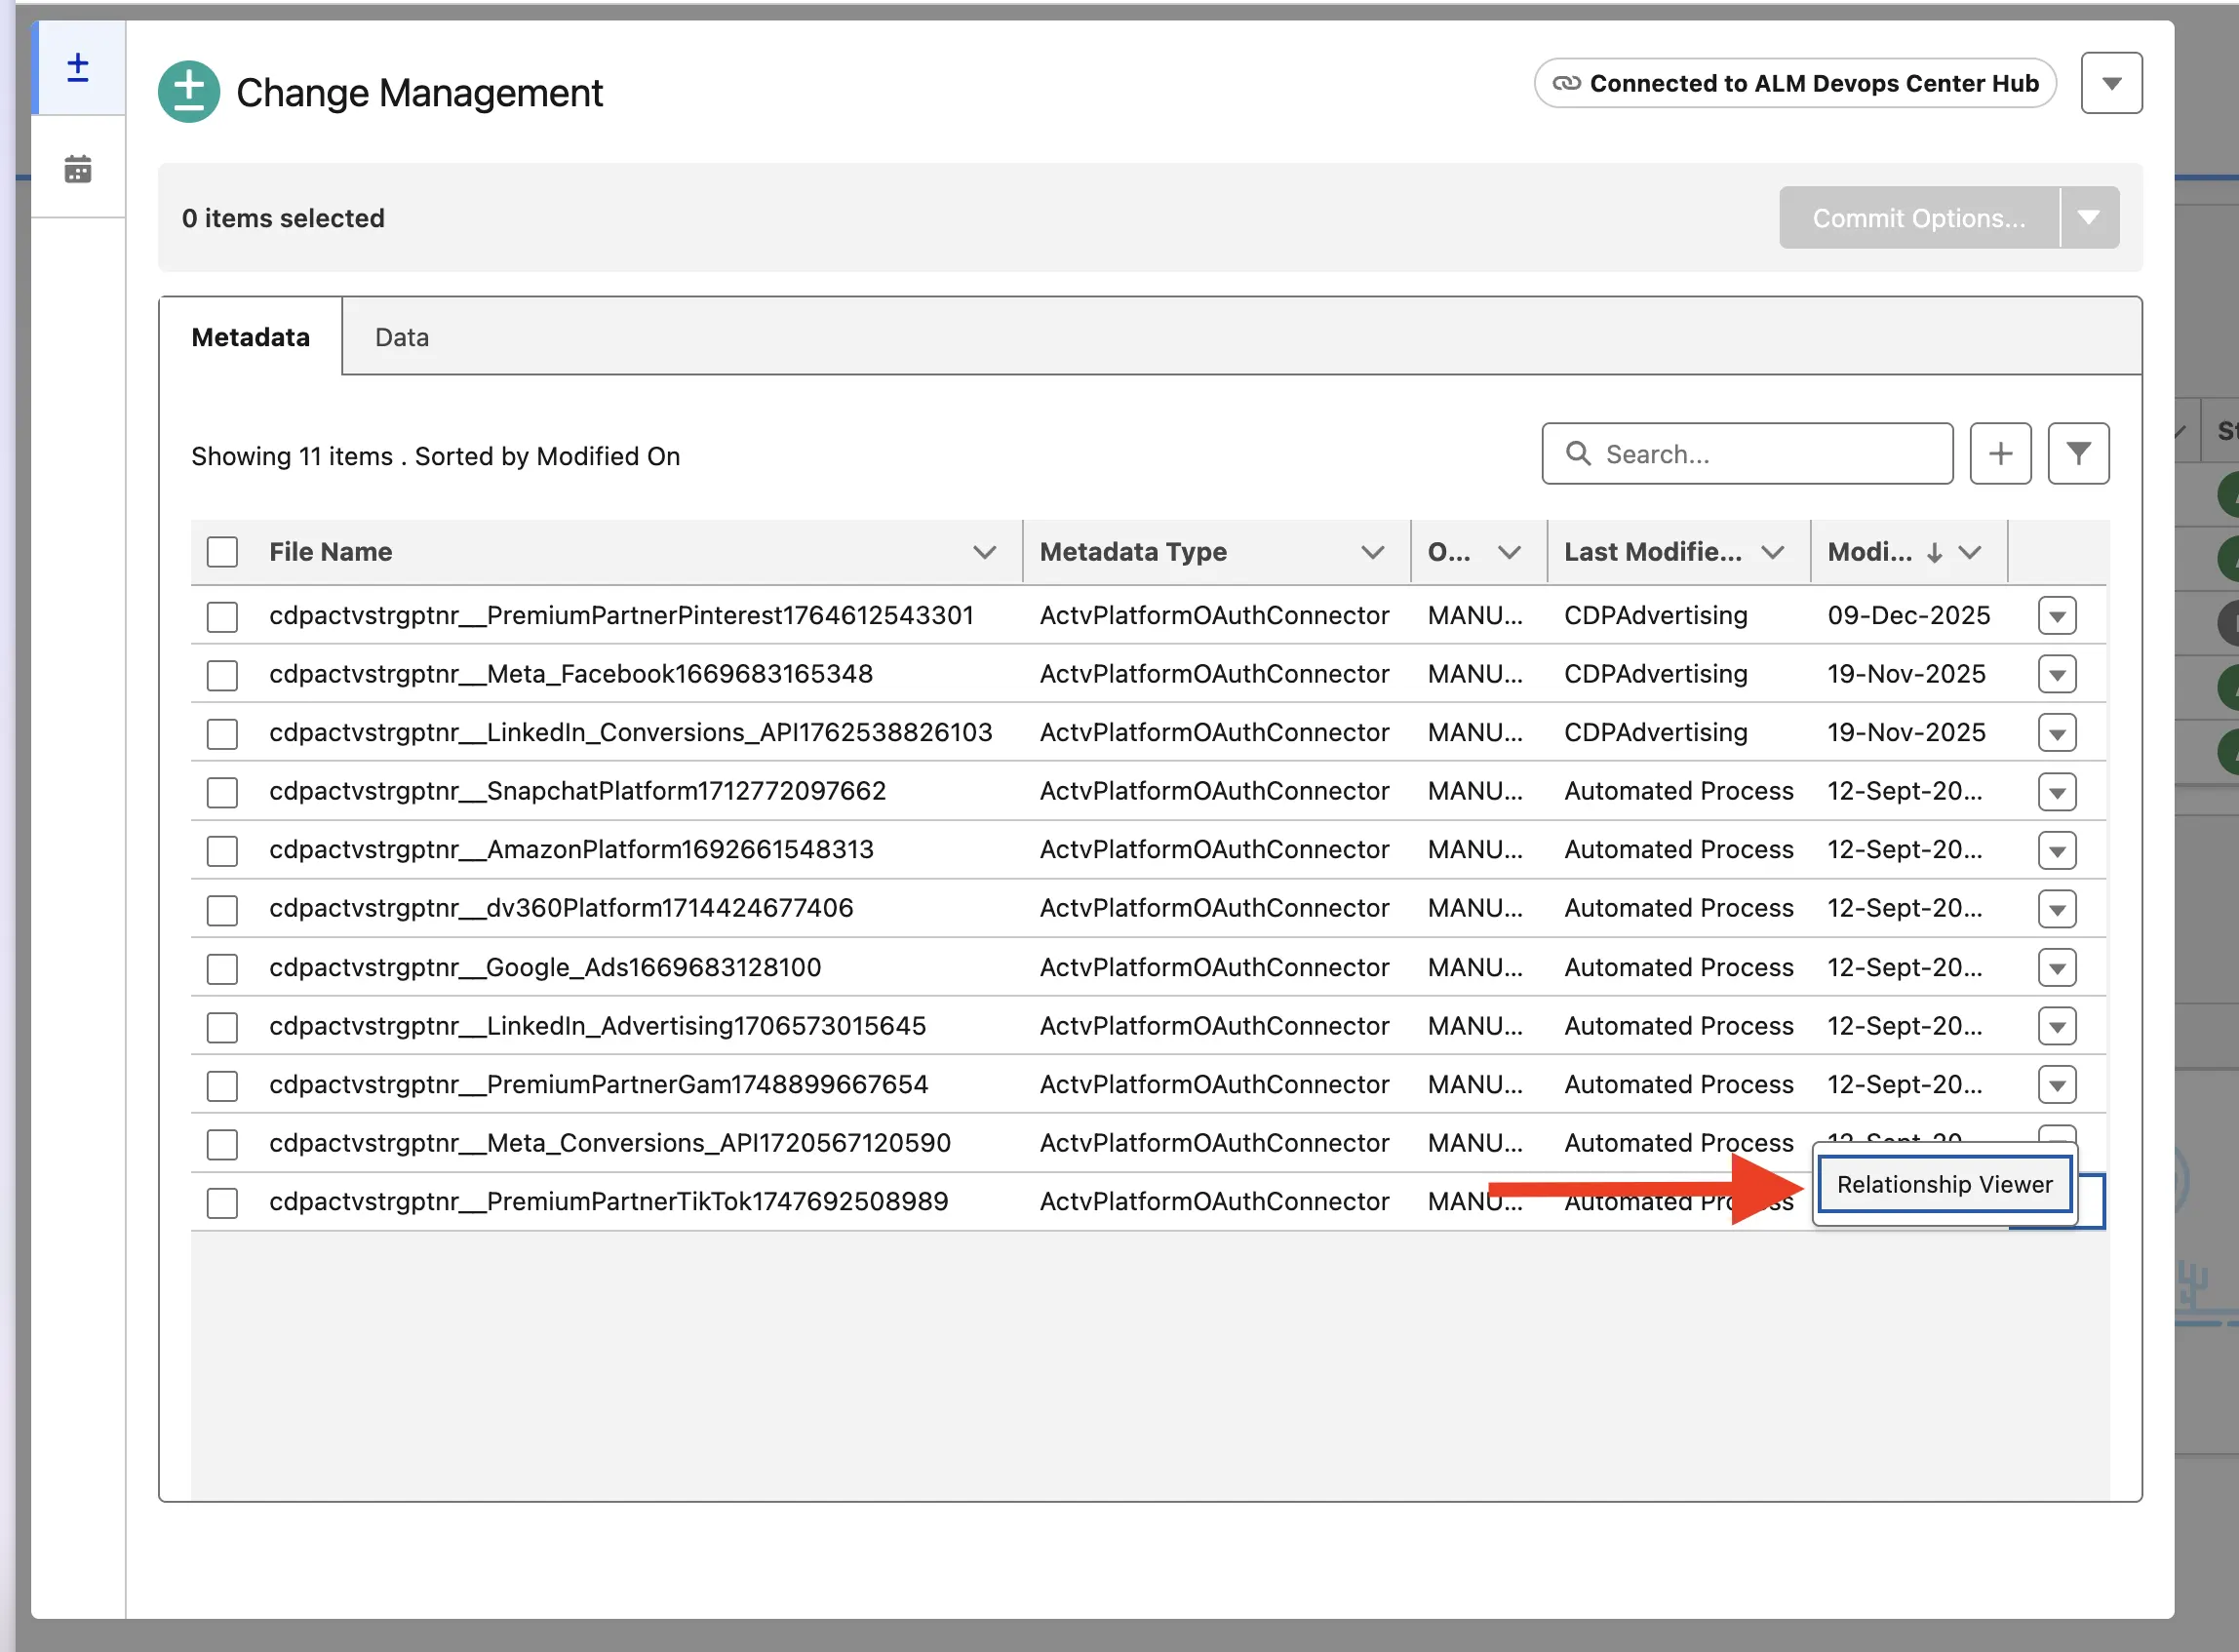
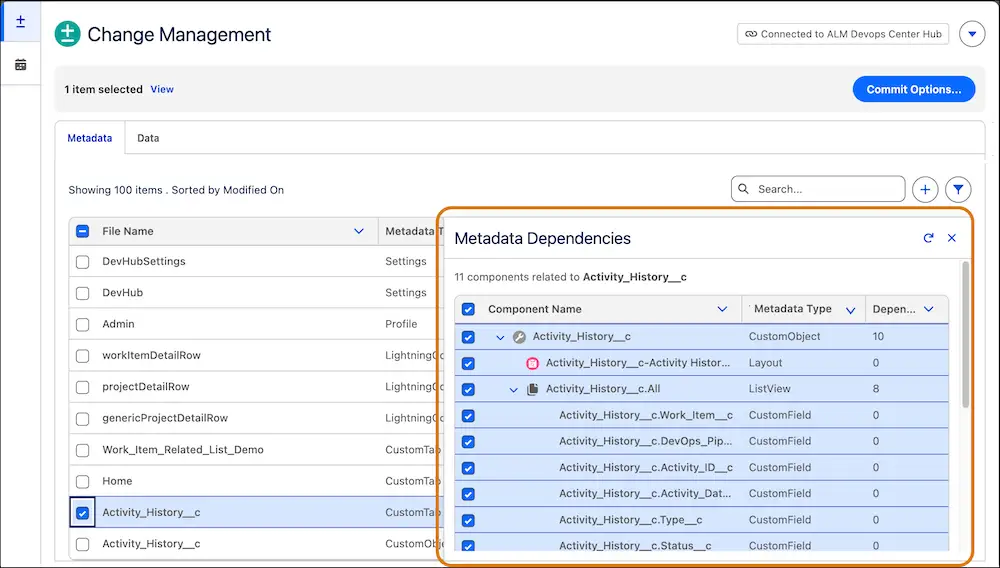
See Metadata Dependencies
The managed package lacked visibility into dependent components, unlike Change Sets. In the Next Generation, the Relationship Viewer lists all related components.
Deploy to Other Sandboxes
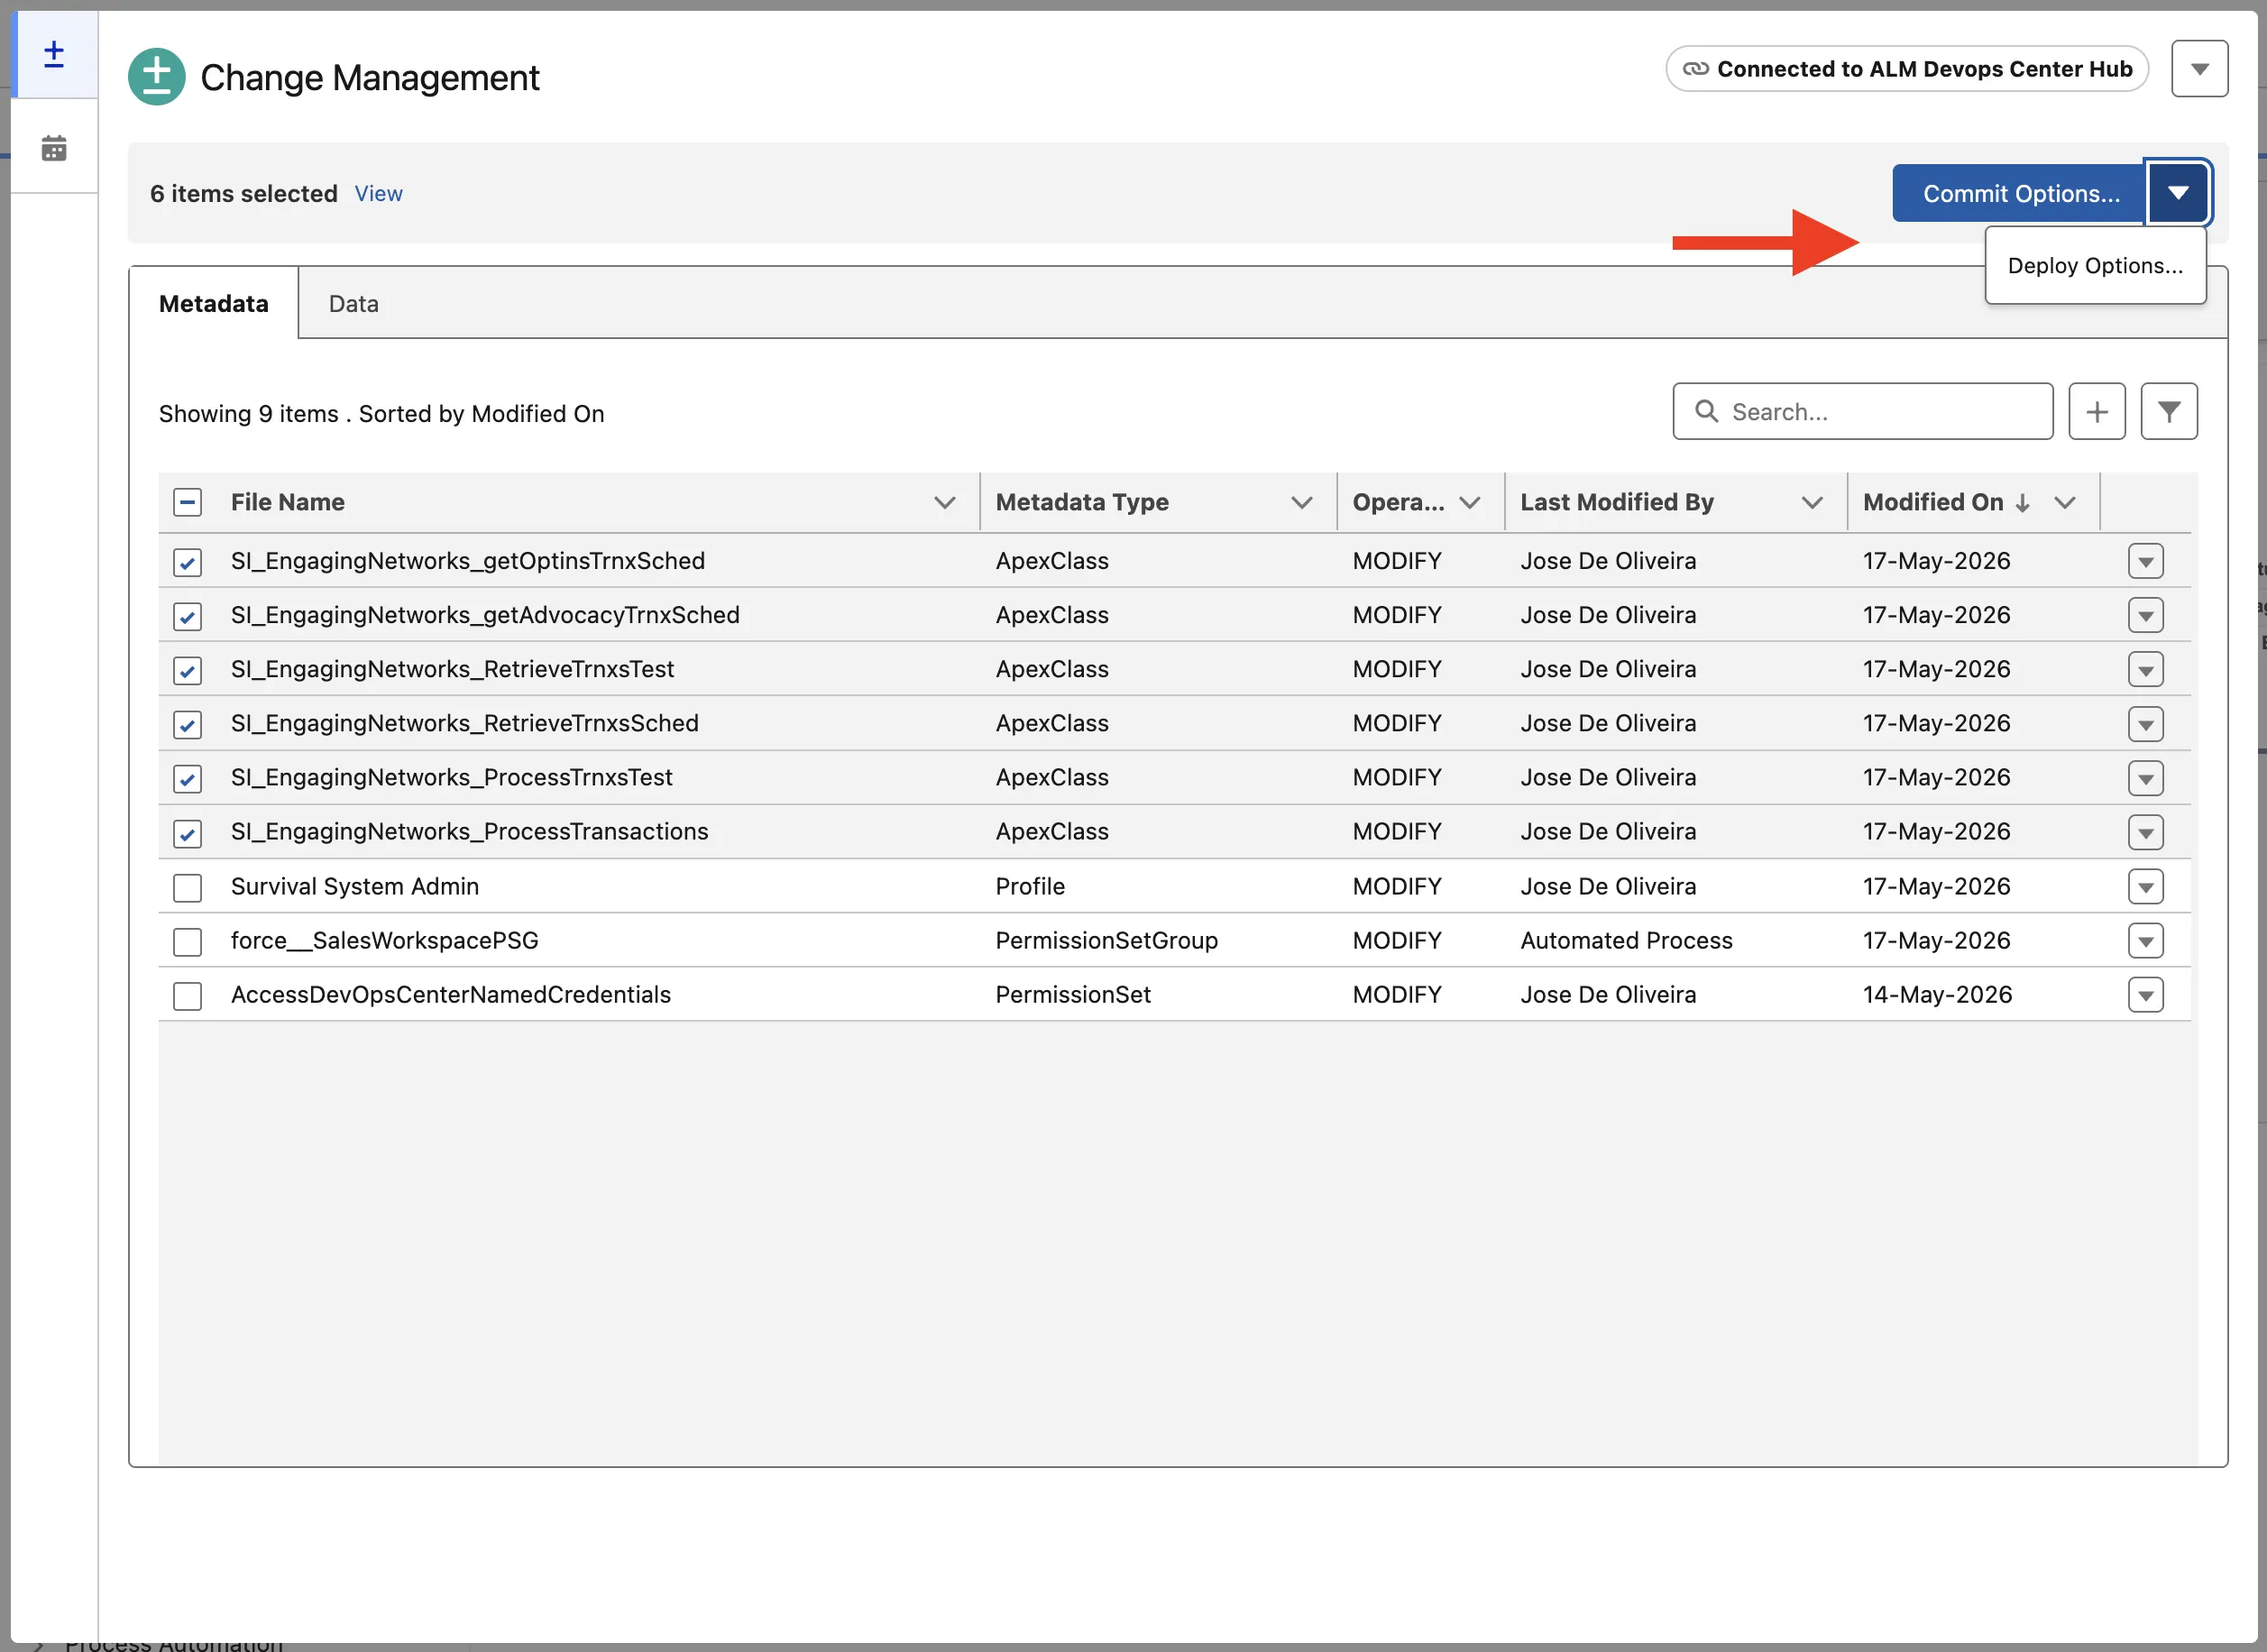
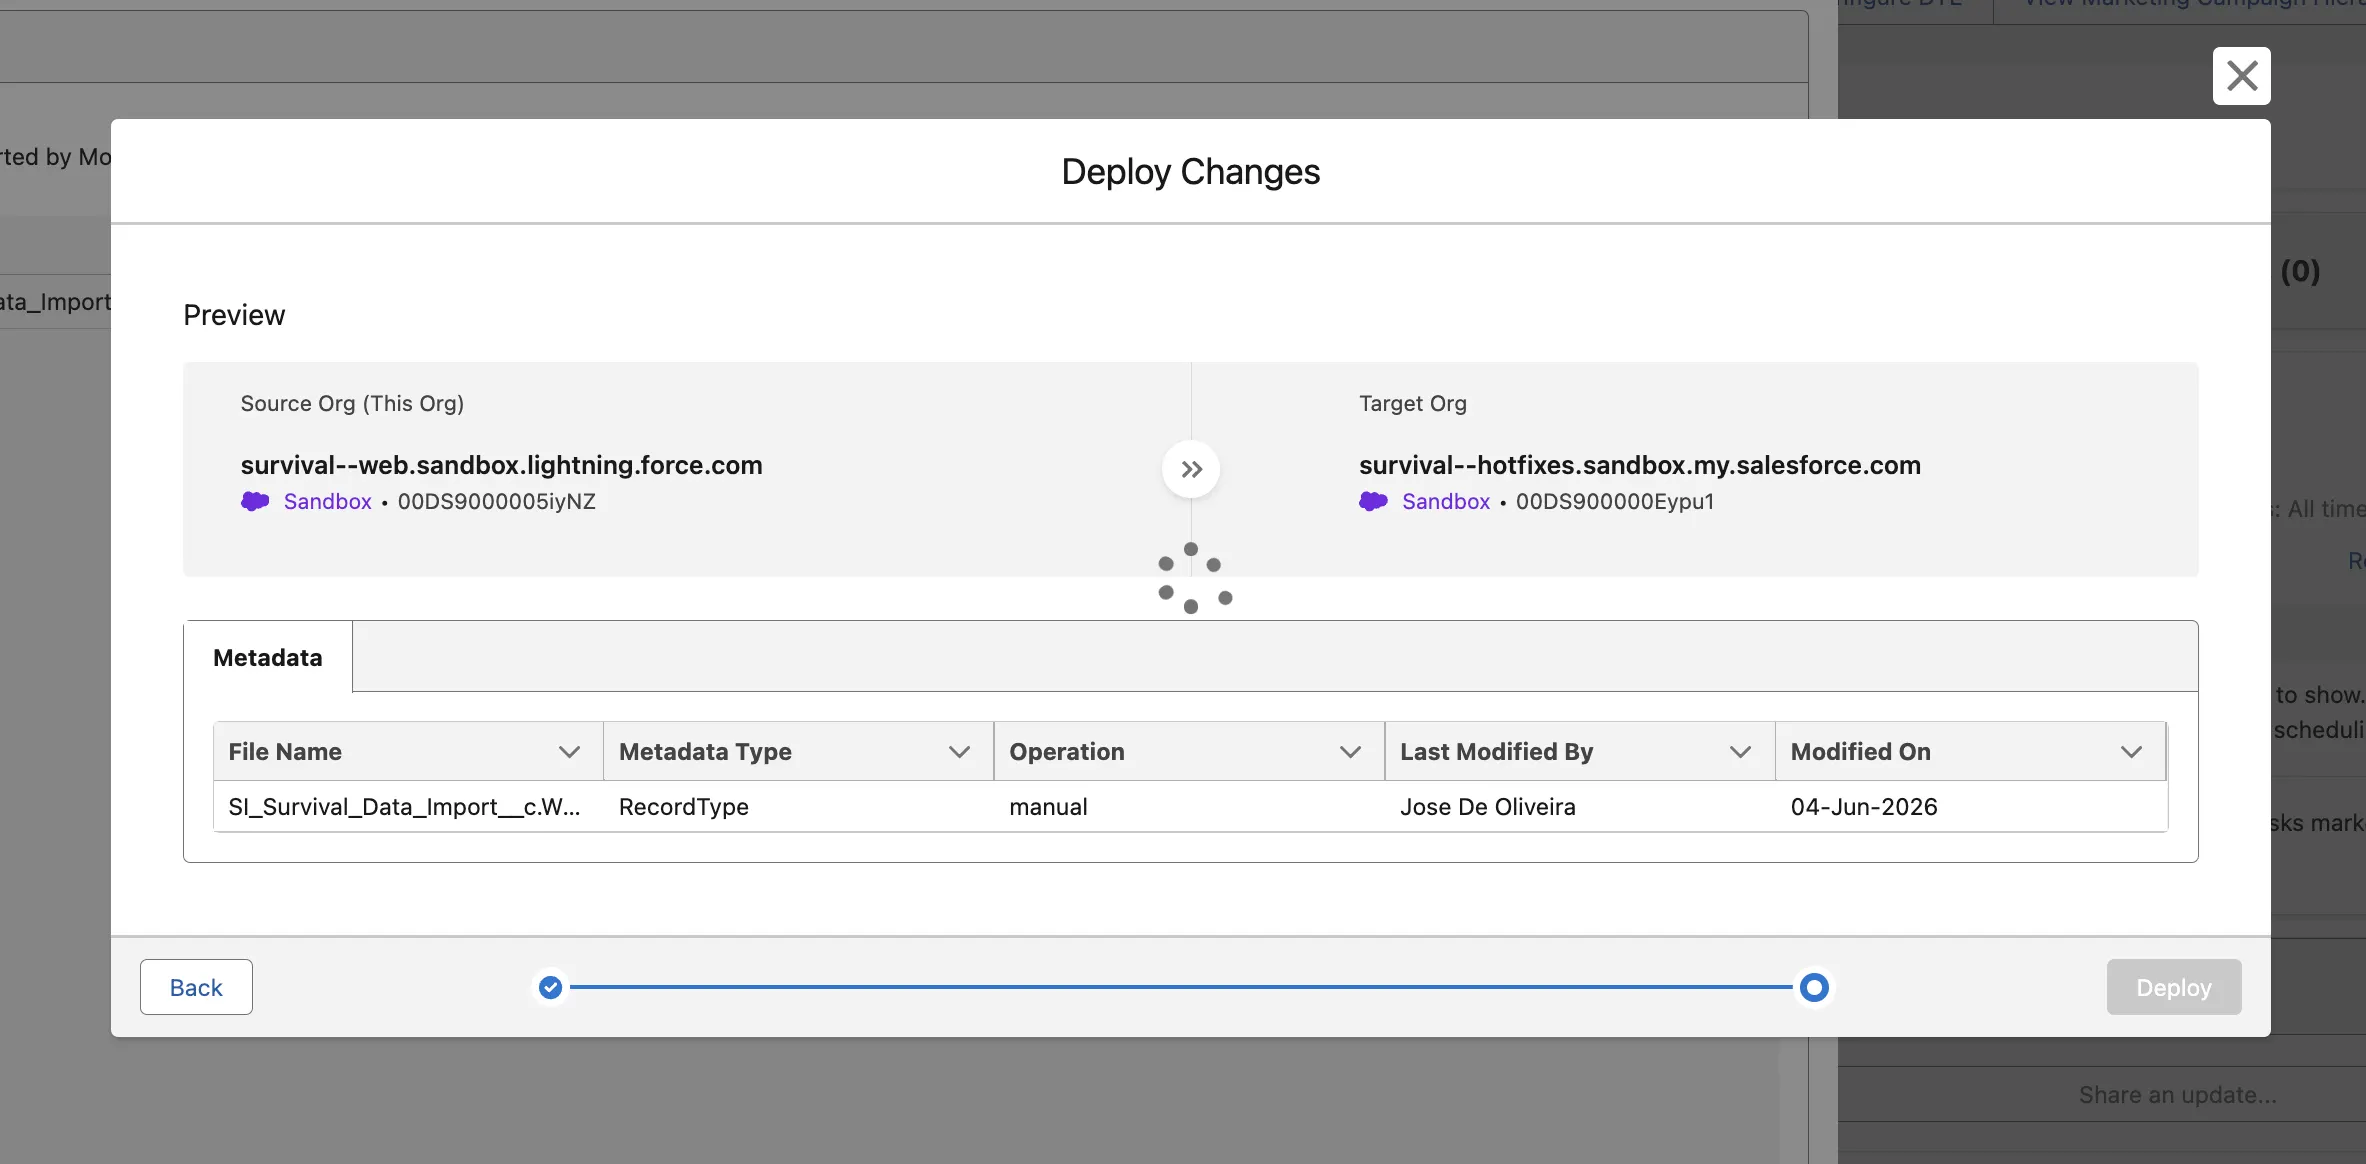
Instead of committing to the branch, you can now move components between environments, similar to Change Sets. In “Commit Options…”, select “Deploy Options…” to choose a target org and bypass the source control system entirely, useful when components need to move to a different isolated environment without a full backsync.
Move Data (Records, Related Records, and Their Metadata Dependencies)
Many changes require moving records alongside configuration (data and metadata). Previously, that meant exporting and importing manually. Not anymore.
The Next Generation lets you move data at a granular level: selecting individual records, fields, and related records (parent, children, record types), while also surfacing their metadata dependencies, custom fields, validation rules, and workflows, so nothing gets missed.
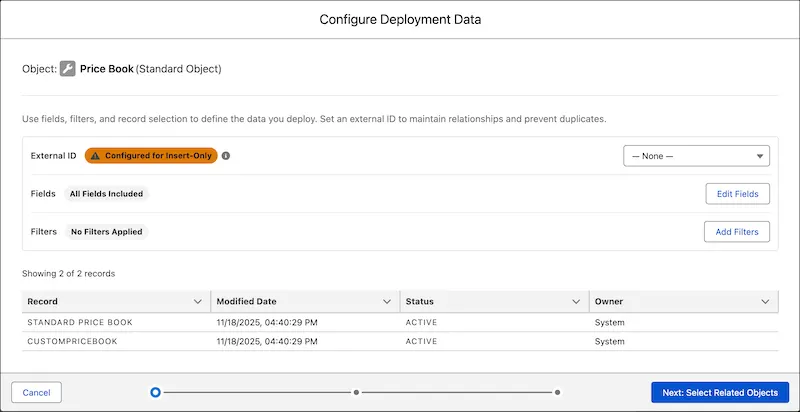
Data deployment from multiple objects. Source: Salesforce Help 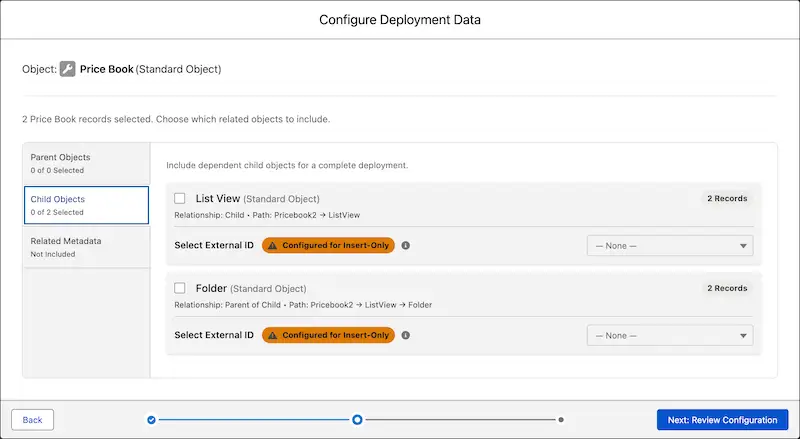
Selection of children, parent records and related metadata during data deployment. Source: Salesforce Help
Unbundled, Flexible Releases With Custom Promotions
Previously, deciding whether to bundle a pipeline was a tough call you couldn’t easily reverse later. I ended up running two separate pipelines: a bundled one for big releases (so end users could read release notes ahead of a “big bang” date), and an unbundled one for hotfixes, so items could move quickly through the whole lifecycle in an emergency.
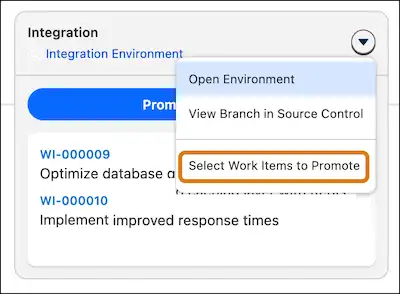
In the Core App, items are bundled by default, but they can be decoupled and deployed individually on the fly with a “Custom Promotion.” This creates a separate change request for the selected items and pushes only those changes forward, while the rest of the release stays put.
Partial Back-Syncs
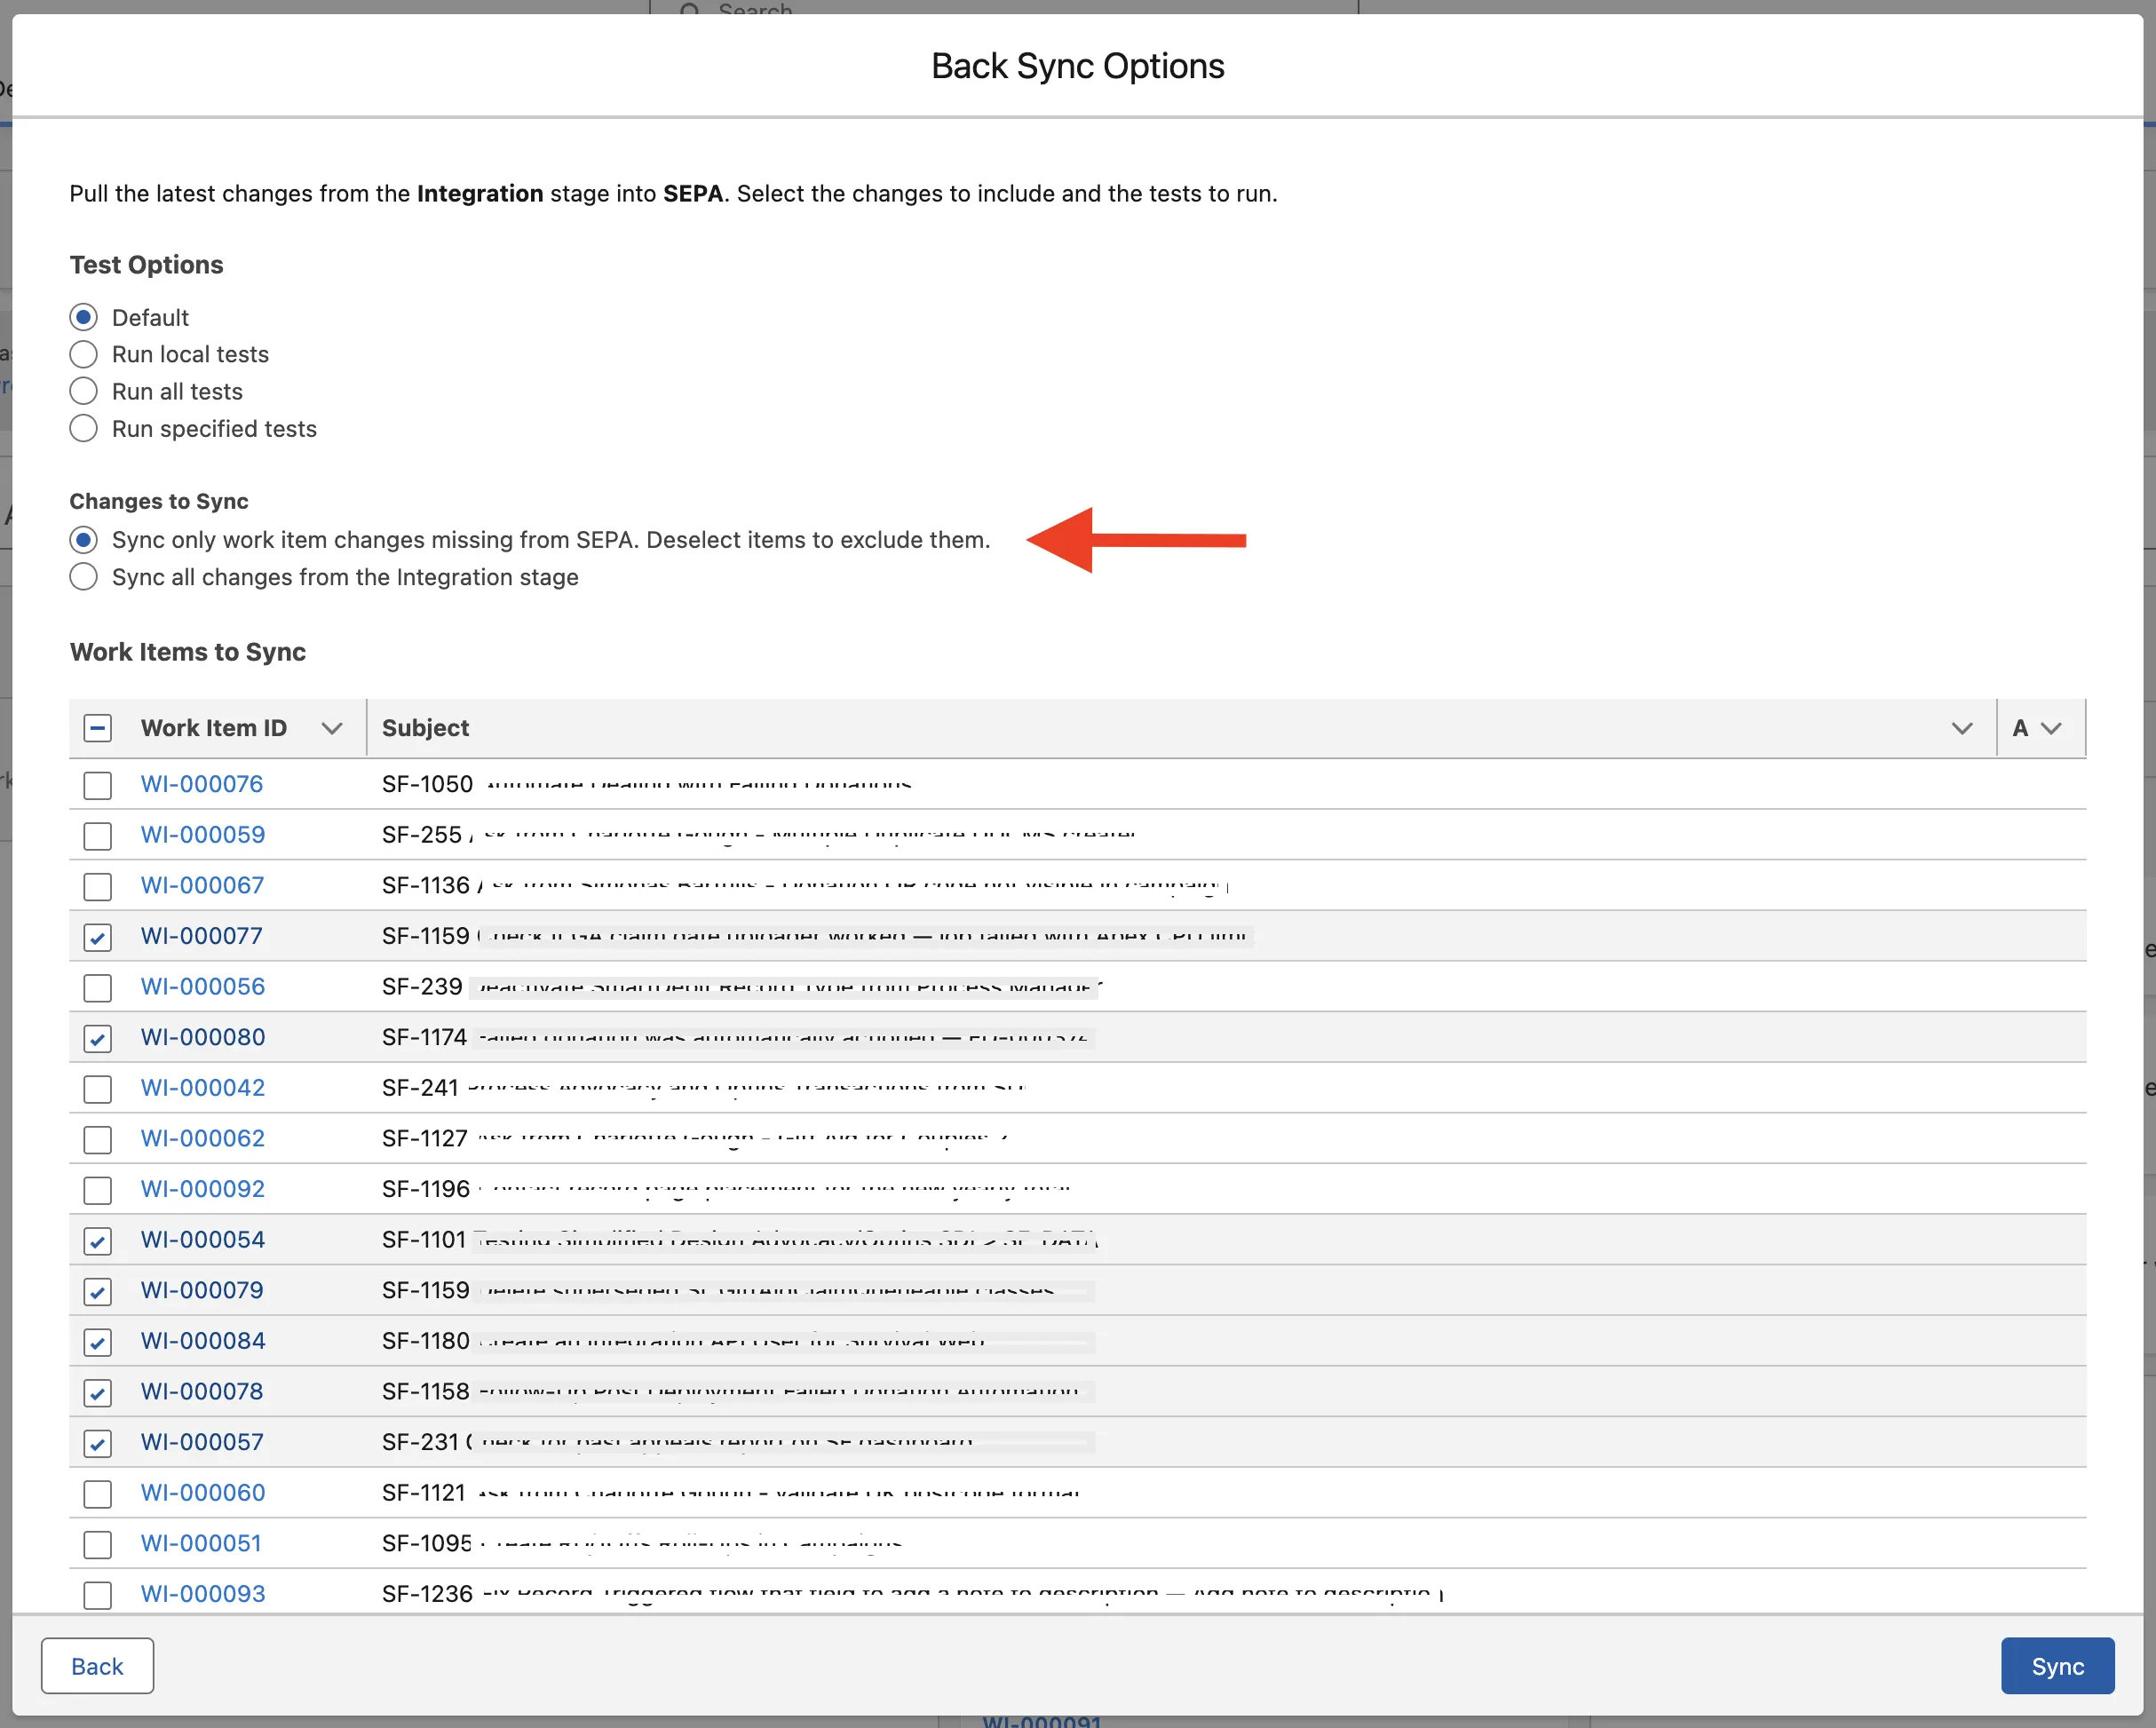
Now, we don’t have to bring all changes to a lower environment when performing a back-sync. “Back Sync Options” allows you to cherry-pick what work items we want to bring from the Source Control system into our Development environment, enabling a narrowed selection of the items we truly need when building a scoped solution.
Decoupling of Entities
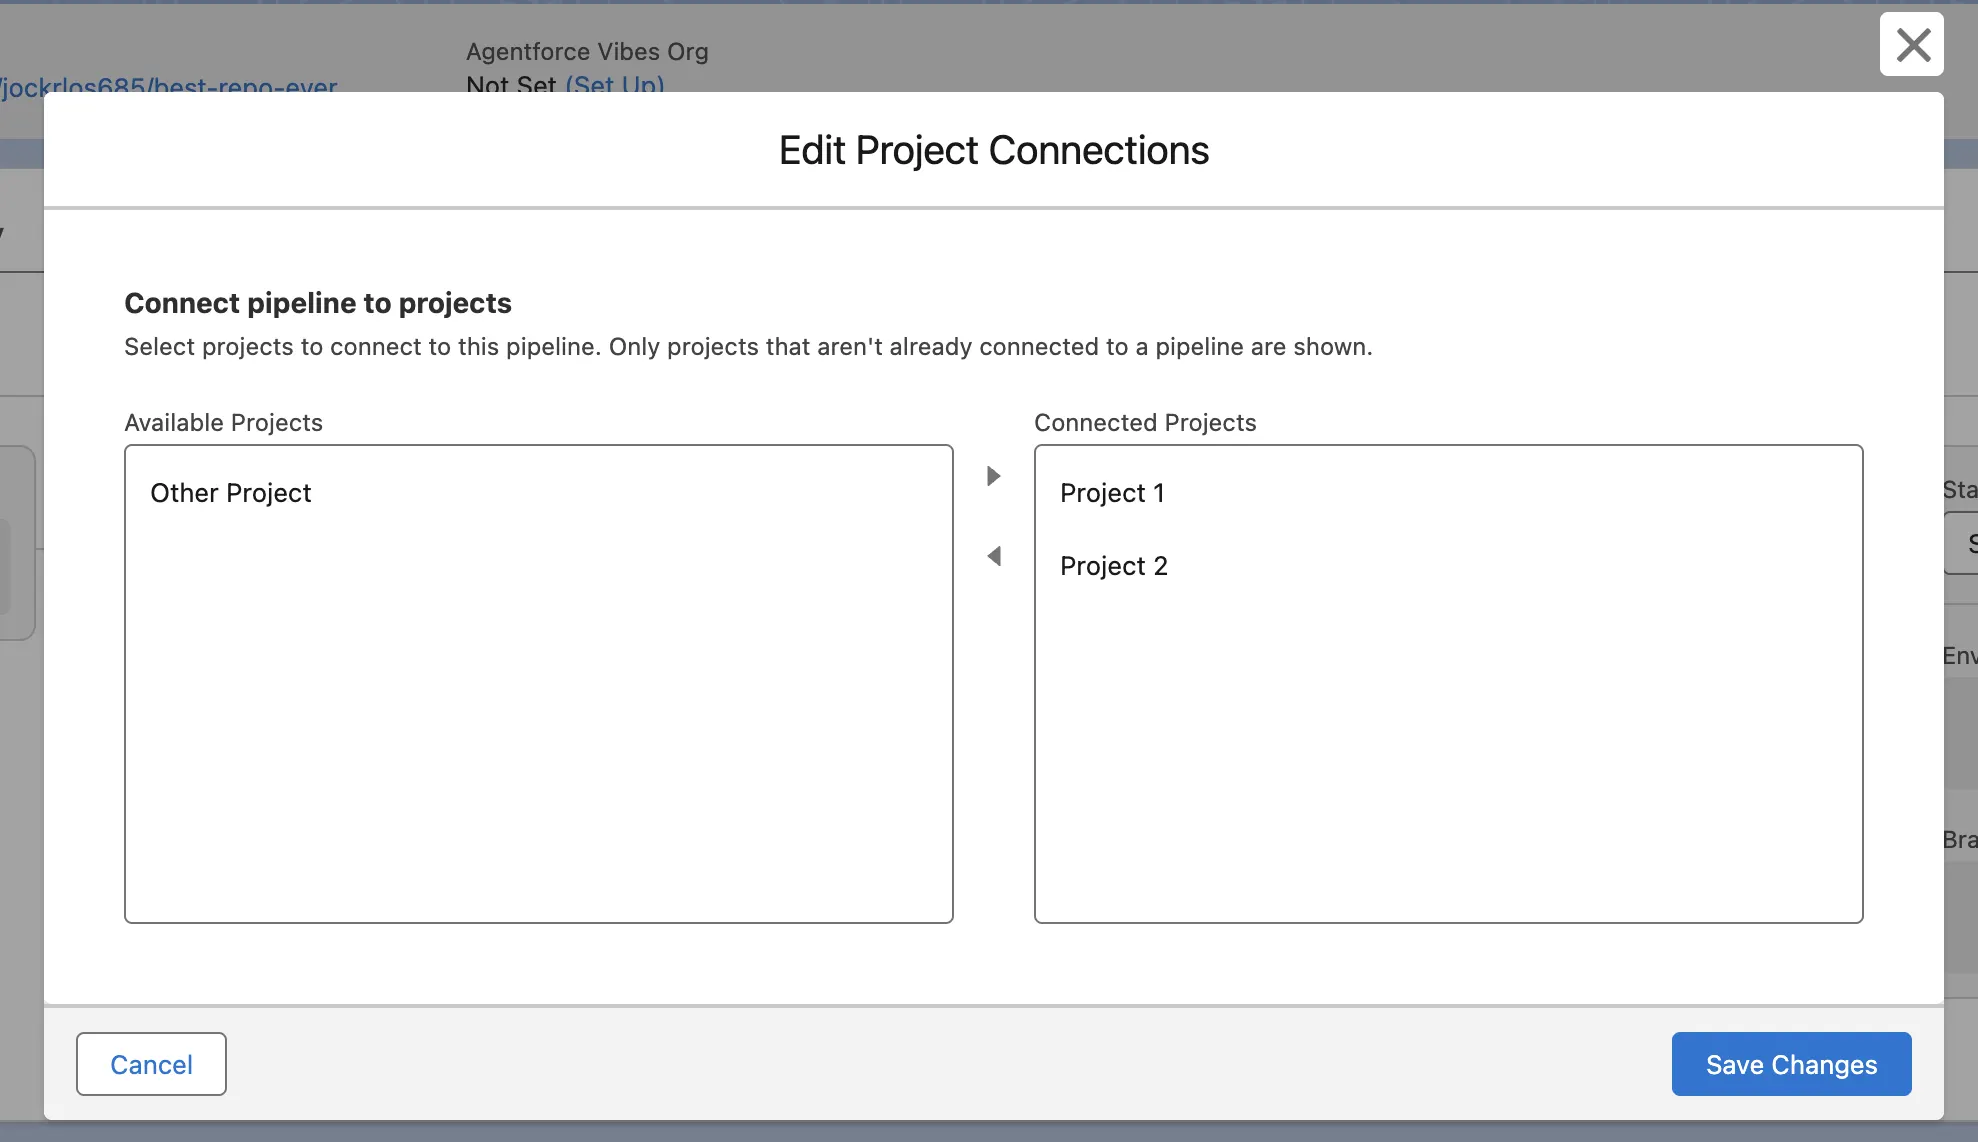
In the managed package, Projects and Pipelines were tightly coupled. In the Core App, multiple Projects can share the same Pipeline, and these associations can be swapped at any time.
Although pipelines remain immutable after promoting Work Items through them, connections between environments and branches are interchangeable during planning and setup.
Flexible Environment Swap on Work Items
In the managed package, a Work Item was tightly coupled to its environment – once a sandbox was selected (or left unselected), that decision was permanent, short of cancelling the item as Never Promoted.
Now, environments can be swapped or removed at any time. (This is typically used when changes are committed straight from an IDE, the CLI, or an LLM via the SF MCP, often built in a completely unrelated space, like a scratch org.)
A Streamlined Workflow
The workflow itself has improved dramatically – each step naturally leads to the next, with clear guidance on where to click, removing friction and making the whole process feel intuitive and seamless.
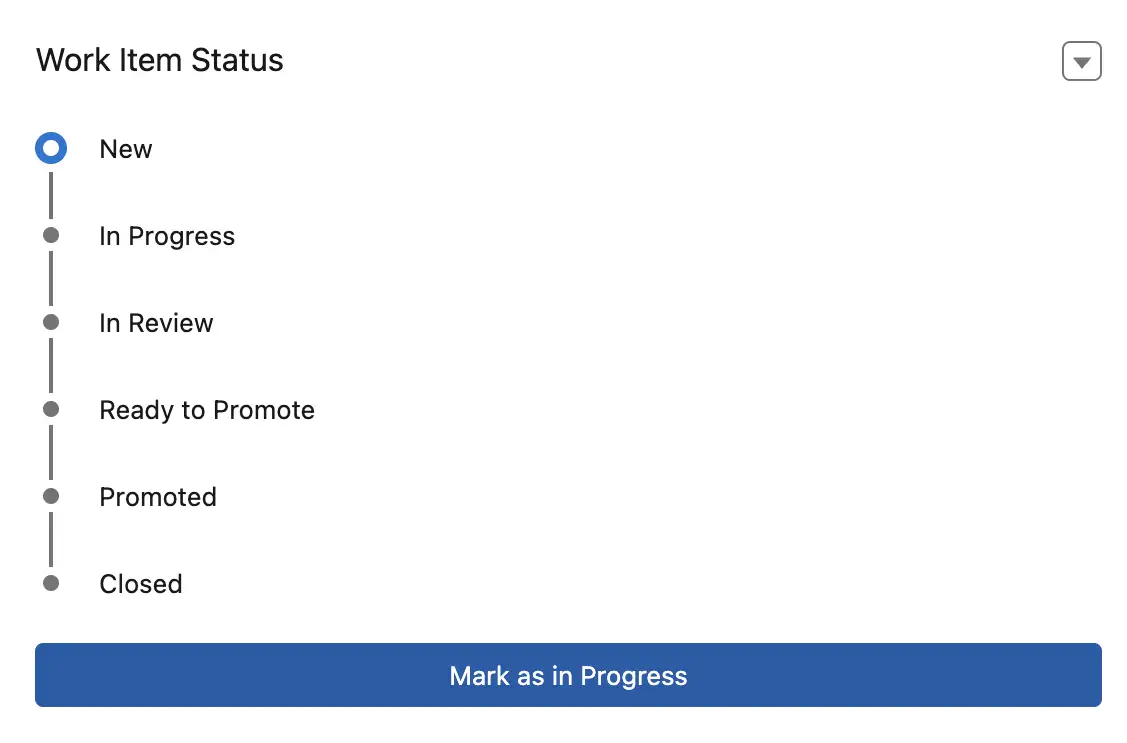
Previously, it wasn’t always obvious what to do next. The only real visual guide was the pipeline’s Kanban board.
Now, the Work Item has a progress bar showing a clear path and current stage, making it easy for release managers to track where a WI stands. A link to the next step always appears – after committing changes, a “Create Review” link shows up to open a pull request – once that’s done, the link changes to take you to the source control system to merge.
One Home for Every Role
Each persona can now handle their part of the lifecycle from their own space: admins push changes and create pull requests straight from the UI, developers work from their IDE or CLI, agents act via the SF MCP, and release managers oversee the pipeline view while running tests to enforce quality gates, enabling multiple streams of collaboration that keep delivery moving.
Multiple Actions, Simultaneously
You can now deploy and backsync at the same time.
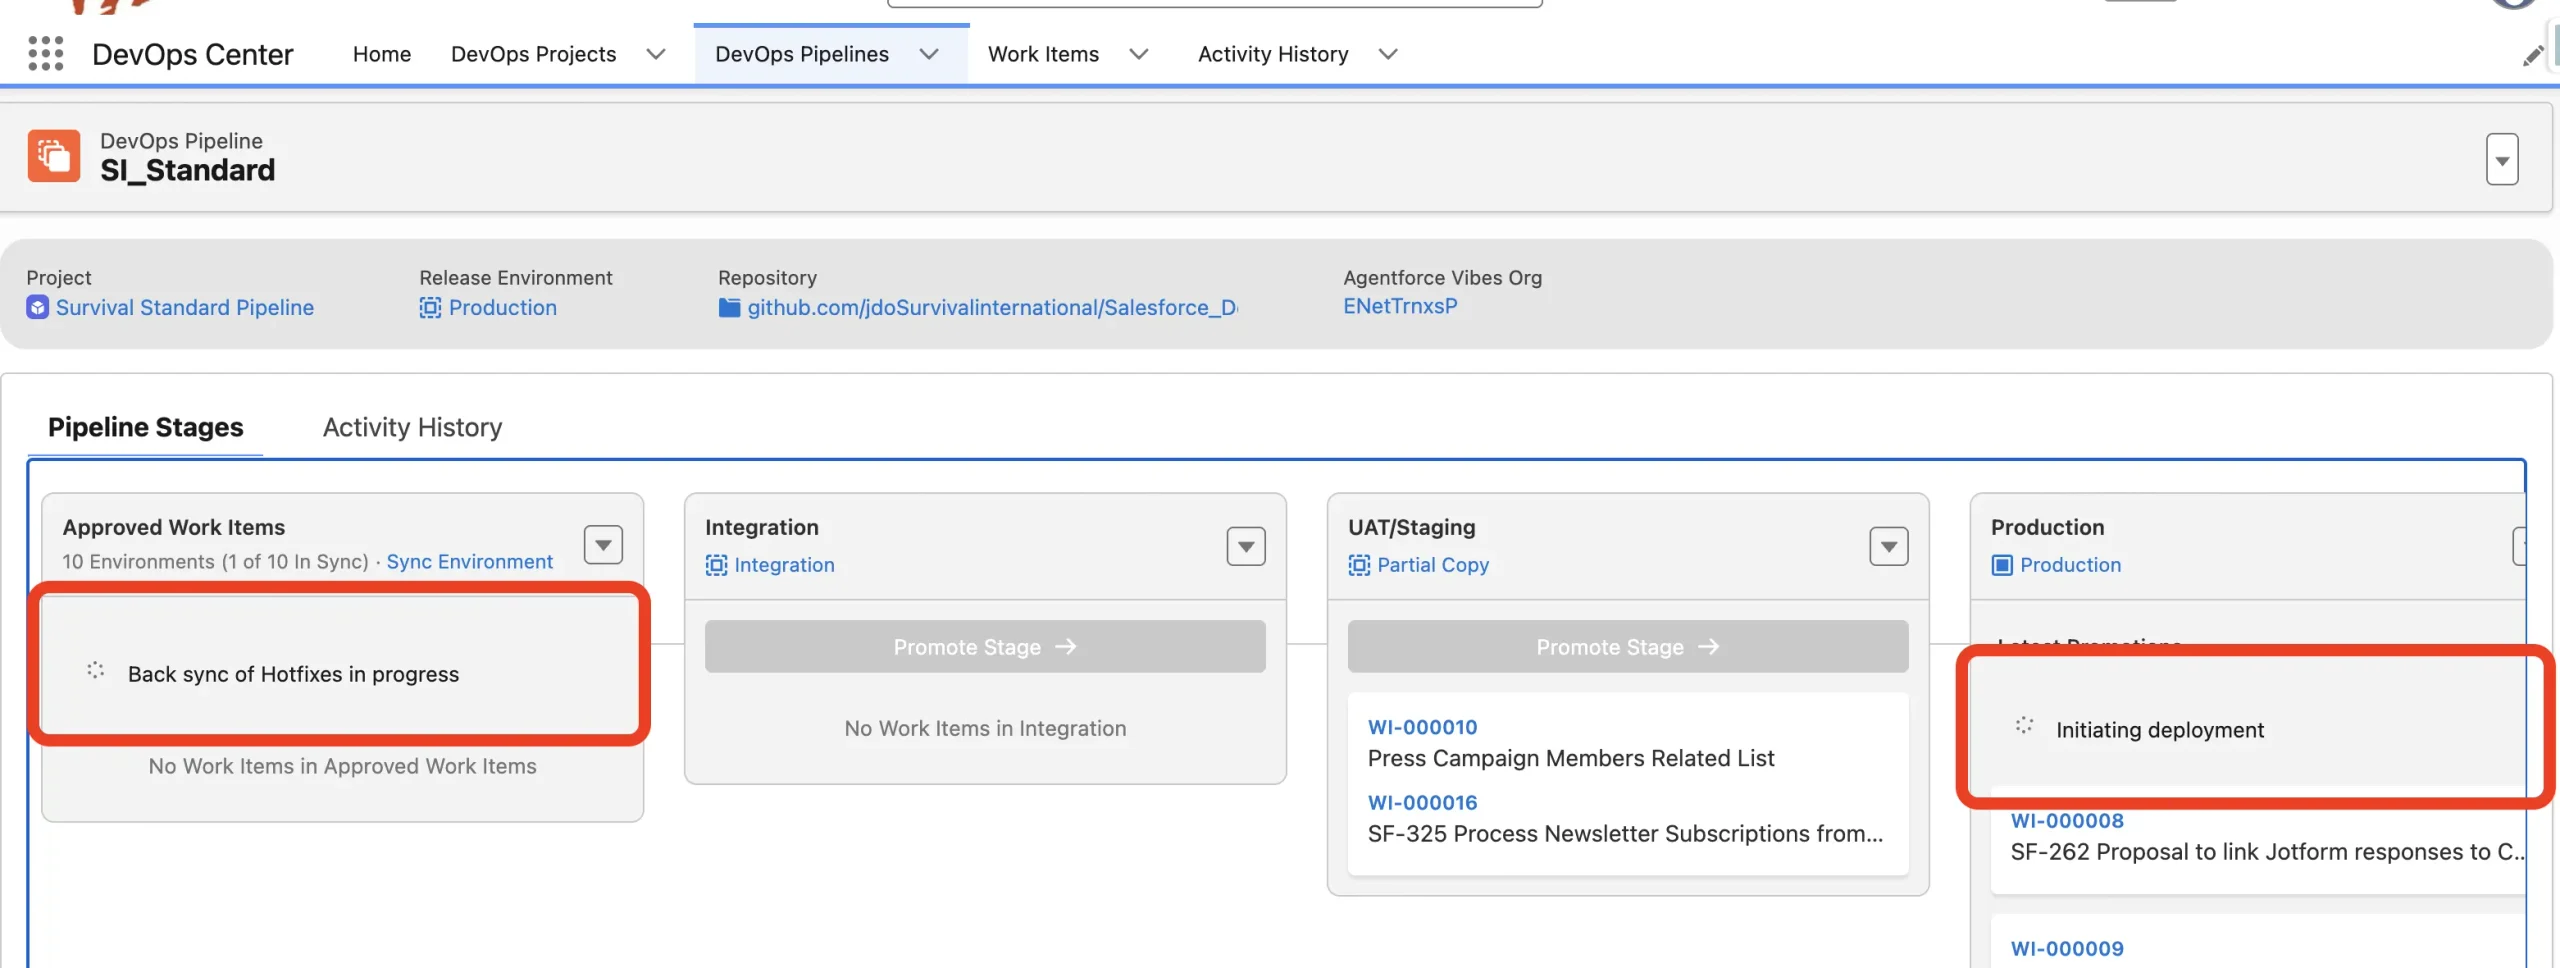
Track Your KPIs With DORA Metrics
DORA (DevOps Research and Assessment) metrics – lead time from initial commit to delivery, failed-deployment rate, and number of promotions – give you an overview of your project’s DevOps health.
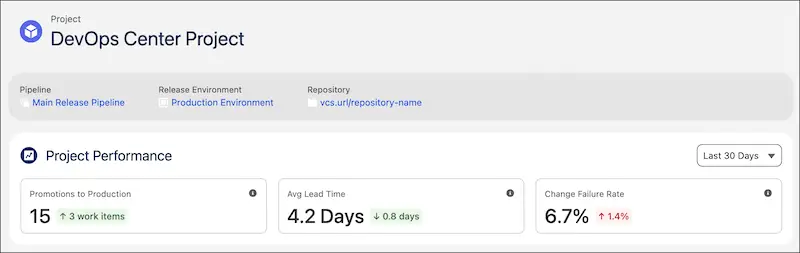
More Flexibility Across Multiple Streams
In the managed package, changes could already come from two sources: outside DevOps Center entirely (components built, deployed, and tested in an isolated environment like a scratch org, then committed straight to the branch, bypassing the UI), or through the app itself (built declaratively, committed from a non-technical perspective).
The key difference in the Next Generation is full pipeline flexibility: stages, environments, and branches are now fully independent and interchangeable, with no rigid dependency between them.
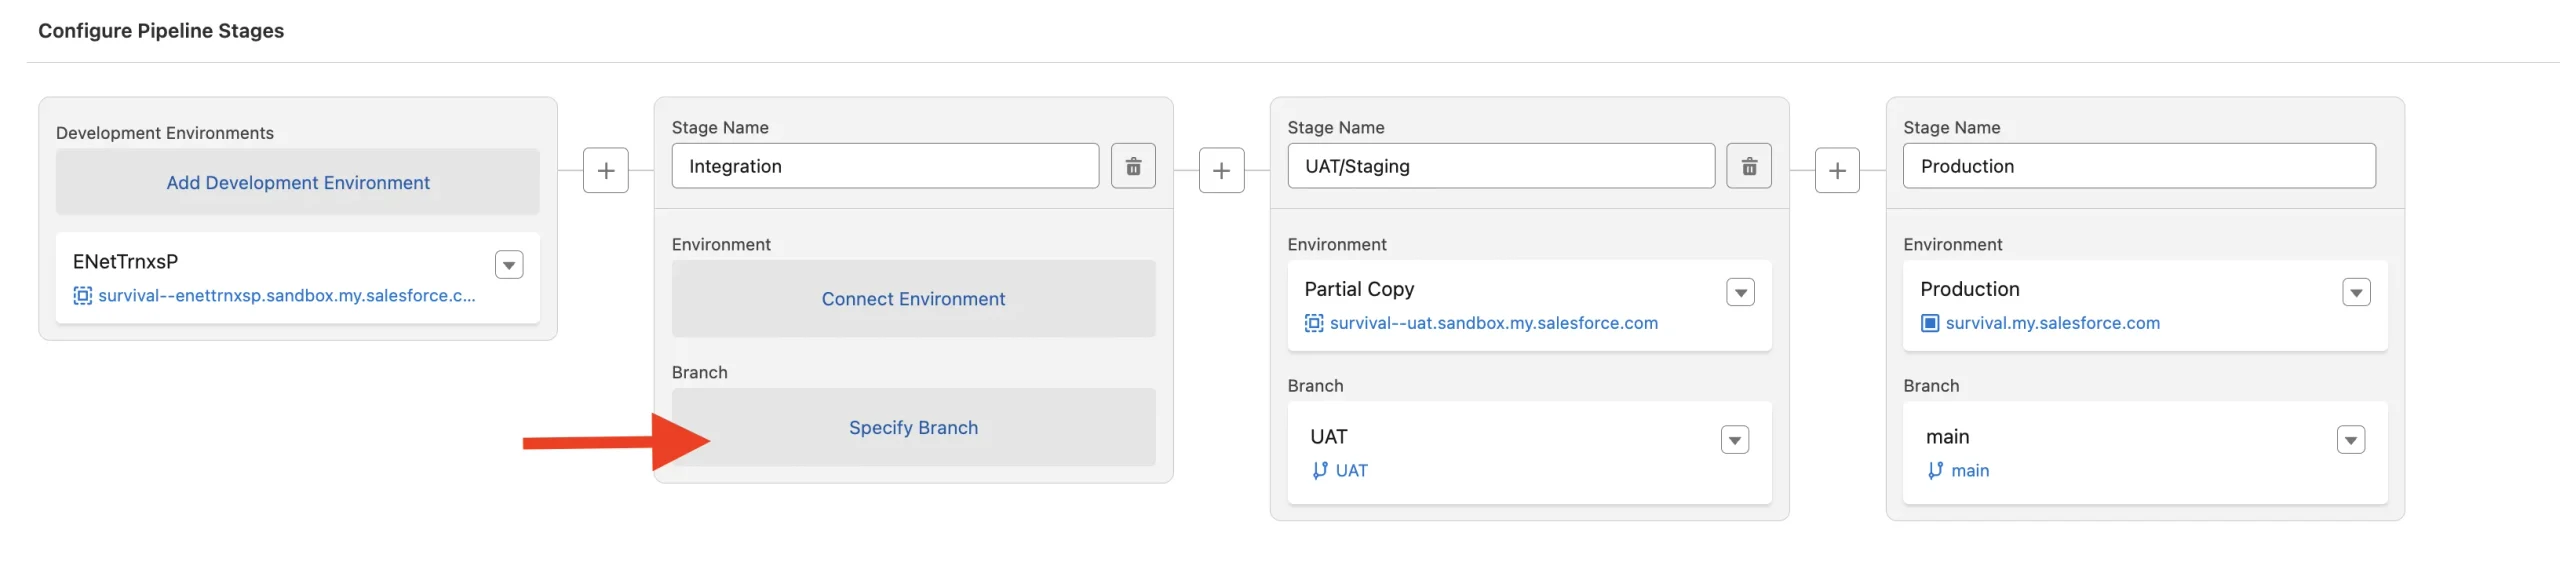
Quality Gates With Built-In Testing
The Core App now includes a Tests tab, where you can define Test Suites and choose Test Providers (Apex Test, Flow Test, Code Analyzer) to run pre-promotion or before a review is created, catching issues earlier in the pipeline.
Limitations and Considerations
The Repo Is the Source of Truth, Not the Org
Something to keep in mind: even with live, working components in your environment, if the repo differs from what’s in the org, you risk having those changes wiped out on the next promotion.
The repo always overwrites what’s currently in the target org. This matters most when running hotfixes straight in production, bypassing source control. If that change isn’t committed back to the repo, the next promotion brings back the previous version of your app.
Everything Starts from an Empty Repository
The source control system (GitHub or Bitbucket) builds up incrementally. It will be completely empty the first time you use DevOps Center, containing only the SFDX project folder structure. As you commit and merge into environment branches (including Main/Production), the repository fills up with those changes.
Alternatively, you can run a full metadata retrieval (excluding packages) and push it into the repository up front to set a baseline that mirrors production.
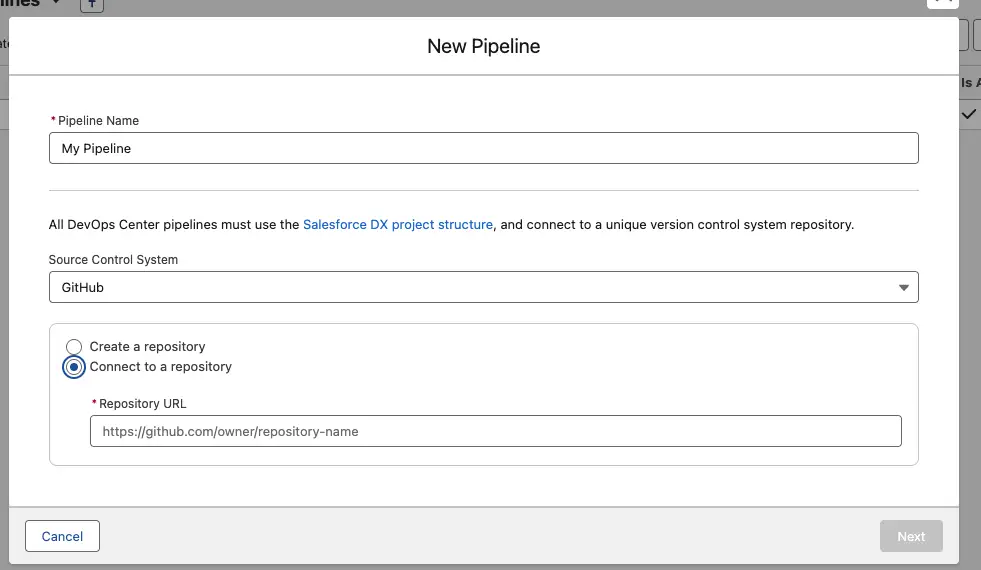
If you’re migrating from the managed package to the Next Generation Core App, you can point to an existing repository instead of starting from scratch.
Backsync Isn’t Allowed While a Work Item Is in Progress
This is a deliberate safeguard, and it makes sense: backsync doesn’t offer conflict resolution – it simply overwrites whatever is currently in the lower environment with the pipeline’s version.
If your environment falls out of sync with the pipeline because other items were promoted while your Work Item was still active, you can push your changes forward without backsyncing. Just make sure your components aren’t reintroducing an older version of something already further along the pipeline.
Every Salesforce Release Requires a Manual Update
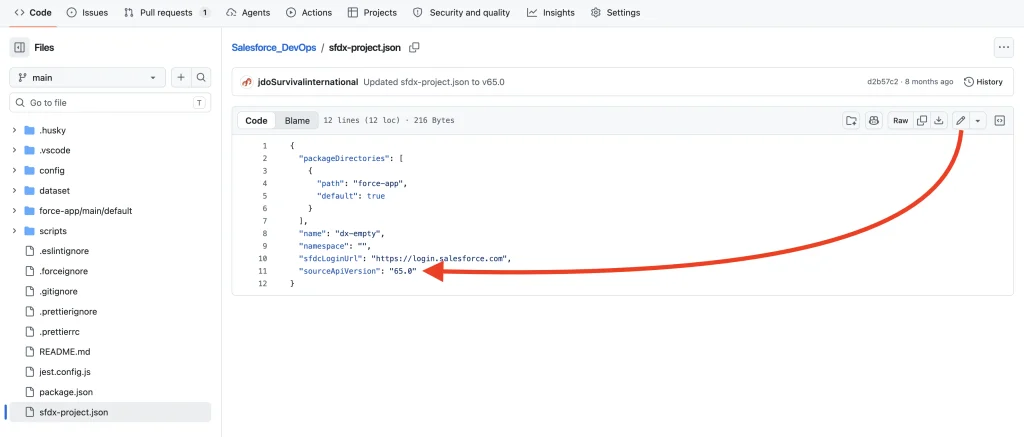
Since the repo is the source of truth, the sfdx-project.json file needs a manual update to reflect the project’s latest API version. DevOps Center uses this value when moving components. Skip this, and components may end up deployed on an outdated API version, silently missing newer features.
For example, the “check for existing records” toggle on the Flow Create Records element (introduced in Winter ’25 / API v62) simply disappears if your project version is lower, and the flow can produce unexpected results.
To fix it, create a branch and merge, or commit the change directly to the lowest relevant environment branch (e.g., Integration) in source control. The change will propagate from there.
Flows Are Versioned on Every Deployment
Every time a flow deploys, it creates a new version on top of the latest one in the target org, without overwriting anything. A flow might end up with different version numbers across sandboxes due to individual testing in isolated environments, but regardless of its version number in the source org, it’s always added as the next version in the target org.
This can get confusing when resolving conflicts between flows deployed from different environments. I personally note the production version number in the flow’s description as a lightweight version history.
Order Matters
Similar to the order of execution for DML operations, some components deploy in a strict, specific sequence behind the scenes (a custom object deploys before its fields, for instance), but the exact order isn’t publicly documented, and it can affect dependent deployments.
For example: deploying a new record type and a permission set in the same transaction can fail, with the permission set erroring out because the record type “doesn’t exist”, even though it’s in the same bundle.
The same applies to destructive changes: deleting a component that isn’t in the target org fails for the same reason (“component not found”). Outside DevOps Center, this is normally handled by running destructive changes after deploying the new component, via destructiveChangesPost.xml. A quick workaround is to manually create or push the component in the target org, outside DevOps Center.
Manual Deployments
Following on from the above: if a promotion or backsync fails due to missing components, a pragmatic fix is to deploy them manually into the target org. Ideally, though, those components should still be pushed to the repo (as the source of truth) so they propagate correctly.
A small trick: make a trivial change (editing a description, or adding a comment to an Apex class), then commit it to a Work Item and promote. This flags the component as “changed,” so the latest version lands in the repo – otherwise it may not be recognized as newer than what’s in the target org, and gets skipped during backsync.
Migrating from Managed Package to Core App
Salesforce has recently announced a migration tool rolling out in Dev Preview, check out the official article with details of how to migrate.

Alternatively, you might want to consider pointing a new project/pipeline to the existing repository, but you’ll need to recreate any work-in-progress Work Items and re-commit their changes.
Multi-Org Teams: Consider Package Development on Top
Organizations running multiple production orgs need a separate DevOps Center per org, and it’s recommended to keep one repository per project. A common challenge is distributing cross-organization components across those multiple production instances.
A workaround is linking different projects/pipelines to the same repo, but this is strongly discouraged. Unlocked Packages are the better fit here: bundle the logic into a package and install it across orgs via an installation link.
It’s worth reviewing the Enterprise Architecture Operating Model to understand which quadrant your organization falls into (Diversification, Replication, Coordination, or Unification) and pick a strategy accordingly.
Think Before Committing Data
As we’ve seen, DevOps Center allows you to move Data during deployments (records), and we already know Source Control is the sole source of truth. That means existing data in the Target Org will be overwritten with whatever comes from the Repository, in every deployment, forever!
Make sure to thoroughly think and evaluate what Data needs to be in the Source Control before committing. Using .forceignore with **/dataset/** doesn’t exclude those records.
This is highly relevant when Data is used as a configuration mechanism in the org (data as metadata), like NPSP’s Table-Driven Trigger Management, where records control what triggers are run when DML occurs (for reference, these records live in a Custom Object from the NPSP Managed Package, not in Custom Settings or CMDT. Then, a single trigger per object calls handler classes to control what happens and when during record changes).
What’s On the Roadmap?
There have already been plenty of changes since GA – testing tools were added recently, for example. Ahead, we’re hoping to see: creating Work Items straight from the sandbox when no open items are connected (already possible via the Salesforce MCP), automated updates to sfdx-project.json after each release, and eventually automatic deployments once testing passes at each pipeline stage.
To submit feedback, ideas, or issues, check out the product roadmap and the Next Generation Feedback Repo in GitHub.
Final Thoughts
DevOps Center is a powerful tool that controls Git operations in the cloud from a simple interface, combining core SFDX actions, testing, metadata, and data deployments into one place. With clicks instead of code, an underlying engine automates complex tasks, simplifying the ALM cycle into a user-friendly, intuitive flow.
With a simplified data model, built-in testing, a guided visual workflow, and native AI support, delivery genuinely becomes CI/CD in practice, accelerating lifecycles, shipping faster and more frequently, reducing error-prone deployments, and increasing reliability by baking industry best practices into the release cycle.
The Next Generation marks a major step forward: unifying capabilities from legacy tools like Change Sets, extending current functionality, and turning an organisation’s delivery process into a genuinely high-velocity one.




Comments: