

Solution testing is an inevitable part of any development cycle to ensure the stable and consistent operation of every piece of code.
In this guide, I’ll explain the Jest framework in greater detail and how (and why) to use it for testing Lightning Web Components (LWC), as well as implementing Jest into your projects and how to mock functions and modules. Let’s get started!
Why Use Jest for Lightning Web Components Testing?
The most popular frameworks for testing web components – not necessarily just in Lightning – are Jasmine, Mocha, and Jest.

Salesforce recommends using Jest because it’s extremely easy to write tests within this framework.
Jest is a JavaScript Testing framework that focuses on simplicity, and is tuned for projects based on:
- Node
- React
- TypeScript
- Babel
- Angular
- Vue
It is a powerful tool with rich features for writing JavaScript tests. This JavaScript library enables the creation, structuring, and running of LWC Jest tests.
Jest is distributed as an NPM package and helps to obtain information about the code coverage. It also supports mocks to isolate tests from complicated dependencies, due to which tests can be executed fast.
Why Do LWC Require Testing?
- Lightning Web Components apply common standards pertaining to all web components to ensure smooth performance on browsers supported by Salesforce.
- LWC is a code-based solution that can be easily set up and launched in the browser to improve productivity.
- When more and more logic moves from Apex to Lightning Web Components, LWC testing will become as important as Apex testing. This is because LWC contain numerous files including CSS, JS controllers, and JavaScript services, all of which require testing.
- LWC testing helps to identify issues and prevent broken scripts from publishing in the very early stages (and fixes them in time), without spending too much money, resources, or effort on their elimination.
How to Start Working with Jest to Test LWC
To start working with Jest, you need to install sfdx-lwc-jest together with its dependencies in each Salesforce project. Prior to this, you have to install Node.js together with npm. It is worth noting that when you install Node.js, npm installs as well.
From time to time, you may need to update npm. Jest for Salesforce can be installed either with Salesforce CLI (Command Line Interface) or manually. You can learn more about both procedures here.
Note: Introduction of LWC testing into the existing project seems like a big task. However, due to the undeniable benefits of using Jest to test components and services independently of one another, the most successful deployment strategy will be to add several items to the Jest testing in one sprint.

By doing this you can test the whole front-end without affecting the team’s productivity, and LWC test results will be interpreted in an easy-to-understand and informative way.

If a test fails, the console will display what has gone wrong.
How to Run LWC Jest Tests
There are various commands used to run LWC Jest tests.
1. Run the command test:unit:coverage
For example, by running the command test:unit:coverage, you’ll see a short report about the code coverage. By the way, you can run the test straight from the VC code tab, available from the left sidebar.
2. Execute Jest Test from Azure Pipeline
Jest Tests can be executed from Azure Pipeline. After the test setting, the results can be viewed in the following way.

Let’s move to test writing.
How to Write Jest Test for LWC
1. Start with Simple Jest Test
The simplest Jest test starts with the import of the tested method and the block describe which defines a set of tests. The first parameter of describe is the description, and the second is the callback that contains separate tests. What’s more, the describe blocks can be put into one another.
Particular tests are represented by the function it. Each accepts test description and callback function, which define the execution of the test.
2. Check the Results With Match Functions
To check the results of testing, you can use various match functions – there are numerous variations of them for different testing purposes.
For example, they can differentiate by how the error appeared and how many times this method was called. The full list can be found on the website.
The Jest hooks like beforeEach, afterEach, beforeAll, and afterAll can also be very helpful for test writing.

These functions receive callbacks, having been carried out during testing. For example, this function will be carried out before each test it.
3. Use Jest for Synchronized LWC Testing
Once the configuration is done, you will need to:
- Import the LWC method framework createElement.
- Use the afterEach method to clean the element.
Note: Running the Jest test doesn’t require a browser. Jest uses jsdom for the creation of the environment which acts like a DOM browser. Each test file gets one jsdom sample, which saves it from purging changes automatically between the tests within the file. That’s why you need to think about file cleansing on your own.
So, due to createElement method, we can create the required Lightning Web Component and:
- Access LWC variables, declared with an API decorator, via dot operator. In the unitNumber the variable is declared by the API decorator.
- Get information about the content of the HTML component, and add the created element to the document body.
- Get the required HTML element and verify its content, with the help of querySelector.
- Act in a similar way, if you need to check the variable component, not declared by the API decorator but used, for example, as an attribute of any embedded component. It will be necessary if the tested method results in changing this private variable.
4. Use Jest for Asynchronized LWC Testing
The previous example showcases how to test the code if the test is completely synchronized. But what if the tests are run asynchronously?
If, during the test, we change unitNumber method, for example, and add the row unitNumber = 7?, we’ll most likely get an error. The easiest way to avoid this error is to use promise.
Promise is a special object that stores its state, the current result (if there is any), and callbacks:
- When creating a new promise ((resolve, reject) => …), an argument function automatically launches, which should call resolve (result) on success and reject (error) on error.
- The resolve/reject argument is passed to handlers on this promise.
- Handlers are assigned by calling. then or. Catch.
it(‘Init Component’, () => {
  getInfo.mockResolvedValue(APEX_GET_INFO_SUCCESS);

  const element = createElement(C_Security, {
     Is: Security,
  });
 document.body.appendChild(element);

const  searchPanel = element.shadowRoot.querySelector(‘c-search-panel’);

return flushPromises()
  .then(() => {
     expect(searchPanel).not.toBeNull();
 });
});
Let’s return the updated value in Promise object and add it at the end of it test. Now, everything should work correctly.
If the tested method of the component is asynchronous, the Async/Await option can be an alternative to Promise.
Async/Await is a special syntax for working with promises.
The Async keyword before the function declaration:
- Obliges it to always return a promise.
- Allows you to use await in the body of this function.
The keyword await before promise will make JavaScript wait for its execution finish, after which:
- If promise finishes with an error, the exception will be generated as if there was throw.
- Otherwise, the promise result will be returned.
Here is an example of the sum method if it’s asynchronous.
//sumservice.js file
export async function sum(x, y)  {
   return x + y;
}

//sum.test.js file
import { sum } from “../sumservice”;
describe(“sum()”, () => {
   it(“Async/Await – should add 1 and 2 returning 3”, async () => {
     expect (await sum(1, 2) ).toBe(3);
   });
});
Alternatively, you can use the Jest method resolves. If promise returns reject, the text fails automatically. The reject method can be used to test negative results. All these methods can be combined.
Why Are Mocks Important for Jest Testing?
Let’s move on to the most interesting part: the mocks. Mocks enable code testing (independent of the actual implementation of the called function), intercepting calls of functions and parameters, and configuration during testing of the returned values.
If the component method calls Apex controller method, you can’t go without mocks. What’s new in this example is that, besides the tested component, we can import the controller method (which we should mock).
jest.mock() function
With the help of jest.mock() function, we can mock it by substitution of a standard Jest function. Furthermore, we can set this function a returning value with mockResolvedValue.
Mock is now ready! In JS code, instead of the controller, this function will call this method, which will return the value passed to mockResolvedValue.
You may often need to mock the whole service class used in the tested code. In this case, you have to import this class, as in the code that uses it. Then, with the help of jest.mock, we mock the module which contains the required class.
As in JS class with a variety of construction functions, we can mock the constructor and return the required object with functions, which will return set results.
jest.resetAllMocks()
Meanwhile, you will need to use jest.resetAllMocks() in the afterEach method to purge mocks between tests. Otherwise, they will be passed from test to test – sometimes it can be useful but not always entirely transparent.
mockRestore()
If you need an original implementation of the function or a class, you can use mockRestore() of not mocked function or jest.restoreAllMocks for all the functions. It will cancel the utilization of mocks and restore the behavior of the function.
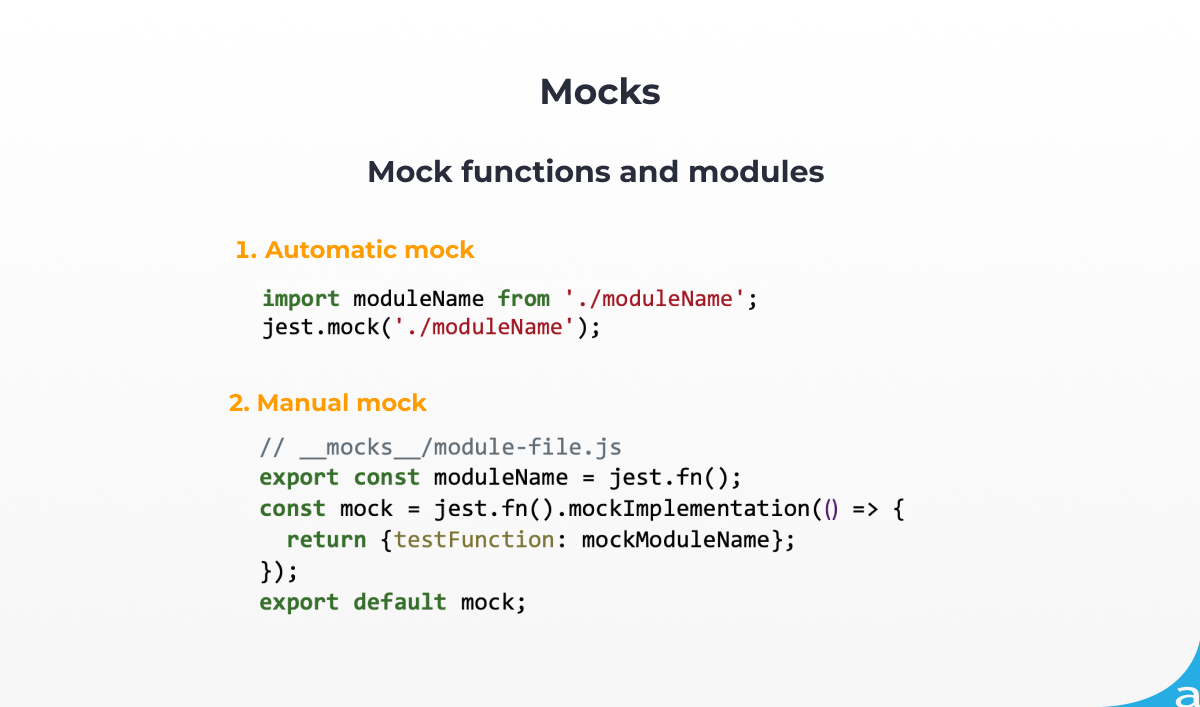
Mock Functions and Modules for LWC Testing
There are four types of mock functions and modules in the ES6 array methods:
Automatic Mock
jest.mock(‘./sound-player’) returns automatic mock. The class construction and all of its functions will automatically return undefined.
Meanwhile, you can oversee the function execution, for example, the number of calls. But if you use an arrow function in these classes, they won’t be mocked.
.import SoundPlayer from ‘./sound-player’;
jest.mock(‘./sound-player’);
Manual Mock
Similar to putting tests into the folder ___test___ or data into ___data___ folder, mocks can be put separately into the folder ___mocks___.
In a separate file, you can mock the necessary functions to make them more readable. Before the execution of each test, you have to clean up instances and calls from mock constructors and methods.
You can also run it from the directory of the tested file – otherwise, there can appear an error notification that the module can’t be imported.
// __mocks__/module-file.js
export const moduleName = jest.fn();
const mock = jest.fn().mockImplementation(() => {
  return {testFunction: mockModuleName};
});
export default mock;
Mock: jest.mock(moduleName, factory, options);
In the call of jest.mock() factory and option parameters jest.mock(moduleName, factory, options);, the first mandatory parameter is the module name. Then jest.mock() receives the second argument, a so-called module factory. The module factory is a function that returns mockups.
To imitate the construction function, the module factory will return the function which, in turn, will be able to return a number of functions.
The options argument can be used for the creation of virtual mocks that do not exist anywhere in the system.
jest.mock('../moduleName’,
   () => {
return jest.fn(() => 42);},
   {virtual: true},
);
const moduleName = require('../moduleName');
mockImplementation() vs mockImplementationOnce() Modules
You can use mockImplementation() or mockImplementationOnce() to determine return values.
mockImplementation returns the value of the function. The mock itself will still track function calls, and the results will return each time when the mock is called.
mockImplementation can also be used for imitation of class constructors. mockImplementationOnce, just like mockImplementation, returns values for the function.
The difference is that mockImplementationOnce can be executed only for one call of the function.
However, they can be united into a chain, so each time the repeated function call could display different results.
So how do you read the file in the test? Module File System (fs) allows interaction with the file system. The function readFileSync reads the file synchronously, which is very easy to use.
it(“exportExcel: checking if file exists”,async () => {
    let file = ‘Filename.xlsx’;
    const fs + require(“fs);
    let result = fs.readFileSync(file,”utf8);
    expect(result).not.toBeFalsy();
});
If your function generates a file, then you should make sure that it is not empty.
Summary
More and more logic will go from Apex to LWC, so it’s worth paying attention to the front-end testing to prevent the risk of logic errors. This is why we’ve shed some light on Jest, along with its many advantages.
Save yourself some time by exploring companies such as Ascendix, who specialize in Salesforce consulting and development, and stay tuned for more tips and tricks.

Comments: