

Earlier this year, Salesforce made the exciting announcement that most orgs would be granted five free licenses for integration users. I don’t know about other admins in the community, but this was one of the most exciting announcements I’ve heard in a long time. It has a direct impact on my day-to-day job and even has a quantifiable financial impact for companies.
Many companies purchase separate tools to go along with Salesforce: Outreach.io, HubSpot, Marketo, SalesLoft, etc. What most companies don’t know is that it’s best practice to create a Salesforce user to get that system connected with Salesforce. When they come up against this requirement, many companies with low or no budget end up setting that integration user as a shared user with an admin or a manager (you know who you are!).
Now, this is a poor business practice. Sharing logins between multiple people, multiple tools, or people and tools is fraught with peril, but people do it anyway because Salesforce licenses are expensive. This enhancement takes away that barrier to best practice and reduces the cost for your integration licenses.
Once you have an integration ready to be set up and have decided to use one of these licenses, follow these steps to make sure your integration works flawlessly!
Considerations
- These licenses are API Only – there is no UI access at all. If your integration user requires even occasional UI Access, this license type will not work for you.
- Unlimited, Enterprise, and Performance Edition orgs get five free licenses.
- Additional licenses are available for purchase for $10/user/month.
Step-by-Step Guide
Get ready! You will need to:
- Determine what permissions the integration tool requires. This should be provided by the integration tool install or integration guide.
- Determine the email address and username you will use for this integration. Remember that your email and username do not have to match. I personally like to use one email address for all my integrations, like “salesforceintegrations@mycompany.com” or even something as simple as your sales or operations alias’ will work. Usernames should be something like the name of the tool, followed by your standard company email. For example:
| Integration/Tool Name | Username | Email Address |
|---|---|---|
| Marketo | marketo@mycompany.com | salesops@mycompany.com |
| Outreach.io | outreach@mycompany.com | salesops@mycompany.com |
| HubSpot | hubspot@mycompany.com | salesops@mycompany.com |
| Intercom | intercom@mycompany.com | salesops@mycompany.com |
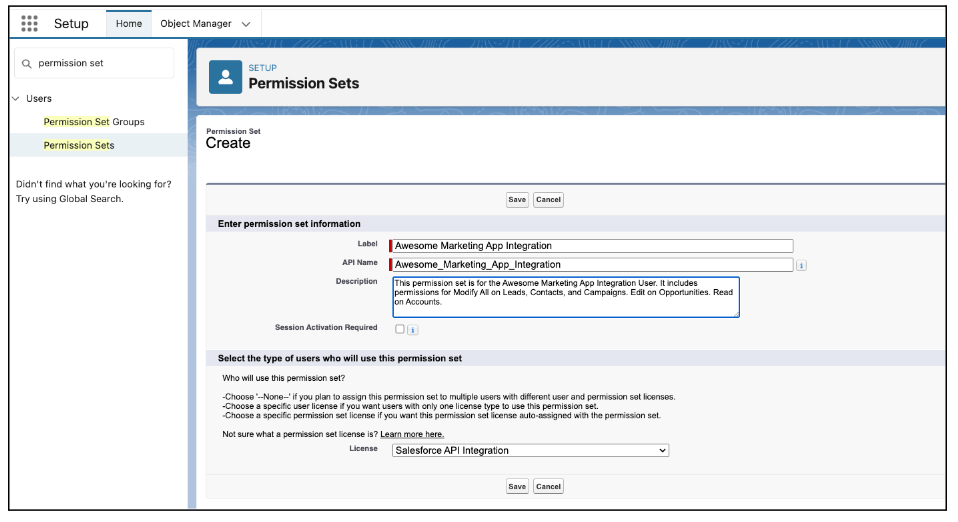
- Create your permission set. Set your name to be the name of the tool, plus the word “Integration”. Include a thorough description, and under “License” select Salesforce API Integration. This step is very important and easily missed, so make sure you select the correct one! Click Save, and then include all the necessary permissions required for this integration.
- Create the Integration User – This one similar to creating a regular user, there are just a few steps to remember. Use the username and email address you decided on earlier. For User License, select Salesforce Integration and under “Profile”, select Salesforce API Only System Integrations. This is where a lot of people go wrong – it’s easy to pick the wrong profile by mistake. And don’t forget – this profile has zero permissions, but luckily, we created the permission set in the prior step.

A note about setting up the password for this user: when you get the email link to create a password, open that link in incognito mode. This user has no UI access, so it won’t be able to go further than the password reset screen, and you don’t want to get that mixed up with your own user account. You can also use a separate tool (like Workbench) to assign a specific password to this user.
- Assign the permission set to this user. After clicking Save click Permission Set Assignment and choose the permission set you just created. Then click Save.

Testing
You’ll want to verify this user has API Access and the correct permissions before actually connecting your integration. Use your favorite third-party API Access tool (again, Workbench is browser-based and completely free to use), and make sure you’re in incognito mode or a separate browser when you log in with your integration user’s credentials. See if you can create the right types of records, read or edit what you need to, and make sure the user can’t do anything else they’re not supposed to, like access any other objects or records.
Set Up the Integration
And that’s it! All integration tools are different but should provide a step-by-step guide that explains exactly what to do with this user once it is set up. Typically you will need to enter this username and password, but you may also need to enter additional information as well.
Summary
I hope this helps guide you through setting up your integration users! This seems pretty straightforward, but it’s easy to choose the wrong license type or profile if you’re not paying attention or in a rush. The benefits are excellent – the money saved for one org alone could be thousands of dollars. They also allow orgs to follow best practices and reduce or eliminate shared Salesforce licenses.


Comments: