

A while ago, I spent some hours researching how to make Salesforce talk to Google APIs – without too much code or juggling Encryption Keys or JSON Web Tokens (JWTs). As part of my requirements, storing any keys or passwords in the code was an absolute no-go.
I will spare you my frustration with dated, complicated, or incomplete instructions. This step-by-step guide will show how to set up Salesforce and Google in order to make authenticated callouts to Google APIs.
Use Case
For the sake of this tutorial, we will send a signed request to the Google Calendar API and get a simple response. To follow along, you will need a private Google Account (we do not experiment with business accounts) and a Salesforce Org – this should be a Developer Org or Scratch Org. Again, start with your personal Google account and a Dev or Scratch Org. Do not expose any credentials, and erase any key files after use.
Another thing to note is that this tutorial does not require any pay-per-use functions. There’s no need to sign up for a trial and no need for Google Credits.
To get everything working, I will show you how to complete the following easy steps:
- Configure Google – create a Project and a Service Account with permissions on how to get a P12 Key file.
- Make the Key file work for Salesforce – convert the P12 file to a JKS file on your local computer.
- Configure Salesforce and upload the JKS File to the Credentials Manager in Salesforce.
- Use a tiny bit of Apex to get the necessary tokens and do an authenticated callout. Salesforce manages the details.
1. Configure Google
Understanding Google Service Accounts
Google Services are generally aimed at individuals, so authenticating usually requires some human interaction. If you have ever used your Google Identity to sign up for another service or if you ever authorised a Connected App to access your Salesforce Org, you’ll know what this is like.
If, on the other hand, my Salesforce Org or a web server – in short, a ‘service’ – wants to talk to Google APIs without any human interaction, the service needs to talk to Google on behalf of me as an individual. Since Salesforce will be sending an authentication request to access my Google Calendar, I am not involved, and Salesforce is acting on behalf of the Google Account involved.
The ‘On-Behalf-Of’ part – Google calls it a “service account” – needs a tiny bit of configuration and we will start with that. It will also provide us with the necessary credentials to store safely in our Salesforce Org.
Creating a Service Account with access to Google Calendar API and get the P12 Key File
The next few steps will guide us through creating a so-called ‘Project’ – a technical necessity for our endeavors – and allowing the project to access the Calendar API. Ultimately, we’re interested in the credentials this project provides. We will use these credentials to configure Salesforce.
In a real world scenario, such a project would already exist and be administered by experts. It would probably combine several (paid) APIs into one project.
1. Go to Google Cloud Platform and create an account (if necessary) with your Google Identity.
2. Create a Project.
3. Enter Details, e.g. Salesforce to Calendar API, and create the project.
4. After a while, you’ll be able to select your newly created project.

6. Search for the Calendar API and hit Enter.
7. Select the Calendar API.
8. Enable it. If you want to check out the API, click here. Remember, this article is not about the API, but getting access to it.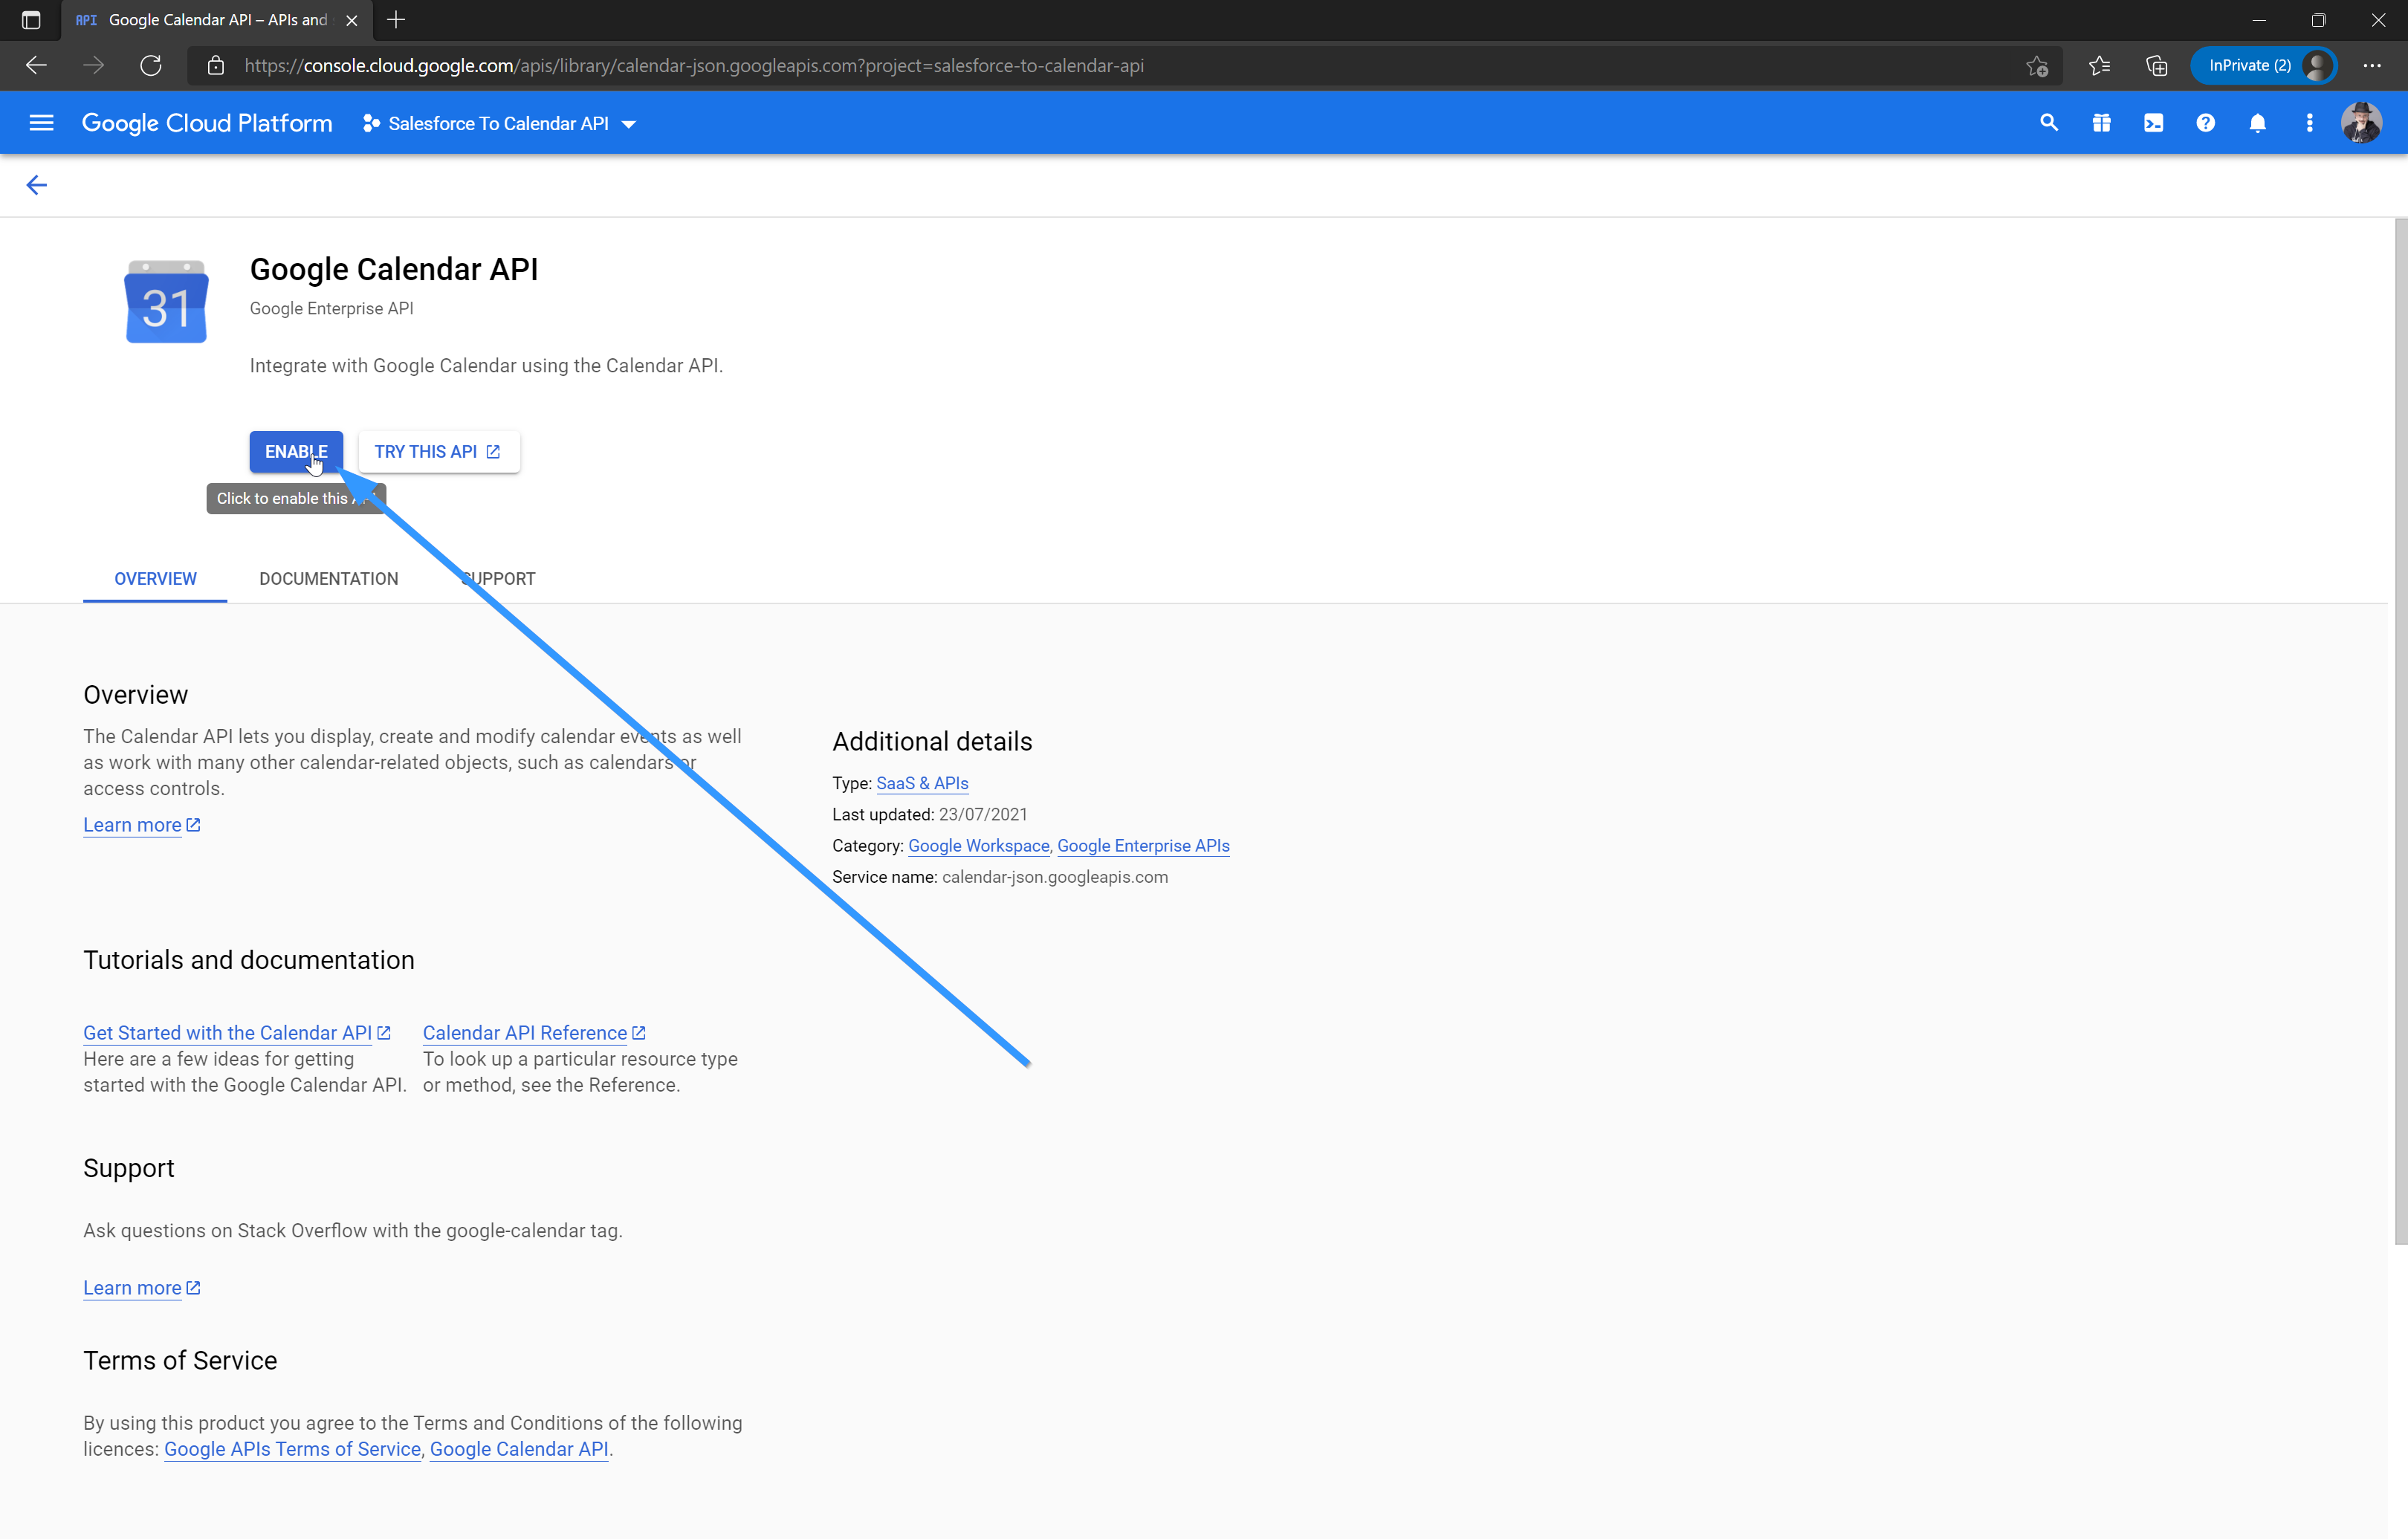
9. On the next screen, click Credentials.
10. Select Service Account. The other option, ‘Oauth Client Id’, requires human interaction similar to a connected App with Oauth2 in Salesforce.
11. Enter descriptive details.
12. Select a Role. These are similar to Profiles in Salesforce – they control access and are to be chosen carefully. To make things easy, we’ll choose Admin (Owner) here. Don’t do this in production.
13. We don’t want to add additional users in Step 3, so click Done.
14. On the next screen, make a note of the email address of your Service Account, then select your new Service Account.
15. Click Keys.
16. Create a New Key. Bear with me – almost done!
17. Generate a P12 Key file. If anyone has a working example for the new Workload Identity Federation and Salesforce, please ping me!
18. The moment you see this screen, a file with a p.12 file extension has already been downloaded to your computer. Check your standard Downloads folder. Make note of “notasecret”.
This is not a pun. It’s a standard password and you can find it on the internet. Hence, please do not expose the keys file to anyone and get rid of them afterwards.
19. Click Close, and we are finally done with Google config.
2. Converting the Credential File on Your Local Machine
Before we can continue to configure Salesforce, there is one step to complete on our local machine.
Salesforce does not support the P12 file format, so we need to convert the file into a format that Salesforce supports: Java Key Store. For this, you need a Java Development Kit installed – if you have the Salesforce Extensions for Apex working, you are probably ready to go. I am running OpenJDK 11 on my Windows 11 machine and have had no trouble running the following command to convert the file:
keytool -importkeystore -srckeystore ./serviceaccountfilename.p12 -destkeystore googlecalendarapiserviceaccount.jks -srcstorepass notasecret -srcalias privatekey -srcstoretype pkcs12 -deststoretype jks -destalias googlecalendarcertificate -deststorepass notasecret
We take the initial P12 file and rewrite it to a file called googleapicalendarserviceaccount.jks – this is the name of the new file that will be stored on your harddrive after running the command.
The old file and the new file use the same password: notasecret.
Over in Salesforce, we will be able to use googlecalendarcertificate to access the certificate in Apex.
With the new *.jks file at hand, we are ready to open our Salesforce Org. Since we feel at home in Salesforce, I don’t think we need as many screenshots for this next section.
3. Configure Salesforce
Create a Remote Site Setting
We want to talk to a third party when talking to Google APIs. For that, we need a Remote Site Setting, otherwise our callouts will be blocked by the platform.
Create an active Remote Site Setting with the Remote Site Url: https://www.googleapis.com
Set Up an Identity Provider
For our credential file to work, we also need an ‘Identity Provider’. Without one, we will not be able to upload the jks file without errors. Go to Setup > Identity Provider > New > Accept Self Signed Certificate > Done. No additional configuration needed.
Upload Converted Credential File
Now head over to Setup > Certificate and Key Management. Click the Import from Keystore button. Select your jks file and enter the passphrase: notasecret
When done, your screen should show googlecalendarcertificate as the label of the newly-uploaded certificate – it should look like this:
4. Write a Tiny Bit of Apex Code
This is just an example class. In a real-world scenario, most of the variables at the top would be extracted into custom metadata type records to be easily changed in the future by Admins. There is no error handling. No Apex Tests. In short: this is not intended for use in production.
The magic happens in getAccessToken(). By using JWT and JWS, we get a working authentication to the Google API endpoint.
public class GoogleAPI {
  private static final String GOOGLECALENDARENDPOINT = 'https://www.googleapis.com/calendar/v3';
  private static final String GOOGLESERVICEACCOUNT = 'calendarservice@salesforce-to-calendar-api.iam.gserviceaccount.com';
  private static final String AUDIENCE_CLAIM = 'https://www.googleapis.com/oauth2/v4/token';
  private static final String CERTIFICATE = 'googlecalendarcertificate'; // this is the name/label of the jks certificate we uplodaded in salesforce
  private static final String SCOPE = 'https://www.googleapis.com/auth/calendar';

  public static void call() {
    String requestUri = '/users/me/calendarList';

    Http http = new Http();
    HttpRequest request = new HttpRequest();
    request.setEndpoint(GOOGLECALENDARENDPOINT + requestUri);
    request.setMethod('GET');

    request.setHeader('Content-Type', 'application/json');
    request.setHeader('Authorization', 'Bearer ' + getAccessToken());

    HttpResponse response = http.send(request);
    String jsonResponse = response.getBody();
    system.debug(jsonResponse);
  }

  private static String getAccessToken() {
    Auth.JWT jwt = new Auth.JWT();
    jwt.setAud(AUDIENCE_CLAIM);
    jwt.setIss(GOOGLESERVICEACCOUNT);
    jwt.setAdditionalClaims(new Map<String, Object>{ 'scope' => SCOPE });

    Auth.JWS jws = new Auth.JWS(jwt, CERTIFICATE);

    Auth.JWTBearerTokenExchange bearer = new Auth.JWTBearerTokenExchange(
      jwt.getAud(),
      jws
    );

    return bearer.getAccessToken();
  }
}
When you run GoogleAPI.call() you should see a response like this in your debug logs – if everything is successful:
53.0 APEX_CODE,DEBUG;APEX_PROFILING,INFO
Execute Anonymous: GoogleAPi.call();
11:12:39.357 (357840765)|USER_INFO|[EXTERNAL]|test-n4rkuy4kmi3u@example.com|(GMT+01:00) Central European Standard Time (Europe/Berlin)|GMT+01:00
11:12:39.357 (357960137)|EXECUTION_STARTED
11:12:39.357 (357970983)|CODE_UNIT_STARTED|[EXTERNAL]|execute_anonymous_apex
11:12:39.357 (654772023)|USER_DEBUG|[27]|DEBUG|{
 "kind": "calendar#calendarList",
 "etag": ""p33odt7uljnbva0g"",
 "nextSyncToken": "CPDen9Wd1_UCEkJjYWxlbmRhcnNlcnZpY2VAc2FsZXNmb3JjZS10by1jYWxlbmRhci1hcGkuaWFtLmdzZXJ2aWNlYWNjb3VudC5jb20=",
 "items": []
}
Conclusion
With just a bit of configuration we can talk to any Google API from Salesforce. No plain text keys, no passwords, no manual fiddling with encrypted Strings – a plain old HttpRequest suffices to do the talking. A few custom metadata records would suffice to store necessary configurations Strings for each Google API. That’s pretty peachy, if you ask me!
The only thing that would make this even easier would be using Named Credentials with Google Service Accounts, but I do not know of any working solution. Do you? Let me know in the comments below.
Resources
- Szandor72 GitHub Repository
- Google Service Accounts: Detailed Instructions
- Use HTTPS certificate that exist within your Community domain (Convert .p12 File)
- Integrating Salesforce CRM with protected Cloud Functions in enterprises | Cloud Architecture Center | Google Cloud
- GitHub – Salesforce Cloud Functions CRM Tutorial

Comments: