Being a Salesforce Admin means you have to be highly knowledgeable about Salesforce, but most people don’t realize there are other skills required to be a successful Admin – skills that aren’t necessarily related to Salesforce!
Almost from the moment I became an administrator, I’ve also had to manipulate spreadsheet imports in Excel. It might be because of mass-creating new records for a custom object, or perhaps it’s down to importing a list of new prospects for the sales team. Today I’ll be sharing with you the tasks I do most frequently in Excel – these are the Excel skills I wish I had known before I became an administrator.
Excel Skills Are Still Relevant
I think that my example – importing a list of new prospects for the sales team – is the most common scenario, especially for smaller companies that do not yet have a marketing ops team (where the Salesforce Admin fills that role). Even today, years after I started, I still get this almost identical email from my clients.
“Hi Stacy, can you import this list of new Leads for me?”
Well, sure I can! But we need to clean it first. As the old saying goes, “bad data in, bad data out”, and in order to clean the list, you’re going to need these valuable Excel skills.
1. Find Duplicates
You don’t want duplicates in your database – trust me! Allowing duplicates in your org is like knowingly letting termites into your home. Sooner or later, either it will crumble or you’ll pay a fortune to fix it.
Just highlight the column you want to find duplicates in, click Conditional Formatting and then Highlight Cells Rules, followed by Duplicate Values.
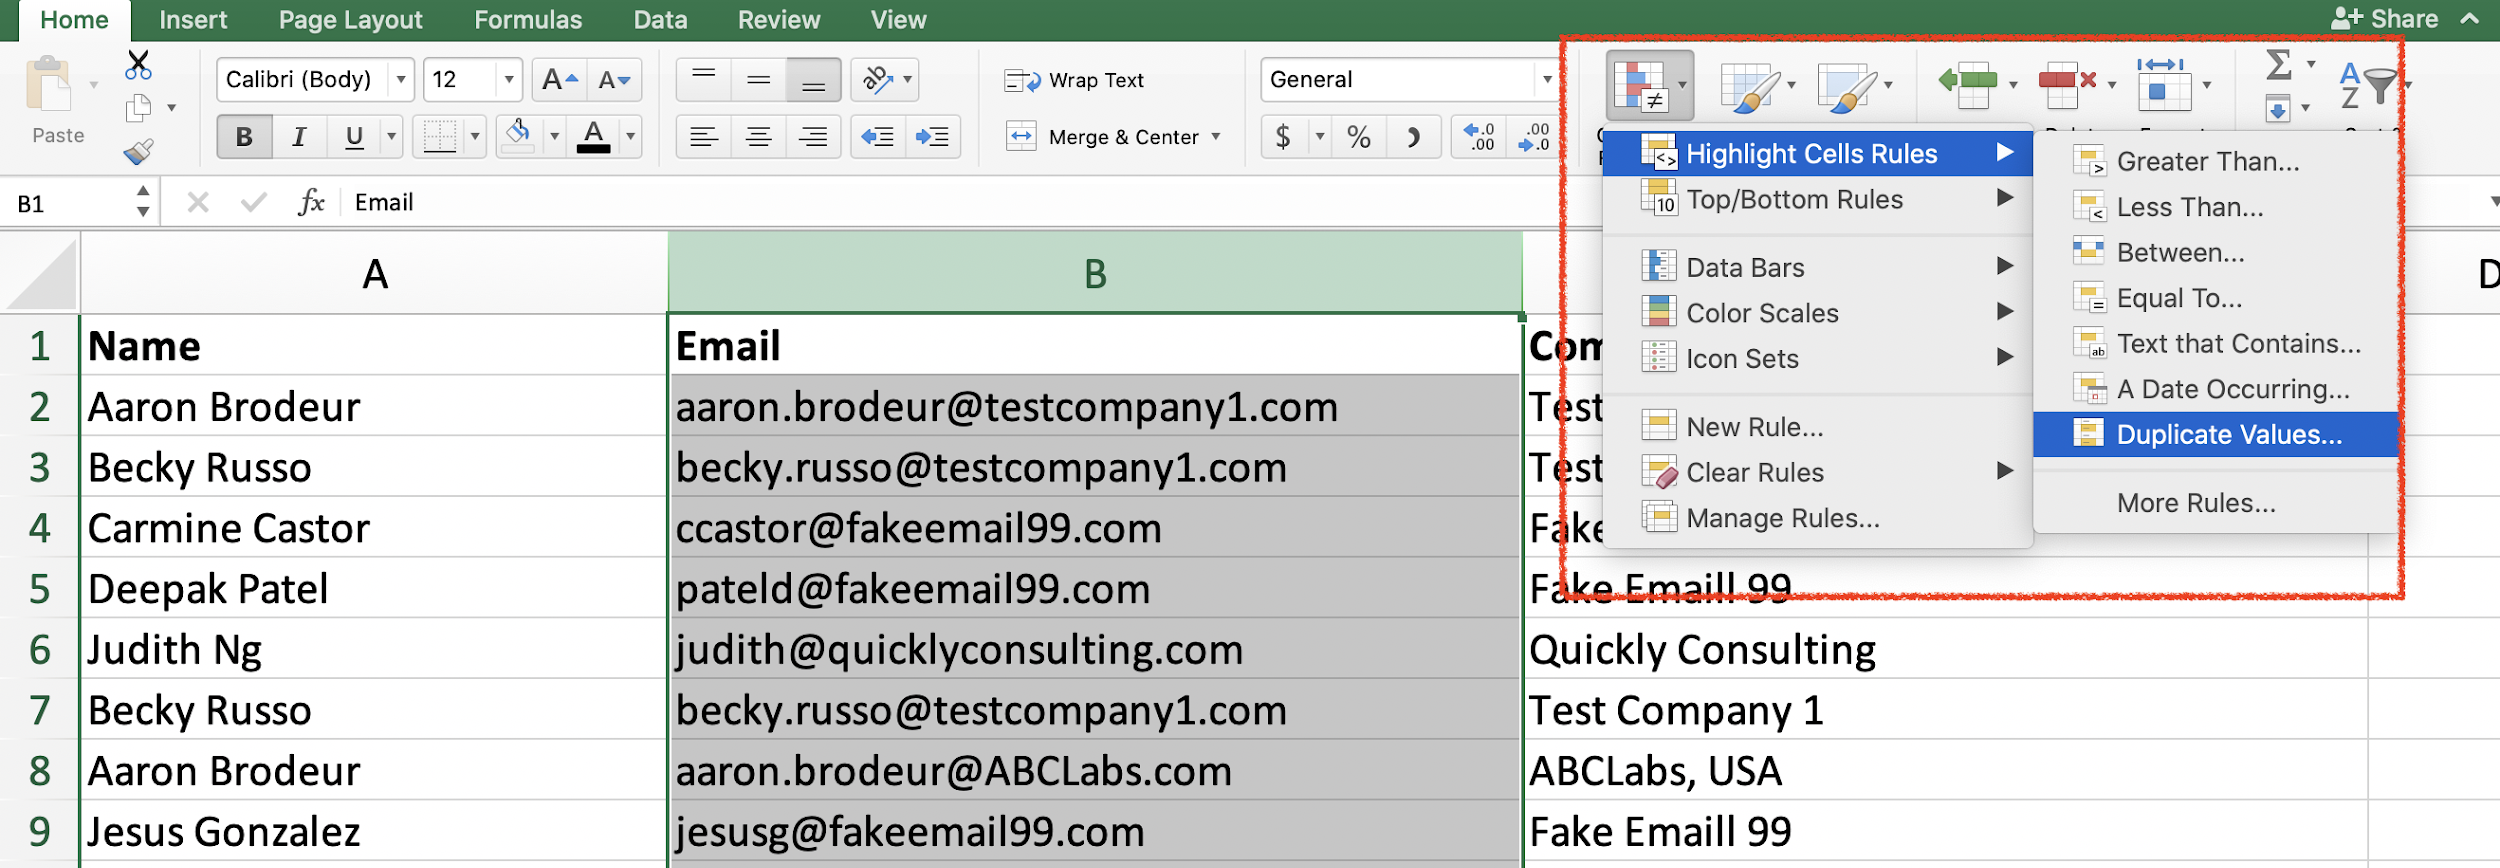

Then click OK.


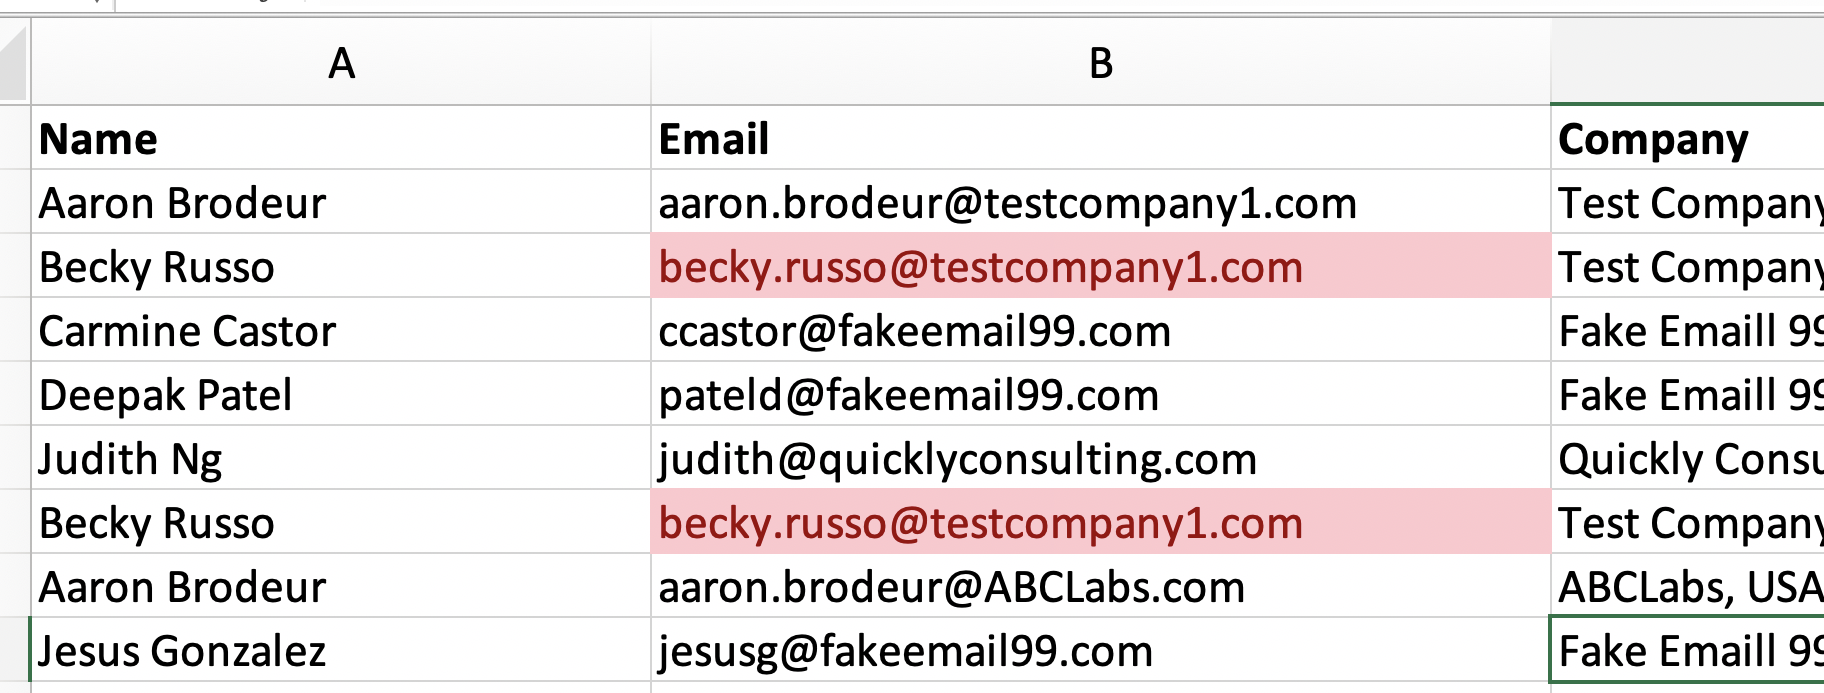
Now you can see Becky is on this list twice. You can delete the duplicate row and keep working.

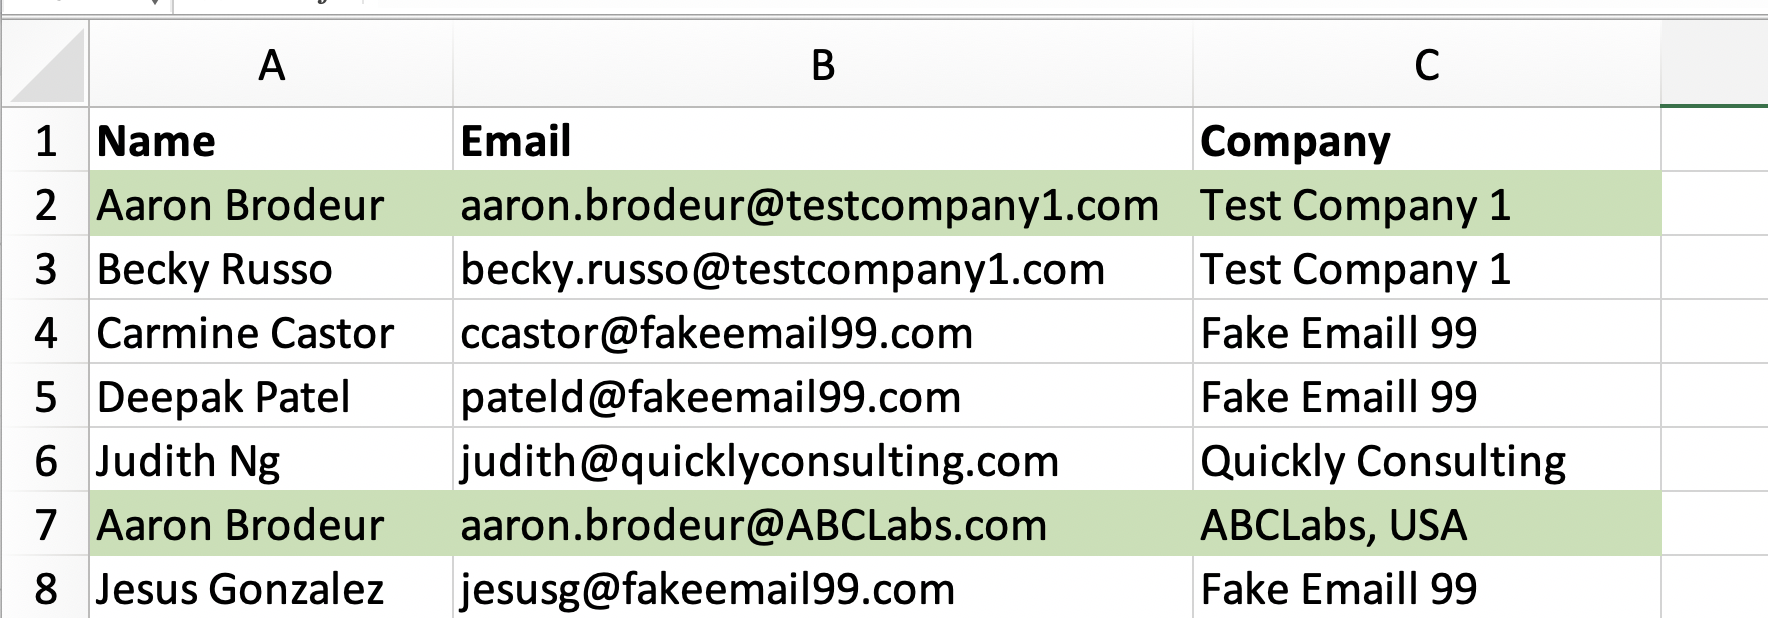
A note about names: You can look for duplicate first and last names too – but beware, it’s common enough for people to have the exact same first and last name. On this list, I have two people named Aaron Brodeur, but they have unique emails and work at different companies, so I know they’re not the same person.

2. Find Text that Contains
Almost as bad as importing duplicates is importing un-marketable people. Perhaps people that work at your own company, or if there happen to be competitors on your list.
Using the same steps above, we can use Conditional Formatting to highlight text that contains email domains that I do not want on my list.


Now I can see that my Sales Rep Judith has inadvertently added herself to this list, I can remove her from the list since she’s not a prospect. This is great for finding any personal domains too, like Gmail or Yahoo, if you want those removed from your list.


3. Text-To-Columns
Salesforce wants to have the First and Last name in separate fields, so we need them separated. This is also great for separating things like addresses, states, and countries, etc.
Here, I’ve moved the column I’m going to be separating to the end of my spreadsheet just to make it easier to read. Just highlight the column you want to separate, and go under your “Data” tab in Excel, and click “Text-to-Columns”
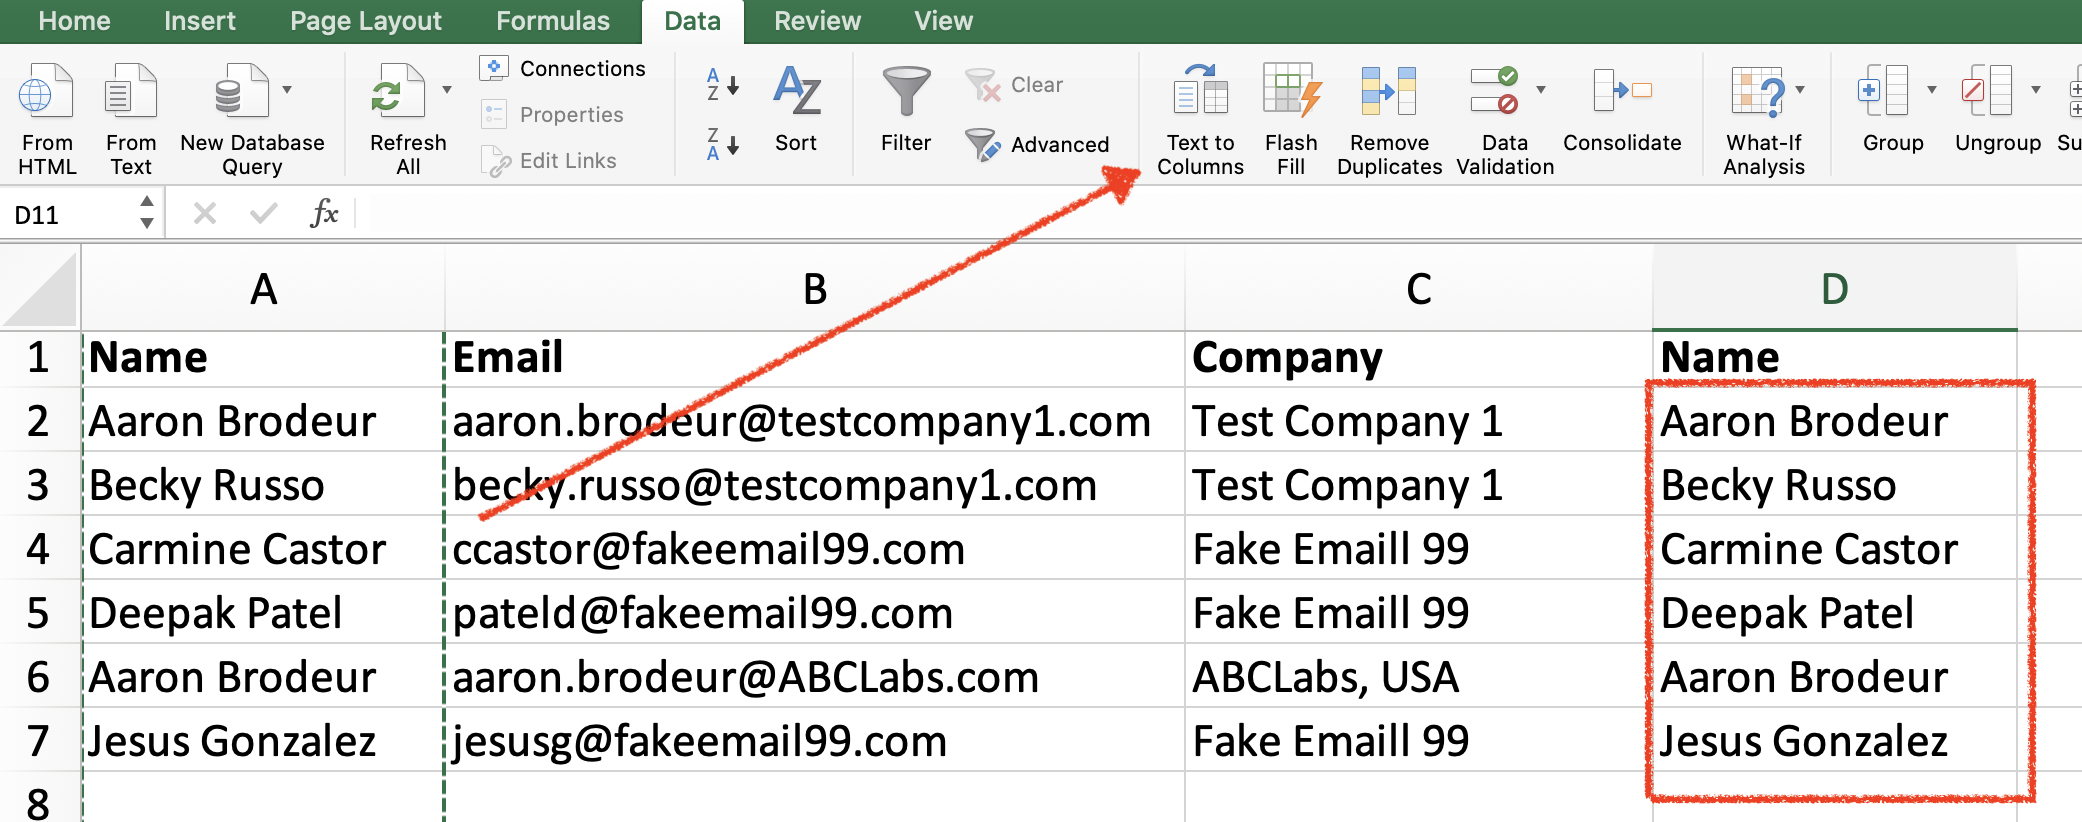

Then just select how you want to split up the data.


When you click Finish, your data on the spreadsheet will move accordingly! Now you just need to re-label your column headers and get rid of any columns you no longer need.


4. Concatenate
Concatenate is the opposite of Text-to-Columns. In some cases, Salesforce wants all the data in just a single field, like phone number.
This one involves writing an excel formula. The formula is pretty simple.
=concatenate( all the stuff I want to smoosh together goes here, separated by commas )
You’ll also need to add in any spaces or characters. Whatever text you want to add (including spaces) should be added in quotes, and separated by commas. In this example, my Area Code and Phone are in separate cells, and I want them combined, but also formatted with parentheses around the area code.
=concatenate( “(“, E2,“) – ”, F2)
Spelt out, it says: First put an open-parentheses, then the value of E2, then a close-parentheses, a space, a dash, another space, then the value from F2.


And now you have the phone number in one cell, which can come into one field in Salesforce. Just make sure to relabel your column header for the column you want to keep.
5. Paste Special
To import the actual data, and not the formula =concatenate(…….)
Now that you’ve concatenated some data, you can see in the spreadsheet the proper value, but you really need to delete column E and F here, and you need column G to just show you the phone number. But if you were to import it just like this, all your phone numbers would say “=concatenate(…….)”
Admin Confession! Yes, I have done this, and yes, it was very embarrassing. Just ‘copy’ the formula cells you just made, in this example, cell G2-G7. Right-click, and then click Paste Special.


Select Values then click OK.


Now you can get rid of all the improperly formatted columns that you no longer need!


Now we have a sparkly clean list!
6. VLOOKUP
Like all these other skills, I use VLOOKUP a lot when scrubbing lists for import. There are a lot of situations where you might need to fill out value, but you don’t want to go searching for the result, and there are too many records to do this by hand. For example, let’s say I’m using State & Country Picklists in my org, and I have a tradeshow list that only has States/Provinces, but not countries. I won’t be able to import that since the State/Province dropdown is dependent on the Country dropdown.


I need the Country column filled out, but I don’t want to go down the list and populate each one by hand. Now is the time to use VLOOKUP!
VLOOKUP is a quick way to populate a bunch of cells all at once, from a single reference point. You’ll need a couple of things:
- The list you want to clean (above).
- The list you’re going to use to do the cleaning (the reference list below).


So now we have two tabs on our spreadsheet. The List Import that we need to scrub, and also the Reference List we’re going to use to get the missing data (Country.) The Reference List is where you are going to find the value you need, so you will need to prepare this one.
On the list, you need to scrub and sort the column you’re going to be searching alphabetically (that would be our State column in this example). Do the same on the Reference List – sort alphabetically by the value you’re searching for.


Image: Columns sorted alphabetically by State.
Now we are ready to actually begin the VLOOKUP process. What the formula is going to do is search for the value you tell it to, find it on the Reference List, and return with whatever you tell it to. For me personally, it helps to think of the formula as a series of questions that I need to answer.


So in Excel, here’s what this really looks like:
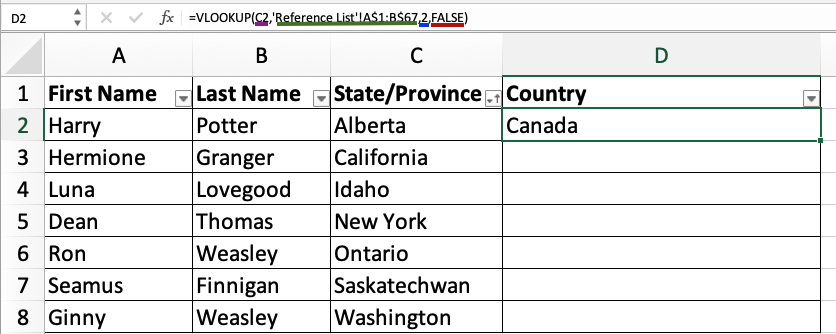

Once the formula is working in the first cell, just drag it down to all the cells you need to fill. Now, with a larger list, you will want to sort by Column D and resolve any errors. In this case, I have one misspelt Province, so I’ll just go ahead and fix that one manually.


Now our Country column is filled out! But wait – your list is not ready for import to Salesforce. If you click on any of the values in column D, you’ll see the formula, rather than the actual Country. On Column D, just copy the entire column and then do Paste Special -> Values.
Save it as a CSV and then you’re done!
There are a lot of tutorials online that explain how to do VLOOKUP, but not many that explain things in the context of Salesforce Admin work, so I hope this helps you out! I’ve used VLOOKUP in this exact situation before, and I’ve also used it to sort records out to new owners, or even if I have to create a new custom field and I want to backfill all the existing records.
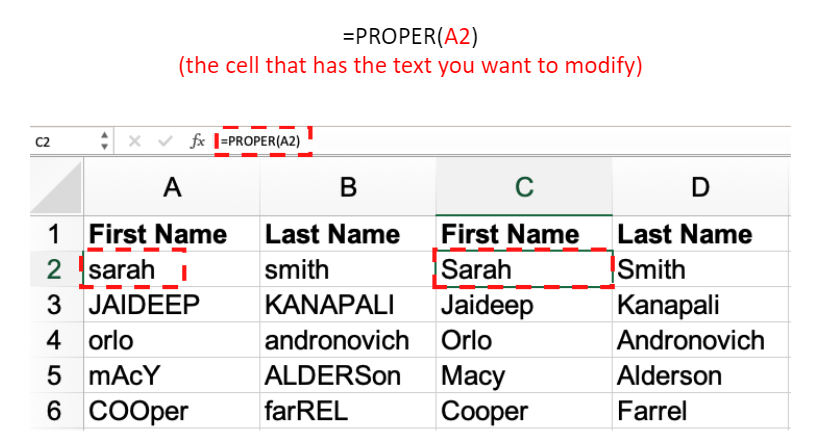
7. PROPER
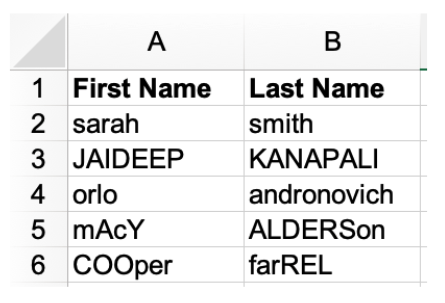
Any list of people you get for import to Salesforce hopefully include “First Name and Last Name. However, sometimes what you get is kind of a mess – like this list here. You could import these names as is, but there’s a problem – if you happen to send any kind of automated email that includes First Name or Last Name, the recipient is going to immediately know that:
- The email is automated.
- Your company couldn’t even be bothered to scrub their email list!
If you’ve ever received a message from a recruiter on LinkedIn, you probably know what I’m talking about!
Lucky for those of us who are Salesforce Admins (but not Excel experts!), this is a very easy fix. The formula is simple:
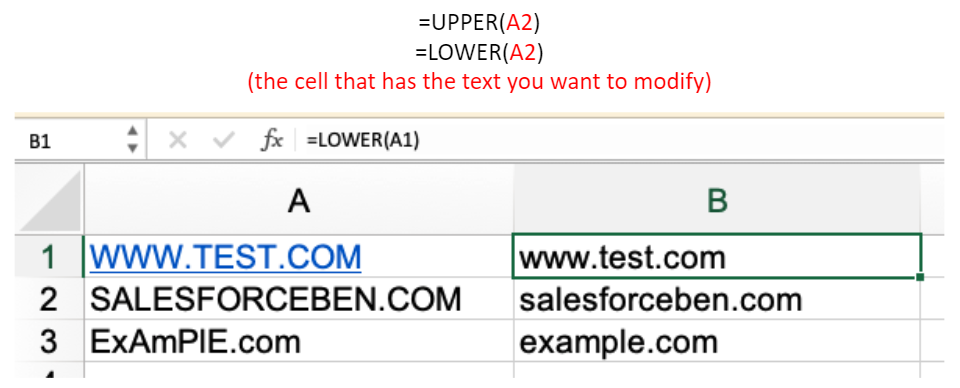
The same function can be used for any text field, but use caution if you’re going to use it on something like Account Name or Company Name on the Lead object. Certain companies may be in all caps, for example, HSBC is most commonly spelled with all capital letters.
Similarly, I’ll share the functions for converting the entire cell to upper or lower case. They’re equally simple:
8. LEN
A few months ago, I was lucky enough to work with a brand new Salesforce instance. The sales team had a very small number of Opportunities that, up until that point, were listed on a spreadsheet. Now, there are a number of fields on the Opportunity that have a character limit – most notably Opportunity Name and the Next Step fields. LEN comes in very handy when you want to make sure that you won’t get an error due to a cell having too many characters.
So we can see that, for our fourth Opportunity, we need to reduce the character count so that we don’t get an error on import.
9. Removing the first or last number of characters from a cell
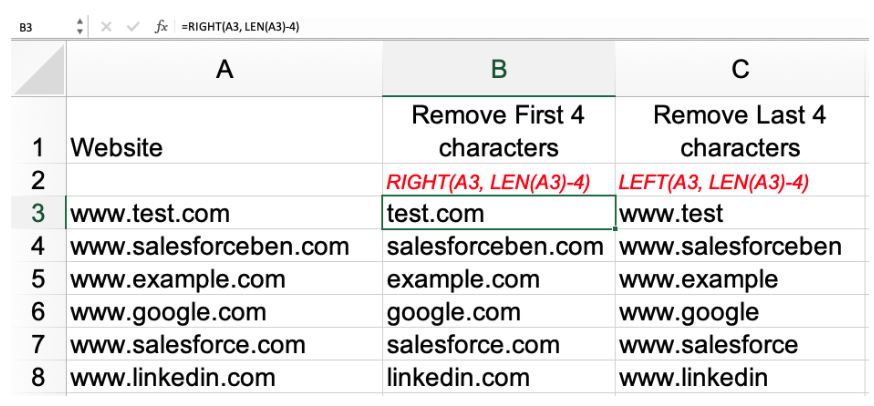
This one is a favorite of mine when I need to remove something like the first four characters, or the last three characters from a cell. In this example, we’ll use some website URLs.
We’ll dig into this one a little, because once you understand what you’re working with, it’s actually very flexible.
Remove the first 4 characters: =RIGHT(A3, LEN(A3)-4)
Remove the last 4 characters: =LEFT(A3, LEN(A3)-4)
So, if we want to remove the first few characters, we’ll use RIGHT and if we want to remove the last few characters, we’ll use LEFT. Make sure to enter the cell that you want to modify, and then finally, a minus character, followed by the number of characters you want to remove. In this example, we’re removing four characters, but you could remove any number that you need to.
10. Extracting Email Domain from an Email List
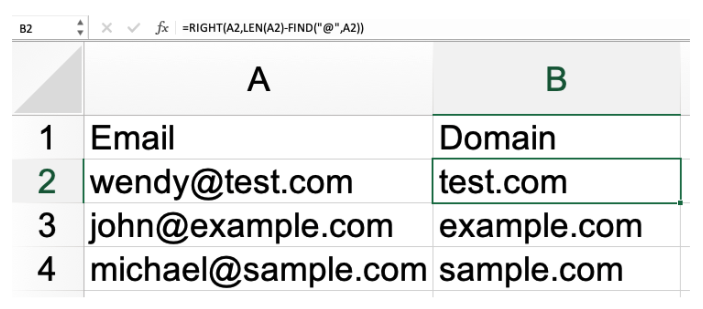
Some Salesforce users do a lot of work filtering on Email Domains of Leads or Contacts, and they want this data as text rather than as a formula field. You can easily extract the Email Domain using Excel too.
=RIGHT(A2,LEN(A2)-FIND(“@”,A2))
11. Leading Zeros (and general formatting)
Stepping back from all these interesting and useful formulas, there’s a lot you can do to improve data quality just by formatting your cells properly, and knowing what type of values Salesforce expects to see for each field type. This is a very common mistake for new admins (I’ve done it plenty of times myself!). All you need to do is to right-click on the cell (or column/row, as needed).
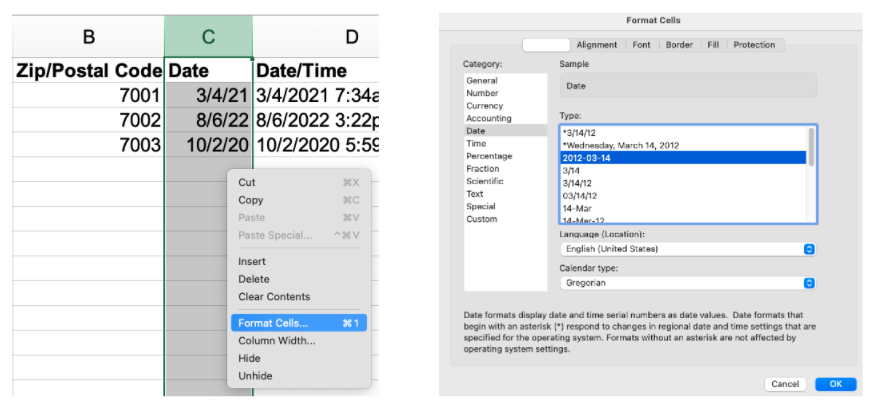

Now, this isn’t the hard part. The hard part here is knowing which fields need a specific format, and remembering to format them all the time – then, keeping this in mind for all future data loads you look at.
Here’s a great example. In the United States, postal codes are generally recorded as five numerical digits. Salesforce has an office in San Francisco, California, which has a postal code of 94105. The New York City office is located in the postal code 10036. If you were to put these on a CSV and import, you’d have no problem, even if you don’t bother with formatting.
However, not every place has a postal code exactly like this. Some of the postal codes in the US start with zeros. This becomes a problem in Excel when you don’t format. New Jersey Postal Codes start with a zero. When you put that in to Excel without formatting, you end up with this:
When you want to keep leading zeros in a spreadsheet, set your format to Text.
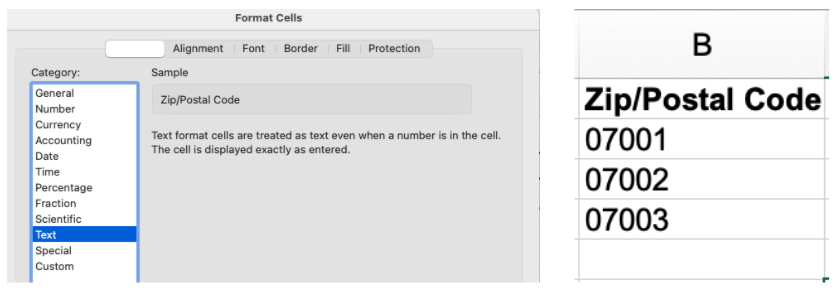

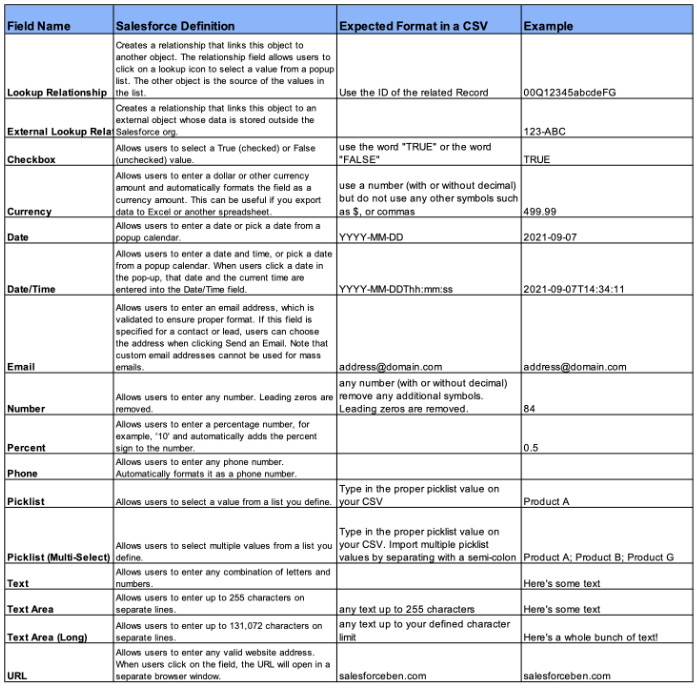
I’ve put together a basic guide on formatting fields for CSVs that might help when you’re getting started. These are just the most common fields. If you’re ever unsure, test in a sandbox. You can do CSV imports into a sandbox just like you do in production, so that’s a great way to know if you’re going to get import errors, and fix them before doing your production import.
Summary
These tips only scratch the surface of everything you can do in Excel. Knowing how to fix data on a spreadsheet before you import it is just one of the steps to ensuring your org maintains the highest data quality in the long term.
To be a Salesforce Admin you have to be highly knowledgeable about Salesforce, but there are lots of other skills required to be successful. You are now equipped with new Excel skills that are easy to learn, incredibly helpful for getting through your admin workload, and will really impress your users!
Please share in the comments below ideas for your favorite Salesforce Excel fixes!



Comments: