


Salesforce deployments, also known as ‘releases’, are one of the greatest challenges for admins, consultants, and those working in multiple other roles. As Salesforce orgs become increasingly complex, changes often have many ‘moving’ parts that can have far-reaching impacts on the Salesforce org.
Once you are satisfied with the solution you’ve built (in a sandbox) and passed through testing (including UAT), these changes will need to be deployed into production.
There’s a high risk that something will go wrong in the deployment process. So, what should you do to ensure everything goes smoothly? In this guide, I will share my proven step-by-step process. But first, let’s establish the types of Salesforce deployments, especially the ones that can trip you up!
Types of Salesforce Deployments
Obviously, not all deployments are created equal. Depending on the size of the org and the scope/complexity of the changes, your deployment will vary in terms of risk.
There are two products that have special deployment considerations attached:
- CPQ Deployments: The differences in maintaining Salesforce CPQ (i.e. deployments) make for a steep learning curve. The number of data relationships between CPQ objects makes it difficult to deploy changes between environments. In a nutshell, you will be working with CPQ object data across multiple orgs, each record with its own unique CRM ID per org (as opposed to metadata, which you’ll be familiar with deploying).
- Salesforce Industries: When making configuration changes to the Vlocity/Salesforce Industries solutions in your org, ensuring changes are deployed correctly is important – especially because Salesforce Industries configuration behaves differently to other Salesforce solutions.
Read more:
- CPQ Deployments: 6 Tips from a Salesforce CPQSpecialist
- Vlocity Deployments That Enable DevOps Success
- How to Prevent Salesforce Deployment Issues (a Guide for Newbies)
Step 1: Project Kick-off
A kick-off meeting is a presentation to anyone who might influence the project. Individuals must feel they are an integral part from the beginning. One of the most common reasons for project failure is when people do not feel included in the project.
Tip: Engage with individuals from the c-level to the end user. Never devalue the lower levels of the organizational hierarchy because often, this is where you will find your biggest champions and information about how Salesforce is used ‘on the ground’.
I organize the kick-off session agenda in this way:
- Teams: Explain exactly who is who. The teams will be made up of Salesforce Consultants, developers, client-side project managers, and business representatives.
- Implementation approach and project overview: Explain the project, its goals, and what the various phases consist of.
- Project timeline: Display a project timeline with the different milestones and deadlines to meet.
- Achievements: This slide should accompany all presentations and serve to identify six major client-side challenges that you will want to see at the next meeting; in this way, we put tangible challenges that measure the success of the project (e.g. to complete all discovery sessions before X, or have the first release on day Y).
- Concerns and action plans: Identify potential project risks (e.g. lack of key users in a complex discovery session) and their action plan in order to minimize them.
- Project name: We play a short, fun game to define the name of the project, which allows all parties to become familiar with it. This name must always be related to the client we are working with;
- Hot topics and Q&A: Summarize the most important topics and make room for any other project issues that may arise.
Tip: A picture is worth a thousand words. Make a light and fun presentation, taking a maximum of 45 minutes to an hour. Everyone is fed up with traditional PowerPoint!

Step 2: Discovery Session
Discovery is when our team sits with each business function to listen to all their needs. Ensure all functions working with Salesforce are well identified (e.g. sales, customer service, the finance team). Give special attention to one-on-one sessions, which will keep the team members motivated and open.
Discovery sessions should be split into four main blocks:
- Listening: Listen freely to the users, imagine their work routines and where their greatest difficulties lie. This phase is critical to understanding the business’s current state.
- Drawing: Map out the current processes with users to make sure you are meeting their needs. This should be done on a physical or virtual whiteboard to be interactive.
- Data definition: A document identifying all the objects and the various groups that will exist, i.e. identifying the profiles, validations, help text, and labels.
- Integrations: If there are integrations, it is very important to document everything from the beginning with a document that maps all integration points.
- Wrap-up: At the end of each session, always wrap up with the project team to set priorities and confirm the customers’ requests.
Step 3: Document
After all discovery, it’s essential to document everything. Documentation lists all the inputs from the sessions (discovery, Flow design notes, data definition, integrations) and produces a formal document with all the needs and the corresponding solutions.
This process should be discussed and reviewed by the various Salesforce experts.
Tip: Validate this document with the project manager (client-side) to ensure it is understandable – not all of us speak Salesforce jargon!
Step 4: Approval
Hold an approval session with the consulting team and the project team. Present back the needs that have already been raised in the discovery sessions, offer a clear explanation of what is going to be developed, and what the project goals and objectives are.
Step 5: Build
This is the fun part! Once the documentation is approved, it’s time to start shaping up Salesforce!
Tip: Be creative, think outside the box, and remind yourself that there’s a high chance that someone has already faced the same challenge – so talk to the Trailblazer community!
Step 6: Get Feedback
We work under an Agile methodology, so it’s crucial to have regular feedback sessions. In these hands-on sessions, we let users play around with Salesforce (in a sandbox environment).
Following this, we arrange a feedback session. These steps are critical to ensure a smooth and solid transition to take the project live and guarantee all users are familiar and comfortable with the new system.
Step 7: Before Deployment
Don’t simply deploy when you’re ready. Deployments can be time-intensive and cause unexpected things to happen.
You definitely don’t want anyone working in production while these changes are taking place. There are three main reasons for this:
- You want to ensure no changes are made in production as you roll yours out, as deploying a change set will overwrite any changes to production.
- You want to give yourself enough time to test your changes in production so you can ensure everything is working correctly before your users get in.
- You don’t want users starting to work in it before it is fully deployed or before you’ve had a chance to brief them fully.
Agree on a Time
Set a time in advance. Let everyone using the org know (particularly any other administrators).
Out-of-hours is usually best to avoid user impact and give you time to fix any issues, which means evenings/weekends for most businesses.
Ensure all users are notified and asked not to log into the org during this window. If you’re working in a big org, or your deployment is a particularly large one, you might want to consider ‘freezing users’ until deployment and testing are complete.
Check the Audit Trail
Check the Audit Trail in production to ensure no changes have been made that will be overwritten by your deployment. If they have, you may want to delay your deployment to get these changes copied over to the sandbox or speak to the stakeholders involved.
This is a good argument for clarifying with users that no changes are to be made in production before you begin developing in the sandbox.
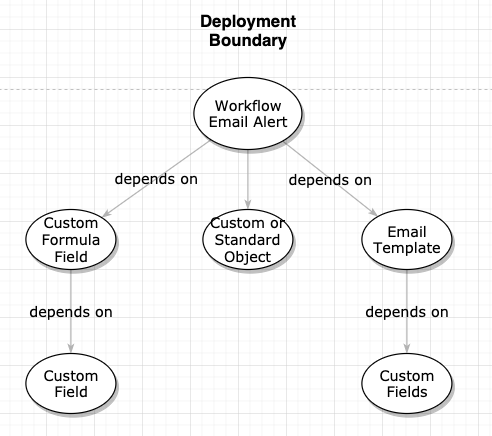
Establish Deployment Boundaries
A Deployment Boundary is all the metadata that an org needs to have in order for a particular feature/configuration to exist. The boundaries take into account all the dependencies involved in a particular feature and can streamline the deployment process.
Prepare Your Change Set/Release
Depending on the size of the deployment and practices within the team, you will either be deploying using a DevOps pipeline or change sets.
DevOps
DevOps is a set of practices that combine software development and IT operations with the aim of creating a collaborative approach between historically siloed teams.
DevOps is a more mature approach to deployment, with an emphasis on implementation models, deployment mechanisms, and version control.
Read more:
- Salesforce DevOps: Learnings from 300+ Salesforce Deployments
- Learn Salesforce DevOps With This Free Deployment Tool
Change Sets
Prepare and validate your Change Set in advance. This can take a significant amount of time if you have to match things up between the sandbox and production, and you don’t want to miss your deployment window because you hadn’t prepared.
Read more:
- Everything You Need to Know About Salesforce Change Sets
- The Problem with Change Sets (And How to Solve It)
There are a few things that may catch you out in validation, such as renaming standard fields and any changes to API names, so watch out for these!
Do a Full Export
Do a full export of production data before deployment. If anything goes wrong, you want to make sure that your data remains intact, so a backup is essential before any big changes.
Build a Sandbox Copy
Create another sandbox that’s a copy of your production org, so you’ve got a record of your existing setup and metadata. Again, if anything goes wrong, you want to be able to revert back to the current state of play if necessary.
Prepare Test Scripts
Prepare the tests you will run after deployment to ensure everything is working correctly.
Of course, as a good admin/consultant, you’ll have already done the testing in your sandbox. However, you should repeat it again in production to check everything has deployed correctly.
Have these test scripts (step-by-step instructions on what to test and how) prepared in advance so you and your users can run through these tests quickly to check everything is functioning as expected.
Disable Email Deliverability
Mass changes can trigger many system emails and notifications, so disable email deliverability while you deploy to ensure your users aren’t bombarded with an avalanche of mail.
Deactivate Rules
Deactivate Validation Rules, Flows (or legacy automations, i.e. Workflow Rules, Process Builders) – anything that might impact changes or prevent them from deploying correctly.
Make a note of what you’ve deactivated so you can reactivate it once your change set has deployed. Make sure that you run tests after you’ve reactivated these (and your new ones!) to ensure you have a fully functioning environment.
Prepare Support
If you’re making big changes, your users may be confused afterwards. Organize training sessions and prepare documentation for all users.
Ensure users know how to contact you or raise an internal support ticket with any questions or issues.
Step 8: After Deployment
Data and Undeployed Changes
Do you have to make any manual changes or data updates? Now is the time.
Depending on the desired result, you will probably want to make sure automations and validation rules remain deactivated for this.
Reactivate Anything New/Paused
If you paused Flows and validation rules during deployment, now is the time to reactivate them.
When deployed, rules and automations are not automatically activated. Activate your new Flow, validation rules – and anything that might not be active on deployment.
Test
Again, test your changes. Is everything working? Are you able to complete processes as expected? Are Flows and validation rules functioning correctly?
Log in as different users and check their profile access and preferences – are you seeing what you’d expect? Ask your champion super users to help you test, too.
Switch Email Deliverability Back On
Now that testing is complete and you’re satisfied everything is working, you can enable email deliverability so your users can receive emails again.
Step 9: Training
If you’re happy everything is working successfully, congratulations! You’ve completed a successful deployment.
The final step now is to reactivate users, allowing them to log in again. Let them know the changes have taken place and give them access to all the support and training resources they need. Check in periodically to ensure they’re as thrilled with the changes as you’d expect them to be.
After the training sessions, it is always important to leave support material for the team’s progressive growth in learning to use Salesforce. Examples include:
- In-app guidance and/or interactive videos explaining some process
- FAQ manual
Tip: Celebrate after each successful step. If the client is open to it, you can take champagne or invite the team to dinner. Create relationships.
Summary
This post is your go-to guide for nailing Salesforce deployments, breaking down the process to guarantee seamless functionality. It’s a must-read for hassle-free Salesforce success!
Comments: